数据结构之二叉查找树的代码实现
本节继续对上一节BST的功能实现
在实现之前,先对要实现的功能进行一下简单的介绍
BST的几种常见遍历方式
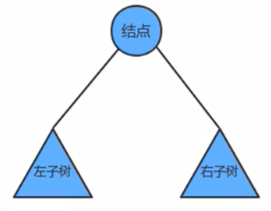
以一个简化的树为例,一棵树包含根(父)结点和其左子树及右子树:

遍历顺序的先后是指根(父)结点被遍历的相对顺序
- 先序遍历:指的是“先根后左再右”
- 中序遍历:指的是“先左后根再右”
- 后序遍历:指的是“先左后又再根”
如果子树也存在子树,则也需按此规则进行遍历,一般是递归地进行遍历

4. 层序遍历:指按树层次顺序,从根结点往下,子结点从左到右地遍历

5. 获取树的最大深度:
- 实现步骤(使用递归):
1.如果根结点为空,则最大深度为0 ;
2.计算左子树的最大深度;
3.计算右子树的最大深度;
4.当前树的最大深度=左子树的最大深度和右子树的最大深度中的较大者+1
接下来对BST的这些遍历功能进行实现
实现功能
- pre_ergodic()实现BST的先序遍历,返回遍历的元素组成的列表
- mid_ergodic()实现BST的中序遍历,返回遍历的元素组成的列表
- post_ergodic()实现BST的后序遍历,返回遍历的元素组成的列表
- layer_ergodic()实现BST的层序遍历,返回遍历的元素组成的列表
- max_depth()获取树的最大深度
Python代码实现
注:注释的测试代码是前一节的实现,可以忽略
import operatorclass Node:def __init__(self, key=None, value=None):self.key = keyself.value = valueself.left = Noneself.right = Noneclass BinarySearchTree:def __init__(self):self.root = Noneself.len = 0def size(self):return self.lendef put(self, _key, _value):"""Put an element into this tree and generate a new BST"""def put_into(node, _key, _value):"""Adjust position of new inserted nodeby BST character:left > root > right"""if not node:self.len += 1return Node(_key, _value)if operator.lt(_key, node.key):node.left = put_into(node.left, _key, _value)elif operator.gt(_key, node.key):node.right = put_into(node.right, _key, _value)elif operator.eq(_key, node.key):node.value = _valuereturn nodeself.root = put_into(self.root, _key, _value)return self.rootdef get(self, _key):"""Get a value responding to the given _key from this tree"""def get_value_by_key(node, _key):if not node:returnif operator.lt(_key, node.key):return get_value_by_key(node.left, _key)elif operator.gt(_key, node.key):return get_value_by_key(node.right, _key)else:return node.valuereturn get_value_by_key(self.root, _key)## def delete(self, _key):# """Delete a node responding to the giving key(_key)"""# def delete_value_by_key(node, _key):# if not node:# return# if operator.lt(_key, node.key):# node.left = delete_value_by_key(node.left, _key)# elif operator.gt(_key, node.key):# node.right = delete_value_by_key(node.right, _key)# else:# self.len -= 1# to_delete_node = node# if node == self.root:# self.root = None# return# # node = None# if not to_delete_node.left:# return to_delete_node.right# elif not to_delete_node.right:# return to_delete_node.left# else:# min_right_tree = to_delete_node.right# pre = min_right_tree# while min_right_tree.left:# pre = min_right_tree# min_right_tree = min_right_tree.left# pre.left = None# min_right_tree.left = to_delete_node.left# min_right_tree.right = to_delete_node.right# return min_right_tree# return delete_value_by_key(self.root, _key)## def min_key(self):# """Find the minimum key"""# def min_node(node):# while node.left:# node = node.left# return node# return min_node(self.root).key## def max_key(self):# """Find the maximum key"""# def max_node(node):# while node.right:# node = node.right# return node# return max_node(self.root).keydef pre_ergodic(self):"""Get every key of this tree, pre_ergodic; Return a list of its keys"""def pre_ergodic(node, keys_list):"""Root --> Left --> Right"""if not node:returnkeys_list.append(node.key)if node.left:pre_ergodic(node.left, keys_list)if node.right:pre_ergodic(node.right, keys_list)keys_list = []pre_ergodic(self.root, keys_list)return keys_listdef mid_ergodic(self):def mid_ergodic(node, keys_list):"""Left --> Root --> Right"""if not node:returnif node.left:mid_ergodic(node.left, keys_list)keys_list.append(node.key)if node.right:mid_ergodic(node.right, keys_list)keys_list = []mid_ergodic(self.root, keys_list)return keys_listdef post_ergodic(self):def post_ergodic(node, keys_list):"""Left --> Right --> Root"""if not node:returnif node.left:post_ergodic(node.left, keys_list)if node.right:post_ergodic(node.right, keys_list)keys_list.append(node.key)keys_list = []post_ergodic(self.root, keys_list)return keys_listdef layer_ergodic(self):"""Root-->Left --> Right"""queue = [self.root]keys = []while queue:node = queue.pop(0)keys.append(node.key)if node.left:queue.append(node.left)if node.right: queue.append(node.right)return keysdef max_depth(self):"""Get the max depth of this tree"""def max_depth(node):max_left, max_right = 0, 0if not node:return 0if node.left:max_left = max_depth(node.left)if node.right:max_right = max_depth(node.right)return max(max_left, max_right) + 1return max_depth(self.root)代码测试
if __name__ == '__main__':BST = BinarySearchTree()BST.put('e', '5')BST.put('b', '2')BST.put('g', '7')BST.put('a', '1')BST.put('d', '4')BST.put('f', '6')BST.put('h', '8')BST.put('c', '3')print(f"The size of this binary tree now is {BST.size()}\n")print("pre_order:\n", [(key, BST.get(key)) for key in BST.pre_ergodic()])print("mid_order:\n", [(key, BST.get(key)) for key in BST.mid_ergodic()])print("post_order:\n", [(key, BST.get(key)) for key in BST.post_ergodic()])print("layer_order:\n", [(key, BST.get(key)) for key in BST.layer_ergodic()])print(f"Get the maximum depth of this tree: {BST.max_depth()}")
测试结果
The size of this binary tree now is 8pre_order:[('e', '5'), ('b', '2'), ('a', '1'), ('d', '4'), ('c', '3'), ('g', '7'), ('f', '6'), ('h', '8')]
mid_order:[('a', '1'), ('b', '2'), ('c', '3'), ('d', '4'), ('e', '5'), ('f', '6'), ('g', '7'), ('h', '8')]
post_order:[('a', '1'), ('c', '3'), ('d', '4'), ('b', '2'), ('f', '6'), ('h', '8'), ('g', '7'), ('e', '5')]
layer_order:[('e', '5'), ('b', '2'), ('g', '7'), ('a', '1'), ('d', '4'), ('f', '6'), ('h', '8'), ('c', '3')]
Get the maximum depth of this tree: 4Process finished with exit code 0
根据前/后序+中序确定这颗二叉查找树:

最大深度显然是4

渲染位图)


)


