Ubuntu16.04 软件商店闪退打不开
sudo apt-get updatesudo apt-get dist-upgrade# 应该执行一下更新就好,不需要重新安装软件中心
sudo apt-get install –reinstall software-center
Ubuntu16.04 深度美化
https://www.jianshu.com/p/4bd2d9b1af41
Ubuntu18.04 美化
https://www.cnblogs.com/lishanlei/p/9090404.html
https://blog.csdn.net/ice__snow/article/details/80152068
一、Chrome浏览器
ubuntu软件中心应该搜不到Chrome,可以去官网下载安装包,也可以用命令行安装
# 将下载源加入到系统的源列表
# 如果返回“地址解析错误”等信息,可以百度搜索其他提供 Chrome 下载的源,用其地址替换掉命令中的地址。
sudo wget http://www.linuxidc.com/files/repo/google-chrome.list -P /etc/apt/sources.list.d/
# 导入谷歌软件的公钥,用于下面步骤中对下载软件进行验证。
# 如果顺利的话,命令将返回“OK”
wget -q -O - https://dl.google.com/linux/linux_signing_key.pub  | sudo apt-key add -

# 对当前系统的可用更新列表进行更新
# 这是许多 Linux 发行版经常需要执行的操作,目的是随时获得最新的软件版本信息。
sudo apt-get update# 谷歌 Chrome 浏览器(稳定版)的安装
sudo apt-get install google-chrome-stable# 启动谷歌 Chrome 浏览器,然后锁定到启动器
/usr/bin/google-chrome-stable
参考链接: https://jingyan.baidu.com/article/335530da98061b19cb41c31d.html
为chrom安装flash播放器(没有试过,就是记下)
屏幕右上角,“系统设置”–>“软件和更新”–>“其它软件”
勾选“Canonical合作伙伴”, 点击“关闭”
sudo apt install adobe-flashplugin
二、Plank
(一)在 Ubuntu 里如何下载、安装和配置 Plank Dock
sudo add-apt-repository ppa:docky-core/stable
sudo apt-get update
sudo apt-get install plank
安装成功后,你就可以在 Unity Dash里通过输入 Plank 来打开该应用,或者从应用菜单里面打开,如果你没有使用 Unity 环境的话。
也可以直接通过plank命令打开
(二)安装plank后,自启动
搜索“启动应用程序”, 打开启动应用程序首选项
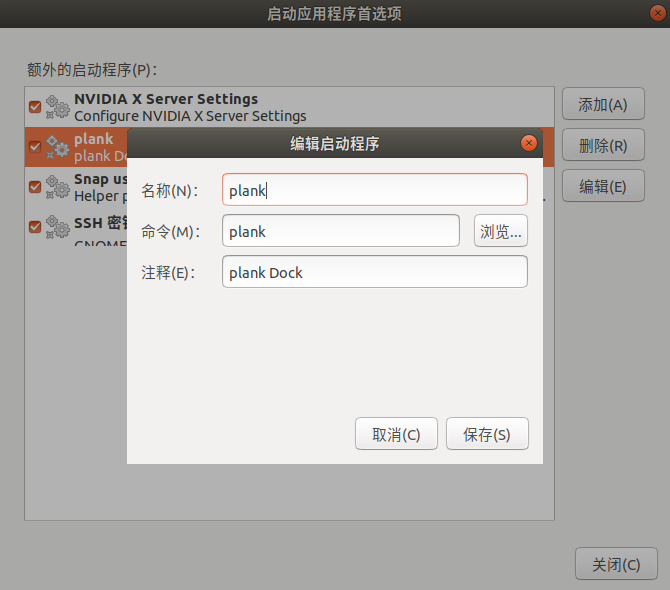
(三)Plank开机自启动导致 注销、登录选项错乱
解决办法:延迟启动:
# /usr/share/applications
sudo gedit plank.desktop# 在plank.desktop加一行:
X-GNOME-Autostart-Delay=20
三、***
参考链接:https://www.litcc.com/2016/12/29/Ubuntu16-shadowsocks-pac/
去这里下载最新的版本是后缀为.AppImage的文件:https://github.com/shadowsocks/shadowsocks-qt5/releaseschmod a+x ***-Qt5-3.0.1-x86_64.AppImage
./***-Qt5-3.0.1-x86_64.AppImage 创建一个桌面快捷方式
1.将AppImage文件拷贝到opt文件夹下
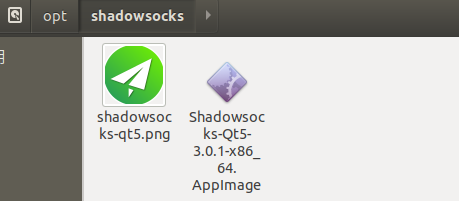
2.打开/usr/share/Application,新建shadowsocks-qt5.desktop
写入下面这些代码,注意Icon、Exec这两项要换成自己的(路径记得改)
[Desktop Entry]
Type=Application
Version=V3.0.1alpha
Encoding=UTF-8
Name=shadowsocks-qt5
Comment=shadowsocks qt application
Icon=/opt/shadowsocks/shadowsocks-qt5.png
Exec=/opt/shadowsocks/***-Qt5-3.0.1-x86_64.AppImage
Terminal=false
StartupNotify=true
Categories=Internet
MimeType=application/shadowsocks

安装完***之后,添加自己的连接,配置自己的ss服务器
可以开启全局代理(一般不建议这样),如下
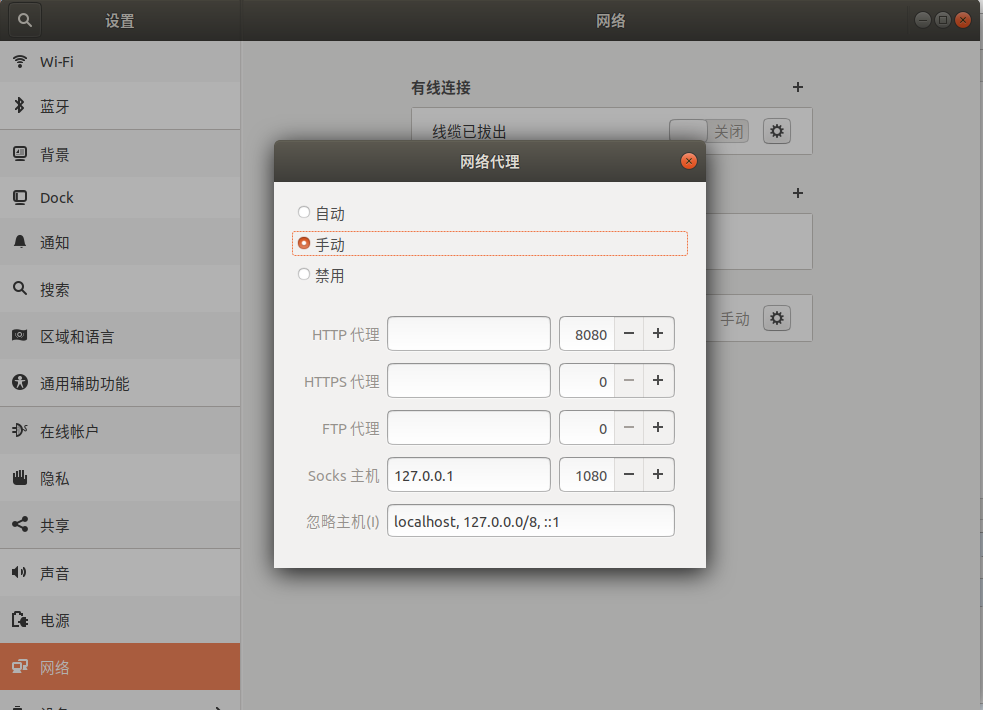
Chrome浏览器 添加SwitchyOmega插件(可以从chrome商店添加,也可自己下载),来管理代理
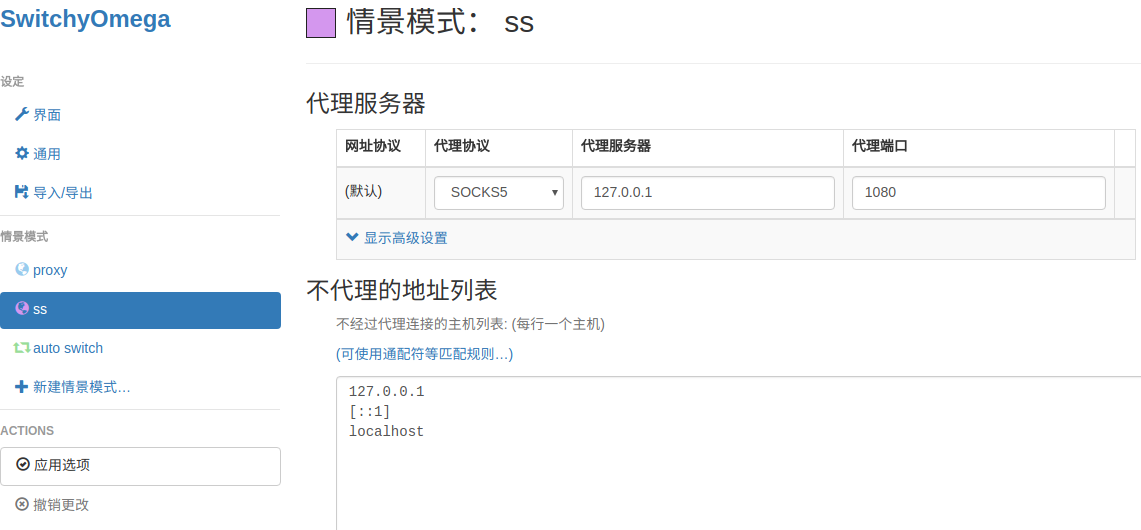
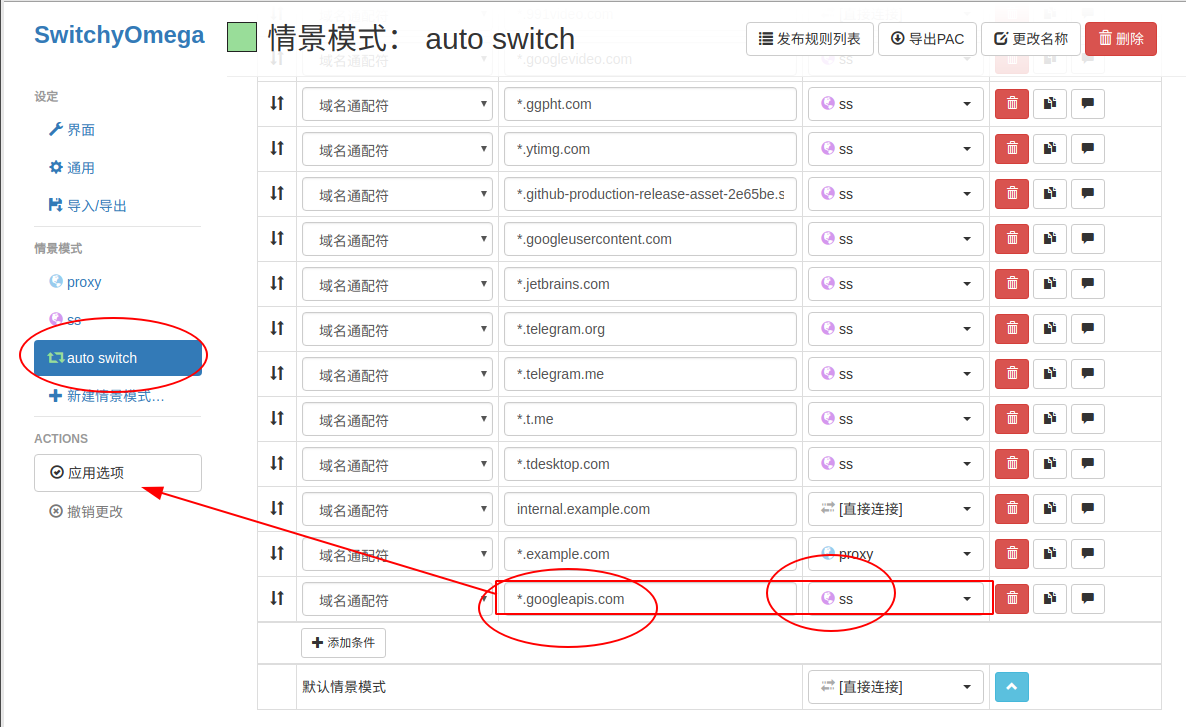
为了避免chrome同步问题,需要在auto switch中添加如下规则:
参考链接:http://www.cnblogs.com/tanrong/p/9885222.html
*.googleapis.com # 情景模式设为“shadowsocks代理模式”
四、搜狗输入法
官网下载:https://pinyin.sogou.com/linux/
下载deb安装包直接安装即可
五、QQ/TIM
参考链接: Ubuntu安装TIM(QQ) 使用crossover方式
https://github.com/askme765cs/Wine-QQ-TIM 使用AppImage打开
六、flameshot 火焰截图
sudo apt-get install flameshot
或者去github上下载deb https://github.com/lupoDharkael/flameshot/releases
注意选择系统版本:
设置快捷键:
进入 设置>设备>键盘,拉到最下面,点击加号
快捷键命令填写:flameshot gui
问题:文本框不能调整文本大小
解决:选中文字,滚动鼠标滚轮
七、(一)Pycharm
参考链接:https://blog.csdn.net/hhhuua/article/details/80429764
下载pycharm professional:http://www.jetbrains.com/pycharm/download/#section=linux
进入下载路径,将你的pycharm安装包解压(解压到你的安装目录吧)
tar -zxvf pycharm*.tar.gz -C ~
进入解压目录, 进入 bin/pycharm.sh
sh ./pycharm.sh
创建图标:
a、在桌面创建一个文件:pycharm.desktop(或者直接在 /usr/share/applications 中创建)
b、编辑这个文件,添加以下内容(Exec是sh文件位置(以自己实际文件为主),icon是图标文件位置,修改两处):
[Desktop Entry]
Version=1.0
Type=Application
Name=Pycharm
Icon=/home/rongt/Software/pycharm-2018.3.2/bin/pycharm.png
Exec=/home/rongt/Software/pycharm-2018.3.2/bin/pycharm.sh
MimeType=application/x-py;
Name[en_US]=pycharm
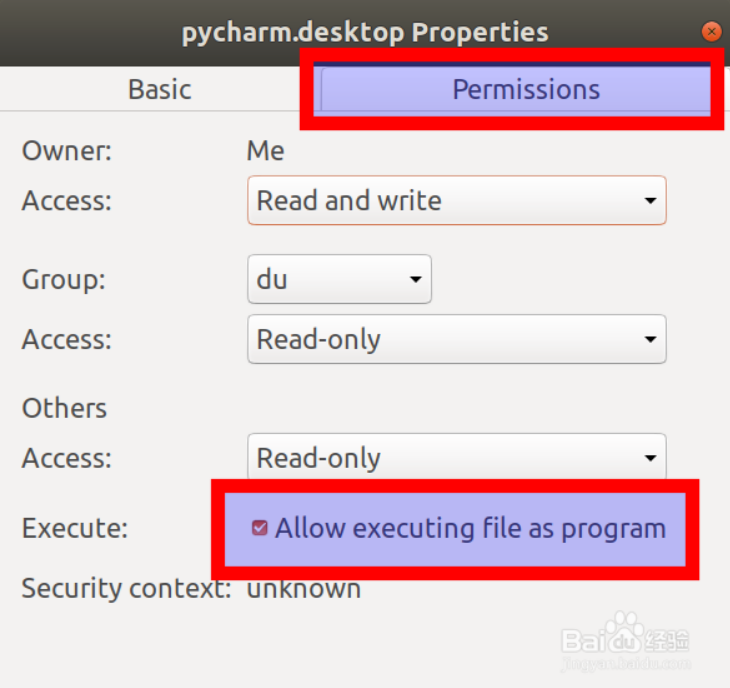
c、右击这个文件,把允许作为程序运行给选择上,双击这个桌面文件,这个文件就从文本图标,变成了程序图标。
d、打开终端,cd到桌面,然后把这个文件复制到系统APP目录里面,这样在系统程序里面就可以找到了
如果是在 /usr/share/applications 中创建的,就不需要这一步了
sudo cp pycharm.desktop /usr/share/applications/
Pycharm 破解激活:
参考链接:https://www.cnblogs.com/tanrong/p/7309343.html
Pycharm更改项目默认路径:

七、(二)IntelliJ IDEA
下载链接:https://www.jetbrains.com/idea/download/#section=linux
选择Ultimate版本的tar.gz包下载,如果已经配置好jdk环境的话,选择 Linux,without jdk 版本下载:
和Pycharm的安装类似:
解压、进入解压目录, 运行 bin/idea.sh 即可
IntelliJ IDEA 破解激活:
参考链接:https://www.cnblogs.com/tanrong/p/7309343.html
八、Anaconda
Linux下载安装:
参考链接: Anaconda介绍、安装及使用教程
下载链接:https://www.anaconda.com/download/#linux 下载64位
只放重要命令,如果需要详细解释,就看第一个参考链接
如果需要自定义安装路径,请看下面
bash /home/rongt/Software/Anaconda3-2018.12-Linux-x86_64.sh
安装完成之后这个安装包就可以删了
一路回车,注意输入yes, ctrl+c取消
/home/<user>/.bashrc文件中吗?”),建议输入“yes”。source ~/.bashrc也可完成启动。验证安装结果。可选用以下任意一种方法:
-
在终端中输入命令
condal list,如果Anaconda被成功安装,则会显示已经安装的包名和版本号。 -
在终端中输入
python。这条命令将会启动Python交互界面,如果Anaconda被成功安装并且可以运行,则将会在Python版本号的右边显示“Anaconda custom (64-bit)”。退出Python交互界面则输入exit()或quit()即可。 -
在终端中输入
anaconda-navigator。如果Anaconda被成功安装,则Anaconda Navigator将会被启动。
Ubuntu在自己的路径安装Anaconda
参考链接:https://blog.csdn.net/u014618300/article/details/78783957
Ubuntu下,平时我们下载Anaconda可能是直接下载然后安装,一路回车,最后默认在usr/local下,但是如果团队服务器,需要自己用的时候,需要将Anaconda安装在自己的位置下面。
bash Anacondaxxxxx.bash -p PATH -u
其中PATH是自己的安装路径,这样就可以更改Anaconda默认安装路径了
在pycharm配置anaconda环境
参考链接:https://blog.csdn.net/weixin_39223665/article/details/80706154
操作步骤:打开Pycharm:Files→settings→Project Interpreter→点击齿轮选择Add local里面→选中existing environment并在interpreter中添加Anaconda 的python.exe(在你anaconda安装到哪里打开哪里就OK了)。
点OK后,再点Applay就可以调用Anaconda中的库了。
九、Codeblocks
参考链接:
Ubuntu下codeblocks安装配置方法及opencv配置方法 https://blog.csdn.net/lhanchao/article/details/53440160
http://www.cnblogs.com/GHzz/p/9553520.html
官网推荐的方法https://launchpad.net/~damien-moore/+archive/ubuntu/codeblocks-stable进行安装,在ubuntu终端下输入如下命令:
(第三条和第四条我没试)
# 添加源
sudo add-apt-repository ppa:damien-moore/codeblocks-stable
sudo apt-get update# 安装简版
sudo apt-get install codeblocks# 把编译环境,C库、C++库和Boost库装好
sudo apt install build-essential# 安装 CodeBlocks 的调试组件 Valgrind 用来探测内存泄露的
sudo apt install valgrind # 安装常用的插件
sudo apt-get install codeblocks codeblocks-contrib
十、Git
sudo apt install git
Pycharm 配置git:Git 的使用
十一 Ubuntu 换源
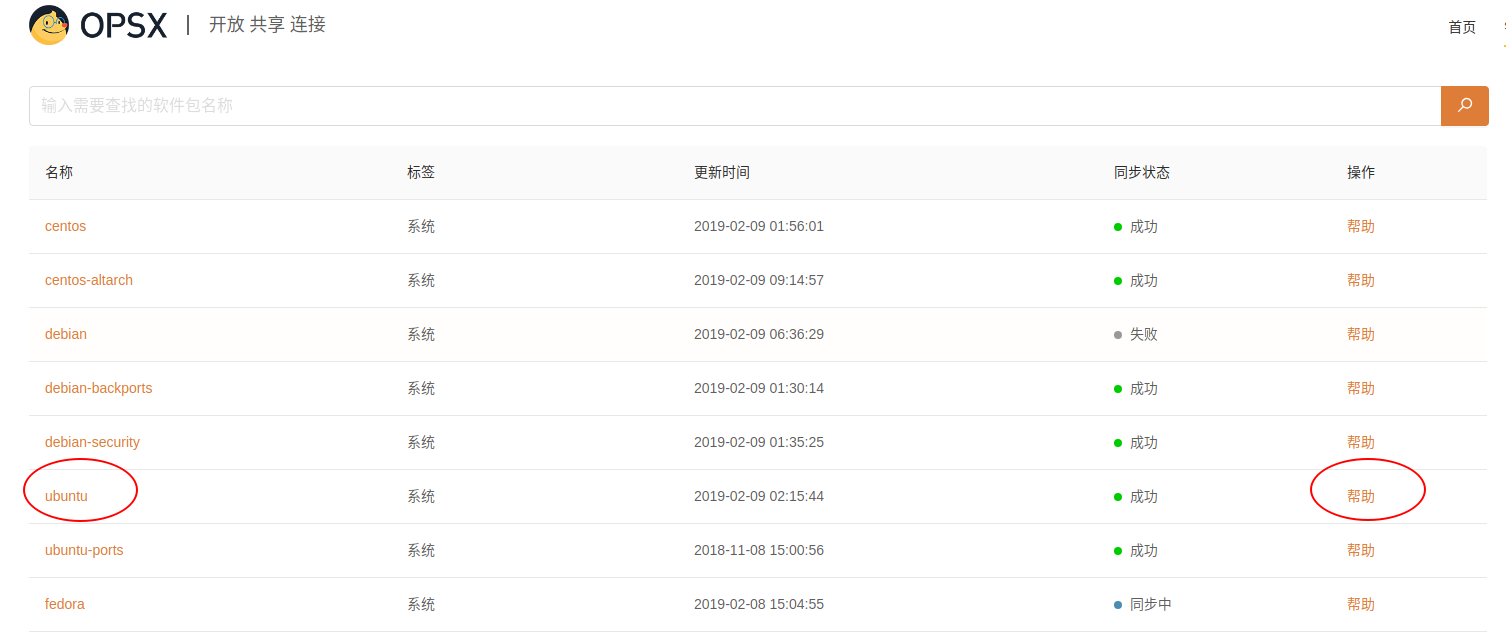
Ubuntu镜像清华源:https://mirror.tuna.tsinghua.edu.cn/help/ubuntu/
Ubuntu镜像清华源:https://opsx.alibaba.com/mirror?lang=zh-CN
1. 备份源列表
cd /etc/aptsudo cp sources.list sources.list.bak 2. 更换源
sudo gedit sources.list # sources.list 所有内容删除,放进去任何一种源(比如清华源,阿里源)
3. 更新
sudo apt-get update
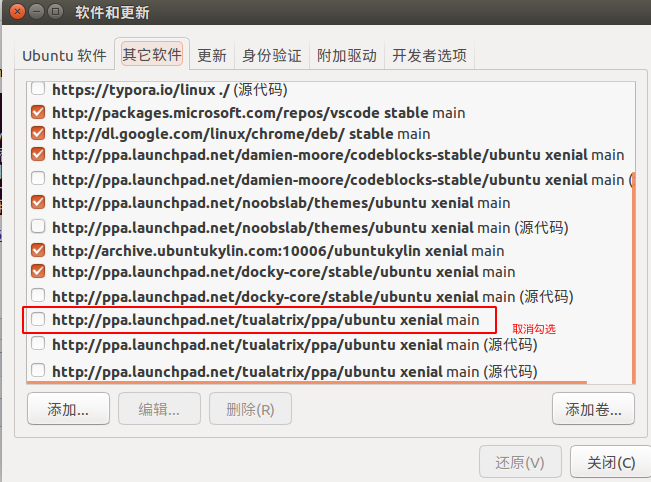
问题:执行sudo apt-get update 后出现 W: 仓库 “http://ppa.launchpad.net/tualatrix/ppa/ubuntu xenial Release” 没有 Release 文件。

解决:https://blog.csdn.net/qq_41980584/article/details/84234658
双击etc/apt/sources.list,在弹出的 目录中删除对应的ppa
十二 安装vim以及配置
参考链接:
ubuntu16.04下vim的安装与配置
vim常用命令总结
一、安装vim
$ sudo apt-get install vim
安装后的vim需要进行一些配置,不然使用起来会有些不方便,比如不会自动缩进。
二、配置vim
$ vim /etc/vim/vimrc
修改vim配置文件 (修改该文件对所有用户都生效),在该文件最后添加如下代码:
 1 set ai                          " 自动缩进,新行与前面的行保持—致的自动空格
 2 set aw                          " 自动写,转入shell或使用:n编辑其他文件时,当前的缓冲区被写入
 3 set flash                       " 在出错处闪烁但不呜叫(缺省)
 4 set ic                          " 在查询及模式匹配时忽赂大小写
 5 set nu
 6 set number                      " 屏幕左边显示行号
 7 "set showmatch                   " 显示括号配对,当键入“]”“)”时,高亮度显示匹配的括号
 8 set showmode                    " 处于文本输入方式时加亮按钮条中的模式指示器
 9 set showcmd                     " 在状态栏显示目前所执行的指令,未完成的指令片段亦会显示出来
10 set warn/nowarn                 " 对文本进行了新的修改后,离开shell时系统给出显示(缺省)
11 set ws/nows                     " 在搜索时如到达文件尾则绕回文件头继续搜索
12 set wrap/nowrap                 " 长行显示自动折行
13 "colorscheme evening            " 设定背景为夜间模式
14 filetype plugin on              " 自动识别文件类型,自动匹配对应的, “文件类型Plugin.vim”文件,使用缩进定义文件
15 set autoindent                  " 设置自动缩进:即每行的缩进值与上一行相等;使用 noautoindent 取消设置
16 set cindent                     " 以C/C++的模式缩进
17 set noignorecase                " 默认区分大小写
18 set ruler                       " 打开状态栏标尺
19 set scrolloff=5                 " 设定光标离窗口上下边界 5 行时窗口自动滚动
20 set shiftwidth=4                " 设定 << 和 >> 命令移动时的宽度为 4
21 set softtabstop=4               " 使得按退格键时可以一次删掉 4 个空格,不足 4 个时删掉所有剩下的空格)
22 set tabstop=4                   " 设定 tab 长度为 4
23 set wrap                        " 自动换行显示
24 syntax enable
25 syntax on                       " 自动语法高亮
注意第10、11、12行只能选一个值,不然会报错。如果有些功能自己不需要可以在行前使用符号"注释该行。如果使用!wq不能保存,则使用w ! sudo tee %保存
上面的方法是对vim的一些基本配置,更高级的配置可以通过vim插件实现。
十三 Smplayer
https://www.linuxidc.com/Linux/2016-05/131375.htm
https://blog.csdn.net/doublezsx/article/details/79663019
$ sudo add-apt-repository ppa:rvm/smplayer $ sudo apt-get update $ sudo apt-get install smplayer smtube smplayer-themes smplayer-skins
十四 坚果云
官网下载:https://www.jianguoyun.com/s/downloads/linux
下载 nautilus_nutstore_amd64.deb 双击安装即可
十五 Visual Studio Code
https://code.visualstudio.com/Download
十六 Telegram
下载运行:https://desktop.telegram.org/


有偏见)


