(一)阻塞和非阻塞
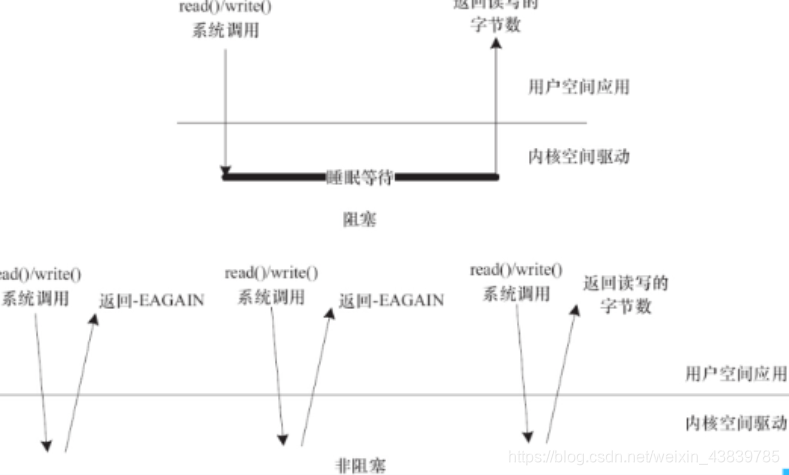
阻塞:执行设备操作时,若不能获得资源,则挂起进程进入休眠直到满足可操作的条件后再操作。
非阻塞:进程在不能进行设备操作时,并不挂起,它要么放弃,要么不停地查询,直至可以进行操作为止。
(二)为什么学习等待队列
在讲解等待队列的作用之前先来看一下内核的休眠机制:
正在运行的进程让出CPU,休眠的进程会被内核搁置在一边,只有当内核再次把休眠的进程唤醒,
进程才会重新在CPU运行,这是内核中的进程调度
一个CPU在同一时间只能有一个进程在运行,内核将所有的进程按一定的算法将CPU轮流的给每个
进程使用,而休眠就是进程没有被运行时的一种形式。在休眠下,进程不占用CPU,等待被唤醒。
当一个进程休眠时,其他进程为了能够唤醒休眠的进程,它必须知道休眠的进程在哪里,出于这样的原因,需要有一个称为等待队列的结构体。等待队列是一个存放着等待某个特定事件进程链表。所以等待队列相当于休眠进程的链表,需要手动进行操作
它的作用主要是:实现中断处理、进程同步及延时进程
(三)等待队列的相关接口
等待队列头数据结构:
struct __wait_queue_head {spinlock_t lock; //自旋锁机制struct list_head task_list;
};
typedef struct __wait_queue_head wait_queue_head_t;
wait_queue_head_t:即为等待队列头的数据类型
初始化等待队列头:
静态定义等待队列头并初始化:
#define DECLARE_WAIT_QUEUE_HEAD(name) \wait_queue_head_t name = __WAIT_QUEUE_HEAD_INITIALIZER(name)动态定以并初始化:#define init_waitqueue_head(q)				\do {						\static struct lock_class_key __key;	\\__init_waitqueue_head((q), #q, &__key);	\} while (0)
休眠等待队列wait_event或wait_event_interruptible:
/*** wait_event - sleep until a condition gets true* @wq: the waitqueue to wait on* @condition: a C expression for the event to wait for** The process is put to sleep (TASK_UNINTERRUPTIBLE) until the* @condition evaluates to true. The @condition is checked each time* the waitqueue @wq is woken up.** wake_up() has to be called after changing any variable that could* change the result of the wait condition.*/
#define wait_event(wq, condition) 					\
do {									\if (condition)	//判断条件是否满足,如果满足则退出等待 						\break;							\__wait_event(wq, condition);	//如果不满足,则进入__wait_event宏				\
} while (0)#define __wait_event(wq, condition) 					\
do {									\DEFINE_WAIT(__wait);						\/*定义并且初始化等待队列项,后面我们会将这个等待队列项加入我们的等待队列当中,同时在初始化的过程中,会定义func函数的调用函数autoremove_wake_function函数,该函数会调用default_wake_function函数。*/										\for (;;) {							\prepare_to_wait(&wq, &__wait, TASK_UNINTERRUPTIBLE);	\/*调用prepare_to_wait函数,将等待项加入等待队列当中,并将进程状态置为不可中断TASK_UNINTERRUPTIBLE;*/			if (condition)		//继续判断条件是否满足							\break;						\schedule();	 //如果不满足,则交出CPU的控制权,使当前进程进入休眠状态 					\}								\finish_wait(&wq, &__wait);/**如果condition满足,即没有进入休眠状态,跳出了上面的for循环,便会将该等待队列进程设置为可运行状态,并从其所在的等待队列头中删除    */ 					\
} while (0)#define wait_event_interruptible(wq, condition)				\
({	/**如果condition为false,那么__wait_event_interruptible将会被执行*/  \int __ret = 0;
\if (!(condition))						\__wait_event_interruptible(wq, condition, __ret);	\__ret;								\
})
唤醒等待队列节点wake_up_interruptible或wake_up:
#define wake_up(x)			__wake_up(x, TASK_NORMAL, 1, NULL)
void __wake_up(wait_queue_head_t *q, unsigned int mode, int nr, void *key);
/*** __wake_up - wake up threads blocked on a waitqueue.* @q: the waitqueue* @mode: which threads* @nr_exclusive: how many wake-one or wake-many threads to wake up* @key: is directly passed to the wakeup function** It may be assumed that this function implies a write memory barrier before* changing the task state if and only if any tasks are woken up.*//**定义wake_up函数宏,同时其需要一个wait_queue_head_t的结构体指针,在该宏中调用__wake_up方法。*/
#define wake_up(x)			__wake_up(x, TASK_NORMAL, 1, NULL)
#define wake_up_nr(x, nr)		__wake_up(x, TASK_NORMAL, nr, NULL)
#define wake_up_all(x)			__wake_up(x, TASK_NORMAL, 0, NULL)
加interruptible接口标识唤醒可中断
#define wake_up_interruptible(x)	__wake_up(x, TASK_INTERRUPTIBLE, 1, NULL)
#define wake_up_interruptible_nr(x, nr)	__wake_up(x, TASK_INTERRUPTIBLE, nr, NULL)
#define wake_up_interruptible_all(x)	__wake_up(x, TASK_INTERRUPTIBLE, 0, NULL)
#define wake_up_interruptible_sync(x)	__wake_up_sync((x), TASK_INTERRUPTIBLE, 1)
(四)如何实现等待队列
1、创建等待队列头
//1.静态定义并初始化
#define DECLARE_WAIT_QUEUE_HEAD(name) \wait_queue_head_t name = __WAIT_QUEUE_HEAD_INITIALIZER(name)//2.动态定以并初始化:wait_queue_head_t name;init_waitqueue_head(q)
默认情况下会把当前进程作为等待任务放到等待队列中
2、在需要休眠的地方调用休眠操作
wait_event 、 wait_event_timeout wait_event_interruptible(首选)
3、在满条件的地方唤醒等待队列
wake_up 、wake_up_interruptible
(五)实例代码
chrdev.c
#include <linux/kernel.h>
#include <linux/module.h>
#include <linux/fs.h>
#include <linux/cdev.h>
#include <linux/device.h>
#include <linux/slab.h>
#include <linux/interrupt.h>
#include <linux/gpio.h>
#include <linux/init.h>
#include <linux/wait.h>
#include <linux/sched.h>
#include <linux/uaccess.h>#define CDEVCOUNT 5
#define CDEVNAME "cdevdevice"
#define INODENAME "mycdev"
int count=0;
dev_t dev=0;
int keyflag;//等待队列第二个参数
char keyvalue[4]={-1,-1,-1,-1};
struct cdev * cdev =NULL;
struct class * cdevclass =NULL;
wait_queue_head_t  waithead;struct Key
{unsigned int gpios;char * name;int num;unsigned int irq;};struct Key key[]={{EXYNOS4_GPX3(2),"K1",0},{EXYNOS4_GPX3(3),"K2",1},{EXYNOS4_GPX3(4),"K3",2},{EXYNOS4_GPX3(5),"K4",3},};
irqreturn_t key_handler(int irq, void * dev)
{struct Key * tmp =(struct Key *)dev;int value[4];value[tmp->num]= gpio_get_value(tmp->gpios);gpio_set_value(EXYNOS4X12_GPM4(tmp->num),value[tmp->num]);keyflag = 1;keyvalue[tmp->num] = value[tmp->num];wake_up_interruptible(&waithead);printk("key%d value is %d\n",tmp->num,value[tmp->num]);printk("the current cpu is %d\n",smp_processor_id());return IRQ_HANDLED;}int cdev_open (struct inode *node, struct file *file)
{printk("cdev_open is install\n");return 0;
}
ssize_t cdev_read (struct file *fp, char __user *buf, size_t size, loff_t *offset)
{int ret =0;if((fp->f_flags & O_NONBLOCK)== O_NONBLOCK)//非阻塞{if(!keyflag)return -EAGAIN;}else//阻塞{wait_event_interruptible(waithead,keyflag);}keyflag =0;ret = copy_to_user(buf,keyvalue,4);if(ret <0)return -EFAULT;printk("cdev_read is install\n");return 0;
}
ssize_t cdev_write (struct file *fp, const char __user * buf, size_t size, loff_t *offset)
{printk("cdev_write is install\n");return 0;
}
int cdev_release (struct inode *node, struct file *fp)
{printk("cdev_release is install\n");return 0;
}
struct file_operations fop={.open=cdev_open,.read=cdev_read,.write=cdev_write,.release=cdev_release,
};void mycdev_add(void)
{//1.申请设备号--动态int ret =alloc_chrdev_region(&dev,0, CDEVCOUNT, CDEVNAME);if(ret)return ;//初始化cdev结构体cdev = cdev_alloc();if(!cdev){goto out;}cdev_init(cdev,&fop);//添加字符设备到系统中ret =cdev_add(cdev,dev, CDEVCOUNT);if(ret){goto out1;}//创建设备类cdevclass = class_create(THIS_MODULE, INODENAME);if(IS_ERR(cdevclass)){goto out2;}for (count=0;count<CDEVCOUNT;count++)device_create(cdevclass, NULL, dev+count, NULL, "mydevice%d",count);out:unregister_chrdev_region(dev,CDEVCOUNT);	return ;
out1:unregister_chrdev_region(dev,CDEVCOUNT);kfree(cdev);return ;
out2:cdev_del(cdev);unregister_chrdev_region(dev,CDEVCOUNT);kfree(cdev);return ;}static int __init  dev_module_init(void)
{int ret=0,i=0;unsigned long flags= IRQF_TRIGGER_RISING|IRQF_TRIGGER_FALLING|IRQF_SHARED;for(i=0;i<4;i++){key[i].irq = gpio_to_irq(key[i].gpios);ret =request_irq(key[i].irq, key_handler,flags,key[i].name,(void *) &key[i]);}init_waitqueue_head(&waithead);//创建等待队列头mycdev_add();printk("this is dev_module_init \n");return 0;
}static void __exit dev_module_cleanup(void)
{int i=0;for(i=0;i<4;i++){key[i].irq = gpio_to_irq(key[i].gpios);free_irq(key[i].irq,(void *)&key[i]);}for(count=0;count<CDEVCOUNT;count++){device_destroy(cdevclass, dev+count);}class_destroy(cdevclass);cdev_del(cdev);unregister_chrdev_region(dev, CDEVCOUNT);kfree(cdev);printk("this is dev_module_cleanup\n");
}module_init(dev_module_init);
module_exit(dev_module_cleanup);
MODULE_LICENSE("GPL");
chr_app.c
#include<stdio.h>
#include <sys/types.h>
#include <sys/stat.h>
#include <fcntl.h>char status[]={-1,-1,-1,-1};
char key[]={-1,-1,-1,-1};
int main(int argc, char *argv[])
{int i=0,fd= open(argv[1],O_RDWR);if(fd== -1){perror("open");return -1;}while(1){if(read(fd,status,4)<0){printf("按键状态未改变\n");sleep(1);continue;}for(i=0;i<4;i++){if(status[i] != key[i] ){printf("key%d is %s\n",i,status[i]?"up":"down");status[i]=key[i];}}}close(fd);return 0;
}
Makefile
CFLAG =-C
TARGET = chrdev
TARGET1 = chr_app
KERNEL = /mydriver/linux-3.5
obj-m += $(TARGET).oall:make $(CFLAG)  $(KERNEL) M=$(PWD)arm-linux-gcc -o $(TARGET1) $(TARGET1).c
clean:make $(CFLAG)  $(KERNEL) M=$(PWD) clean
本文章仅供学习交流用禁止用作商业用途,文中内容来水枂编辑,如需转载请告知,谢谢合作
微信公众号:zhjj0729
微博:文艺to青年
linux之poll轮询)
)
linux内核定时器)
)
linux中断底半部分处理机制)
 B. Pasha and Phone C. Duff and Weight Lifting)

与 $()区别)


)
)


)