总结Vue中index.html、main.js、App.vue、index.js之间关系以及Vue项目加载流程
文章目录
- 总结Vue中index.html、main.js、App.vue、index.js之间关系以及Vue项目加载流程
- 1 vue中index.html、main.js、App.vue、index.js关系
- 简介
- 1.1 项目的运行入口index.html
- 1.2 入口文件main.js
- 1.3 根组件App.vue
- 1.4 控制路由index.js
- 2 Vue项目加载流程
1 vue中index.html、main.js、App.vue、index.js关系
简介
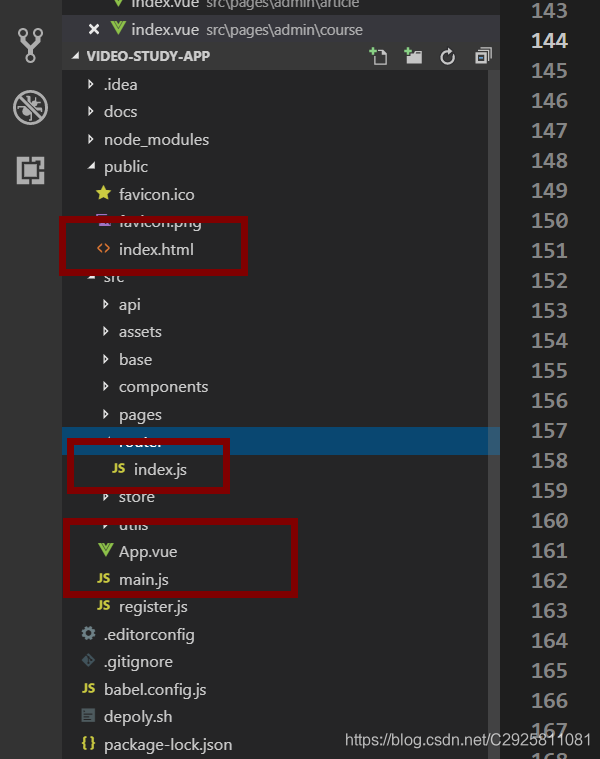
项目部署完成后的项目结构以及index.html、main.js、App.vue、index.js如下图所示:

- index.html—主页,项目入口
- App.vue—根组件,主窗口 组件汇聚点 Vue是基于主键化开发
- main.js—入口文件: 整个项目工程入口 用于全局配置
- index.js设置路由–名字和资源映射起来
src中所有的编译打包后在public下index.html中app里面
引出我们的问题:那么这几个文件之间的联系如何呢?
1.1 项目的运行入口index.html
为什么index.html是项目的入口以及为什么index.html加载后会继续加载main.js、App.vue、index.js,以及他们之间的关系是如何联系起来的呢???
解释:
这是vue底层源码实现的,通过项目的里面webpack.dev.conf.js等配置文件,可以加载运行我们的index.html文件以及自动关联vue相关的模块。感兴趣的可以了解下。
首先我们来看一下index.html中的内容
<!DOCTYPE html>
<html lang="en"><head><meta charset="utf-8"><meta http-equiv="X-UA-Compatible" content="IE=edge"><meta name="viewport" content="width=device-width,initial-scale=1.0"><link rel="icon" href="<%= BASE_URL %>favicon.png"><title>vue-mooc</title></head><body><noscript><strong>We're sorry but vue-mooc doesn't work properly without JavaScript enabled. Please enable it to continue.</strong></noscript><div id="app"></div><!-- built files will be auto injected --></body>
</html>
在网页的Title部分,加载了index.html中定义的Title,而在正文部分,加载了App.vue中定义的部分。
网页效果如下:

1.2 入口文件main.js
在index.html的body体中只有一个div标签,其id为app,这个id将会连接到src/main.js内容,接着我们看一下main.js中的主要的代码`
import Vue from 'vue'
import App from './App.vue'
import router from 'router/index.js'
import store from './store/index.js'import ElementUI from 'element-ui'
import 'element-ui/lib/theme-chalk/index.css'
import locale from 'element-ui/lib/locale/lang/en' // lang i18n// set ElementUI lang to EN
Vue.use(ElementUI, { locale })// register custom base component
import Mooc from './register.js'
import 'assets/theme/index.styl'
Vue.use(Mooc)import 'assets/stylus/index.styl'Vue.config.productionTip = falsenew Vue({router,store,render: h => h(App),
}).$mount('#app')
在main.js中,new一个vue实例,并手动挂载在index.html中app里面。也就是说通过main.js我们关联到App.vue组件
1.3 根组件App.vue
接着,我们继续看一下App.vue组件中的内容。
<template><div id="app" :style="getStyle"><mooc-container><mooc-header height="72px"><m-header /></mooc-header><mooc-main><router-view /></mooc-main><mooc-footer height="120px"><m-footer /></mooc-footer></mooc-container><mooc-backtop :show-height="500"></mooc-backtop><login v-if="showLogin" @maskClick="handleMaskClick" /></div>
</template><script>
import MHeader from 'components/header/index.vue'
import MFooter from 'components/footer/footer.vue'
import { mapGetters, mapMutations } from 'vuex'
import { scrollMixin } from 'assets/js/mixin.js'
export default {name: 'App',mixins: [scrollMixin],computed: {getStyle () {return {'max-height': this.showLogin ? '100%' : '','overflow': this.showLogin ? 'hidden' : ''}},// vuex...mapGetters(['showLogin'])},methods: {// 遮罩点击事件handleMaskClick () {this.setShowLogin(!this.showLogin)},// vuex...mapMutations({'setShowLogin': 'login/SET_SHOW_LOGIN'})},components: {MHeader,MFooter,Login: () => import('components/login/login.vue')}
}
</script>
App.vue中的内容是一个标准的vue模板的形式,包含了<template></template>、<script></script>、<style></style>三部分
script中直接处理好业务,template中直接渲染 ,通过v-model双向绑定,
从template标签中可以看到,引入了其他页面组件,也就是我们使用npm run serve运行vue项目后看到的界面

问题:那么内容是从哪里渲染出来的呢?
1.4 控制路由index.js
我们注意到,
<template>标签下,除了<img>标签外,还有<router-view>标签,<router-view>标签将会把路由相关内容渲染在这个地方,接下来,我们看一下路由的内容有哪些,在哪里出现的。其实,这个文件位于src/router/index.js中,我们看一下index.js中的代码
import Vue from 'vue'
import Router from 'vue-router'
import store from '../store/index.js'
import { getUserInfo } from 'utils/cache.js'
Vue.use(Router)const Home = () => import('pages/home/index.vue') // 首页路由
const CourseIndex = () => import('pages/course/index.vue') // 免费课程路由
const CourseDetail = () => import('pages/course-detail/index.vue') // 免费课程详情路由
const LessonIndex = () => import('pages/lesson/index.vue') // 实战课程路由
const LessonDetail = () => import('pages/lesson-detail/index.vue') // 实战课程详情路由
const ReadIndex = () => import('pages/read/read.vue') // 专栏路由
const ReadDetaiil = () => import('pages/read-detail/read-detail.vue') // 专栏详情路由
const UserCenter = () => import('pages/user/index.vue') // 个人中心路由
const VipCenter = () => import('pages/vip/index.vue') const UserCRUD = () => import('pages/admin/user/index')
const CourseCRUD = () => import('pages/admin/course/index')
const ArticleCRUD = () => import('pages/admin/article/index')
const CommentCRUD = () => import('pages/admin/comments/index')//路由元信息
const routes = [{path: '/crud/user',name: 'UserCRUD',    //给路由起个名,标识路由对象,可以根据name去取一个路由component:UserCRUD,meta: {requireAuth: true  //将开启你的页面路由守卫}},{path: '/crud/course',name: 'CourseCRUD',component:CourseCRUD,meta: {requireAuth: true}},{path: '/crud/article',name: 'ArticleCRUD',component:ArticleCRUD,meta: {requireAuth: true}},{path: '/crud/comments',name: 'CommentCRUD',component:CommentCRUD,meta: {requireAuth: true}},{path: '/',name: 'Index',redirect: '/home'},{path: '/home',name: 'Home',component:Home},{path: '/user',name: 'UserCenter',component:UserCenter,meta: {requireAuth: true}},{path: '/vip',name: 'VipCenter',component:VipCenter,meta: {requireAuth: true}},{path: '/course',name: 'CourseIndex',component: CourseIndex,},{path: '/course/:id',name: 'CourseDetail',component: CourseDetail,meta: {requireAuth: true}},{path: '/lesson',name: 'LessonIndex',component:LessonIndex},{path: '/lesson/:id',name: 'LessonDetail',component: LessonDetail,meta: {requireAuth: true}},{path: '/read',name: 'ReadIndex',component:ReadIndex,},{path: '/read/:id',name: 'ReadDetaiil',component:ReadDetaiil,meta: {requireAuth: true}}
]
const router = new Router({routes: routes,scrollBehavior () {return {x: 0,y: 0}}
})// 路由拦截   全局路由守卫  权限控制,前端路由守卫控制,登录才可以访问
router.beforeEach((to, from, next) => {let userinfo = getUserInfo()if (to.meta.requireAuth) {if (userinfo.username) {next()} else{store.commit('login/SET_SHOW_LOGIN', true)}} else {next()  //拿到next才放行}
})//对外输出一个router实例
export default router
在
index.js的代码中,建立了路由相关的内容,也就会渲染到App.vue下面的router-view中。
本项目在index.js下面配置了路由守卫,路由守卫一般应用于权限控制
路由守卫具体作用可以理解为:前端每次跳转路由,就判断localStroage中有无token,没有就跳转到登录页面,有则跳转到对应路由页面(本项目为例)
在
index.js中,取其中一个例子,将UserCRUD组件发布为路由,换句说,index.js在这里就是将UserCRUD发布为路由,以在下面进行展示UserCRUD内容,接下来我们再看看components/UserCRUD中的内容是啥(由于里面的内容比较多,这里我们只截取了template中的内容)。
<template><ul class="course-list"><li v-for="(item,index) in list" :key="index" class="course-item" @click="handleCourseClick(item)"><div class="img-box"><img :src="item.img" alt=""><span v-if="item.type == 'vip'" class="vip">{{item.type}}</span><span v-else class="free">{{item.type}}</span><div v-if="item.tags && item.tags.split(',').length > 0" class="tags"><span v-for="(tag, index) in item.tags.split(',')" :key="index" class="tag-item">{{ tag }}</span></div><div v-if="item.process > 0" class="badge rate">{{ item.process }}%</div><div v-if="item.script" class="badge script">{{ item.script }}</div></div><p class="course-name">{{ item.title }}</p><p class="info"><span>{{ item.rank }}</span><span><i class="iconfont icon-user"></i></span><span><mooc-star class="star-box" :value="num" :disabled="true" /></span></p></li></ul>
</template>
在course.vue的template中,我们可以看到界面上渲染的一些连接等内容。
course实际渲染效果如下:

2 Vue项目加载流程
通过上述过程,我们可以看到项目加载的过程是index.html->main.js->app.vue->index.js->course.vue。
本项目完整代码可以进入我的码云查看:我的码云


