大家好,我是若川。最近组织了源码共读活动,感兴趣的可以加我微信 ruochuan12 参与,已进行三个月了,大家一起交流学习,共同进步。
背景
相信很多同学在学习 webpack 的时候,对 loader 的概念应该有所了解,它用于模块源码的转换,描述了 webpack 如何处理非 JavaScript 模块,常见的有 css-loader、babel-loader、url-loader、vue-loader 等。
大部分 loader 已经满足我们的日常开发需求,不过有些时候我们仍然需要自定义 loader。为了让你了解如何开发一个 webpack loader,我决定从 ElementUI 组件库的 md-loader 入手,带你去了解其中的实现原理,以及在它的基础上,如何做进一步的优化。
文档的设计
对于一个组件的文档,首先我们要考虑的是如何更好地展现组件的功能,其次要考虑的是如何更方便地做文档维护。
想要编写好一个组件的文档,需要做好以下几点:
1.功能描述
对组件功能、使用场景做详细的描述。
2.demo 演示
直观地让用户感受到组件的功能,并且能展示 demo 对应的代码。
3.接口说明
写清楚组件支持的属性、方法、事件等。
那么,如何方便地维护文档呢?
ElementUI 组件库的文档也是一个 Vue 项目,组件的文档页面是单独的路由视图,而文档是用 markdown 文件来描述的,在文档内部,不仅包含了对组件的功能以及接口的描述,还可以通过编写 vue 组件的方式直接编写组件的 demo,这种方式对于组件文档的维护还是比较方便的。
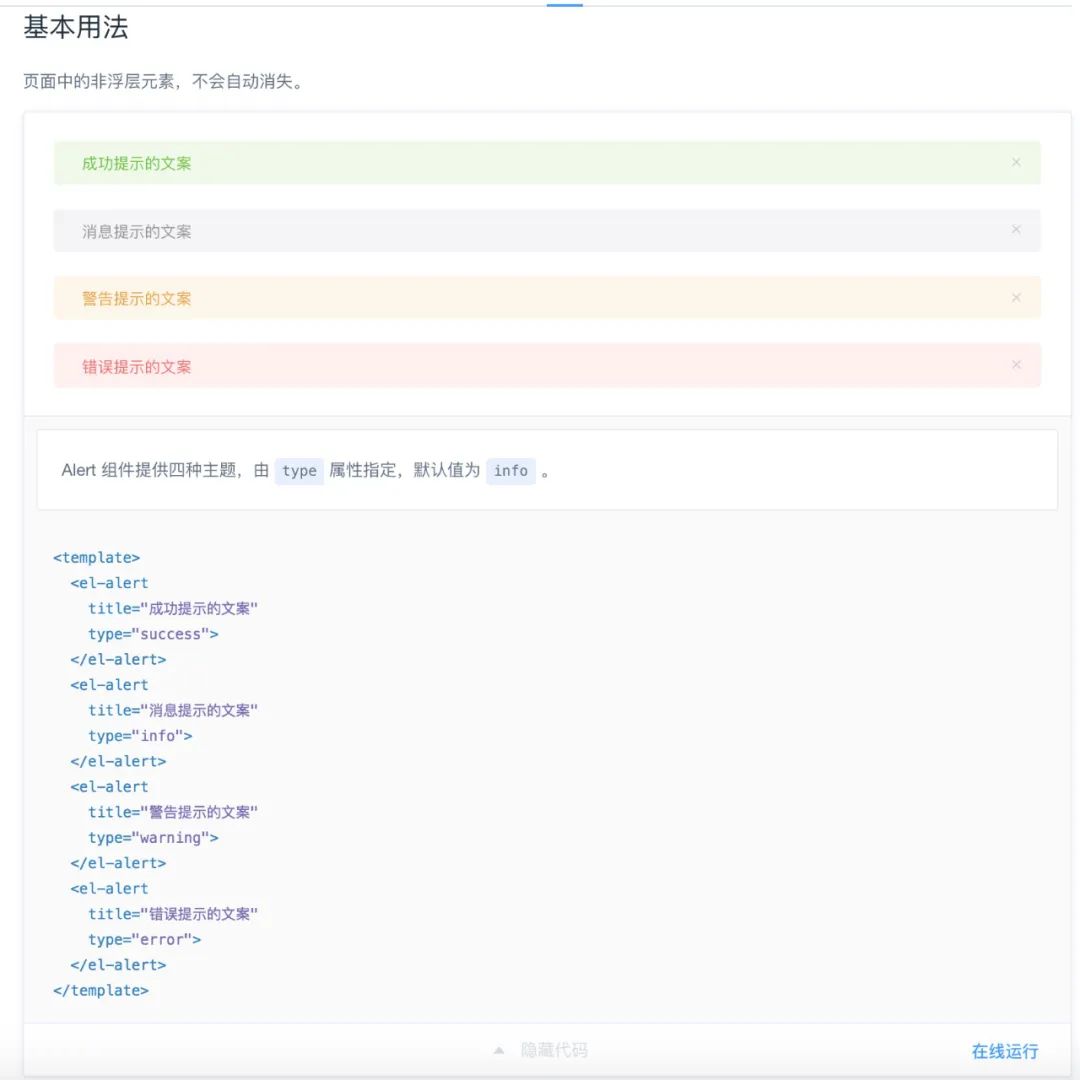
以 ElementUI 组件库 Alter 组件为例:
## Alert 警告用于页面中展示重要的提示信息。### 基本用法页面中的非浮层元素,不会自动消失。:::demo Alert 组件提供四种主题,由`type`属性指定,默认值为`info`。```html
<template><el-alerttitle="成功提示的文案"type="success"></el-alert><el-alerttitle="消息提示的文案"type="info"></el-alert><el-alerttitle="警告提示的文案"type="warning"></el-alert><el-alerttitle="错误提示的文案"type="error"></el-alert>
</template>
```
:::
最终它在页面上的展示效果如下:

可以看到,组件的路由视图对应的是一个 markdown 文件,而在我们通常的认知中,Vue 的路由视图应该对应的是一个 Vue 组件。
在 ElementUI 内部,是通过 require.ensure 的方式去加载一个 .md 文件,它的返回值会作为路由视图对应的异步组件。
const LOAD_DOCS_MAP = {'zh-CN': path => {return r => require.ensure([], () =>r(require(`./docs/zh-CN${path}.md`)),'zh-CN');},// ...
}
因此内部就必须要把 markdown 文件转换一个 Vue 组件,我们可以借助 webpack loader 来实现这一需求。
自定义 md-loader
首先,在 webpack 的配置规则中,需要指定 .md 文件应用的 loader:
{test: /\.md$/,use: [{loader: 'vue-loader',options: {compilerOptions: {preserveWhitespace: false}}},{loader: path.resolve(__dirname, './md-loader/index.js')}]
}
接下来,我们就来分析 md-loader 的源码实现:
const {stripScript,stripTemplate,genInlineComponentText
} = require('./util');
const md = require('./config');module.exports = function(source) {const content = md.render(source);const startTag = '<!--element-demo:';const startTagLen = startTag.length;const endTag = ':element-demo-->';const endTagLen = endTag.length;let componenetsString = '';let id = 0; // demo 的 idlet output = []; // 输出的内容let start = 0; // 字符串开始位置let commentStart = content.indexOf(startTag);let commentEnd = content.indexOf(endTag, commentStart + startTagLen);while (commentStart !== -1 && commentEnd !== -1) {output.push(content.slice(start, commentStart));const commentContent = content.slice(commentStart + startTagLen, commentEnd);const html = stripTemplate(commentContent);const script = stripScript(commentContent);let demoComponentContent = genInlineComponentText(html, script);const demoComponentName = `element-demo${id}`;output.push(`<template slot="source"><${demoComponentName} /></template>`);componenetsString += `${JSON.stringify(demoComponentName)}: ${demoComponentContent},`;// 重新计算下一次的位置id++;start = commentEnd + endTagLen;commentStart = content.indexOf(startTag, start);commentEnd = content.indexOf(endTag, commentStart + startTagLen);}// 仅允许在 demo 不存在时,才可以在 Markdown 中写 script 标签let pageScript = '';if (componenetsString) {pageScript = `<script>export default {name: 'component-doc',components: {${componenetsString}}}</script>`;} else if (content.indexOf('<script>') === 0) {start = content.indexOf('</script>') + '</script>'.length;pageScript = content.slice(0, start);}output.push(content.slice(start));return `<template><section class="content element-doc">${output.join('')}</section></template>${pageScript}`;
};
md-loader 要做的事情,就是把 markdown 语法的字符串,转成 Vue 组件字符串。转换的过程可以拆成三个步骤:markdown 渲染,demo 子组件的处理,构造完整的组件。接下来我们就来依次分析这三个步骤。
markdown 渲染
markdown 文件内容会渲染生成对应的 HTML,它是通过下面这段代码完成的:
const md = require('./config');
module.exports = function(source) {const content = md.render(source);
}
而 md 对象的来源如下:
const Config = require('markdown-it-chain');
const anchorPlugin = require('markdown-it-anchor');
const slugify = require('transliteration').slugify;
const containers = require('./containers');
const overWriteFenceRule = require('./fence');const config = new Config();config.options.html(true).end().plugin('anchor').use(anchorPlugin, [{level: 2,slugify: slugify,permalink: true,permalinkBefore: true}]).end().plugin('containers').use(containers).end();const md = config.toMd();
overWriteFenceRule(md);module.exports = md;
首先实例化了 config 对象,它依赖于 markdown-it-chain,通过 webpack chain 的链式 API,配置了 markdown-it 的插件。而 md 对象指向的就是 markdown-it 的实例。
markdown-it 的实例提供了很多 API,具体可以参考它的官网文档。其中 md.render 就是把 markdown 字符串渲染生成 HTML。
不过我们注意到,组件文档使用了一些非标准的 markdown 语法,比如:
:::demo
:::
它实际上是一个 markdown 的自定义容器,借助于 markdown-it-container 插件,就可以解析这个自定义容器:
const mdContainer = require('markdown-it-container');module.exports = md => {md.use(mdContainer, 'demo', {validate(params) {return params.trim().match(/^demo\s*(.*)$/);},render(tokens, idx) {const m = tokens[idx].info.trim().match(/^demo\s*(.*)$/);if (tokens[idx].nesting === 1) {const description = m && m.length > 1 ? m[1] : '';const content = tokens[idx + 1].type === 'fence' ? tokens[idx + 1].content : '';return `<demo-block>${description ? `<div>${md.render(description)}</div>` : ''}<!--element-demo: ${content}:element-demo-->`;}return '</demo-block>';}});md.use(mdContainer, 'tip');md.use(mdContainer, 'warning');
};
可以看到,对于 demo 这个自定义容器,它会解析 demo 后面紧接着的描述字符串以及 code fence,并生成新的 HTML 字符串。
此外,code fence 也定义了新的渲染策略:
// 覆盖默认的 fence 渲染策略
module.exports = md => {const defaultRender = md.renderer.rules.fence;md.renderer.rules.fence = (tokens, idx, options, env, self) => {const token = tokens[idx];// 判断该 fence 是否在 :::demo 内const prevToken = tokens[idx - 1];const isInDemoContainer = prevToken && prevToken.nesting === 1 && prevToken.info.trim().match(/^demo\s*(.*)$/);if (token.info === 'html' && isInDemoContainer) {return `<template slot="highlight"><pre v-pre><code class="html">${md.utils.escapeHtml(token.content)}</code></pre></template>`;}return defaultRender(tokens, idx, options, env, self);};
};
对于在 demo 容器内且带有 html 标记的 code fence,会做一层特殊处理。
对于我们前面的示例:
:::demo Alert 组件提供四种主题,由`type`属性指定,默认值为`info`。```html
<template><el-alerttitle="成功提示的文案"type="success"></el-alert><el-alerttitle="消息提示的文案"type="info"></el-alert><el-alerttitle="警告提示的文案"type="warning"></el-alert><el-alerttitle="错误提示的文案"type="error"></el-alert>
</template>
```
:::
经过解析后,生成的 HTML 大致如下:
<demo-block><div><p>Alert 组件提供四种主题,由<code>type</code>属性指定,默认值为<code>info</code>。</p></div><!--element-demo: <template><el-alerttitle="成功提示的文案"type="success"></el-alert><el-alerttitle="消息提示的文案"type="info"></el-alert><el-alerttitle="警告提示的文案"type="warning"></el-alert><el-alerttitle="错误提示的文案"type="error"></el-alert></template>:element-demo--><template slot="highlight"><pre v-pre><code class="html"><template><el-alerttitle="成功提示的文案"type="success"></el-alert><el-alerttitle="消息提示的文案"type="info"></el-alert><el-alerttitle="警告提示的文案"type="warning"></el-alert><el-alerttitle="错误提示的文案"type="error"></el-alert></template></code></pre></template>
</demo-block>demo 子组件的处理
目前我们了解到,每一个 demo 容器对应一个示例,它会解析生成对应的 HTML,最终会通过 demo-block 组件渲染,这个组件是预先定义好的 Vue 组件:
<template><divclass="demo-block":class="[blockClass, { 'hover': hovering }]"@mouseenter="hovering = true"@mouseleave="hovering = false"><div class="source"><slot name="source"></slot></div><div class="meta" ref="meta"><div class="description" v-if="$slots.default"><slot></slot></div><div class="highlight"><slot name="highlight"></slot></div></div><divclass="demo-block-control"ref="control":class="{ 'is-fixed': fixedControl }"@click="isExpanded = !isExpanded"><transition name="arrow-slide"><i :class="[iconClass, { 'hovering': hovering }]"></i></transition><transition name="text-slide"><span v-show="hovering">{{ controlText }}</span></transition><el-tooltip effect="dark" :content="langConfig['tooltip-text']" placement="right"><transition name="text-slide"><el-buttonv-show="hovering || isExpanded"size="small"type="text"class="control-button"@click.stop="goCodepen">{{ langConfig['button-text'] }}</el-button></transition></el-tooltip></div></div>
</template>
demo-block 支持了多个插槽,其中默认插槽对应了组件的描述部分;highlight 插槽对应组件高亮的代码部分;source 插槽对应 demo 实现的部分。
因此,目前我们生成的 HTML 字符串还不能够直接被 demo-block 组件使用,需要进一步的处理:
module.exports = function(source) {const content = md.render(source);const startTag = '<!--element-demo:';const startTagLen = startTag.length;const endTag = ':element-demo-->';const endTagLen = endTag.length;let componenetsString = '';let id = 0; // demo 的 idlet output = []; // 输出的内容let start = 0; // 字符串开始位置let commentStart = content.indexOf(startTag);let commentEnd = content.indexOf(endTag, commentStart + startTagLen);while (commentStart !== -1 && commentEnd !== -1) {output.push(content.slice(start, commentStart));const commentContent = content.slice(commentStart + startTagLen, commentEnd);const html = stripTemplate(commentContent);const script = stripScript(commentContent);let demoComponentContent = genInlineComponentText(html, script);const demoComponentName = `element-demo${id}`;output.push(`<template slot="source"><${demoComponentName} /></template>`);componenetsString += `${JSON.stringify(demoComponentName)}: ${demoComponentContent},`;// 重新计算下一次的位置id++;start = commentEnd + endTagLen;commentStart = content.indexOf(startTag, start);commentEnd = content.indexOf(endTag, commentStart + startTagLen);}// 处理 script// ...output.push(content.slice(start))
};
其中 output 表示要输出的模板内容,componenetsString 表示要输出的脚本内容。这段代码要做的事情就是填充 demo-block 组件内部的 source 插槽,并且插槽的内容是一个 demo 子组件。
由于前面生成的 HTML 中包含了 <!--element-demo: 和 :element-demo--> 注释字符串,因此就可以找到注释字符串的位置,通过字符串截取的方式来获取注释内外的内容。
对于注释内的内容,会提取其中的模板部分和 JS 部分,然后构造出一个内联的组件字符串。
前面的示例经过处理,output 对应的内容如下:
[`<demo-block><div><p>Alert 组件提供四种主题,由<code>type</code>属性指定,默认值为<code>info</code>。</p></div>`,`<template slot="source"><element-demo0 /></template>`, `<template slot="highlight"><pre v-pre><code class="html"><template><el-alerttitle="成功提示的文案"type="success"></el-alert><el-alerttitle="消息提示的文案"type="info"></el-alert><el-alerttitle="警告提示的文案"type="warning"></el-alert><el-alerttitle="错误提示的文案"type="error"></el-alert></template></code></pre></template><demo-block>`
]处理后的 demo-block 就变成一个标准的 Vue 组件的应用了。
componenetsString 对应的内容如下:
`"element-demo0": (function() {var render = function() {var _vm = thisvar _h = _vm.$createElementvar _c = _vm._self._c || _hreturn _c("div",[[_c("el-alert", { attrs: { title: "成功提示的文案", type: "success" } }),_vm._v(" "),_c("el-alert", { attrs: { title: "消息提示的文案", type: "info" } }),_vm._v(" "),_c("el-alert", { attrs: { title: "警告提示的文案", type: "warning" } }),_vm._v(" "),_c("el-alert", { attrs: { title: "错误提示的文案", type: "error" } })]],2)  }  var staticRenderFns = []render._withStripped = trueconst democomponentExport = {}return {render,staticRenderFns,...democomponentExport}
})(),`
通过内联的方式定义了 element-demo0 子组件的实现。
示例只是处理了单个 demo 子组件,如果有多个 demo 容器,就可以通过循环查找注释字符串 element-demo:,处理所有的 demo-block。
构造完整的组件
module.exports = function(source) {const content = md.render(source);let componenetsString = '';let output = [];let start = 0;// 循环处理 demo 子组件// ...let pageScript = '';if (componenetsString) {pageScript = `<script>export default {name: 'component-doc',components: {${componenetsString}}}</script>`;} else if (content.indexOf('<script>') === 0) {start = content.indexOf('</script>') + '</script>'.length;pageScript = content.slice(0, start);}output.push(content.slice(start));return `<template><section class="content element-doc">${output.join('')}</section></template>${pageScript}`;
};可以看到,output 负责组件的模板定义,pageScript 负责组件的脚本定义,最终会通过字符串拼接的方式,返回完整的组件定义。
对于最开始完整的示例而言,经过 md-loader 处理的结果如下:
<template><section class="content element-doc"><h2 id="alert-jing-gao"><a class="header-anchor" href="#alert-jing-gao" aria-hidden="true">¶</a> Alert 警告</h2><p>用于页面中展示重要的提示信息。</p><h3 id="ji-ben-yong-fa"><a class="header-anchor" href="#ji-ben-yong-fa" aria-hidden="true">¶</a> 基本用法</h3><p>页面中的非浮层元素,不会自动消失。</p><demo-block><div><p>Alert 组件提供四种主题,由<code>type</code>属性指定,默认值为<code>info</code>。</p></div><template slot="source"><element-demo0/></template><template slot="highlight"><pre v-pre><code class="html"><template><el-alerttitle="成功提示的文案"type="success"></el-alert><el-alerttitle="消息提示的文案"type="info"></el-alert><el-alerttitle="警告提示的文案"type="warning"></el-alert><el-alerttitle="错误提示的文案"type="error"></el-alert></template></code></pre></template></demo-block></section>
</template>
<script>export default {name: 'component-doc',components: {"element-demo0": (function() {var render = function() {var _vm = thisvar _h = _vm.$createElementvar _c = _vm._self._c || _hreturn _c("div",[[_c("el-alert", { attrs: { title: "成功提示的文案", type: "success" } }),_vm._v(" "),_c("el-alert", { attrs: { title: "消息提示的文案", type: "info" } }),_vm._v(" "),_c("el-alert", { attrs: { title: "警告提示的文案", type: "warning" } }),_vm._v(" "),_c("el-alert", { attrs: { title: "错误提示的文案", type: "error" } })]],2)}var staticRenderFns = []render._withStripped = trueconst democomponentExport = {}return {render,staticRenderFns,...democomponentExport}})(),}}
</script>显然,经过 md-loader 处理后原来 markdown 语法的字符串变成了一个 Vue 组件定义的字符串,就可以交给 vue-loader 继续处理了。
文档的优化
ElementUI 文档的设计确实巧妙,由于我们研发的 ZoomUI 是 fork 自 ElementUI 的,很长一段时间,我们也沿用了 ElementUI 文档的编写方式。
但是随着我们自研的组件越来越多,组件使用的场景也越来越丰富,我们对于文档编写和维护的需求也越来越多。
我发现在现有模式下写文档有几个不爽的点:
1.在 .md 中写 Vue 组件不方便,没法格式化代码,IDE 的智能提示不够友好。
2.在 demo 中写 style 是无效的,需要在外部的 css 文件另外定义样式。
3.中英文文档需要分别写 demo,修改一处没法自动同步到另一处。
我认为理想中编写一个组件的文档的方式是这样的:

## Select 选择器当选项过多时,使用下拉菜单展示并选择内容。### 基础用法适用广泛的基础单选。:::demo `v-model` 的值为当前被选中的 `zm-option` 的 `value` 属性值。```html
<basic/>
```
:::### 有禁用选项:::demo 在 `zm-option` 中,设定 `disabled` 值为 `true`,即可禁用该选项。
```html
<disabled/>
```
:::
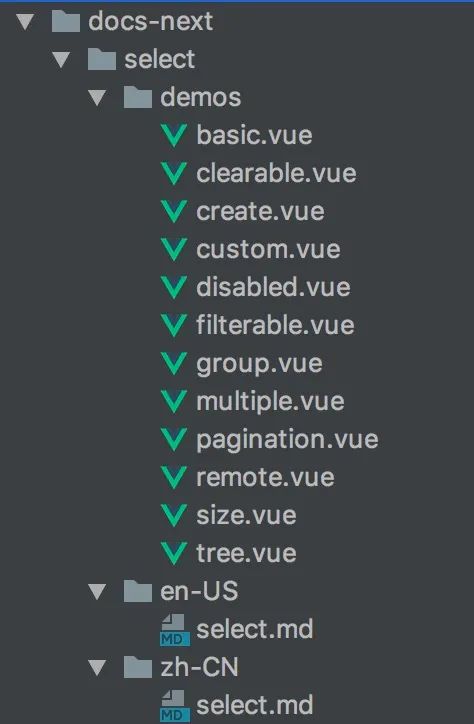
所有组件的 demo 拆成一个个 Vue 组件,然后在 markdown 文档中引入这些同名的组件。通过这种方式,前面提到的三个痛点就解决了。
那么,想达到这种效果,我们需要对 md-loader 做哪些修改呢?
来看一下修改后的 md-loader 的实现:
const md = require('./config');module.exports = function(source) {const content = md.render(source, {resourcePath: this.resourcePath});const startTag = '<!--element-demo:';const startTagLen = startTag.length;const endTag = ':element-demo-->';const endTagLen = endTag.length;const tagReg = /\s*<([\w-_]+)\s*\/>\s*/;let componenetsString = '';let output = []; // 输出的内容let start = 0; // 字符串开始位置let commentStart = content.indexOf(startTag);let commentEnd = content.indexOf(endTag, commentStart + startTagLen);while (commentStart !== -1 && commentEnd !== -1) {output.push(content.slice(start, commentStart));const commentContent = content.slice(commentStart + startTagLen, commentEnd);const matches = commentContent.match(tagReg);if (matches) {const demoComponentName = matches[1];output.push(`<template slot="source"><${demoComponentName} /></template>`);const imports = `()=>import('../demos/${demoComponentName}.vue')`;componenetsString += `${JSON.stringify(demoComponentName)}: ${imports},`;}start = commentEnd + endTagLen;commentStart = content.indexOf(startTag, start);commentEnd = content.indexOf(endTag, commentStart + startTagLen);}let pageScript = '';if (componenetsString) {pageScript = `<script>export default {name: 'component-doc',components: {${componenetsString}}}</script>`;} else if (content.indexOf('<script>') === 0) {start = content.indexOf('</script>') + '</script>'.length;pageScript = content.slice(0, start);}output.push(content.slice(start));return `<template><section class="content element-doc">${output.join('')}</section></template>${pageScript}`;
};
思路很简单,解析出每个 demo 容器中的组件名称,通过动态 import 的方式加载组件,然后在 source 插槽中直接用这个组件。
这样就把组件的 markdown 文档和 demo 直接关联起来。但这样还不够,我们还需要解决组件 demo 下面的代码展示问题,需要对 code fence 渲染策略做一定的修改:
const path = require('path');
const fs = require('fs');const tagReg = /\s*<([\w-_]+)\s*\/>\s*/;// 覆盖默认的 fence 渲染策略
module.exports = md => {const defaultRender = md.renderer.rules.fence;md.renderer.rules.fence = (tokens, idx, options, env, self) => {const token = tokens[idx];// 判断该 fence 是否在 :::demo 内const prevToken = tokens[idx - 1];const isInDemoContainer = prevToken && prevToken.nesting === 1 && prevToken.info.trim().match(/^demo\s*(.*)$/);if (token.info === 'html' && isInDemoContainer) {const matches = token.content.match(tagReg);if (matches) {const componentName = matches[1];const componentPath = path.resolve(env.resourcePath, `../../demos/${componentName}.vue`);const content = fs.readFileSync(componentPath, 'utf-8');return `<template slot="highlight"><pre v-pre><code class="html">${md.utils.escapeHtml(content)}</code></pre></template>`;}return '';}return defaultRender(tokens, idx, options, env, self);};
};
由于组件 demo 的代码已经不在 markdown 文档中维护了,因此只能从组件文件中读取了。
但是我们如何知道应该从哪个路径读取对应的 demo 组件呢?
在 webpack loader 中,我们可以通过 this.resourcePath 获取到当前处理文件的路径,那么在执行 markdown 渲染的过程中就可以把路径当做环境变量传入:
const content = md.render(source, {resourcePath: this.resourcePath
})
这样在 markdown 处理器的内部我们就可以通过 env.resourcePath 拿到处理的 markdown 文件路径,从而通过相对路径计算出要读取组件的路径,然后读取它们的内容:
const componentPath = path.resolve(env.resourcePath, `../../demos/${componentName}.vue`);
const content = fs.readFileSync(componentPath, 'utf-8');
有了组件文档的重构方案,接下来的工作就是依次重构组件的文档。当然在这个阶段,新老文档编写的方式都需要支持。
因此需要对 webpack 的配置做一些修改:
{test: /examples(\/|\\)docs(\/|\\).*\.md$/,use: [{loader: 'vue-loader',options: {compilerOptions: {preserveWhitespace: false}}},{loader: path.resolve(__dirname, './md-loader/index.js')}]
}, {test: /(examples(\/|\\)docs-next(\/|\\).*|changelog\.[\w-_]+)\.md$/i,use: [{loader: 'vue-loader',options: {compilerOptions: {preserveWhitespace: false}}},{loader: path.resolve(__dirname, './md-loader-next/index.js')}]
}
对于重构的文档,使用新的 markdown loader。当然加载组件视图的逻辑也需要做一定的修改,对于重构的文档,指向新的文档地址。
总结
ElementUI 通过 markdown 编写组件文档的思路还是非常棒的,主要利用了自定义 md-loader 对 markdown 文件内容做了一层处理,解析成 Vue 组件字符串,再交给 vue-loader 处理。
在写这篇文章之前,我就在粉丝群里分享了重构文档的方案。有同学告诉我,Element-plus 已经用 vitepress 重写,看了一下文档的组织方式,和我重构的方式非常类似,这就是传说中的英雄所见略同吗?
我在之前的文章中强调过,要善于发现工作中的痛点,并通过技术的方式解决,这是优秀的工程师重要的能力之一,希望这篇文章能够带给你这方面的一些思考。
参考资料
[1] markdown-it-chain: https://github.com/ulivz/markdown-it-chain
[2] markdown-it: https://markdown-it.github.io/markdown-it/
最近组建了一个江西人的前端交流群,如果你是江西人可以加我微信 ruochuan12 私信 江西 拉你进群。
推荐阅读
1个月,200+人,一起读了4周源码
我历时3年才写了10余篇源码文章,但收获了100w+阅读
老姚浅谈:怎么学JavaScript?
我在阿里招前端,该怎么帮你(可进面试群)

················· 若川简介 ·················
你好,我是若川,毕业于江西高校。现在是一名前端开发“工程师”。写有《学习源码整体架构系列》10余篇,在知乎、掘金收获超百万阅读。
从2014年起,每年都会写一篇年度总结,已经写了7篇,点击查看年度总结。
同时,最近组织了源码共读活动,帮助1000+前端人学会看源码。公众号愿景:帮助5年内前端人走向前列。

识别上方二维码加我微信、拉你进源码共读群
今日话题
略。欢迎分享、收藏、点赞、在看我的公众号文章~


)


 一些知识点(续2))


