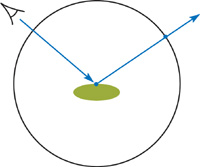
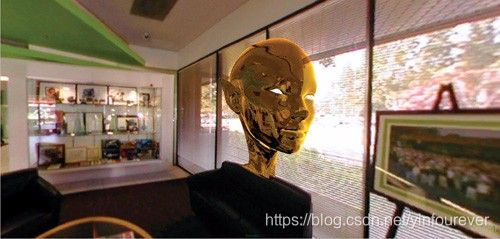
这篇文章打破了当时立方体贴图环境(Cube-Map Environment)用法的桎梏,深入研究了更多可能的逼真光照效果。文章主要研究了基于图像的光照(Image-Based Lighting,IBL),包括局部化的立方体映射,类似于使用基于图像的局部光照(Localizing Image-Based Lighting),然后介绍了如何把哪些重要的技巧用于着色模型,包括逼真的反射、阴影和漫反射/环境项。
cube map反射总是使它好像在无限远处,只与观察角度有关(想象一下skybox),这限制了它对小的封闭环境的应用.

在室内环境移动模型时,环境最好是近距离的cube map,距离的大小与当前的房间类似。当模型移动式,根据模型在房间中的位置进行反射。只要加很少的shader代码就能将反射局部化。这种方法得到的模拟效果使人感到更为可靠和逼真。尤其在包含窗户,屏幕和其他可识别光源的环境中。而只要加入很少的Shader数学就能将反射局部化。具体可以看原文贴出的Shader源码。


顶点shader:由cpu传入世界空间和光照空间的矩阵等信息,在顶点shader中将点和矢量转换两次,先由模型空间转换到世界空间,然后从世界空间转换到光照空间。具体代码如下:
Example 19-1. Vertex Shader to Generate World-Space and Lighting-Space Coordinates
vertexOutput reflectVS(appdata IN,uniform float4x4 WorldViewProjXf,uniform float4x4 WorldITXf,uniform float4x4 WorldXf,uniform float4x4 ViewITXf,uniform float4x4 LightingXf,uniform float4x4 LightingITXf)
{vertexOutput OUT;OUT.TexCoord = IN.UV;float4 Po = float4(IN.Position.xyz,1.0); // pad to "float4"OUT.HPosition = mul(WorldViewProjXf, Po);float4 Pw = mul(WorldXf, Po); // world coordinatesfloat3 WorldEyePos = ViewITXf [3].xyz;float4 LightingEyePos = mul(LightingXf, float4(WorldEyePos, 1.0));float4 Pu = mul(LightingXf, Pw);float4 Nw = mul(WorldITXf, IN.Normal);float4 Tw = mul(WorldITXf, IN.Tangent);float4 Bw = mul(WorldITXf, IN.Binormal);OUT.LightingEyeVec = (LightingEyePos - Pu).xyz;OUT.LightingNormal = mul(LightingITXf, Nw).xyz;OUT.LightingTangent = mul(LightingITXf, Tw).xyz;OUT.LightingBinorm = mul(LightingITXf, Bw).xyz;OUT.LightingPos = mul(LightingXf, Pw).xyz;return OUT;
}
片元shader:给定待着色点的位置和矢量,在光照空间计算反射矢量,它的起点是光照空间的表面,通过解球的二次方程,让矢量与那个球面相交,球面中心在照明空间的原点,半径=1.0。得到反射矢量后就可以采样从cube map采样。该shader还提供了几个另外的选项,以增加shader的逼真性,如表面颜色,Fresnel反射衰减等。
Example 19-2. Localized-Reflection Pixel Shader
float4 reflectPS(vertexOutput IN,uniform samplerCUBE EnvMap,uniform sampler2D NormalMap,uniform float4 SurfColor,uniform float Kr, // intensity of reflectionuniform float KrMin, // typical: 0.05 * Kruniform float FresExp, // typical: 5.0uniform float Bumpiness // amount of bump) : COLOR
{float3 Nu = normalize(IN.LightingNormal);// for bump mapping, we will alter "Nu" to get "Nb"float3 Tu = normalize(IN.LightingTangent);float3 Bu = normalize(IN.LightingBinorm);float3 bumps = Bumpiness *(tex2D(NormalMap, IN.TexCoord.xy).xyz - (0.5).xxx);float3 Nb = Nu + (bumps.x * Tu + bumps.y * Bu);Nb = normalize(Nb); // expressed in user-coord spacefloat3 Vu = normalize(IN.LightingEyeVec);float vdn = dot(Vu, Nb); // or "Nu" if unbumped - see text// "fres" attenuates the strength of the reflection// according to Fresnel's lawfloat fres = KrMin + (Kr - KrMin) * pow((1.0 - abs(vdn)), FresExp);float3 reflVect = normalize(reflect(Vu, Nb)); // yes, normalize// now we intersect "reflVect" with a sphere of radius 1.0float b = -2.0 * dot(reflVect, IN.LightingPos);float c = dot(IN.LightingPos, IN.LightingPos) - 1.0;float discrim = b * b - 4.0 * c;bool hasIntersects = false;float4 reflColor = float4(1, 0, 0, 0);if (discrim > 0) {// pick a small error value very close to zero as "epsilon"hasIntersects = ((abs(sqrt(discrim) - b) / 2.0) > 0.00001);}if (hasIntersects) {// determine where on the unit sphere reflVect intersectsreflVect = nearT * reflVect - IN.LightingPos;// reflVect.y = -reflVect.y; // optional - see text// now use the new intersection location as the 3D directionreflColor = fres * texCUBE(EnvMap, reflVect);}float4 result = SurfColor * reflColor;return result;
}
另外,我们可以将3D几何体做成立方体贴图,并且在正常地渲染环境的时候,把贴图应用到该环境的物体上。也可以使用贴图作为环境,把它投射到较简单的几何体上。
立方体贴图也能用来决定漫反射光照。Debevec的HDRShop程序能够从映射立方体光照环境积分出全部的漫反射贡献度,那么通过把表面法线带入预先卷积的立方体贴图,能够简单地查询漫反射贡献。
基于图像的光照为复杂的光照计算提供了综合而廉价的替代品,将一点数学加入纹理方法,可以大大拓宽“简单”IBL效果,给3D图像提供更强的的方位感。
【关键词提炼】
基于图像的光照(Image-Based Lighting,IBL)
立方体贴图环境(Cube-Map Environment )
基于图像的局部光照(Localizing Image-Based Lighting)

)

)


)

)


)


![[知乎] 开放世界游戏中的大地图背后有哪些实现技术?](http://pic.xiahunao.cn/[知乎] 开放世界游戏中的大地图背后有哪些实现技术?)


)
