haproxy 他也是常用的负载均衡软件
nginx 支持四层转发,七层转发
haproxy也可以四层和七层转发
haproxy:法国人开发的威利塔罗在2000年基于C语言开发的一个开源软件
可以支持一万以上的并发请求
高性能的tcp和http负载均衡2.4 1.5.9
haproxy:主要用于高并发的web站点,工作原理和nginx一样,lvs都一样
支持的功能
1、tcp和http的反向代理
2、https的代理配置
3、可以针对http请求添加Cookie,转发到后端服务器(添加缓存)
4、也支持主备服务器切换(keepalived)
5、基于端口的实时监控
6、压缩响应报文
haproxy的特点
1、可靠性和稳定性非常好,可以和硬件(f5 big)负载均衡的硬件设备相媲美
2、同时维护40000-50000个并发连接,单位时间内处理最大请求数20000个
3、支持8中负载均衡算法,但是haproxy不带缓存功能,但是可以支持会话保持
4、也支持配置虚拟主机
haproxy的负载均衡算法
1、roundrobin rr 轮询
2、static-rr wrr 加权轮询
3、leastconn 最小连接数
4、source 根据请求的源ip进行调度 sh
5、uri 根据请求地址进行调度
6、url param 根据URL的参数实现调度
7、hdr(name)表示根据http的请求头锁定每一次http的请求
8、rdp-Cookie(name)表示根据Cookie的名称来锁定每一次请求
haproxy:单节点部署,单实例运行,代理服务器出现故障,整个负载集群全部不可用
haproxy是一个无状态的负载均衡器,没缓存,也没有会话保持,靠应用程序实现会话保持,状态不是保存在代理服务器,而在后端服务器,或者依靠cookie
日志问题:haproxy的日志比较简单,只提供基本的请求日志和错误日志,需要更高级的日志,人工自定义
实验
1、搭建
2、实现七层 实现四层
3、如何实现haproxy的日志单独存放
准备阶段
准备两台nginx
一台haproxy
一台客户机
haproxy配置(实现七层)
关闭防火墙和安全机制
解压源码包
安装依赖环境
yum install -y pcre-devel bzip2-devel gcc gcc-c++ make
进入haproxy配置
编译
make TARGET=linux2628 ARCH=X86_64
安装
make install
在etc目录下创建haproxy文件
mkdir /etc/haproxy
复制配置文件到创建的目录下
cp haproxy.cfg /etc/haproxy
查看配置文件
# this config needs haproxy-1.1.28 or haproxy-1.2.1global#全局配置 定义全局参数log/dev/log local0 info#系统日志log/dev/log local0 notice #修改日志 的存放路径#log loghost    local0 infomaxconn 4096#支持的最大连接数10240 一定要改#chroot /usr/share/haproxyuid 99gid 99daemonnbproc 6#可以同时并发进程数,要么和cpu相同,要么#debug#quietdefaultslog     global#引入全局配置日志格式mode    http#模式为http七层option  httplog#日志类别是http格式的日志option  dontlognull#不记录健康检查的日志信息retries 3#检查节点服务器的失败次数3次失败就认为节点服务器失效redispatch#服务器的负载很高maxconn 2000#contimeout     5000#clitimeout     50000#srvtimeout      50000timeout http-request 10stimeout http-request 10s#默认http请求的超时时间timeout queue 1m#默认队列超时时间timeout connect 10s#默认连接超时的时间timeout client 1m#客户端的超时时间timeout server 1m#服务端的超时时间timeout http-keep-alive 10s#默认会话保持的超时时间timeout check 10s#心跳检查的超时时间listen test 0.0.0.0:80option httpchk GET /index.htmlbalance roundrobinserver inst1 20.0.0.41:80 check inter 2000 fall 3 server inst2 20.0.0.42:80 check inter 2000 fall 3
#check inter 开启对后端服务器的健康检查,检查时间间隔2000毫秒
#fall 3 表示连续3次检测不到后端服务器的心跳线,则认为该节点失效
切换到opt/haproxy目录下
复制haproxy的启动文件
cp haproxy.init /etc/init.d/haproxy
给启动文件权限
chmod 777 /etc/init.d/haproxy
chkconfig --add /etc/init.d/haproxy
建立软连接
In -s /usr/local/sbin/haproxy /usr/sbin/
重启服务
nginx修改一下一下测试文件就可以了
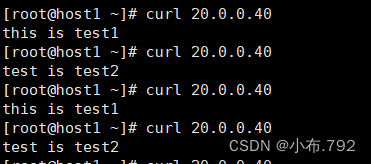
测试

加权重
在haproxy的配置文件中
listen test 0.0.0.0:80option httpchk GET /index.htmlbalance roundrobinserver  app1_1 inst1 20.0.0.40:80 check inter 2000  fall 3 weight 4server  app1_1 inst2 20.0.0.40:80 check inter 2000  fall 3 weihgt 3
#check inter 开启对后端服务器的健康检查,检查时间间隔2000毫秒
#fall 3 表示连续3次检测不到后端服务器的心跳线,则认为该节点失效haproxy配置(实现四层)
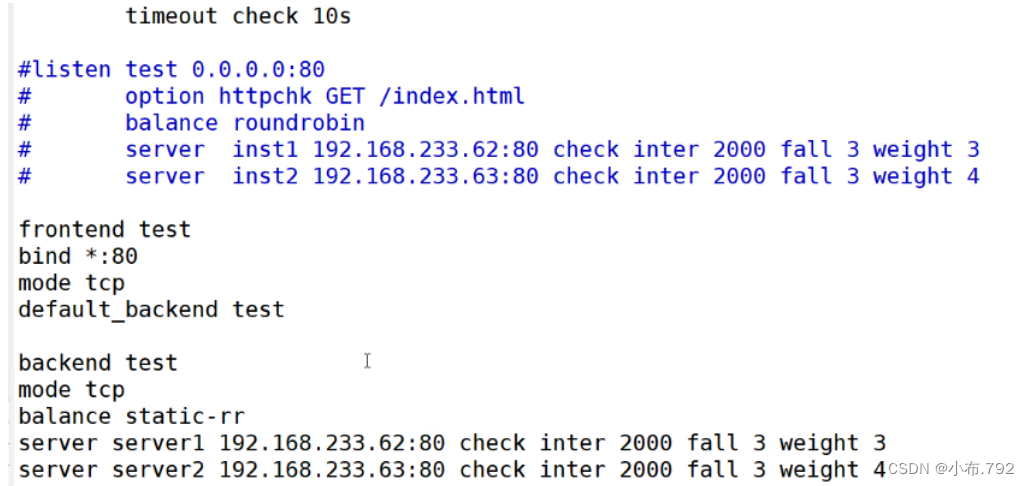
注释掉刚刚配置的七层配置
在后面添加
frontend test
bind *.80
mode tcp
default_backend testbackend test
mode tcp
balance static-rr
server server1 20.0.0.41:80 check inter 2000 fall 3 weight 3
server server1 20.0.0.42:80 check inter 2000 fall 3 weight 3
重启服务
客户机测试
模拟故障 停止nginx1服务
测试
如何实现haproxy的日志单独存放
vim/etc/rsyslog.d/haproxy.conf
if ($programname == 'haproxy' and $syslogseverity-text == 'info')then -/var/log/haproxy/haproxy-info.log&~#&~ 表示rsyslog服务处理完指定的信息,把日志写入到日志文件之后,rsyslog不再处理其他的信息if ($programname == 'haproxy' and $syslogseverity-text == 'notice')then -/var/log/haproxy/haproxy-notice.log&~

![[动态规划] (二) LeetCode 面试题 08.01.三步问题](http://pic.xiahunao.cn/[动态规划] (二) LeetCode 面试题 08.01.三步问题)


)


之basename)


JVM的运行时数据区)

