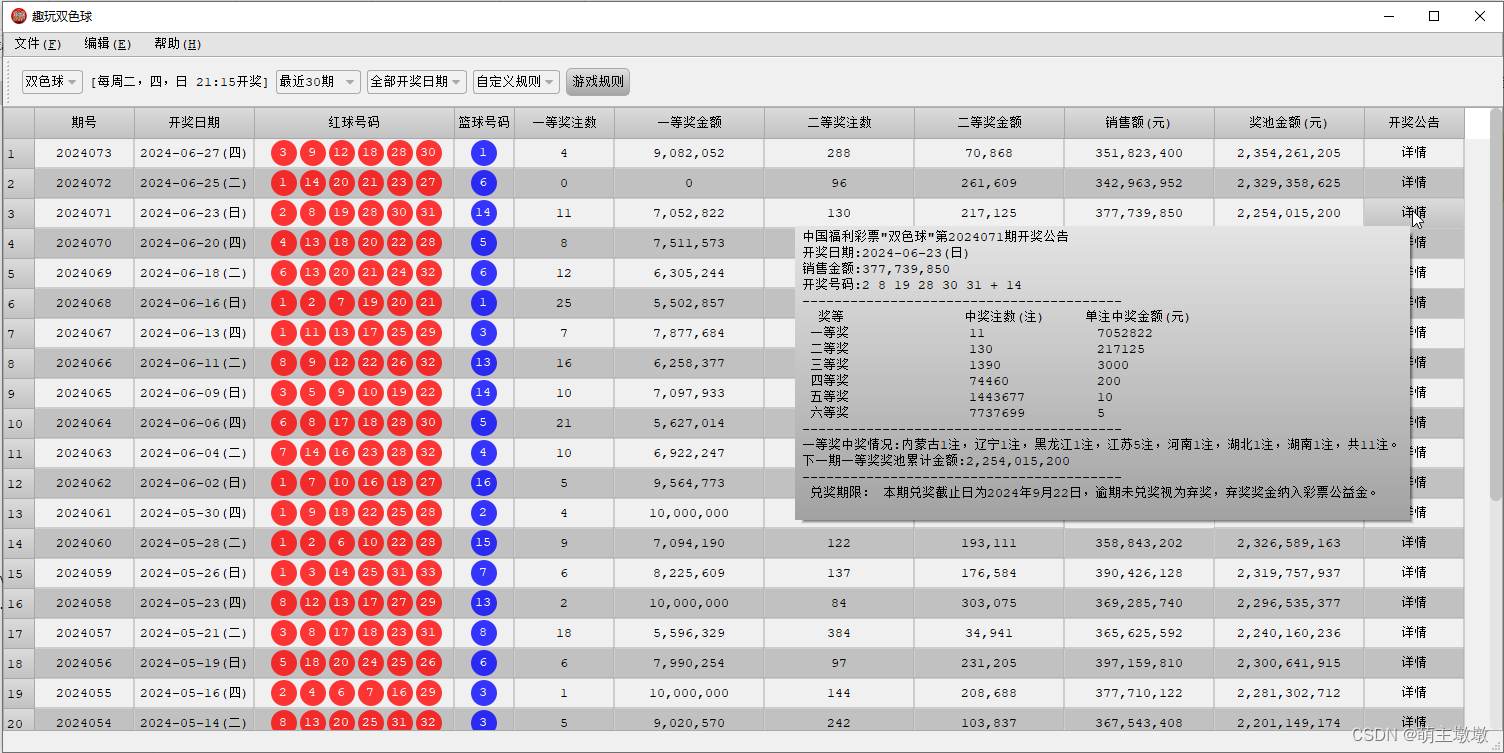
开发环境及软件主要功能说明
开发环境
win10 + Vscode + Python10.5-64_bit
使用的python库
requests,bs4,pandas,PyQt5
主要功能说明:
- 数据库更新,保存,另存为功能
- 过滤显示,根据期数,开奖日期,开间期号过滤
- 数据预测,随机预测,统计预测等
- 界面UI纯代码实现
- nuitka, pyinstaller 打包python 文件为exe方法
软件框架图

软件主要功能界面

APP使用视频演示
趣玩双色球app使用
语言大模型在这个APP干嘛了
我一直在疑惑一个问题,现在大模型在软件实现上能够给我们什么帮助。为了得到一个答案我写了这个软件。有不懂或者不想写的代码我直接问百度文心一言,不懂就问。下面是我问的几个问题给出的答案。
PyQt 实现多线程
from PyQt5.QtWidgets import QApplication, QMainWindow, QPushButton, QVBoxLayout, QWidget
from PyQt5.QtCore import QThread, pyqtSignal
import time  class Worker(QThread):  # 定义一个信号,当任务完成时发出  finished = pyqtSignal()  def run(self):  # 在这里执行你的长时间运行的任务  time.sleep(5)  # 模拟长时间运行的任务  self.finished.emit()  # 任务完成时发出信号  class MainWindow(QMainWindow):  def __init__(self):  super().__init__()  self.initUI()  # 创建工作线程实例  self.worker = Worker()  # 连接工作线程的 finished 信号到一个槽函数  self.worker.finished.connect(self.on_finished)  # 启动工作线程  self.worker.start()  def initUI(self):  layout = QVBoxLayout()  btn = QPushButton('Start Thread', self)  btn.clicked.connect(self.start_thread)  # 注意:这里只是为了演示,实际上我们已经在 __init__ 中启动了线程  layout.addWidget(btn)  central_widget = QWidget()  central_widget.setLayout(layout)  self.setCentralWidget(central_widget)  def start_thread(self):  # 注意:通常不需要在这里启动线程,除非你想在按钮点击时启动新线程  # 但在这个例子中,我们已经在 __init__ 中启动了线程  pass  def on_finished(self):  # 当工作线程的任务完成时,这个槽函数会被调用  print("Worker thread finished!")  if __name__ == '__main__':  app = QApplication([])  ex = MainWindow()  ex.show()  app.exec_()
pands 处理json数据
from pandas.io.json import json_normalize  # 假设您有一个包含嵌套 JSON 对象的列表
data = [  {'name': 'John', 'info': {'age': 30, 'city': 'New York'}},  {'name': 'Jane', 'info': {'age': 25, 'city': 'Los Angeles'}}
]  # 使用 json_normalize 来展开嵌套的数据
df = json_normalize(data, 'info', ['name'])
pyqt中viem item的自定义显示
from PyQt5.QtWidgets import QApplication, QTreeView, QStyledItemDelegate
from PyQt5.QtGui import QPainter, QBrush, QColor
from PyQt5.QtCore import Qt, QStandardItemModel, QStandardItem  class CustomDelegate(QStyledItemDelegate):  def paint(self, painter: QPainter, option: QStyleOptionViewItem, index: QModelIndex):  # 在这里,你可以根据 index.data() 或其他条件来更改渲染逻辑  # 例如,我们简单地改变背景色  if index.data(Qt.DisplayRole) == "Special Item":  painter.save()  painter.setBackground(QBrush(QColor("lightblue")))  painter.drawRect(option.rect)  painter.drawText(option.rect, Qt.AlignCenter, index.data(Qt.DisplayRole))  painter.restore()  else:  super().paint(painter, option, index)  app = QApplication([])
model = QStandardItemModel()
model.appendRow([QStandardItem("Regular Item")])
model.appendRow([QStandardItem("Special Item")])  view = QTreeView()
view.setModel(model)  delegate = CustomDelegate(view)
view.setItemDelegate(delegate)
view.show()  app.exec_()
PyQt 如何实现自定义toolbar
import sys
from PyQt5.QtWidgets import QApplication, QMainWindow, QToolBar, QAction, QToolButton  class CustomMainWindow(QMainWindow):  def __init__(self):  super().__init__()  # 创建一个工具栏  self.toolbar = QToolBar("Custom Toolbar")  self.addToolBar(self.toolbar)  # 添加一个自定义的QAction  self.action_open = QAction("Open", self)  self.action_open.triggered.connect(self.on_open)  self.toolbar.addAction(self.action_open)  # 添加一个自定义的QToolButton  self.button_save = QToolButton(self)  self.button_save.setText("Save")  self.button_save.clicked.connect(self.on_save)  self.toolbar.addWidget(self.button_save)  def on_open(self):  print("Open action triggered")  def on_save(self):  print("Save button clicked")  if __name__ == "__main__":  app = QApplication(sys.argv)  window = CustomMainWindow()  window.show()  sys.exit(app.exec_())
文心一言实现自定义控件
'''PyQt 实现一个控件,控件有2行,第1行包含2个label和一个文本框,文本框在2个标签之间。第2行有2个按钮,按钮四角有点弧度,第2行第1个按钮背景为红色
'''
import sys
from PyQt5.QtWidgets import QWidget, QLabel, QLineEdit, QPushButton, QVBoxLayout, QHBoxLayout
from PyQt5.QtCore import Qt  class CustomWidget(QWidget):  def __init__(self):  super().__init__()  # 初始化布局  self.initUI()  def initUI(self):  # 第一行布局  hline_layout = QHBoxLayout()  # 创建两个标签  label1 = QLabel('Label 1')  label2 = QLabel('Label 2')  # 添加到水平布局  hline_layout.addWidget(label1)  # 创建文本框  line_edit = QLineEdit()  # 添加文本框到水平布局  hline_layout.addWidget(line_edit)  # 继续添加第二个标签(尽管它可能不在文本框和第一个标签之间,但在这个例子中它后面)  hline_layout.addWidget(label2)  # 第二行布局  vline_layout = QVBoxLayout()  # 创建两个按钮,并设置样式表以添加圆角  button1 = QPushButton('Red Button')  button1.setStyleSheet('QPushButton { background-color: red; border-radius: 10px; }')  button2 = QPushButton('Another Button')  button2.setStyleSheet('QPushButton { border-radius: 10px; }')  # 添加到垂直布局  vline_layout.addWidget(button1)  vline_layout.addWidget(button2)  # 主布局  main_layout = QVBoxLayout()  # 将两个布局添加到主布局中  main_layout.addLayout(hline_layout)  main_layout.addLayout(vline_layout)  # 设置主窗口的布局  self.setLayout(main_layout)  # 设置窗口标题和大小  self.setWindowTitle('Custom Widget')  self.setGeometry(300, 300, 300, 200)  if __name__ == '__main__':  app = QApplication(sys.argv)  ex = CustomWidget()  ex.show()  sys.exit(app.exec_())
从体验结果来看,文心一言基本能够给出个可以跑的基本功能代码,代码注释也比较详细。借助大模型工具在我的这个软件中可以减少30%左右的工作量。
大模型能够提供基本的轮子,但是想要做到产品化的程度,大模型还有一段路要走。当前环境下,软件开发还是要对基本的框架,理论熟悉,基本功扎实,才能游刃有余的使用大模型来提高我们的工作效率。
将python 打包为exe文件
#  nuitka
```
将python代码先转成c代码,然后调用本地编译器编译成本地机器码1. 安装nuitka
pip install nuitka2.配置本地c编译器,默认使用的mingw编译器路径如下:编译器csdn下载地址: https://download.csdn.net/download/wllw7176/89374134将winlibs-x86_64-posix-seh-gcc-13.2.0-llvm-16.0.6-mingw-w64msvcrt-11.0.1-r1.zip 解压的mingw64文件夹放到上面路径c:\Users\lwua\AppData\Local\Nuitka\Nuitka\Cache\downloads\gcc\x86_64\13.2.0-16.0.6-11.0.1-msvcrt-r1\3.执行如下打包程序,编译时间较长
nuitka.bat --standalone  --onefile  --disable-console --enable-plugin=pyqt5 app_main_window.py
```# pyinstaller
```将pthon代码转为字节码,python解释器及依赖库,都会打包到最终的exe文件中,这种方式的exe 本质还是python解释器将字节码翻译成机器码,执行效率较低
1. pyinstaller
pip install pyinstaller2.打包程序
pyinstaller.exe --onefile  -i pics/logo_xn.ico  app_main_window.py```
代码共享
在开源软件开发的江湖中,只给人看Demo,不给源码是不道德的。我这个人呢,做不到大爱无疆,但是小爱奉献还是有的。要源码的直接去这里下载趣玩双色球app源码。
趣玩APP的口号
玩趣玩吗-必须的


缓存能力)


)


)


)