Canvas容器:
canvas标签用来定义图像的容器,必须配合脚本来绘制图像,canvas也运用于游戏开发。注意:canvas绘制图时会出现线条模糊情况,这是因为显示屏像素和canvas中定义的一个点不完全重合(相差0.5)导致,若要解决这个问题,就要计算canvas中0.5的坐标值。
创建画布:
注意:一个页面可以创建多个canvas画布,每个画布建议给一个id属性方便配合脚本。
<canvas id='canvasBox' width='200' height='200'></canvas>
Canvas绘图基本流程:
在canvas容器中绘制图形,需要配合使用javascript脚本,具体如下:
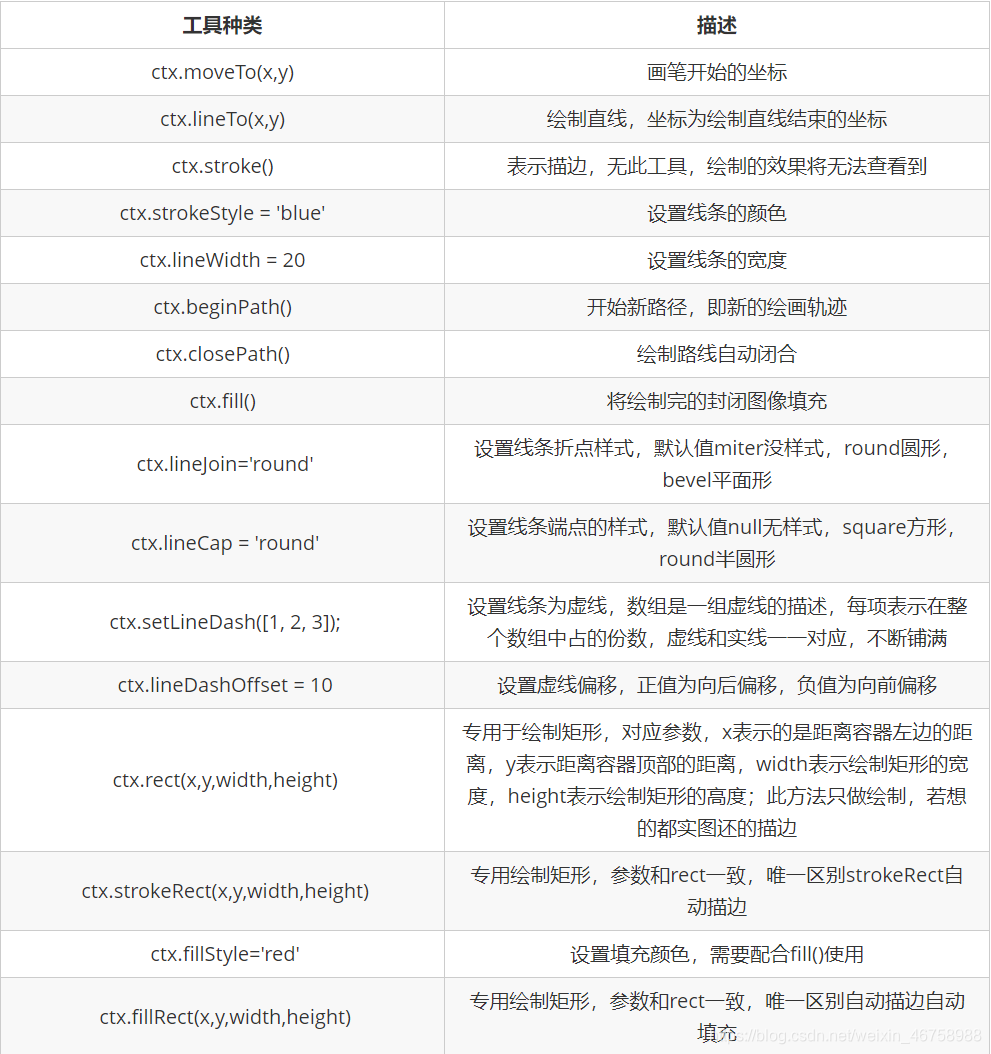
<script>// 1.获取canvas容器元素:var canvasBox = document.querySelector('#canvasBox');// 2.获取上下文(这里指获取绘制工具):var ctx = canvasBox.getContext('2d'); //3d技术这里不做详细介绍// 3.利用绘制工具配合画笔开始绘制图:ctx.moveTo(100, 100); //moveTo(x,y)表示画笔开始移动的坐标ctx.lineTo(200, 200); //lineTo(x,y)表示绘制直线,坐标为直线末尾点坐标ctx.stroke(); //stroke()表示描边,必须有这项才会显示效果// 开始下一笔绘制:这里可以是多个不同种的绘制,lineTo()只表示绘制直线ctx.moveTo(200, 200);ctx.lineTo(200, 300);ctx.stroke();</script><script>var myCanvas = document.querySelector('canvas');var ctx = myCanvas.getContext('2d');// 平移画布的原点:// ctx.translate(x,y)------参数表示在原有的基础上移动目标点的坐标,即绘制的图和画布都移动(里层移动,外面容器看起来不移动)// 缩放// scale(x,y)------参数表示宽高及坐标缩放比例,画布和图都进行缩放了// 旋转// rotate(angle)-----参数表示以canvas原点旋转angle角度,// ctx.strokeRect(200,100,100,100);//一个矩形 // ctx.translate(10,20)//在原有的基础上X轴移动10px,Y轴移动20px// ctx.strokeRect(200,100,50,50);//一个矩形 // ctx.strokeRect(0,0,100,100);//一个矩形 // ctx.scale(.5,.5)//对下面的矩形进行宽度和高度以及坐标的缩放// ctx.strokeRect(0,0,50,50);//一个矩形// ctx.strokeRect(300,200,100,100);//一个矩形 // ctx.rotate(Math.PI / 8)//对下面的矩形进行宽度和高度以及坐标的旋转// ctx.strokeRect(300,200,50,50);//一个矩形var startAngle = 0;ctx.translate(150, 150);setInterval(function() {startAngle += Math.PI / 180;ctx.rotate(startAngle);ctx.strokeRect(-50, -50, 100, 100);}, 500);//更多绘制工具如下表:</script>
绘制工具:

续:
Canvas绘制图片:
<script>// 1.获取canvas容器元素:var canvasBox = document.querySelector('#canvasBox');// 2.获取上下文(这里指获取绘制工具):var ctx = canvasBox.getContext('2d'); //3d技术这里不做详细介绍// 3.创建对象的方式在内存中生成img对象,这里无需DOM:var image = new Image();image.src = '捕获.PNG';// 等image加载完在处理image.onload = function() {// 这里图片一定加载完成了,也有可能在这段代码执行前加载完,所以这段代码一般放在图片路径的前面。// 绘制图片的三种方式:// 第一种:传入 3 个参数的用法:ctx.drawImage(img对象,x,y)---分别是img对象,图片的左上角在canvas中的坐标(x,y)。// ctx.drawImage(image,0,0);// 第二种:传入 5 个参数的用法:ctx.drawImage(img对象,x,y,w,h)---分别是img对象,图片的左上角在canvas中的坐标(x,y)和图片的缩放宽度w和高度h。// ctx.drawImage(image,0,0,500,400);// 第三种:传入 9 个参数的用法:ctx.drawImage(img对象,要渲染的对象定位坐标x,要渲染的对象定位坐标y,截取对象的宽度w,截取对象的宽度h,对象在canvas中的位置定位x,对象在canvas中的位置定位y,对象缩放宽度w,对象缩放高度h)ctx.drawImage(image, 400, 400, 2000, 2000, 0, 0, 300, 200);};</script>
Canvas绘制帧动画:
canvas绘制帧动画的原理:利用定时器不断改变图片参数:
<script>// 1.获取canvas容器元素:var canvasBox = document.querySelector('#canvasBox');// 2.获取上下文(这里指获取绘制工具):var ctx = canvasBox.getContext('2d'); //3d技术这里不做详细介绍// 3.创建对象的方式在内存中生成img对象,这里无需DOM:var image = new Image();image.src = 'image/4.png';// 4.等image加载完在处理绘制:image.onload = function() {// 第三种:传入 9 个参数的用法:ctx.drawImage(img对象,要渲染的对象定位坐标x,要渲染的对象定位坐标y,截取对象的宽度w,截取对象的宽度h,对象在canvas中的位置定位x,对象在canvas中的位置定位y,对象缩放宽度w,对象缩放高度h)// 拿到图片的宽度和高度:var imageWidth = image.width;var imageHeight = image.height;// 声明一个计数器:var i = 0;// 利用定时器开启动画:setInterval(function() {i++;// 解决重影问题,需要每次清除canvas画布中之前的绘制图:ctx.clearRect(0, 0, ctx.canvas.width, ctx.canvas.height);//开始绘制新图片ctx.drawImage(image, 80 * i, 0, imageWidth / 4, imageHeight / 4, 300, 200, 100, 100);if (i >= 3) {i = 0;};}, 300);};</script>
Canvas渐变色:
<script>// 1.获取canvas容器元素:var canvasBox = document.querySelector('#canvasBox');// 2.获取上下文(这里指获取绘制工具):var ctx = canvasBox.getContext('2d'); //3d技术这里不做详细介绍// 3.定义一个渐变色:var linearGradient = ctx.createLinearGradient(10, 10, 10, 100);// 4.添加渐变的颜色:linearGradient.addColorStop(0.8, 'green');linearGradient.addColorStop(.2, 'red');// 5.设置填充颜色为上面定义的渐变色ctx.fillStyle = linearGradient;// 6.定义一个填充的矩形ctx.fillRect(10, 10, 100, 100);</script>
Canvas中曲线:
canvas中绘制曲线都是套用数学公式进行绘制的,其工具还是基础工具,想要绘制复杂的图形,那么对数学要求功底就非常高了,这里简单介绍一下,绘制思路,如:
<script>// 1.获取canvas容器元素:var canvasBox = document.querySelector('#canvasBox');// 2.获取上下文(这里指获取绘制工具):var ctx = canvasBox.getContext('2d'); //3d技术这里不做详细介绍// 3.绘制曲线思路(数学功底要求):不断改变线条运动轨迹达到效果for (var i = 0; i < 600; i++) {var x = i;var y = Math.pow(x / 20, 2) + 30;ctx.lineTo(x, y);};// 4.描边:ctx.stroke();</script>
Canvas面向对象绘制饼图:
<script>// 1.获取canvas容器元素:var canvasBox = document.querySelector('#canvasBox');// 2.获取上下文(这里指获取绘制工具):var ctx = canvasBox.getContext('2d'); //3d技术这里不做详细介绍// 3.以 面向对象的方式绘制一个饼图:// 声明一个函数:var PieChart = function(ctx) {// 绘制工具:this.ctx = ctx || document.querySelector('canvas').getContext('2d');// 拿到canvas的尺寸大小:this.w = this.ctx.canvas.width;this.h = this.ctx.canvas.height;// 定义圆心的坐标:this.x0 = this.w / 2 + 100;this.y0 = this.h / 2;// 定义圆的半径:this.radius = 100;// 定义文字部分伸出去的线的长度:this.outLine = 30;// 定义说明矩形的宽度:this.rectW = 30;// 定义说明矩形的高度:this.rectH = 12;// 距离旁边的间距:this.space = 5;};// 为 PieChart函数添加画饼图的方法:PieChart.prototype.drawPie = function(data) {// 解决this指向不同的问题:var that = this;// 调用下面的trans方法得到新的data数据,并用变量angleList接收:var angleList = this.trans(data);// 定义起始弧度:var begangle = 0;//遍历angleList得到数据中的angle弧度:angleList.forEach(function(item, i) {// 定义结束弧度为endangle,endangle = 开始的角度(上一次结束的弧度) + 数据angleList中的anglevar endangle = begangle + item.angle;// 开启新路径:ctx.beginPath();//移动画笔到(that.x0,that.y0):ctx.moveTo(that.x0, that.y0);// 绘制圆的轨迹ctx.arc(that.x0, that.y0, that.radius, begangle, endangle);// 随机的设置每个扇形的填充颜色:var colors = `rgb(${Math.floor(Math.random()*256)},${Math.floor(Math.random()*256)},${Math.floor(Math.random()*256)})`;ctx.fillStyle = colors;// 填充扇形ctx.fill();//调用drawTitle方法绘制扇形: that.drawTitle(begangle, item.angle, item.title, colors);// 调用drawDesc方法绘制说明的矩形:that.drawDesc(i, item.title);// 把结束弧度给起始弧度作为下一次绘制扇形的起始弧度begangle = endangle;});};// 为 PieChart函数添加画文字的方法:PieChart.prototype.drawTitle = function(begAngle, angle, text, color) {// 计算伸出去的边的长度(斜边):var edge = this.radius + this.outLine;// 计算伸出去的边的终点的X的长度:var edgeX = Math.cos(begAngle + angle / 2) * edge;// 计算伸出去的边的终点的Y的长度:var edgeY = Math.sin(begAngle + angle / 2) * edge;// 计算伸出去的边的终点的坐标:var outX = this.x0 + edgeX;var outY = this.y0 + edgeY;// 开启新路径:this.ctx.beginPath();// 移动画笔到(this.x0,this.y0)的位置:this.ctx.moveTo(this.x0, this.y0);// 绘制伸出去线的轨迹:this.ctx.lineTo(outX, outY);this.ctx.strokeStyle = color;this.ctx.font = '15px Microsoft YaHei';this.ctx.textBaseline = 'bottom';var titleWidth = this.ctx.measureText(text).width;// 判断Math.cos(begAngle + angle /2)的正负决定水平线的方向:if (Math.cos(begAngle + angle / 2) > 0) {// 绘制伸出去线的轨迹:this.ctx.lineTo(outX + titleWidth, outY);// 开始绘制文字titlethis.ctx.textAlign = 'start'; //文本居中对齐,属性值:left,right,center,end,startthis.ctx.fillText(text, outX, outY);} else {// 绘制伸出去线的轨迹:this.ctx.lineTo(outX - titleWidth, outY);// 开始绘制文字titlethis.ctx.textAlign = 'end'; //文本居中对齐,属性值:left,right,center,end,startthis.ctx.fillText(text, outX, outY);};this.ctx.stroke();};// PieChart的说明的方法:PieChart.prototype.drawDesc = function(index, tex) {// 绘制带独立路径的矩形:this.ctx.fillRect(this.space, this.space + index * (this.space + this.rectH), this.rectW, this.rectH);this.ctx.beginPath();this.ctx.textAlign = 'start';this.ctx.font = '10px Microsoft YaHei';this.ctx.fillText(tex, this.space + this.rectW + 5, this.space + index * (this.space + this.rectH) + 12);};// 把数据中的num转化为弧度并追加到data中返回新的data数据PieChart.prototype.trans = function(data) {var sum = 0;data.forEach(function(item, i) {sum += item.num;});data.forEach(function(item, i) {var angle = Math.PI * 2 * item.num / sum;item.angle = angle; //追加弧度到data数据中});return data;};// PieChart初始化:PieChart.prototype.init = function(data) {this.drawPie(data);};// 定义一个数据data:var data = [{title: '15-20岁',num: 16}, {title: '20-25岁',num: 12}, {title: '25-30岁',num: 56}, {title: '30-35岁',num: 12}, {title: '35-40岁',num: 42}, {title: '45-50岁',num: 12}, {title: '50岁以上',num: 22}];// 实例化一个对象:var piechart = new PieChart();piechart.init(data);</script>
Canvas面向对象绘制坐标系:
<script>//1. 构造坐标系函数:var LineChart = function(ctx){this.ctx = ctx || document.querySelector('#canvaBox').getContext('2d');// 获取画布的大小尺寸:this.canvasWidth = this.ctx.canvas.width;this.canvasHeight = this.ctx.canvas.height;// 设置网格的大小尺寸为10:this.gridSize = 10;// 设置坐标系的间距为20:this.space = 20;// 定义坐标轴的原点坐标为(this.space,this.canvasHeight - this.space)this.x0 = this.space;this.y0 = this.canvasHeight - this.space;// 设置箭头的大小为10:this.arrowSize = 10;// 设置绘制的点的大小为6:this.dottedSize = 6;// 点的坐标和数据有关,数据可视化:};// 2.绘制canvas(LineChar)中需要的数据:// 绘制网格线:LineChart.prototype.drawGrid = function(){// x方向的线:this.ctx.strokeStyle = '#999';var xLineTotal = Math.floor(this.canvasHeight / this.gridSize);//x方向的线的总条数for(var i = 0;i < xLineTotal;i ++){this.ctx.beginPath();this.ctx.moveTo(0,this.gridSize * i - .5);this.ctx.lineTo(this.canvasWidth,this.gridSize * i - .5);this.ctx.stroke();};// y方向的线:var yLineTotal = Math.floor(this.canvasWidth / this.gridSize);//y方向的线的总条数for(var j = 0;j < yLineTotal; j++){this.ctx.beginPath();this.ctx.moveTo(this.gridSize * j - .5,0);this.ctx.lineTo(this.gridSize * j - .5,this.canvasHeight);this.ctx.stroke();};};// 绘制坐标系:LineChart.prototype.drawNav = function(){this.ctx.strokeStyle='#000'this.ctx.beginPath();// 设置x和y的原点坐标为(x0,y0):this.ctx.moveTo(this.x0 - .5,this.y0 - .5);// 绘制x轴:this.ctx.lineTo(this.canvasWidth,this.y0 -.5);this.ctx.lineTo(this.canvasWidth - this.gridSize,this.y0 + this.gridSize / 2);this.ctx.lineTo(this.canvasWidth - this.gridSize,this.y0 - this.gridSize / 2);this.ctx.lineTo(this.canvasWidth,this.y0 -.5);this.ctx.stroke();this.ctx.fill();// 绘制y轴:this.ctx.beginPath();this.ctx.moveTo(this.x0 - .5,this.y0 - .5);this.ctx.lineTo(this.x0 - .5,-0.5);this.ctx.lineTo(this.x0 + this.gridSize / 2,this.gridSize - 0.5);this.ctx.lineTo(this.x0 - this.gridSize / 2,this.gridSize - 0.5);this.ctx.lineTo(this.x0 - .5,-0.5);this.ctx.stroke();this.ctx.fill();};LineChart.prototype.drawDotted = function(data){var that = this;// 记录当前坐标:var VarCanvasX = 0;var VarCanvasY = 0;// 遍历传入的date数据:data.forEach(function(item,i){// 在canvas中的坐标:var canvasX = that.x0 + item.x;var canvasY = that.y0 - item.y;// 在canvas中绘制点:that.ctx.beginPath();that.ctx.moveTo(canvasX - that.dottedSize / 2 ,canvasY - that.dottedSize /2);that.ctx.lineTo(canvasX - that.dottedSize / 2 ,canvasY + that.dottedSize /2);that.ctx.lineTo(canvasX + that.dottedSize / 2 ,canvasY + that.dottedSize /2);that.ctx.lineTo(canvasX + that.dottedSize / 2 ,canvasY - that.dottedSize /2);that.ctx.closePath();that.ctx.fill();// 用直线连接每一个点:if(i == 0){//判断当为0时,为第一个点的时候,起点为(x0,y0),否则起点为上一个点that.ctx.beginPath();that.ctx.moveTo(that.x0,that.y0);that.ctx.lineTo(canvasX,canvasY);that.ctx.stroke();}else{that.ctx.beginPath();that.ctx.moveTo(VarCanvasX,VarCanvasY);that.ctx.lineTo(canvasX,canvasY);that.ctx.stroke();};VarCanvasX = canvasX;VarCanvasY = canvasY;});}; //绘制所有点:var data =[{x:50,y:120},{x:100,y:140},{x:150,y:150},{x:200,y:170}, {x:250,y:110}, {x:300,y:170},{x:350,y:160},{x:400,y:120},{x:450,y:130}, {x:500,y:140}];//3.为构造的坐标函数添加定义好的方法初始化canvas:LineChart.prototype.show = function(data){this.drawGrid();this.drawNav();this.drawDotted(data);};// 4.创建一个LineChart对象:var lineChart = new LineChart();// 5.调用对象的方法:lineChart.show(data);</script>
Canvas面向对象方式控制小人行走(游戏开发方向):
主要原理:利用雪碧图定位的方式产生帧动画,如下雪碧图:

<!DOCTYPE html><html lang="en"><head><meta charset="UTF-8"><meta name="viewport" content="width=device-width, initial-scale=1.0"><title>运动小人</title><style>canvas {margin: 0 auto;border: 1px solid;}</style></head><body><canvas width='1300' height='800'></canvas><script>// 创建对象的函数:var Person = function(cTx) {// 定义属性并赋值:this.ctx = cTx || document.querySelector('canvas').getContext('2d');this.src = 'image/04.png';this.canvasWidth = this.ctx.canvas.width;this.canvasHeight = this.ctx.canvas.height;// 行走的步伐大小:this.stepSize = 10;// 行走的方向:0---前面 1----左边 2----右边 3-----后面this.direction = 0;// 记录当前图片的位置:/*x轴方向的偏移步数*/this.stepX = 0;/*y轴方向的偏移步数*/this.stepY = 0;// 调用初始化方法this.init();};// 加载图片的业务:Person.prototype.loadimage = function(callback) {var image = new Image(); // 创建对象的方式载入图片到内存中image.onload = function() {callback && callback(image); //图片加载完成后可以通过回调函数的方式获取图片的相关信息,也可直接在这个函数里面直接获取图片的信息};image.src = this.src;};// 初始化方法:Person.prototype.init = function() {var that = this;// 1.调用 加载图片的业务 的方法并通过回调函数获取图片的信息this.loadimage(function(image) {// 图片的大小:that.imageWidth = image.width;that.imageHeight = image.height;// 人物的大小:that.personWidth = that.imageWidth / 4;that.personHeight = that.imageHeight / 4;// 绘制图片的起点:that.x0 = (that.canvasWidth - that.personWidth) / 2;that.y0 = (that.canvasHeight - that.personHeight) / 2;// 2.默认绘制小人在canvas中间:that.ctx.drawImage(image, 0, 0, that.personWidth, that.personHeight, that.x0, that.y0, that.personWidth, that.personHeight);// 3.通过方向键控制小人行走// 注册键盘按下事件控制小人行走的方向和定位:上---38 下---40 左----37 右---39that.index = 0;document.onkeydown = function(e) {if (e.keyCode == 38) {// 上that.direction = 3;that.stepY--;that.DrawImage(image);} else if (e.keyCode == 40) {// 下that.direction = 0;that.stepY++;that.DrawImage(image);} else if (e.keyCode == 37) {// 左that.direction = 1;that.stepX--;that.DrawImage(image);} else if (e.keyCode == 39) {// 右that.direction = 2;that.stepX++;that.DrawImage(image);};};});};// 绘制通过方向控制行走的小人的方法:Person.prototype.DrawImage = function(image) {this.index++;// 清除画布:this.ctx.clearRect(0, 0, this.canvasWidth, this.canvasHeight);// 绘制小人行走:this.ctx.drawImage(image,this.index * this.personWidth, this.direction * this.personHeight,this.personWidth, this.personHeight,this.x0 + this.stepX * this.stepSize, this.y0 + this.stepY * this.stepSize,this.personWidth, this.personHeight);if (this.index >= 3) {this.index = 0;}};new Person();</script></body></html>
提示:本文图片等素材来源于网络,若有侵权,请发邮件至邮箱:810665436@qq.com联系笔者 删除。
笔者:苦海
![[VirtaulBox]网络连接设置](http://pic.xiahunao.cn/[VirtaulBox]网络连接设置)


)


)


和toString()的区别)