用户邮箱地址有效性验证
在上一节中,我们编写了用于用户注册的代码。但是当时并没有为用户的Email添加有效性验证,导致Email被设置为任何字符串都能注册成功。所以在本节初,我们首先来为Email添加一个有效性验证。
首先还是来编写测试数据,打开我们上一节创建的test_user_data.json,向其中添加一个测试用的用户信息。
代码清单3-1
models/test_user_data.json
[
.
.
. {"email":"email8@exam_ple.com","password": "password8","username": "username8"}
]
我们添加的这个新的用户信息的Email是一个无效的邮箱地址。接着我们打开user_test.go,也向其中增加一个测试case。
代码清单3-2
models/user_test.go
func TestUserCreate(t *testing.T) {
.
.
.err = users[7].Create() // 测试Email为无效的邮箱地址的情况if err == nil {t.Error("expected get an error but no error occured.")} else if err.Error() != "Invalid email address" {t.Errorf("expected get "Invalid email address" but got "%s"n", err.Error())}
}
然后打开user.go,我们向其中增加一个isValidEmail()方法用来检测设置的用户Email是否有效,然后再在向数据库插入数据之前,检查邮箱地址是否有效。如果无效的话,我们返回一个“Invalid email address”的错误。
代码清单3-3
models/user.go
package modelsimport ("errors""regexp""time"
)type User struct {ID intEmail *string `gorm:"not null;unique_index"`Password *string `gorm:"not null"`Username *string `gorm:"not null;unique_index"`Message stringCreatedAt time.TimeUpdatedAt time.Time
}func (u *User) Create() (err error) {if u.Email != nil && !u.isValidEmail() {err = errors.New("Invalid email address")return err}if u.Password == nil {err = errors.New("Error occured when creating user")return err}plain := *u.Passwordencrypt := Encrypt(plain)u.Password = &encrypterr = DB.Create(&u).Errorif err != nil {err = errors.New("Error occured when creating user")}return
}func (u *User) isValidEmail() bool {pat := `(?i)A[w+-.]+@[a-zd-.]+.[a-z]+z`email := u.Emailok, _ := regexp.MatchString(pat, *email)return ok
}
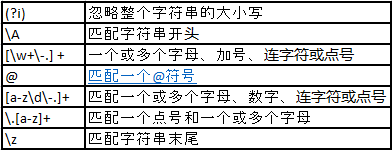
在isValidEmail()方法里,我们使用了正则表达式去匹配Email属性。如果能匹配上,则返回true,否则就会返回false。所使用的正则表达式的含义如下:

完成后我们新打开一个命令行工具,cd到models文件夹下,运行go test
C:Userssxu37GosrcGoWeb>cd models
C:Userssxu37GosrcGoWebmodels>go test
结果如下:
PASS
ok GoWeb/models 4.101s
测试Pass,说明我们添加的用于测试邮箱地址是否有效的代码是正确的。
查找用户
既然我们已经有了创建用户的功能,接下来,我们就来实现简单的用户查找的功能。在创建用户模型的时候,我们在数据库中,将用户的id列设置为了primary key,并且在email和username都创建了index,这就意味着,通过ID、Email和Username这三者我们都可以快速检索到一个用户的信息。
首先我们还是来编写查找用户的测试代码。打开user_test.go,向其中增加下面三个函数。
代码清单3-4
models/user_test
.
.
.
func TestFindUserByID(t *testing.T) {id1, id2 := 5, 4user1, err := FindUserByID(id1)if err == nil {t.Error("expected find no user but got:", user1)}user2, err := FindUserByID(id2)if err != nil {t.Error("got an unexpected error:", err)} else if user2.ID != id2 {t.Errorf("expected find user which id is %d but got user which id is: %dn", id2, user2.ID)} else if user2.Email != nil || user2.Password != nil {t.Error("expected do not get user email and password but got them now")}
}func TestFindUserByEmail(t *testing.T) {email1, email2 := "email6@exam.com", "email5@exam.com"user1, err := FindUserByEmail(email1)if err == nil {t.Error("expected find no user but got:", user1)}user2, err := FindUserByEmail(email2)if err != nil {t.Error("got an unexpected error:", err)} else if *user2.Email != email2 {t.Errorf("expected find user which email is "%s" but got user which email is: "%s"", email2, *user2.Email)}
}func TestFindUserByUsername(t *testing.T) {username1, username2 := "username6", "username5"user1, err := FindUserByUsername(username1)if err == nil {t.Error("expected find no user but got:", user1)}user2, err := FindUserByUsername(username2)if err != nil {t.Error("got an unexpected error:", err)} else if *user2.Username != username2 {t.Errorf("expected find user which username is "%s" but got user which username is: "%s"", username2, *user2.Username)} else if user2.Email != nil || user2.Password != nil {t.Error("expected do not get user email and password but got them now")}
}
在上面的测试代码中,我们分别测试了通过ID、Email和Username来查找用户的情况。因为这三个属性在数据库中都是唯一的,所以我们每条测试case最多只能找到一条数据。所以我们只测试了找到的这条数据的某一项值是否是我们所期待的值。如果是,就表明这条数据就是我们需要的数据,如果不是,说明我们查找用户的功能代码有问题。我们还检查了查找到的数据中是否包含用户的Email和Password,如果包含了的话也不能通过测试。
接下来,我们就来编写查找用户的代码。因为在查找用户之前,我们通常不会事先得到一个用户的实例,所以我们直接将查找用户的代码作为函数来编写的。另外,我们为FindUserByID()和FindUserByUsername()添加了Select()函数,对查询到的数据进行筛选,不从数据库中获取用户的email和password信息,以保证用户账号的安全。
代码清单3-5
models/user.go
.
.
.
var QueryKey string = "id, username, message"
func FindUserByID(id int) (user User, err error) {DB.Where("id = ?", id).Select(QueryKey).Find(&user)if user.ID == 0 {err = errors.New("Cannot find such user")}return
}func FindUserByEmail(email string) (user User, err error) {DB.Where("email = ?", email).Find(&user)if user.ID == 0 {err = errors.New("Cannot find such user")}return
}func FindUserByUsername(username string) (user User, err error) {DB.Where("username = ?", username).Select(QueryKey).Find(&user)if user.ID == 0 {err = errors.New("Cannot find such user")}return
}
清空数据库,然后打开命令行,cd到models目录下,运行go test。
C:Userssxu37GosrcGoWebmodels>go test
.
.
.
PASS
ok GoWeb/models 3.781s
接下来,我们为查找用户编写一个接口。在我们的App中,我们不会将FindUserByEmail()公开。这个函数将只在App内部被使用。FindUserByUsername()可以作为通过用户名查找用户的功能被公开,但是我们目前并不打算先实现这个功能。我们首先实现通过ID来查找用户,然后我们通过访问类似“users/1”的路径来获取某个具体的用户的信息。我们先编写测试代码。向users_controller_test.go中增加如下的测试代码:
代码清单3-6
controllers/users_controller_test.go
func TestFindUserByID(t *testing.T) {id := 1controller := UsersController{}user, err := controller.Show(id)if user.ID == 0 || err != nil {t.Error("expected to show user but error occured:", user, err)}
}
这个测试case很简单,就是指定id为1,看能不能返回id为1的用户。
接着我们就应用代码,应用代码也很简单。
代码清单3-7
controllers/users_controller.go
func (c *UsersController) BeforeActivation(b mvc.BeforeActivation) {middleware := func(ctx iris.Context) {ctx.Application().Logger()ctx.Next()}b.Handle("POST", "/users/new", "Create", middleware)b.Handle("GET", "/users/{id:int}", "Show", middleware)
}func (c *UsersController) Create(ctx iris.Context) (user models.User, err error) {...
}func (c *UsersController) Show(id int) (user models.User, err error) {user, err = models.FindUserByID(id)return
}
注意在设置路径的时候,我们用/users/{id:int}的形式设置了一个动态路径。int值会通过{id:int}作为id参数传入到Show()方法中。加入我们访问/users/1这个路径,那么访问就会被转发到Show()方法并且参数为1,即Show(1)。
清空数据库,cd到controllers目录,运行go test
C:Userssxu37GosrcGoWebcontrollers>go test
.
.
.
PASS
ok GoWeb/controllers 3.124s
接着,我们再试一试接口。
代码清单3-8
main_test.go
.
.
.func TestUsersShowRoute(t *testing.T) {app := weiboApp()e := httptest.New(t, app)request := e.Request("GET", "/users/1")response := request.Expect()response.Status(httptest.StatusOK)
}
C:Userssxu37GosrcGoWeb>go test
.
.
.
PASS
ok GoWeb 2.655s
现在我们不仅能创建用户,还能根据用户的ID查询一个用户。查询到用户之后,我们可以实现对这些用户的资料进行更新和删除。
但是仅仅这样操作就会产生一个问题,任何用户,只要知道其他用户的ID,就可以随意地向服务器发送请求,去更改、删除其他用户的信息。这明显是很不安全的,所以我们需要为更新和删除操作增加一点安全性。大多数App在进行更新和删除操作的时候都需要有先进行登录,有些严格的App还需要登录的用户拥有这些操作的权限才可以。在这里,我们实现只要用户登录就能对自己的账号进行更新和删除。
用户登录
那么接下来,我们来实现用户登录。用户登录功能的实现最简单的方式就是利用session,通过下面几个步骤来实现:
1. 客户端通过request将用户的邮箱和密码提交到服务器。
2. 服务器取得request的数据后,会首先从数据库读取该用户的信息,并判断数据库和request提交上来的信息是否一致。
3. 如果一致的话,服务器将该用户的信息记录到session里,并将session的标识返回给客户端。
4. 客户端收到session的标识之后将它添加到之后每一次request的header里,服务器通过识别request的header里的session标识,来判断该客户端是否已经登录。
一般还会给服务器的session 设置一个有效期,一旦某个session生成后超过了一个固定期限即视为过期,过期的session也是无效的。
在上面的登录过程中,我们User模型需要做的就是进行登录验证:对客户端request过来的邮箱和密码进行验证,并返回一个布尔值来表示验证结果是否通过。首先我们来编写登录验证的测试代码。打开models文件夹,新建一个test_auth_data.json,然后将下列测试数据保存到该文件中。
代码清单3-9
models/test_auth_data.json
[{"email": "wrongemail4@example.com","password": "password4"},{"email": "email4@exam.com","password": "wrongpassword4"},{"email": "email4@exam.com","password": "password4"}
]
然后打开test_user.go,稍微修改一下setup()函数,然后向其中增加一个TestUserAuthenticate()函数。
代码清单3-10
models/test_user.go
.
.
.
func setup(filename string) (users []User) {file, _ := os.Open(filename)defer file.Close()data, _ := ioutil.ReadAll(file)json.Unmarshal(data, &users)return users
}func TestUserCreate(t *testing.T) {users := setup("test_user_data.json")
.
.
.}func TestUserAuthenticate(t *testing.T) {users := setup("test_auth_data.json")if _, err := users[0].Authenticate(); err == nil {if err.Error() != "Invalid email or password" {t.Errorf("expected get "Invalid email or password" but got "%s"n", err.Error())}t.Error("expected authentication fail but it passed")}if _, err := users[1].Authenticate(); err == nil {if err.Error() != "Invalid email or password" {t.Errorf("expected get "Invalid email or password" but got "%s"n", err.Error())}t.Error("expected authentication fail but it passed")}if user, err := users[2].Authenticate(); err != nil {t.Error("expected authentication pass but it failed cause:", err)} else if user.ID != 3 {t.Errorf("expected user id to be 3 but got %dn", user.ID)}}
在这份测试代码中,我们分别测试了三种情况:email不正确、password不正确和两者都正确。
前两种情况,我们除了验证不通过以外,我们还得到了一个Invalid email or password的错误信息。只有email和password都正确的时候,我们确认验证通过,此时错误为空。
接下来,我们就为User模型添加Authenticate()方法。
代码清单3-11
models/user.go
.
.
.
func (u *User) Authenticate() (user User, err error) {user, err = FindUserByEmail(*u.Email)if err != nil {return}if user.ID == 0 || *user.Password != Encrypt(*u.Password) {user = User{}err = errors.New("Invalid email or password")return}return
}
登录验证的代码中,我们通过FindUserByEmail()函数寻找数据库中email和待验证的用户的Email一致的数据。将找到的数据的password和待验证的用户的Password进行比较。如果找不到用户,或者找到的记录和待验证的用户两者的password不一致,那么我们就判定为验证失败,并返回一个Invalid email or password错误。如果既能找到记录,而且password也一致,我们就判定为验证通过。
登录验证的代码就编写完成,就可以进行测试了。我们首先还是清空数据库:
DROP TABLE users;然后打开命令行工具,cd到models目录下,运行go test。
C:Userssxu37GosrcGoWebmodels>go test
.
.
.
PASS
ok GoWeb/models 4.417s
说明我们登录验证的代码的行为符合预期。
接下来,我们还需要在控制器里面添加一个Login()方法,我们希望用这个Login()方法来处理用户登录。如果用户登录验证成功,Login()方法会返回登录成功的用户信息。如果登录验证失败,我们就返回从User#Authenticate()得到的错误。
首先我们还是来编写测试代码。打开users_controller_test.go,向里面添加下面的函数。
代码清单3-12
controllers/users_controller_test.go
.
.
.
func TestUserLogin(t *testing.T) {app := iris.New()ctx := context.NewContext(app)// 向新创建的ctx中添加一个ResponseWriter用来写入session的信息w := context.AcquireResponseWriter()hw := httptest.NewRecorder()w.BeginResponse(hw)ctx.ResetResponseWriter(w)// 向新创建的ctx中添加一个Request并将文件中的数据读取到Request的Body中file, _ := os.Open("sample_login_user.json")defer file.Close()newRequest, _ := http.NewRequest("POST", "/login", nil)newRequest.ContentLength = 500newRequest.Body = filectx.ResetRequest(newRequest)// 创建一个UsersController的实例,并设置该实例的Session属性controller := UsersController{}cookie := http.Cookie{Name: "sample_cookie_uuid", Value: ""}ctx.SetCookie(&cookie)sess := sessions.New(sessions.Config{Cookie: "weibo_app_cookie"})controller.Session = sess.Start(ctx)// 调用UsersController实例的Login()方法进行测试user, err := controller.Login(ctx)if err != nil {t.Error("expected no error, but an error occured:", err)}if user.ID != 1 {t.Errorf("expected returned user id to be 1, but got %dn:", user.ID)}id, _ := controller.Session.GetInt("userID")if id != 1 {t.Errorf("expected user id in session to be 1, but got %dn", id)}
}
在上面的代码中,我们会从一个叫sample_login_user.json中读取测试数据,然后用测试数据作为参数调用Login()方法模拟登录。登录后,我们首先检查登录过程有无err以及被登录的用户是否是我们的测试用户,接着我们访问Session,并用GetInt获得Session里的userID字段。检查Session的userID字段的值是否和测试数据的id是一致的。
接着我们还是在controllers目录下,新建一个sample_login_user.json文件,用来编写测试数据。
代码清单3-13
controllers/sample_login_user.json
{"email": "email1@sample.com","password": "password1"
}
接下来,我们打开users_controller.go,为UsersController新增一个Session属性和一个Login()方法:
代码清单3-14
controllers/users_controller.go
package controllersimport ("goweb/models""github.com/kataras/iris""github.com/kataras/iris/mvc""github.com/kataras/iris/sessions"
)type UsersController struct {Session *sessions.Session
}
.
.
.
func (c *UsersController) Login(ctx iris.Context) (user models.User, err error) {if err = ctx.ReadJSON(&user); err != nil {ctx.StatusCode(iris.StatusBadRequest)return}if user, err = user.Authenticate(); err != nil {return}c.Session.Set("userID", user.ID)return
}
在Login()方法中,我们读取客户端request中的json格式的数据,然后将这些数据映射为一个User实例。调用这个User实例的Authenticate()方法进行验证,如果验证能够通过,我们就将该用户的ID记录到session里,并且将验证通过的用户保存到前面我们声明的全局变量里。
接下来,我们在main.go里将session注册到WeiboApp里。
代码清单3-15
main.go
package mainimport ("github.com/kataras/iris""github.com/kataras/iris/middleware/logger""github.com/kataras/iris/middleware/recover""github.com/kataras/iris/mvc""github.com/kataras/iris/sessions""goweb/controllers"
)func main() {app := weiboApp()app.Run(iris.Addr(":8080"))
}func weiboApp() *iris.Application {app := iris.New()app.Use(recover.New())app.Use(logger.New())weiboApp := mvc.New(app)expiresTime, _ := time.ParseDuration("168h")sess := sessions.New(sessions.Config{Cookie: "weibo_app_cookie", Expires: expiresTime})weiboApp.Register(sess.Start,)helloWorldController := new(controllers.HelloWorldController)usersController := new(controllers.UsersController)weiboApp.Handle(helloWorldController)weiboApp.Handle(usersController)return app
}
我们在创建session的时候,设置的session的名字“weibo_app_cookie”和过期的时间168个小时,即一个星期。
接下来,我们清空数据库,打开命令行工具,cd到controllers目录,运行go test
C:Userssxu37Go>cd srcgowebcontrollers
C:Userssxu37GosrcGoWebcontrollers>go test
.
.
.
PASS
ok GoWeb/controllers 8.059s
说明我们用户登录的代码也是编写正确的。接着我们只需要再测试一下”/login“这个路径是否可以用”POST“方法访问即可。
代码清单3-16
main_test.go
.
.
.
func TestLoginRoute(t *testing.T) {app := weiboApp()e := httptest.New(t, app)request := e.Request("POST", "/login")request.WithJSON(map[string]interface{}{"email": "email1@example.com", "password": "password1"})response := request.Expect()response.Status(httptest.StatusOK)
}
清空数据库,然后打开命令行工具,cd到项目根目录下,运行go test
C:Userssxu37GosrcGoWeb>go test
.
.
.
PASS
ok GoWeb 3.684s
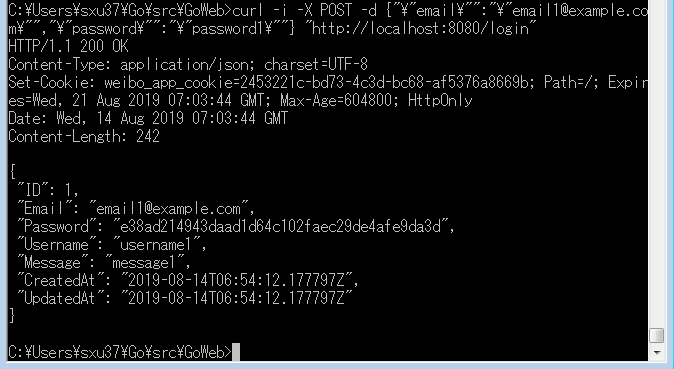
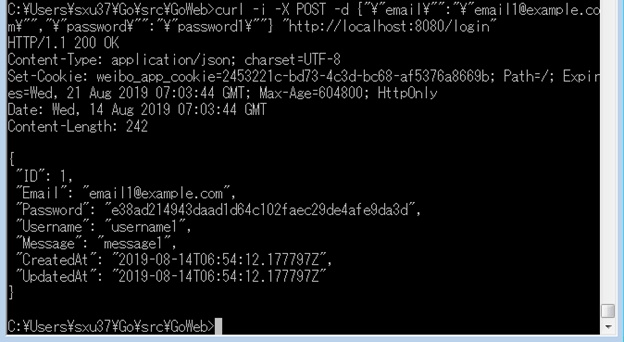
用户登录的功能我们也成功实现了。 我们也还是可以使用crul命令测试一下:
C:Userssxu37GosrcGoWeb>curl -i -X POST -d {""email"":""email1@example.co
m"",""password"":""password1""} “http://localhost:8080/login”
服务器按照预期返回了登录成功的用户信息。
在开始下一节之前,我们还是先把代码push到Github上保管。
C:Userssxu37GosrcGoWeb>git add –A
C:Userssxu37GosrcGoWeb>git commit -m "user login"
C:Userssxu37GosrcGoWeb>git push


)


