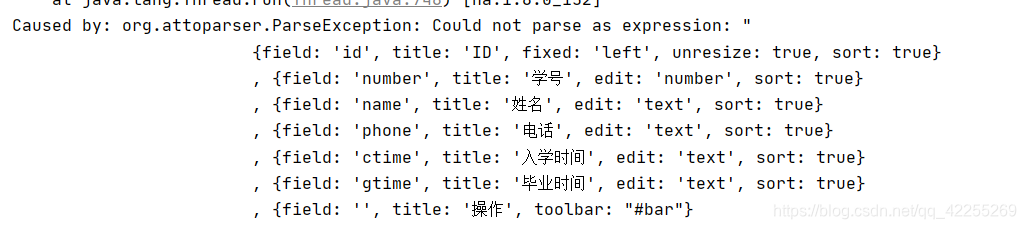
信息论 哈夫曼编码 与 菲诺编码的实现(对一幅BMP格式的灰度图像(个人 证件照片)进行二元霍夫曼编码和译码。并进行编码效率的计算,对一幅BMP格式的灰度图像进行二 元Fano编码、译码 )
原始图片

灰度处理

编码生成的码表:noldList:

解码后图片

编码结果

fano编码实现

源码:
哈夫曼编码实现
#Writen by james ruslinimport json
from math import log
from tkinter import *
from PIL import Image
pixelFrequen = {} #全局 字典
nodeList = []
codeList = {}
E1 = NONE
E2 = NONEclass node:def __init__(self, leftChild=None, rightChild=None, father=None, value=0, count=None):self.leftChild = leftChildself.rightChild = rightChildself.father = fatherself.value = valueself.count = countdef calculater(p):return -log(p, 2)*pdef efficient(image):row = image.size[0]col = image.size[1]allnumber = row*colh = 0for key in pixelFrequen.keys():h += calculater(pixelFrequen[key] / allnumber)L = 0for key in pixelFrequen.keys():L += len(codeList[str(key)]) * pixelFrequen[key] / allnumberR = h/Lreturn Rdef toGray(string):im = Image.open(string)im = im.convert('L')im.save('C:/Users/user/Desktop/newGray.bmp')return im       #返回图片‘对象’def counter(list):global pixelFrequenfor i in list:if i in pixelFrequen.keys():pixelFrequen[i] += 1else:pixelFrequen[i] = 1def leafNodes(pixelValue): #通过组合数组,构造叶子for i in range(len(pixelValue)):nodeList.append(node(value=pixelValue[i][1], count=str(pixelValue[i][0])))return nodeListdef sortNodes(nodeList):nodeList = sorted(nodeList, key=lambda node: node.value) #按照node.value对node排序return nodeListdef huffmanTree(nodeList):nodeList = sortNodes(nodeList)while len(nodeList) != 1:left = nodeList[0]right = nodeList[1]new = node()new.leftChild = leftnew.rightChild = rightleft.father = newright.father = newnew.value = left.value + right.valuenodeList.remove(left)nodeList.remove(right)nodeList.append(new)nodeList = sortNodes(nodeList)return nodeListdef huffmanCoder(image):width = image.size[0]height = image.size[1]imMatrix = image.load()list = []for i in range(width):for j in range(height):list.append(imMatrix[i, j])counter(list)global pixelFrequenpixel = pixelFrequenpixel = sorted(pixel.items(), key=lambda item: item[1])  #以列表返回可遍历的(键, 值) 元组数组。leafList = leafNodes(pixel)head = huffmanTree(leafList)[0]  #leafList里的结点相互连接,形成树global codeListfor i in leafList:codingNode = icodeList.setdefault(i.count, "")while codingNode != head:if codingNode == codingNode.father.leftChild:codeList[i.count] = '0' + codeList[i.count]else:codeList[i.count] = '1' + codeList[i.count]codingNode = codingNode.fatherresult = ''for i in range(width):for j in range(height):for key, value in codeList.items():if str(imMatrix[i, j]) == key:result = result + valuefile = open('C:/Users/user/Desktop/result.txt', 'w')file.write(result)file1 = open('C:/Users/user/Desktop/codeList.json', 'w')jsObj = json.dumps(codeList)file1.write(jsObj)print("编码结果已写入文件")def decode(width, height):file = open('C:/Users/user/Desktop/result.txt', 'r')codeGet = file.readlines()[0].strip('\n')len = codeGet.__len__()pixelReturn = []global codeListi = 0current = ""current += codeGet[0]flag = 0while i < len:for key in codeList.keys():if current == codeList[key]:pixelReturn.append(key)flag = 1breakif flag == 1:if i == len - 1:breakelse:i = i + 1current = codeGet[i]flag = 0else:i += 1if i < len:current += codeGet[i]else:breakc = Image.new('L', (width, height))t = 0for i in range(width):for j in range(height):c.putpixel((i, j), (int(pixelReturn[t])))t = t + 1c.save('C:/Users/user/Desktop/ReturnedHuffman.bmp')def core():global E1global E2root = Tk(className='刘畅2017212184')root.geometry("600x600+100+0")  # 800宽度,800高度,x,y坐标,左上角label = Label(root)label['text'] = '二元huffman编码'label.pack()L1 = Label(root, text="图像文件的位置:")L1.place(x=130, y=100, width=100, height=50)E1 = Entry(root, bd=5)E1.place(x=270, y=100, width=300, height=40)L2 = Label(root, text="编码效率为:")L2.place(x=130, y=200, width=100, height=50)E2 = Text(root)E2.place(x=270, y=200, width=150, height=40)button = Button(root, text='开始编码', command=main)# 收到消息执行go函数button.place(x=250, y=400, width=70, height=50)root.mainloop()def main():global E1global E2string = E1.get()print(string)image = toGray(string)huffmanCoder(image)row = image.size[0]col = image.size[1]decode(image.size[0], image.size[1])e = efficient(image)E2.insert(INSERT, str(e))
core()
fano编码实现
# Writen by Liu
import copy
from math import log
from tkinter import *
from PIL import Image
import jsonpixelFrequent = {}#键为像素值,键值为数量
nodeList = []   #存放结点
codeList = {}   #键为像素值,键值为码字
E1 = NONE
E2 = NONEclass Node:def __init__(self, leftChild = None, rightChild = None, father = None, value = 0, count = None):self.leftChild = leftChildself.rightChild = rightChildself.father = fatherself.value = valueself.count = countdef calculater(p):return -log(p, 2)*pdef efficient(image):row = image.size[0]col = image.size[1]allnumber = row * colh = 0for key in pixelFrequent.keys():h += calculater(pixelFrequent[key]/allnumber)L = 0for key in pixelFrequent.keys():L += len(codeList[key])*pixelFrequent[key]/allnumberR = h/Lreturn Rdef toGray(string):im = Image.open(string)im = im.convert('L')im.save('C:/Users/user/Desktop/newGray.bmp')return im       # 返回图片‘对象’def counter(list):  # 对像素字典初始化,键为像素,键值为其对应的数量global pixelFrequentfor i in list:if i in pixelFrequent.keys():pixelFrequent[i] += 1else:pixelFrequent[i] = 1def leafNode(pixelValueList):for i in range(len(pixelValueList)):nodeList.append(Node(value = pixelValueList[i][1], count = pixelValueList[i][0]))return nodeListdef sortNode(codeList):codeList = sorted(codeList, key=lambda Node: Node.value)return codeListdef initcodeList(list):  # list = pixelFrequent(keys())  #初始化编码表,键值为空串global codeListlength = len(list)for i in range(length):codeList.setdefault(list[i], "")def sortList(list):  # 通过字典的键值进行字典的访问排序global pixelFrequentTemplist = sorted(pixelFrequent.items(), key=lambda item: item[1])length = len(Templist)for i in range(length):list.append(Templist[i][0])return listdef FanoProgress(paralist):  # list = pixelFrequent(keys()),对list排序 ,对编码表进行更新,递归list = copy.copy(paralist)global pixelFrequentglobal codeListvalue_all = 0length = len(list)if length == 1:return 0for i in range(length):value_all += pixelFrequent[list[i]]count1 = 0count2 = 0for i in range(int((length*2)/3)):count1 += pixelFrequent[list[i]]distance = 0distance2 = 0if value_all - 2 * count1 > 0:while True:count1 = count1 + pixelFrequent[list[int((length*2)/3)+distance]]distance += 1if value_all - 2 * count1 <= 0:count2 = count1 - pixelFrequent[list[int((length*2)/3)+distance - 1]]breakif abs(value_all - 2 * count1) > abs(value_all - 2 * count2):distance -= 1else:distance -= 0listlower = copy.copy(list)listHigher = copy.copy(list)for i in range(int((length*2)/3) + distance):codeList[list[i]] = codeList[list[i]] + '1'listHigher.remove(list[i])for j in range(int((length*2)/3) + distance, length):codeList[list[j]] = codeList[list[j]] + '0'listlower.remove(list[j])FanoProgress(listlower)FanoProgress(listHigher)elif value_all - 2 * count1 < 0:while True:count1 = count1 - pixelFrequent[list[int((length*2)/3) - distance2-1]]distance2 += 1if value_all - 2 * count1 >= 0:count2 = count1 + pixelFrequent[list[int((length*2)/3) - distance2]]breakif abs(value_all - 2 * count1) > abs(value_all - 2 * count2):distance2 -= 1else:distance2 -= 0listlower = copy.copy(list)listHigher = copy.copy(list)for i in range(int((length*2)/3) - distance2):codeList[list[i]] += '1'listHigher.remove(list[i])for j in range(int((length*2)/3) - distance2, length):codeList[list[j]] += '0'listlower.remove(list[j])FanoProgress(listlower)FanoProgress(listHigher)else:listlower = copy.copy(list)listHigher = copy.copy(list)for i in range(int((length*2)/3)):codeList[list[i]] += '1'listHigher.remove(list[i])for j in range(int((length*2)/3), length):codeList[list[j]] += '0'listlower.remove(list[j])FanoProgress(listlower)FanoProgress(listHigher)def Fanocoder(im):  # 读取像素列表,对应编码表进行编码imMatrix = im.load()width = im.size[0]height = im.size[1]pixelList = []for i in range(width):for j in range(height):pixelList.append(imMatrix[i, j])counter(pixelList)list = []list = sortList(list)initcodeList(list)FanoProgress(list)result = ""  # 编码结果,对每个像素点进行Fano编码for i in range(width):for j in range(height):for key, values in codeList.items():if imMatrix[i, j] == key:result = result + valuesfile = open('C:/Users/user/Desktop/FanoResult.txt', 'w')file.write(result)file1 = open('C:/Users/user/Desktop/FanoCodeList.json', 'w')jsObj = json.dumps(codeList)file1.write(jsObj)print("编码结果已写入文件")def decode(width, height):file = open('C:/Users/user/Desktop/FanoResult.txt', 'r')codeGet = file.readlines()[0].strip('\n')len = codeGet.__len__()pixelReturn = []global codeListi = 0current = ""current += codeGet[0]flag = 0while i < len:for key in codeList.keys():if current == codeList[key]:pixelReturn.append(key)flag = 1breakif flag == 1:if i == len - 1:breakelse:i = i + 1current = codeGet[i]flag = 0else:i += 1if i < len:current += codeGet[i]else:breakc = Image.new('L', (width, height))t = 0for i in range(width):for j in range(height):c.putpixel((i, j), pixelReturn[t])t = t + 1c.save('C:/Users/user/Desktop/Returnedfano.bmp')def core():global E1global E2root = Tk(className='刘畅2017212184')root.geometry("600x600+100+0")  # 800宽度,800高度,x,y坐标,左上角label = Label(root)label['text'] = '二元Fano编码'label.pack()L1 = Label(root, text="图像文件的位置:")L1.place(x=130, y=100, width=100, height=50)E1 = Entry(root, bd=5)E1.place(x=270, y=100, width=300, height=40)L2 = Label(root, text="编码效率为:")L2.place(x=130, y=200, width=100, height=50)E2 = Text(root)E2.place(x=270, y=200, width=150, height=40)button = Button(root, text='开始编码', command=main)# 收到消息执行go函数button.place(x=250, y=400, width=70, height=50)root.mainloop()def main():global E1global E2string = E1.get()image = toGray(string)Fanocoder(image)decode(image.size[0], image.size[1])R = efficient(image)E2.insert(INSERT, str(R))
core()