一.L1/L2/smooth_l1_loss/center_loss公式与代码
1.公式
L2公式:![]()
smooth_L1公式:
2.三种函数numpy代码实现
import numpy as np
import matplotlib.pyplot as plt#y = |x|
def L1():x = np.arange(-2, 2, 0.01)y = abs(x)plt.figure()plt.plot(x, y, 'b', label='l1')# plt.show()#y = x^2
def L2():x = np.arange(-2, 2, 0.01)y = x**2plt.plot(x, y, 'g', label='l2')# plt.show()#y = 0.5*x**2 |x|<=1
#y = |x|-0.5 |x|>1
def smooth_l1():x = np.arange(-2, 2, 0.01)t = abs(x)y = np.where(t <= 1, 0.5*t**2, t-0.5)plt.plot(x, y, 'r', label='smooth_l1')plt.legend(loc='best')plt.show()if __name__ == '__main__':L1()L2()smooth_l1()
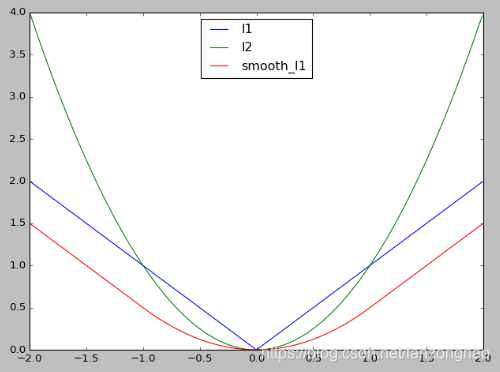
可看出,L1在0点处导数不唯一,会影响收敛,smooth L1对于离群点更加鲁棒,即:相比于L2损失函数,其对离群点、异常值(outlier)不敏感,梯度变化相对更小.也就是当预测框与gt相差过大时,梯度值不至于很大,当预测框与gt相差较小时,梯度值足够小.
3.tensorflow实现smoothL1函数
函数:
def smooth_l1_loss(y_true, y_pred):"""Implements Smooth-L1 loss.y_true and y_pred are typically: [N, 4], but could be any shape."""diff = tf.abs(y_true - y_pred)less_than_one = tf.cast(tf.less(diff, 1.0), "float32")loss = (less_than_one * 0.5 * diff**2) + (1 - less_than_one) * (diff - 0.5)print(loss)with tf.Session() as sess:sess.run(tf.global_variables_initializer())print(sess.run(loss))return loss
4.softmax的交叉熵loss

代码:
import torch.nn as nn
import torch.nn.functional as F
import torch
class L(nn.Module):def __init__(self):super(L, self).__init__()def forward(self, out, label):loss = F.cross_entropy(out, label)return lossdef debug_softmax_loss():batch_size = 4class_nums = 10label = torch.tensor([1, 2, 3, 1])out = torch.rand(batch_size, class_nums)criterion = L()cost = criterion(out, label)print('==cost:', cost)if __name__ == '__main__':debug_softmax_loss()![]()
5.Modified Softmax loss

目的:去除权重模长和偏置对loss的影响
代码:
class Modified(nn.Module):def __init__(self):super(Modified, self).__init__()self.weight = nn.Parameter(torch.Tensor(2, 10)) # (input,output)nn.init.xavier_uniform_(self.weight)self.weight.data.uniform_(-1, 1).renorm_(2, 1, 1e-5).mul_(1e5)#对列进行归一化# 因为renorm采用的是maxnorm,所以先缩小再放大以防止norm结果小于1def forward(self, x, label):w = self.weightw = w.renorm(2, 1, 1e-5).mul(1e5)#对列进行归一化out = x.mm(w)loss = F.cross_entropy(out, label)return lossdef debug_Modified_softmax_loss():batch_size = 4feature_nums = 2label = torch.tensor([1, 2, 3, 1])feature = torch.rand(batch_size, feature_nums)criterion = Modified()cost = criterion(feature, label)print('==cost:', cost)if __name__ == '__main__':# debug_softmax_loss()debug_Modified_softmax_loss()![]()
6.normFace loss

在上述loss的基础上去除feature模长的影响
class NormFace(nn.Module):def __init__(self):super(NormFace, self).__init__()self.weight = nn.Parameter(torch.Tensor(2, 10))  # (input,output)nn.init.xavier_uniform_(self.weight)self.weight.data.uniform_(-1, 1).renorm_(2, 1, 1e-5).mul_(1e5)self.s = 16# 因为renorm采用的是maxnorm,所以先缩小再放大以防止norm结果小于1def forward(self, x, label):cosine = F.normalize(x).mm(F.normalize(self.weight, dim=0))loss = F.cross_entropy(self.s * cosine, label)return loss
def debug_norm_loss():batch_size = 4feature_nums = 2label = torch.tensor([1, 2, 3, 1])feature = torch.rand(batch_size, feature_nums)criterion = NormFace()cost = criterion(feature, label)print('==cost:', cost)if __name__ == '__main__':# debug_softmax_loss()# debug_Modified_softmax_loss()debug_norm_loss()![]()
7.InsightFace(ArcSoftmax) loss

class ArcMarginProduct(nn.Module):def __init__(self, s=32, m=0.5):super(ArcMarginProduct, self).__init__()self.in_feature = 2self.out_feature = 10self.s = sself.m = mself.weight = nn.Parameter(torch.Tensor(2, 10))  # (input,output)nn.init.xavier_uniform_(self.weight)self.weight.data.renorm_(2, 1, 1e-5).mul_(1e5)self.cos_m = math.cos(m)self.sin_m = math.sin(m)# # 为了保证cos(theta+m)在0-pi单调递减:# self.th = math.cos(3.1415926 - m)# self.mm = math.sin(3.1415926 - m) * mdef forward(self, x, label):cosine = F.normalize(x).mm(F.normalize(self.weight, dim=0))cosine = cosine.clamp(-1, 1)  # 数值稳定sine = torch.sqrt(torch.max(1.0 - torch.pow(cosine, 2), torch.ones(cosine.shape) * 1e-7))  # 数值稳定##print(self.sin_m)phi = cosine * self.cos_m - sine * self.sin_m  # 两角和公式( cos(theta+m) )# # 为了保证cos(theta+m)在0-pi单调递减:# phi = torch.where((cosine - self.th) > 0, phi, cosine - self.mm)#必要性未知#one_hot = torch.zeros_like(cosine)one_hot.scatter_(1, label.view(-1, 1), 1)output = (one_hot * phi) + ((1.0 - one_hot) * cosine)output = output * self.sloss = F.cross_entropy(output, label)return output, lossdef debug_insight_loss():batch_size = 4feature_nums = 2label = torch.tensor([1, 2, 3, 1])feature = torch.rand(batch_size, feature_nums)criterion = ArcMarginProduct()_, cost = criterion(feature, label)print('==cost:', cost)
if __name__ == '__main__':# debug_softmax_loss()# debug_Modified_softmax_loss()# debug_norm_loss()debug_insight_loss()![]()
8.center loss
中心损失函数公式:
其中c_yi为第yi类训练样本深度特征的均值点。
由于中心点损失函数值考虑类内差异性,而交叉熵损失函数只考虑类间差异性,一般会把中心损失函数和交叉熵损失函数配合起来用各取所长。这样网络最终的目标函数可以表示为:
![]()
class centerloss(nn.Module):def __init__(self):super(centerloss, self).__init__()self.center = nn.Parameter(10 * torch.randn(10, 2))self.lamda = 0.2self.weight = nn.Parameter(torch.Tensor(2, 10))  # (input,output)nn.init.xavier_uniform_(self.weight)def forward(self, feature, label):batch_size = label.size()[0]nCenter = self.center.index_select(dim=0, index=label)distance = feature.dist(nCenter)centerloss = (1 / 2.0 / batch_size) * distanceout = feature.mm(self.weight)ceLoss = F.cross_entropy(out, label)return out, ceLoss + self.lamda * centerloss
def debug_center_loss():batch_size = 4feature_nums = 2label = torch.tensor([1, 2, 3, 1])feature = torch.rand(batch_size, feature_nums)criterion = centerloss()_, cost = criterion(feature, label)print('==cost:', cost)
if __name__ == '__main__':# debug_softmax_loss()# debug_Modified_softmax_loss()# debug_norm_loss()# debug_insight_loss()debug_center_loss()
9.label smooth losss
目的:平滑标签

import torch
import torch.nn as nn
import torch.nn.functional as F
class LabelSmoothLoss(nn.Module):def __init__(self, smoothing=0.0):super(LabelSmoothLoss, self).__init__()self.smoothing = smoothingdef forward(self, input, target):log_prob = F.log_softmax(input, dim=-1)#(n,classnums)weight = input.new_ones(input.size()) * self.smoothing / (input.size(-1) - 1.)#(n,classnums)print('==weight:', weight)weight.scatter_(1, target.unsqueeze(-1), (1. - self.smoothing))#(n,classnums)print('==weight:', weight)loss = (-weight * log_prob).sum(dim=-1).mean()#(n,classnums)return loss
def debug_label_smooth_loss():batch_size = 4class_num = 10input_ = torch.rand(batch_size, class_num)label = torch.tensor([1, 2, 3, 1])criterion = LabelSmoothLoss(smoothing=0.1)cost = criterion(input_, label)print('==cost:', cost)
if __name__ == '__main__':debug_label_smooth_loss()
10.ohem loss
OHEM是只取3:1的负样本去计算loss,之外的负样本权重置零,而focal loss取了所有负样本,根据难度给了不同的权重。与focal loss差别在于,有些难度的负样本可能在3:1之外。
class BalanceCrossEntropyLoss(nn.Module):'''Balanced cross entropy loss.Shape:- Input: :math:`(N, 1, H, W)`- GT: :math:`(N, 1, H, W)`, same shape as the input- Mask: :math:`(N, H, W)`, same spatial shape as the input- Output: scalar.Examples::>>> m = nn.Sigmoid()>>> loss = nn.BCELoss()>>> input = torch.randn(3, requires_grad=True)>>> target = torch.empty(3).random_(2)>>> output = loss(m(input), target)>>> output.backward()'''def __init__(self, negative_ratio=3.0, eps=1e-6):super(BalanceCrossEntropyLoss, self).__init__()self.negative_ratio = negative_ratioself.eps = epsdef forward(self,pred: torch.Tensor,gt: torch.Tensor,return_origin=False):'''Args:pred: shape :math:`(N, 1, H, W)`, the prediction of networkgt: shape :math:`(N, 1, H, W)`, the target'''positive = gt.byte()negative = (1 - gt).byte()positive_count = int(positive.float().sum())negative_count = min(int(negative.float().sum()), int(positive_count * self.negative_ratio))loss = nn.functional.binary_cross_entropy(pred, gt, reduction='none')positive_loss = loss * positive.float()negative_loss = loss * negative.float()# negative_loss, _ = torch.topk(negative_loss.view(-1).contiguous(), negative_count)negative_loss, _ = negative_loss.view(-1).topk(negative_count)balance_loss = (positive_loss.sum() + negative_loss.sum()) / (positive_count + negative_count + self.eps)if return_origin:return balance_loss, lossif positive_count == 0:return loss.sum()/(int(negative.float().sum()) + self.eps)else:return balance_loss二.Dice loss
1.公式
dice系数公式为:

其用于评估两个样本的相似性的度量,其他距离参考这篇文章。
dice loss可以写为:

其中,dice系数的公式也可以写为


而f1 score也是这个,也就是dice loss其实是优化f1 score.
dice loss 是一种「区域相关」的loss。也就是某像素点的loss以及梯度值不仅和该点的label以及预测值相关,和其他点的label以及预测值也相关,这点和交叉熵loss 不同,正是由于这种特效,导致dice loss更关注于正样本,而交叉熵loss关注每个样本,当负样本更多时,loss主要就由负样本贡献.
class DiceLoss(nn.Module):'''Loss function from https://arxiv.org/abs/1707.03237,where iou computation is introduced heatmap manner to measure thediversity bwtween tow heatmaps.'''def __init__(self, eps=1e-6):super(DiceLoss, self).__init__()self.eps = epsdef forward(self, pred: torch.Tensor, gt, weights=None):''' pred: one or two heatmaps of shape (N, 1, H, W),the losses of tow heatmaps are added together.gt: (N, 1, H, W)'''return self._compute(pred, gt, weights)def _compute(self, pred, gt, weights):if pred.dim() == 4:pred = pred[:, 0, :, :]gt = gt[:, 0, :, :]assert pred.shape == gt.shape# assert pred.shape == mask.shape# if weights is not None:# assert weights.shape == mask.shape# mask = weights * maskintersection = (pred * gt).sum()union = pred.sum() + gt.sum() + self.epsloss = 1 - 2.0 * intersection / unionassert loss <= 1return loss三.Focal loss
四.各种IOU loss
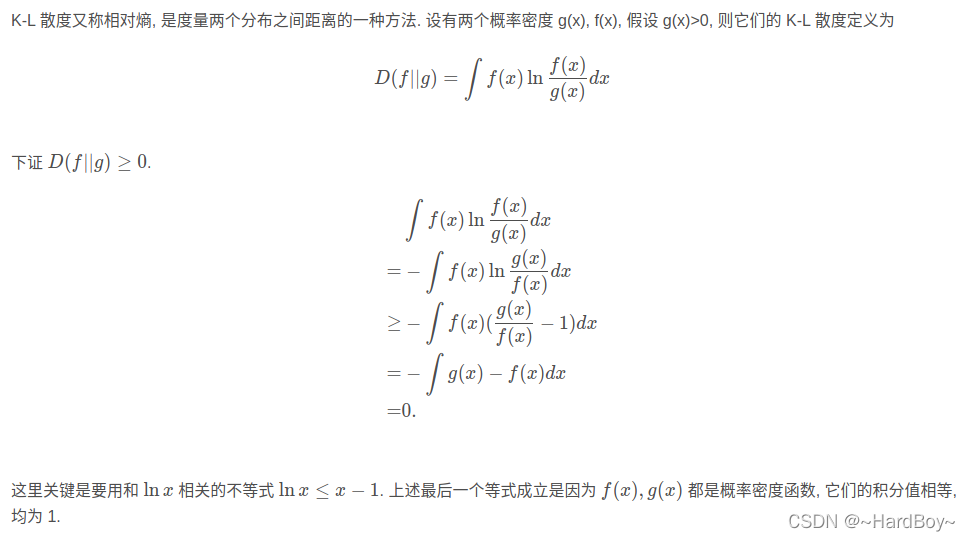
五.证明 K-L 散度大于等于零

所以这里设计loss函数的时候,f(x)满足面积为1, g(x)也是,故对于g(x)需要是softmax
torch 代码:
from __future__ import absolute_import
from __future__ import division
from __future__ import print_functionimport torch
import torch.nn as nn
import torch.nn.functional as F
from torch.autograd import Variablefrom mmpose.models.registry import LOSSES@LOSSES.register_module()
class KLDiscretLoss(nn.Module):def __init__(self):super(KLDiscretLoss, self).__init__()self.LogSoftmax = nn.LogSoftmax(dim=1)  # [B, LOGITS]self.criterion_ = nn.KLDivLoss(reduction='none')def criterion(self, dec_outs, labels):# dec_outs [bs, dim]# labels [bs, dim]# import pdb; pdb.set_trace()scores = self.LogSoftmax(dec_outs)loss = torch.mean(self.criterion_(scores, labels), dim=1)#(bs, )return lossdef forward(self, output_x, output_y, target_x, target_y, target_weight):# import pdb; pdb.set_trace()num_joints = output_x.size(1)loss = 0# output_x [bs, 17, 192*2]# output_y [bs, 17, 256*2]# target_x [bs, 17, 192*2]# target_y [bs, 17, 256*2]# target_weight [bs, 17]for idx in range(num_joints):coord_x_pred = output_x[:, idx].squeeze() #[bs, 192*2]coord_y_pred = output_y[:, idx].squeeze() #[bs, 256*2]coord_x_gt = target_x[:, idx].squeeze() #[bs, 192*2]coord_y_gt = target_y[:, idx].squeeze() #[bs, 256*2]weight = target_weight[:, idx].squeeze() #[bs, ]# import pdb; pdb.set_trace()loss += (self.criterion(coord_x_pred, coord_x_gt).mul(weight).mean())loss += (self.criterion(coord_y_pred, coord_y_gt).mul(weight).mean())return loss / num_jointsdef debug():loss = KLDiscretLoss()target_x = torch.rand((32, 17, 192*2))target_y = torch.rand((32, 17, 256*2))output_x = torch.rand((32, 17, 192*2))output_y = torch.rand((32, 17, 256*2))target_weight = torch.ones((32, 17, 1))cost = loss(output_x, output_y, target_x, target_y, target_weight)print('==cost:', cost)
if __name__ == '__main__':debug()
参考:
语义分割之dice loss深度分析-技术圈


...)


算出长字符串中包含多少个短字符串)


