概述
Prometheus是一套开源的监控&报警&时间序列数据库的组合,起始是由SoundCloud公司开发的。该项目有非常活跃的社区和开发人员,目前是独立的开源项目,现在最常见的Kubernetes容器管理系统中,通常也会搭配Prometheus进行监控。
prometheus大多数组件都是用Go编写的,他们可以非常轻松的基于二进制文件部署和构建
Prometheus的主要特点
自定义多维数据模型(时序列数据由metric名和一组key/value标签组成)
内置PromQL是一种灵活的多维度查询语言
不依赖分布式存储; 支持单个服务器节点自治工作
基于HTTP的pull方式采集时序数据
可以通过push gateway进行时序列数据推送(pushing)
可以通过服务发现或者静态配置去获取要采集的目标服务器
内置简单实用的可视化图表及仪表盘
组件
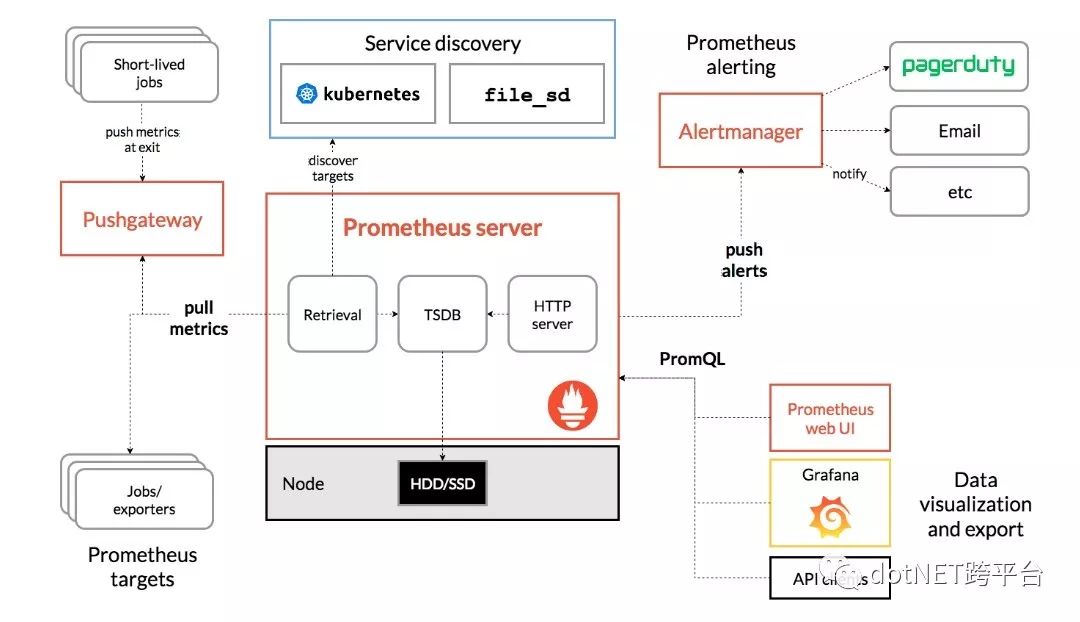
(Prometheus server)最主要的就是Prometheus Server,它用来收集和存储时序数据
(client libraries) 客户端用来检测被监控的应用程序代码
(push gateway) 支持瞬时的网关推送处理
(*. exporters)包括对 HAProxy, StatsD, Graphite等的额外支持
(alertmanager)监控预警管理、以及各种工具
大量的支持工具
结构图

适用场景
Prometheus能够更好的记录数字类型的时序数据,它既可用于对服务器自身性能参数的监视,也适用于高度动态的面向各个服务的监视。在微服务的场景中,它对多维数据收集和查询的支持有很特殊的优势。
为可靠性而设计的Prometheus可以让您在宕机的时候快速诊断分析问题。每个Prometheus服务器都是独立的,不依赖于网络存储或其他远程服务,当基础结构的其他部分损坏时,您可以依赖它,并且不需要设置更多额外的基础结构来使用它。
不适用场景
Prometheus非常重视可靠性,即使在发生故障的情况下,你也可以查看有关系统中的可用统计信息,但是如果你需要百分之百精准统计(如:每次账单请求信息)对Prometheus而言是不适用的,因为收集的数据可能不够详细和完整。在这种情况下,最好使用其他系统来收集和分析数据,并使用Prometheus进行其余额外的监视。
安装node_exporter,系统性能指数收集(收集系统性能情况)
node_exporter 主要用于系统监控, 用 Golang 编写,其默认是9100端口,可以通过/metrics访问
下载文件
cd /tmp
wget https://github.com/prometheus/node_exporter/releases/download/v0.17.0/node_exporter-0.17.0.linux-amd64.tar.gz
解压并复制node_exporter应用程序到/usr/local/bin
tar xvf node_exporter-0.17.0.linux-amd64.tar.gz
sudo cp node_exporter-0.17.0.linux-amd64/node_exporter /usr/local/bin
sudo chown node_exporter:node_exporter /usr/local/bin/node_exporter
清理下载的文件和解压的文件夹
rm -rf node_exporter-0.17.0.linux-amd64.tar.gz node_exporter-0.17.0.linux-amd64
添加自启动服务
添加服务配置文件
sudo vim /etc/systemd/system/node_exporter.service
写入配置内容
[Unit]
Description=Node Exporter
Wants=network-online.target
After=network-online.target[Service]
User=node_exporter
Group=node_exporter
Type=simple
ExecStart=/usr/local/bin/node_exporter[Install]
WantedBy=multi-user.target
node_exporter收集性能点的配置
默认node_exporter会启动一些收集器,你也可以通过服务配置文件进行配置
比如:
ExecStart=/usr/local/bin/node_exporter --collectors.enabled meminfo,hwmon,entropy
启动服务并配置自启动
sudo systemctl daemon-reload
sudo systemctl enable node_exporter
sudo systemctl start node_exporter
sudo systemctl status node_exporter
prometheus的安装
添加prometheus专用的用户名
sudo useradd --no-create-home --shell /usr/sbin/nologin prometheus
sudo useradd --no-create-home --shell /bin/false node_exporter
添加prometheus的目录
sudo mkdir /etc/prometheus
sudo mkdir /var/lib/prometheus
文件夹授权
sudo chown prometheus:prometheus /etc/prometheus
sudo chown prometheus:prometheus /var/lib/prometheus
下载并解压prometheus
wget https://github.com/prometheus/prometheus/releases/download/v2.8.0/prometheus-2.8.0.linux-amd64.tar.gz
tar xfz prometheus-2.8.0.linux-amd64.tar.gz
cd cd prometheus-2.8.0.linux-amd64
拷贝可执行文件到/usr/local/bin
sudo cp ./prometheus /usr/local/bin/
sudo cp ./promtool /usr/local/bin/
授予文件权限
sudo chown prometheus:prometheus /usr/local/bin/prometheus
sudo chown prometheus:prometheus /usr/local/bin/promtool
拷贝目录
sudo cp -r ./console_libraries /etc/prometheus
sudo cp -r ./consoles /etc/prometheus
授权文件夹
sudo chown -R prometheus:prometheus /etc/prometheus/consoles
sudo chown -R prometheus:prometheus /etc/prometheus/console_libraries
清理无用的下载文件和解压的文件夹
cd .. && rm -rf prometheus-*
创建Prometheus配置文件
sudo vim /etc/prometheus/prometheus.yml
注意YML配置文件的缩进
global:
 scrape_interval:     15s
 evaluation_interval: 15s
scrape_configs:
 - job_name: 'prometheus'
   static_configs:
   - targets: ['localhost:9090']
 - job_name: 'node_exporter'
   scrape_interval: 5s
   static_configs:
   - targets: ['localhost:9100']
配置所有者
sudo chown prometheus:prometheus /etc/prometheus/prometheus.yml
启动prometheus
sudo -u prometheus /usr/local/bin/prometheus --config.file /etc/prometheus/prometheus.yml --storage.tsdb.path /var/lib/prometheus/ --web.console.templates=/etc/prometheus/consoles --web.console.libraries=/etc/prometheus/console_libraries
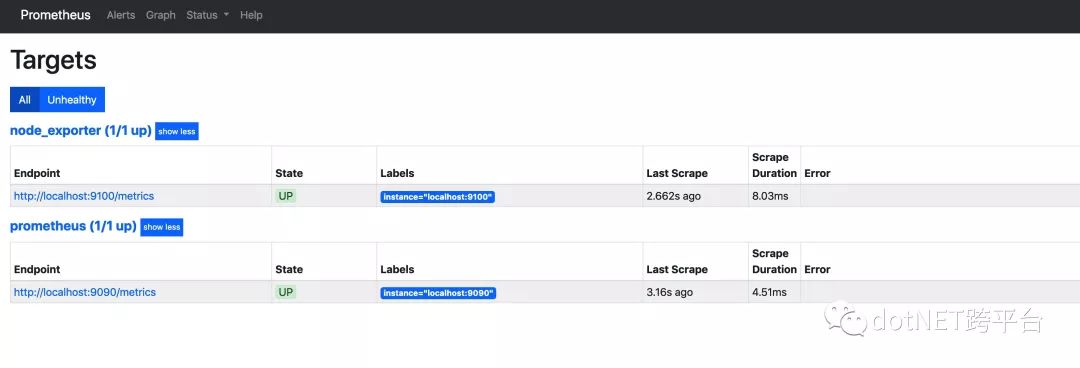
检测
http://服务器ip:9090

配置自启动
sudo vim /etc/systemd/system/prometheus.service
[Unit]
  Description=Prometheus Monitoring
  Wants=network-online.target
  After=network-online.target

[Service]
  User=prometheus
  Group=prometheus
  Type=simple
  ExecStart=/usr/local/bin/prometheus \
  --config.file /etc/prometheus/prometheus.yml \
  --storage.tsdb.path /var/lib/prometheus/ \
  --web.console.templates=/etc/prometheus/consoles \
  --web.console.libraries=/etc/prometheus/console_libraries
  ExecReload=/bin/kill -HUP $MAINPID

[Install]
  WantedBy=multi-user.target
sudo systemctl daemon-reload
sudo systemctl enable prometheus
sudo systemctl start prometheus
sudo systemctl status prometheus
配置安装Grafna
cd /tmp
wget https://dl.grafana.com/oss/release/grafana-6.0.1-1.x86_64.rpm
sudo yum localinstall grafana-6.0.1-1.x86_64.rpm
配置自启动
sudo systemctl daemon-reload && sudo systemctl enable grafana-server && sudo systemctl start grafana-server
登录
启动grafana后可以通过 http://ip:3000登录 

初始用户名和密码都是 admin
初次登录后会要求修改密码
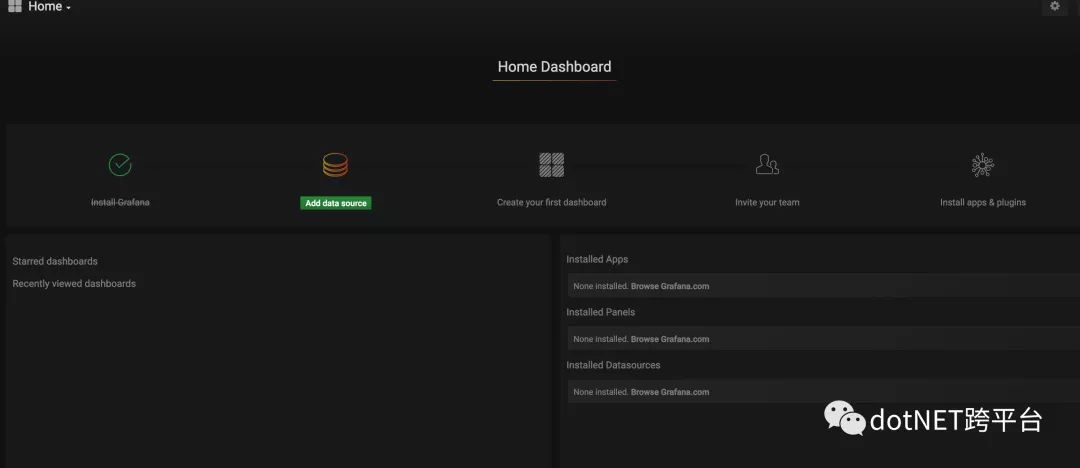
配置数据源到之前的Prometheus

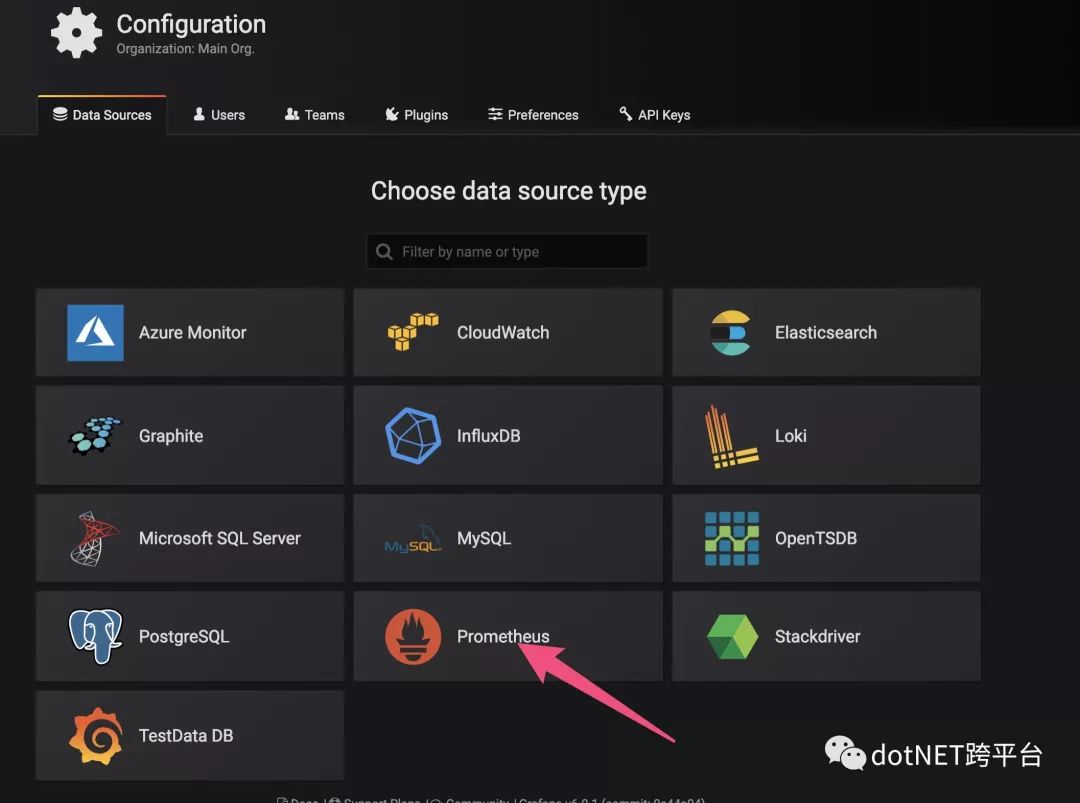
选择Prometheus数据源

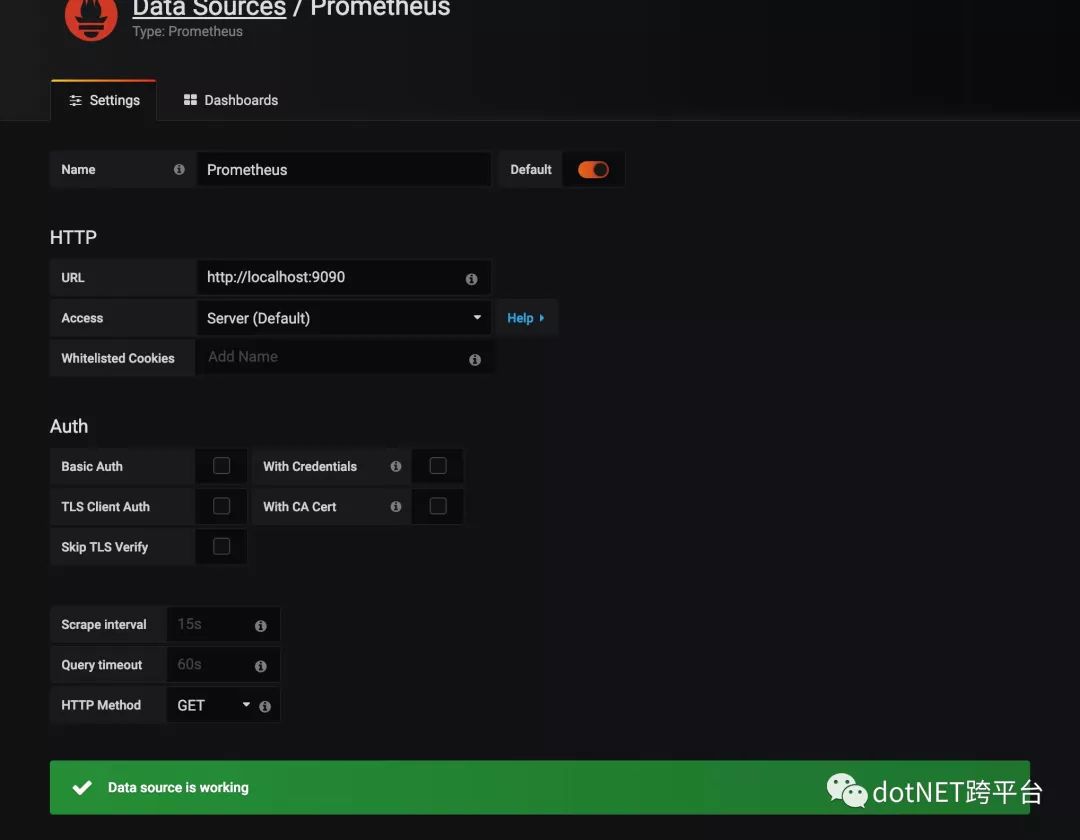 

配置仪表盘
安装饼图插件
grafana-cli plugins install grafana-piechart-panel
导入仪表样本
样本来源,打开浏览器打开如下地址并记录id
https://grafana.com/dashboards/8919
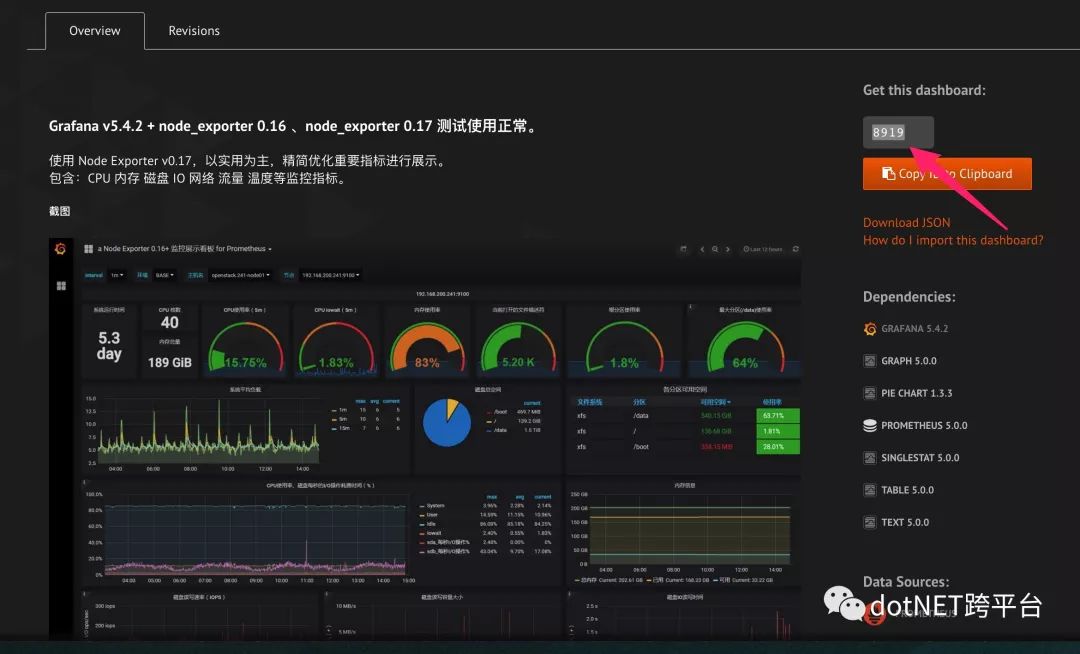 


选择Import
 

然后输入之前记录的id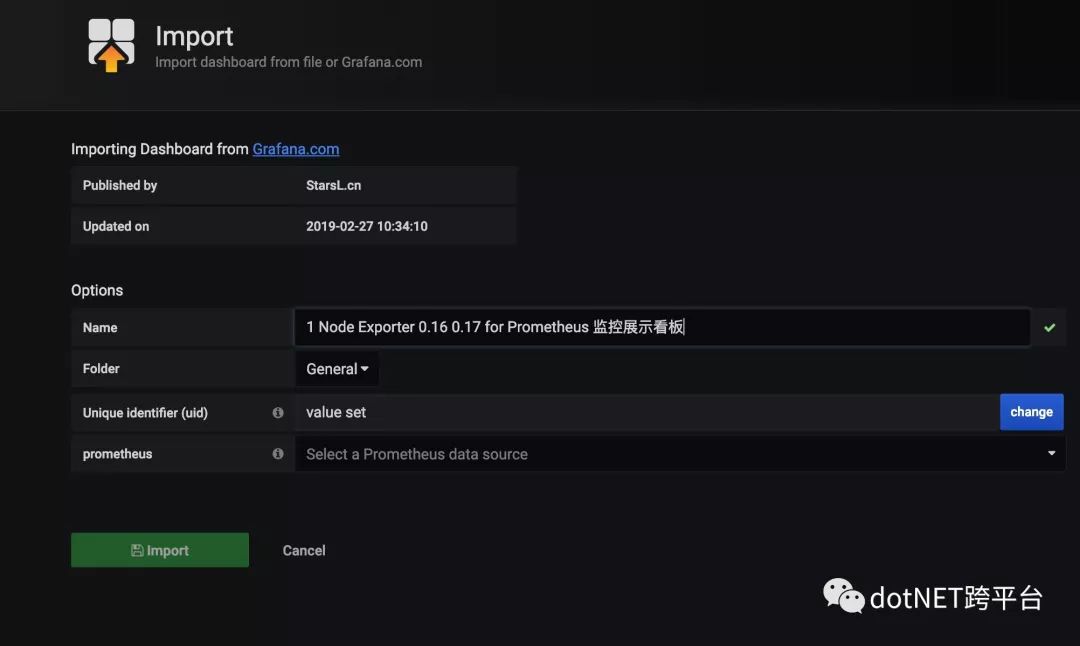 

选择prometheus的数据源,之后打开dashboard就可以看到漂亮的仪表盘了
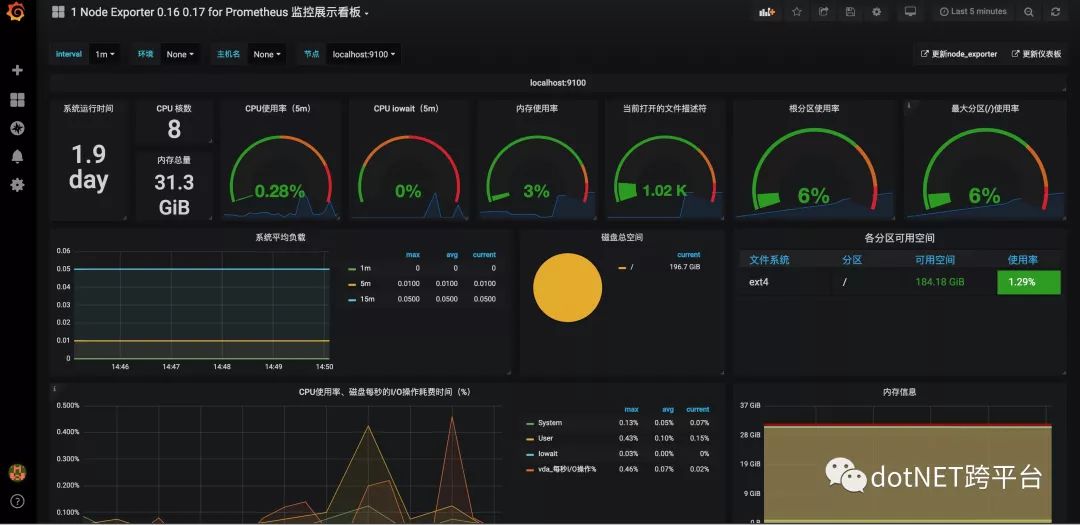 

AspNet Core App Metrics的监控配置
nuget安装包
App.Metrics.Formatters.Prometheus
App.Metrics.AspNetCore
修改program.cs
using System;
using System.Collections.Generic;
using System.IO;
using System.Linq;
using System.Net;
using System.Threading.Tasks;
using App.Metrics;
using App.Metrics.AspNetCore;
using App.Metrics.Formatters;
using App.Metrics.Formatters.Prometheus;
using Microsoft.AspNetCore;
using Microsoft.AspNetCore.Hosting;
using Microsoft.Extensions.Configuration;
using Microsoft.Extensions.Logging;

namespace PrometheusAppMetricsDemo
{
public static class Program
    {
public static IMetricsRoot Metrics { get; set; }

public static IWebHost BuildWebHost(string[] args)
{
            Metrics = AppMetrics.CreateDefaultBuilder()
                .OutputMetrics.AsPrometheusPlainText()
                .OutputMetrics.AsPrometheusProtobuf()
                .Build();

return WebHost.CreateDefaultBuilder(args)
                .ConfigureMetrics(Metrics)
                .UseMetrics(
                    options =>
                    {
                        options.EndpointOptions = endpointsOptions =>
                        {
                            endpointsOptions.MetricsTextEndpointOutputFormatter = Metrics.OutputMetricsFormatters
                                .GetType<MetricsPrometheusTextOutputFormatter>();
                            endpointsOptions.MetricsEndpointOutputFormatter = Metrics.OutputMetricsFormatters
                                .GetType<MetricsPrometheusProtobufOutputFormatter>();
                        };
                    })
                .UseKestrel(options => options.Listen(IPAddress.Any, 5000))
                .UseStartup<Startup>()
                .Build();
        }

public static void Main(string[] args)
{
            BuildWebHost(args).Run();
        }
    }
}
配置prometheus的job
global:
 scrape_interval:     15s
 evaluation_interval: 15s
scrape_configs:
 - job_name: 'prometheus'
   static_configs:
   - targets: ['localhost:9090']
 - job_name: 'node_exporter'
   scrape_interval: 5s
   static_configs:
   - targets: ['localhost:9100']
 - job_name: 'netcoreprometheus'
   scrape_interval: 5s
   scheme: https
   tls_config:
    insecure_skip_verify: true
   metrics_path: /metrics-text
   static_configs:
   - targets: ['{demo_ip}:{demoport}']
为什么是metrics-text 参见appmetrics官方解释
/metrics-text will return metrics in Prometheus plain text format and /> metrics in Prometheus protobuf format.
重启prometheus
sudo systemctl restart prometheus
sudo systemctl status prometheus
 

配置Grafana仪表盘
直接可以用的仪表盘地址:
按之前配置的方式配置完成后,就可以看到grafana正常的从prometheus收集数据并展示了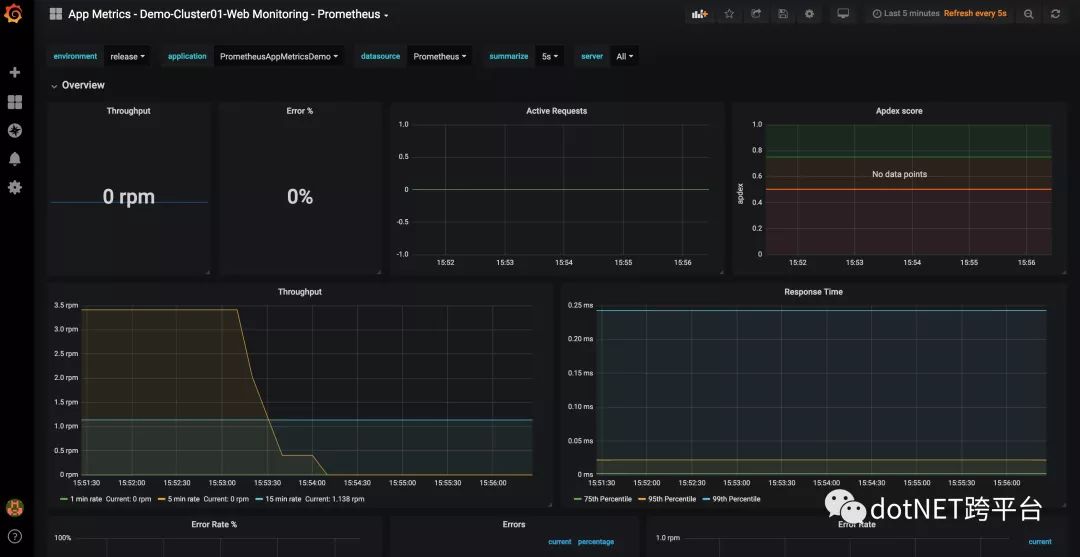
原文地址:
https://www.cnblogs.com/linkanyway/p/Configure-a-Prometheus-Monitoring-Server-with-a-Gr.html
.NET社区新闻,深度好文,欢迎访问公众号文章汇总 http://www.csharpkit.com 


![[WF2011] MachineWorks(李超树优化dp)](http://pic.xiahunao.cn/[WF2011] MachineWorks(李超树优化dp))
![P3644 [APIO2015]八邻旁之桥(中位数、堆)](http://pic.xiahunao.cn/P3644 [APIO2015]八邻旁之桥(中位数、堆))

素性测试,附常用表)

![P5321 [BJOI2019]送别(LCT)](http://pic.xiahunao.cn/P5321 [BJOI2019]送别(LCT))

)
)

)

)
![P5354 [Ynoi2017] 由乃的 OJ(树剖、位运算)](http://pic.xiahunao.cn/P5354 [Ynoi2017] 由乃的 OJ(树剖、位运算))
