大家好,我是若川。持续组织了8个月源码共读活动,感兴趣的可以 点此加我微信ruochuan12 参与,每周大家一起学习200行左右的源码,共同进步。同时极力推荐订阅我写的《学习源码整体架构系列》 包含20余篇源码文章。历史面试系列。另外:目前建有江西|湖南|湖北籍前端群,可加我微信进群。
之前的文章把响应式系统基本讲完了,没看过的同学可以看一下 vue.windliang.wang/。这篇文章主要是按照 Vue2 源码的目录格式和调用过程,把我们之前写的响应式系统移动进去。
html 中我们提供一个 id 为 root 的根 dom 。
<!DOCTYPE html>
<html lang="en"><head><meta charset="UTF-8" /><meta http-equiv="X-UA-Compatible" content="IE=edge" /><meta name="viewport" content="width=device-width, initial-scale=1.0" /><title>Document</title></head><body><div id="root"></div><script src="bundle.js"></script></body>
</html>
其中 bundle.js 就是我们打包好的测试代码,对应 ./VueLiang0/vueliang0.js ,代码如下:
import Vue from "./src/core/index";new Vue({el: "#root",data() {return {test: 1,name: "data:liang",};},watch: {test(newVal, oldVal) {console.log(newVal, oldVal);},},computed: {text() {return "computed:hello:" + this.name;},},methods: {hello() {return "调用methods:hello";},click() {this.test = 3;this.name = "wind";},},render() {const node = document.createElement("div");const dataNode = document.createElement("div");dataNode.innerText = this.test;node.append(dataNode);const computedNode = document.createElement("div");computedNode.innerText = this.text;node.append(computedNode);const methodsNode = document.createElement("div");methodsNode.innerText = this.hello();node.append(methodsNode);node.addEventListener("click", this.click);return node;},
});
提供了 data 、watch 、computed、methods ,在 render 方法中正常情况的话应该是返回虚拟 dom ,这里我们直接生成一个真的 dom 返回。
代理
我们使用 data、methods 或者 computed 的时候,都是通过 this.xxx ,而不是 this.data.xxx 或者 this.methods.xxx ,是因为 Vue 帮我们把这些属性、方法都挂载到了 Vue 实例上。
挂载 methods
// VueLiang0/src/core/instance/state.js
function initMethods(vm, methods) {for (const key in methods) {vm[key] =typeof methods[key] !== "function" ? noop : bind(methods[key], vm);}
}
挂载 computed
export function defineComputed(target, key, userDef) {...Object.defineProperty(target, key, sharedPropertyDefinition);
}
挂载 data
function initData(vm) {let data = vm.$options.data;data = vm._data =typeof data === "function" ? getData(data, vm) : data || {};if (!isPlainObject(data)) {data = {};}// proxy data on instanceconst keys = Object.keys(data);const props = vm.$options.props;const methods = vm.$options.methods;let i = keys.length;while (i--) {const key = keys[i];// 检查 methods 是否有同名属性if (process.env.NODE_ENV !== "production") {if (methods && hasOwn(methods, key)) {console.warn(`Method "${key}" has already been defined as a data property.`,vm);}}// 检查 props 是否有同名属性if (props && hasOwn(props, key)) {process.env.NODE_ENV !== "production" &&console.warn(`The data property "${key}" is already declared as a prop. ` +`Use prop default value instead.`,vm);} else if (!isReserved(key)) { // 非内置属性proxy(vm, `_data`, key); // 代理}}observe(data); // 变为响应式数据
}
为了保证 data 的对象值的稳定,我们的 data 属性其实是一个函数,返回一个对象,所以上边我们用 getData 方法先拿到对象。
export function getData(data, vm) {try {return data.call(vm, vm);} catch (e) {return {};}
}
之后依次判断 data 属性是否和 methods 、computed 属性重名,非线上环境会打印警告,然后调用 isReserved 判断是否是内置属性。
/*** Check if a string starts with $ or _*/
export function isReserved(str) {const c = (str + "").charCodeAt(0);return c === 0x24 || c === 0x5f;
}
最后调用 proxy 方法,将 data 属性挂在到 vm 对象中,相当于将 methods 、computed 的同名属性进行了覆盖。
export function proxy(target, sourceKey, key) {sharedPropertyDefinition.get = function proxyGetter() {return this[sourceKey][key];};sharedPropertyDefinition.set = function proxySetter(val) {this[sourceKey][key] = val;};Object.defineProperty(target, key, sharedPropertyDefinition);
}
响应式
把各个属性初始化完成后,调用 mounted 方法,把我们的 dom 挂载到根节点中。
Vue.prototype._init = function (options) {const vm = this;vm.$options = options;vm._renderProxy = vm;initState(vm);if (vm.$options.el) {vm.$mount(vm.$options.el);}
};
$mount 方法中把 el 对应的 dom 拿到,然后调用 mountComponent 方法进行挂载 dom 。
Vue.prototype.$mount = function (el) {el = el && document.querySelector(el);return mountComponent(this, el);
};
mountComponent 方法中定义 updateComponent 方法和 Watcher 对象,这样当 updateComponent 中依赖的属性变化的时候,updateComponent 就会被自动调用。
export function mountComponent(vm, el) {vm.$el = el;let updateComponent;updateComponent = () => {vm._update(vm._render());};// we set this to vm._watcher inside the watcher's constructor// since the watcher's initial patch may call $forceUpdate (e.g. inside child// component's mounted hook), which relies on vm._watcher being already definednew Watcher(vm, updateComponent, noop /* isRenderWatcher */);return vm;
}
_update 方法原本是进行虚拟 dom 的挂载,这里的话我们直接将 render 返回的 dom 进行挂载。
Vue.prototype._update = function (dom) {const vm = this;/*****这里仅仅是把 dom 更新,vue2 源码中这里会进行虚拟 dom 的处理 */if (vm.$el.children[0]) {vm.$el.removeChild(vm.$el.children[0]);}vm.$el.appendChild(dom);/*******************************/
};
整体流程
入口文件代码如下:
import Vue from "./src/core/index";new Vue({el: "#root",...
});
第一行代码 import Vue from "./src/core/index"; 的时候会进行一些初始化,src/core/index 代码如下:
// src/core/index
import Vue from './instance/index'
import { initGlobalAPI } from './global-api/index'initGlobalAPI(Vue) // Vue 上挂载一些静态全局的方法export default Vue
第一行 import Vue from './instance/index' 继续进行一些初始化,instance/index 代码如下:
// src/core/instance/index.js
import { initMixin } from "./init";
import { stateMixin } from "./state";
import { lifecycleMixin } from "./lifecycle";
import { renderMixin } from "./render";function Vue(options) {this._init(options);
}initMixin(Vue);
stateMixin(Vue);
lifecycleMixin(Vue);
renderMixin(Vue);export default Vue;
initMixin 是在 Vue 挂载一个 _init 方法,也就是在 new Vue 的时候执行。
import { initState } from "./state";export function initMixin(Vue) {Vue.prototype._init = function (options) {const vm = this;vm.$options = options;vm._renderProxy = vm;initState(vm);if (vm.$options.el) {vm.$mount(vm.$options.el);}};
}
_init 方法调用 initState 方法初始化 data 、watch 、computed、methods ,并且把他们变为响应式数据,还有上边讲到的把属性挂载到 Vue 实例上。
$mount 方法就是前边讲到的,把 render 返回的 dom 挂载到 el 节点上。
剩下的 stateMixin、lifecycleMixin 、renderMixin 是在 Vue.prototype 原型对象中挂载各种方法,这里不细说了。
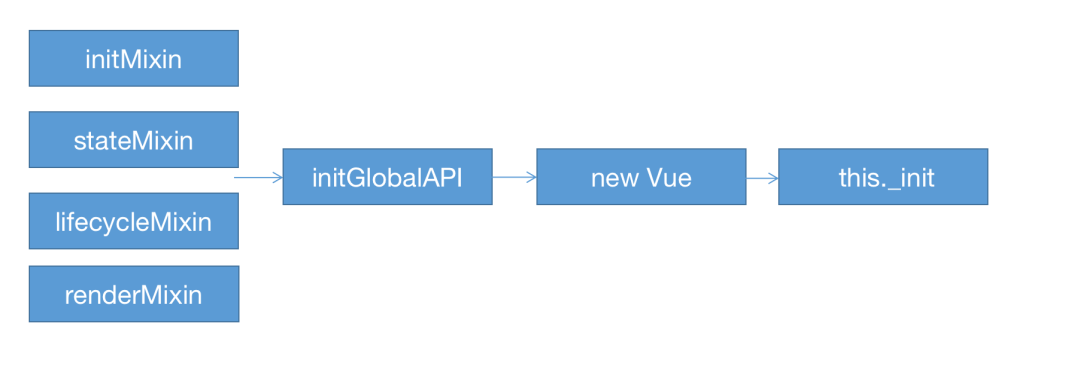
所以整体过程就是下边的样子:

最开始的各种 Mixin 是在 Vue.prototype 原型对象上挂载需要的方法,initGlobalAPI 是直接在 Vue 上挂载方法,new Vue 就是传入 options 属性,接着调用 this.init 方法将 data 、watch 、computed、methods 这些进行初始化,最后调用 $mount 方法挂载 dom 。
最终效果
我们运行下程序,修改 webpack.config.js 的 entry 为我们写好的测试文件。
const path = require("path");
module.exports = {entry: "./VueLiang0/vueliang0.js",output: {path: path.resolve(__dirname, "./dist"),filename: "bundle.js",},devServer: {static: path.resolve(__dirname, "./dist"),},
};
然后执行 npm run dev 。

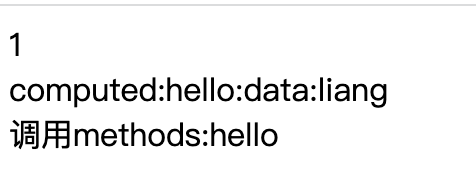
可以看到 data 、computed 和 methods 都调用正常,接下来测试一下响应式,我们测试文件中添加了 click 事件。
import Vue from "./src/core/index";new Vue({el: "#root",data() {return {test: 1,name: "data:liang",};},watch: {test(newVal, oldVal) {console.log(newVal, oldVal);},},computed: {text() {return "computed:hello:" + this.name;},},methods: {hello() {return "调用methods:hello";},click() {this.test = 3;this.name = "wind";},},render() {const node = document.createElement("div");const dataNode = document.createElement("div");dataNode.innerText = this.test;node.append(dataNode);const computedNode = document.createElement("div");computedNode.innerText = this.text;node.append(computedNode);const methodsNode = document.createElement("div");methodsNode.innerText = this.hello();node.append(methodsNode);// click 事件node.addEventListener("click", this.click);return node;},
});
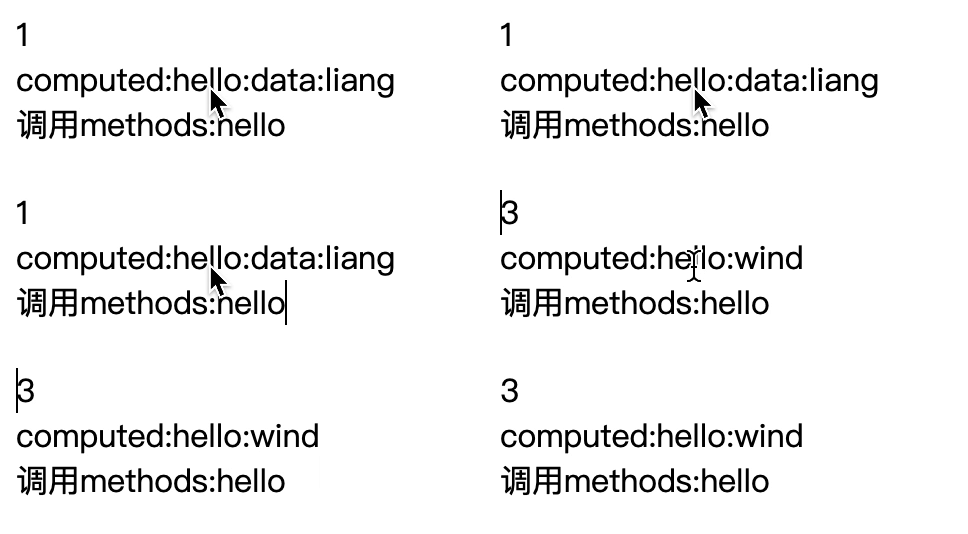
点击的时候会更改 text 和 name 的值,看一下效果:

当我们点击的时候视图就自动进行了更新,简化的响应式系统就被我们实现了。
总
更详细代码的大家可以在 github 进行查看和调试。
https://github.com/wind-liang/vue2
现在我们的 render 函数是直接返回 dom ,当某个属性改变的时候整个 dom 树会全部重新生成,但更好的方式肯定是采用虚拟 dom ,进行局部更新。

················· 若川简介 ·················
你好,我是若川,毕业于江西高校。现在是一名前端开发“工程师”。写有《学习源码整体架构系列》20余篇,在知乎、掘金收获超百万阅读。
从2014年起,每年都会写一篇年度总结,已经坚持写了8年,点击查看年度总结。
同时,最近组织了源码共读活动,帮助4000+前端人学会看源码。公众号愿景:帮助5年内前端人走向前列。

扫码加我微信 ruochuan12、拉你进源码共读群
今日话题
目前建有江西|湖南|湖北 籍 前端群,想进群的可以加我微信 ruochuan12 进群。分享、收藏、点赞、在看我的文章就是对我最大的支持~


