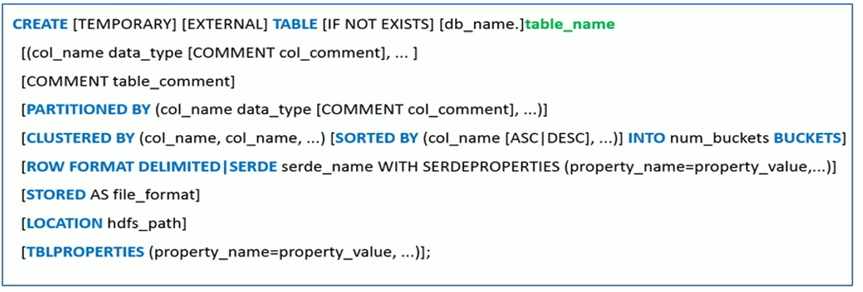
1 CREATE TABLE 建表语法

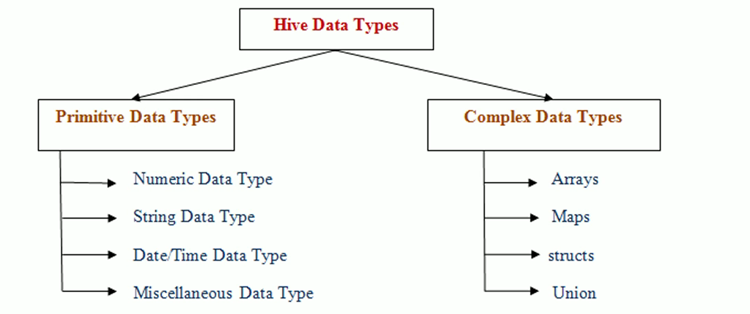
2 Hive 数据类型

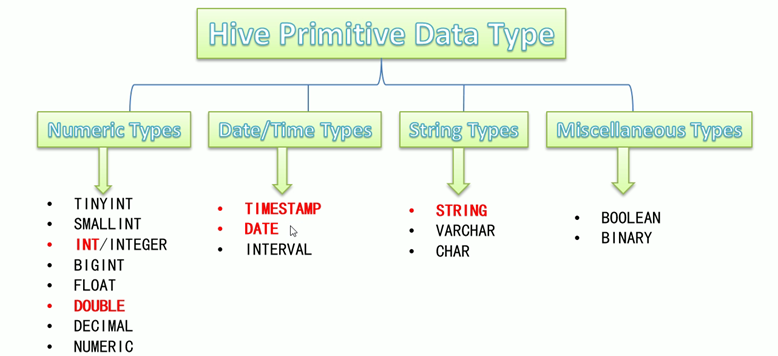
2.1 原生数据类型
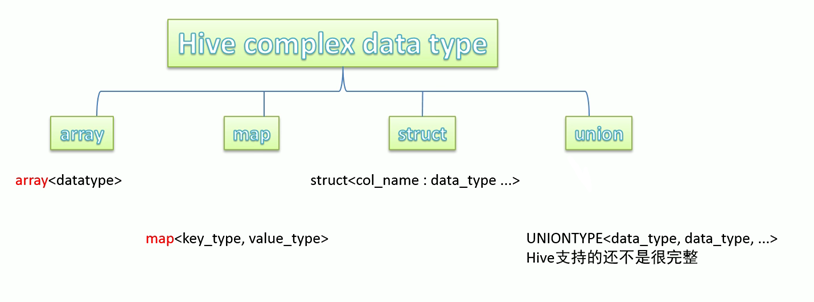
2.2 复杂数据类型
2.3 Hive 隐式转换
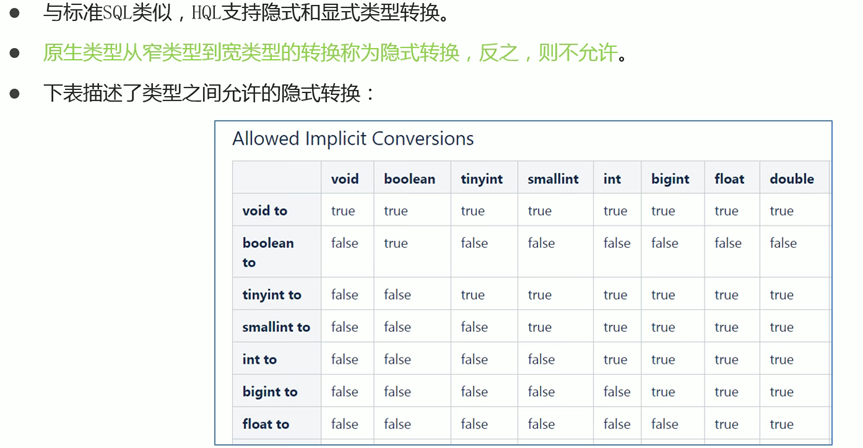
2.4 Hive 显式转换

2.5 注意

3 SerDe机制


3.1 读写文件机制

3.2 SerDe相关语法
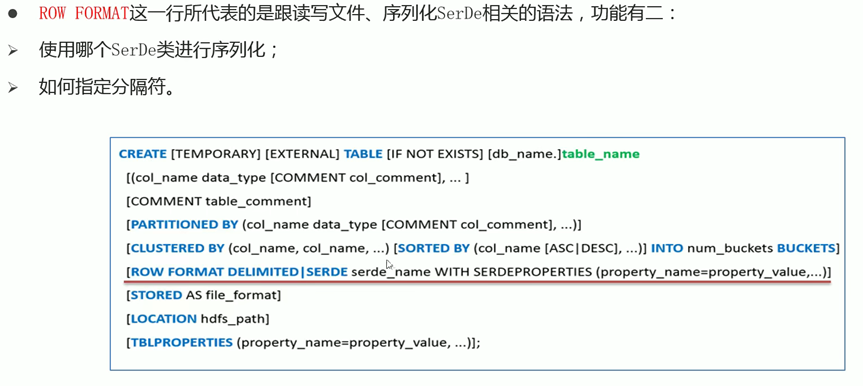
3.2.1 指定序列化类(ROW FORMAT SERDE ‘’)

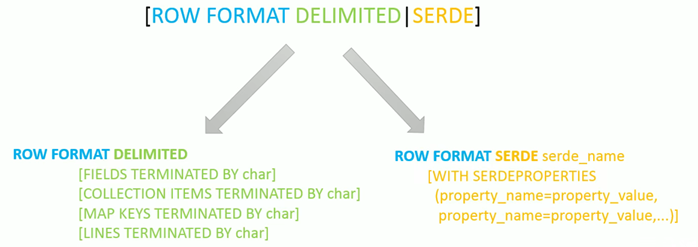
3.2.2 指定分隔符(row format delimited fields terminated by “\t”)

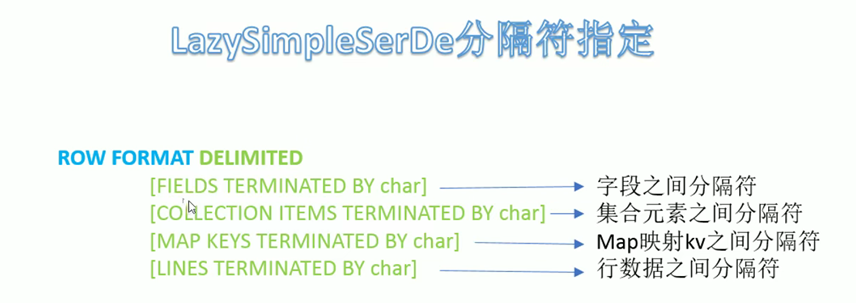
4 Hive 默认分隔符


5 存储路径(location)
5.1 默认存储路径


5.2 Location 修改数据存储路径


6 练习
6.1 简单数据类型
6.1.1 建表语句
create table t_archer(id int comment "ID",name string comment "英雄名称",hp_max int comment "最大生命",mp_max int comment "最大法力",attack_max int comment "最高物攻",defense_max int comment "最大物防",attack_range string comment "攻击范围",role_main string comment "主要定位",role_assist string comment "次要定位"
) comment "王者荣耀射手信息"row format delimited fields terminated by "\t";
6.1.2 上传数据文件到hdfs

hadoop dfs -put archer.txt /user/hive/warehouse/test.db/t_archer6.1.3 查询
select * from t_archer;

6.2 复杂数据类型
6.2.1 建表语句
create table t_hot_hero_skin_price(id int,name string,win_rate int,skin_price map<string,int>
) row format delimitedfields terminated by ',' --字段之间分隔符collection items terminated by '-'  --集合元素之间分隔符map keys terminated by ':'; --集合元素kv之间分隔符;
6.2.2 上传数据文件到hdfs

hadoop dfs -put hot_hero_skin_price.txt /user/hive/warehouse/test.db/t_hot_hero_skin_price
6.2.3 查询
select * from t_hot_hero_skin_price;

6.3 默认分隔符
6.3.1 建表语句
create table t_team_ace_player(id int,team_name string,ace_player_name string
); --没有指定row format语句 此时采用的是默认的\001作为字段的分隔符
6.3.2 上传数据文件到hdfs
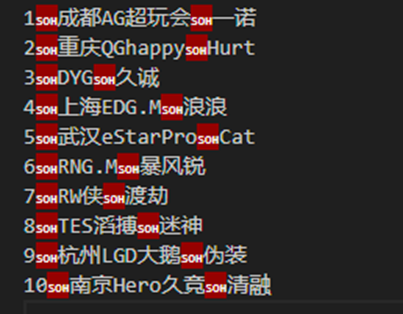
hadoop dfs -put team_ace_player.txt /user/hive/warehouse/test.db/t_team_ace_player
6.3.3 查询
select * from t_team_ace_player;
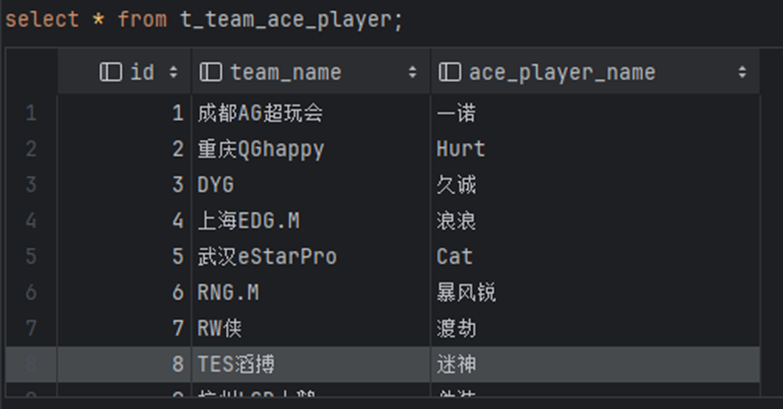
6.4 指定数据存储路径
6.4.1 建表语句
create table t_team_ace_player_location(
id int,
team_name string,
ace_player_name string
)
location ‘/data’; --使用location关键字指定本张表数据在hdfs上的存储路径
6.4.2 上传数据文件到hdfs
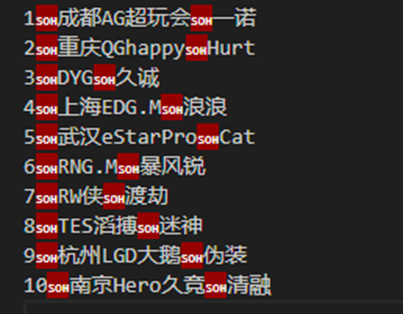
hadoop dfs -put team_ace_player.txt /data
6.4.3 查询
select * from t_team_ace_player_location;
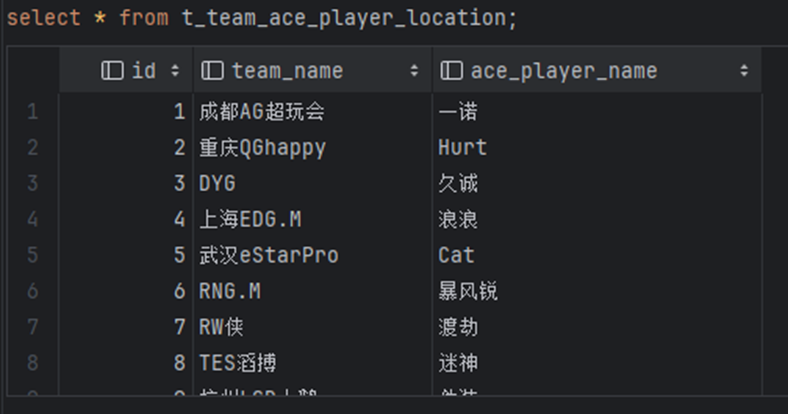
7 内部表、外部表 (external)
7.1 内部表

默认情况下创建的表就是内部表
7.2 外部表

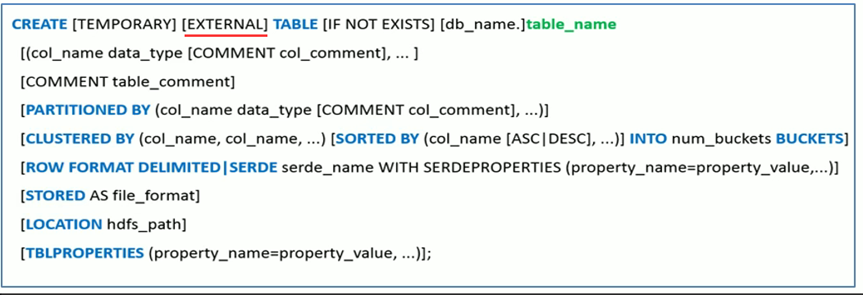
7.3 内部表、外部表的差异


7.4 如何选择内部表或外部表

8 分区表(partitioned by)
8.1 概述
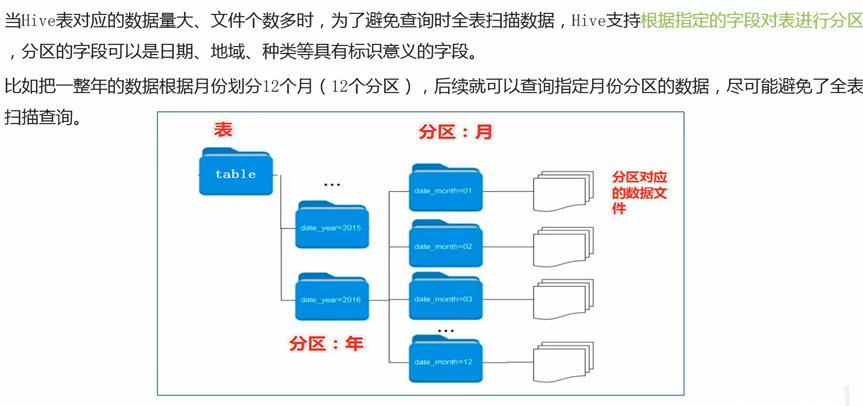


8.2 建表语句
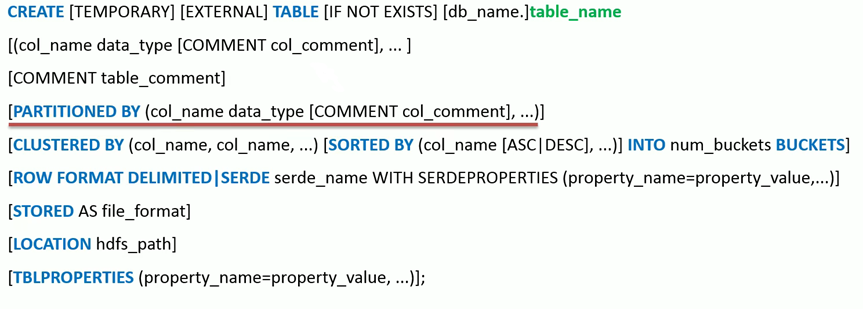

注: 分区字段不能是表中已经存在的字段,因为分区字段最终也会以细腻字段的形式显示在表结构上。
--注意分区表创建语法规则
--分区表建表
create table t_all_hero_part(id int,name string,hp_max int,mp_max int,attack_max int,defense_max int,attack_range string,role_main string,role_assist string
) partitioned by (role string)--注意哦 这里是分区字段row format delimited fields terminated by "\t";
8.3 分区表数据加载–静态分区

--双分区表,按省份和市分区
--分区字段之间是一种递进的关系 因此要注意分区字段的顺序 谁在前在后
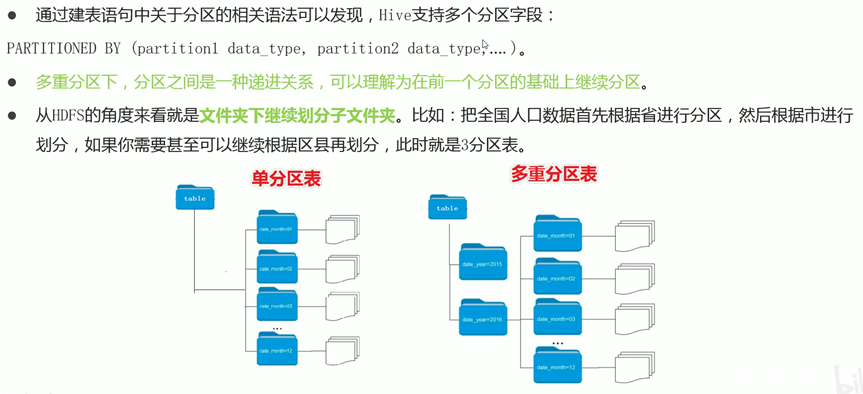
create table t_user_province_city (id int, name string,age int) partitioned by (province string, city string);
静态上传文件
SQL
load data local inpath '/root/data/all_hero/archer.txt' into table t_all_hero_part partition(role='sheshou');
load data local inpath '/root/data/all_hero/assassin.txt' into table t_all_hero_part partition(role='cike');
load data local inpath '/root/data/all_hero/mage.txt' into table t_all_hero_part partition(role='fashi');
load data local inpath '/root/data/all_hero/support.txt' into table t_all_hero_part partition(role='fuzhu');
load data local inpath '/root/data/all_hero/tank.txt' into table t_all_hero_part partition(role='tanke');
load data local inpath '/root/data/all_hero/warrior.txt' into table t_all_hero_part partition(role='zhanshi');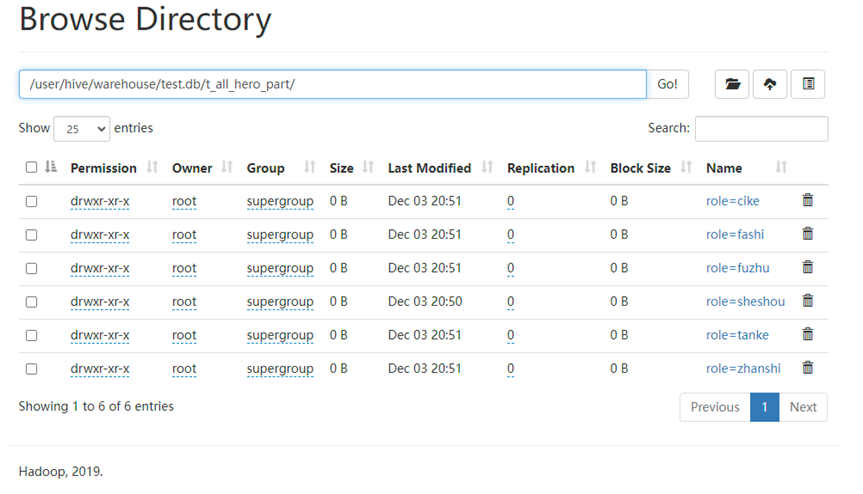
8.4 分区表数据加载–动态分区
8.4.1 概述

8.4.2 开启动态分区

SQL
set hive.exec.dynamic.partition=true;
set hive.exec.dynamic.partition.mode=nonstrict;
8.4.3 动态分区插入
--创建一张新的分区表 t_all_hero_part_dynamic
create table t_all_hero_part_dynamic(id int,name string,hp_max int,mp_max int,attack_max int,defense_max int,attack_range string,role_main string,role_assist string
) partitioned by (role string)row format delimitedfields terminated by "\t";
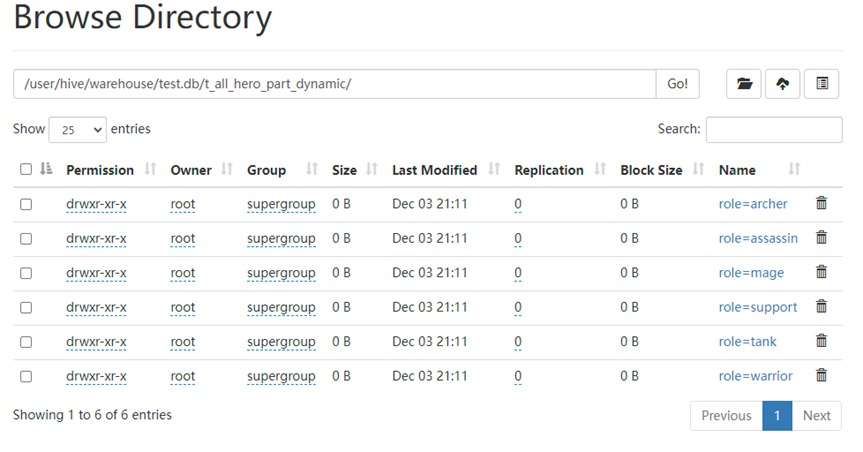
insert into table t_all_hero_part_dynamic partition(role) --注意这里 分区值并没有手动写死指定
select tmp.*,tmp.role_main from t_all_hero tmp;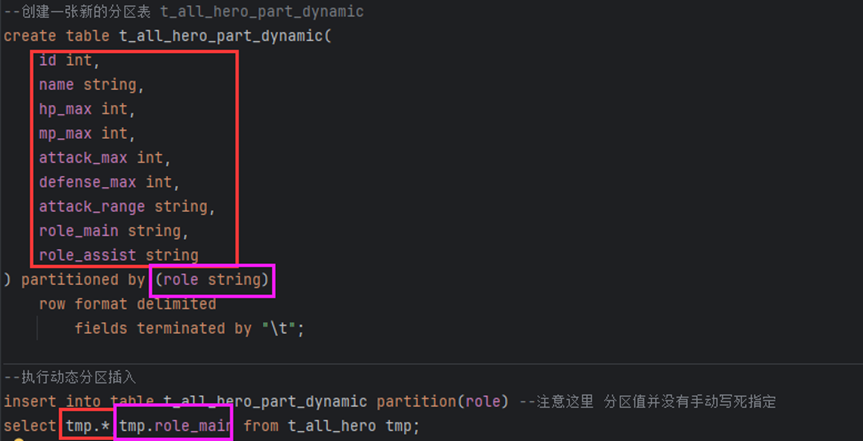

8.5 多重分区表
8.5.1 概述
8.5.2 加载数据
--双分区表的数据加载 静态分区加载数据
load data local inpath '/root/hivedata/user.txt' into table t_user_province_citypartition(province='zhejiang',city='hangzhou');
load data local inpath '/root/hivedata/user.txt' into table t_user_province_citypartition(province='zhejiang',city='ningbo');
load data local inpath '/root/hivedata/user.txt' into table t_user_province_citypartition(province='shanghai',city='pudong');
8.5.3 双分区进行过滤
--双分区表的使用  使用分区进行过滤 减少全表扫描 提高查询效率
select * from t_user_province_city where  province= "zhejiang" and city ="hangzhou";
9 分桶表 (buckets)
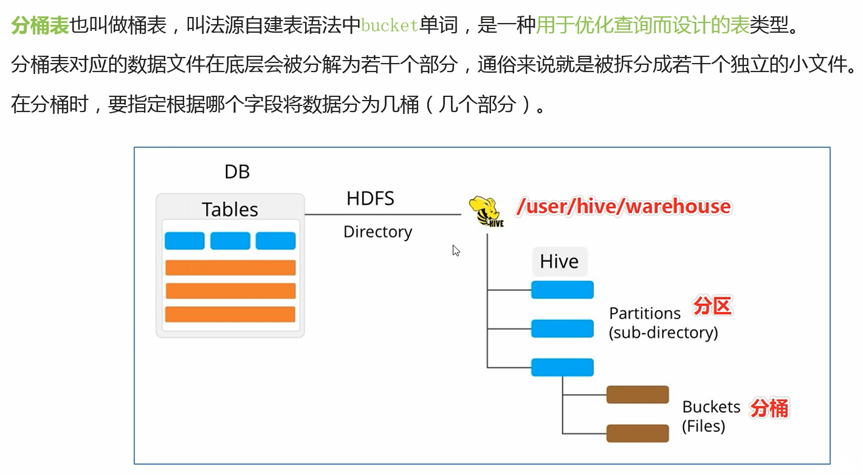
9.1 概述
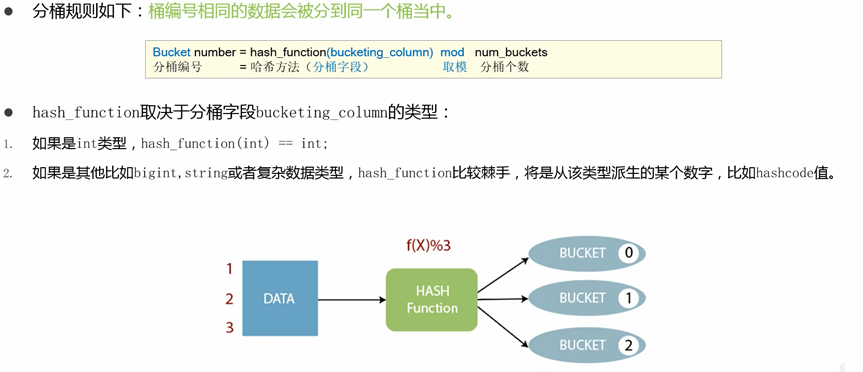
9.2 规则

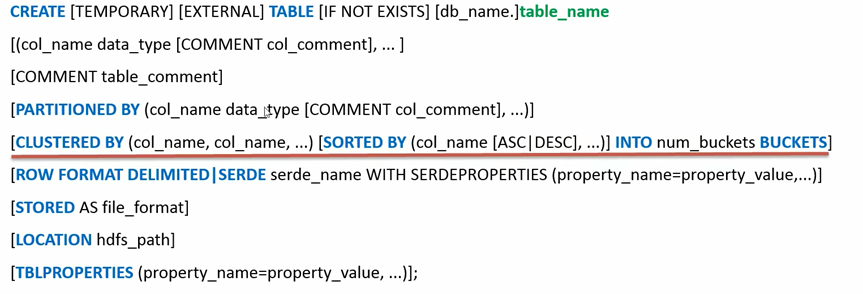
9.3 语法

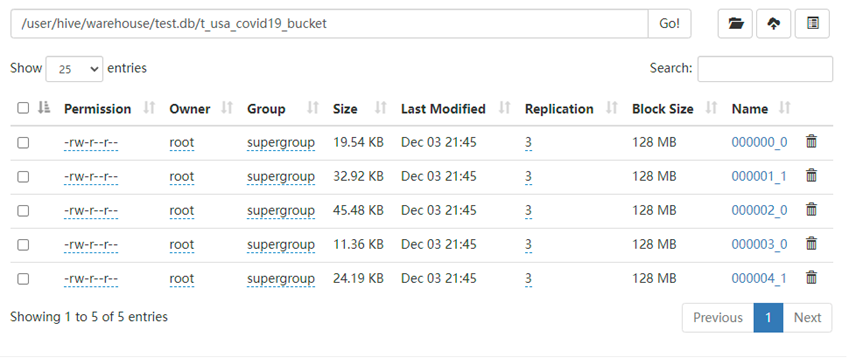
9.4 案例
9.4.1 创建分桶表
CREATE TABLE t_usa_covid19_bucket(count_date string,county string,state string,fips int,cases int,deaths int
)
CLUSTERED BY(state) INTO 5 BUCKETS; --分桶的字段一定要是表中已经存在的字段
9.4.2 创建普通表
CREATE TABLE t_usa_covid19(count_date string,county string,state string,fips int,cases int,deaths int
)row format delimited fields terminated by ",";
9.4.3 向普通表导入数据
hadoop dfs -put us-covid19-counties.dat /user/hive/warehouse/test.db/t_usa_covid19
9.4.5 基于分桶字段查询
--基于分桶字段state查询来自于New York州的数据
--不再需要进行全表扫描过滤
--根据分桶的规则hash_function(New York) mod 5计算出分桶编号
--查询指定分桶里面的数据 就可以找出结果  此时是分桶扫描而不是全表扫描
select *
from t_usa_covid19_bucket where state="New York";
普通查询耗时:181ms
基于分桶字段查询耗时:175ms
9.5 好处
9.5.1 减少全表扫描
基于分桶字段state查询,不再需要进行全表扫描过滤,根据分桶的规则hash_function(New York) mod 5计算出分桶编号,查询指定分桶里面的数据 就可以找出结果 此时是分桶扫描而不是全表扫描
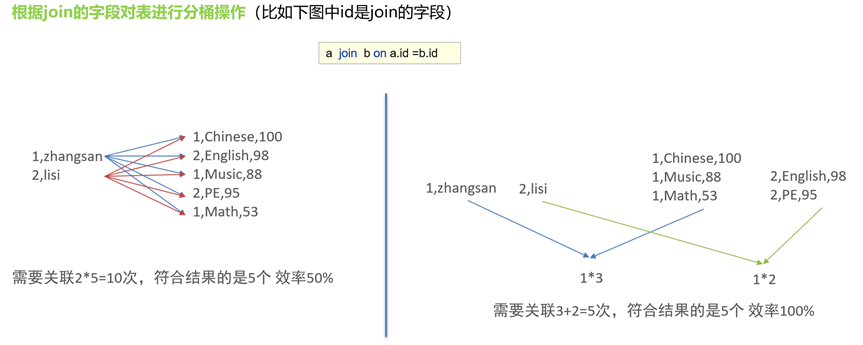
9.5.2 JOIN时可以提高MR程序效率,减少笛卡尔积数量
9.5.3 分桶表数据进行高效抽样
当数据量特别大时,对全体数据进行处理存在困难时,抽样就显得尤其重要了。抽样可以从被抽取的数据中估计和推断出整体的特性,是科学实验、质量检验、社会调查普遍采用的一种经济有效的工作和研究方法。
10 事务表(transactional)
10.1 概述
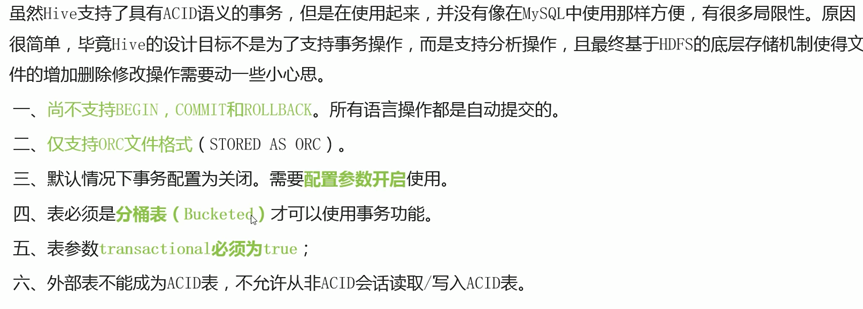
事务表创建几个要素:开启参数、分桶表、存储格式orc、表属性
10.2 事务配置
开启事务配置(可以使用set设置当前session生效 也可以配置在hive-site.xml中)
set hive.support.concurrency = true; --Hive是否支持并发
set hive.enforce.bucketing = true; --从Hive2.0开始不再需要 是否开启分桶功能
set hive.exec.dynamic.partition.mode = nonstrict; --动态分区模式 非严格
set hive.txn.manager = org.apache.hadoop.hive.ql.lockmgr.DbTxnManager; –
set hive.compactor.initiator.on = true; --是否在Metastore实例上运行启动线程和清理线程
set hive.compactor.worker.threads = 1; --在此metastore实例上运行多少个压缩程序工作线程。
10.3 创建事务表
create table trans_student(id int,name String,age int
)
clustered by (id) into 2 buckets
stored as orc
TBLPROPERTIES('transactional'='true');
10.4 insert、update、delete操作
insert into trans_student values(1,"allen",18);update trans_student
set age = 20
where id = 1;delete from trans_student where id =1;select *
from trans_student;
11 视图(view)
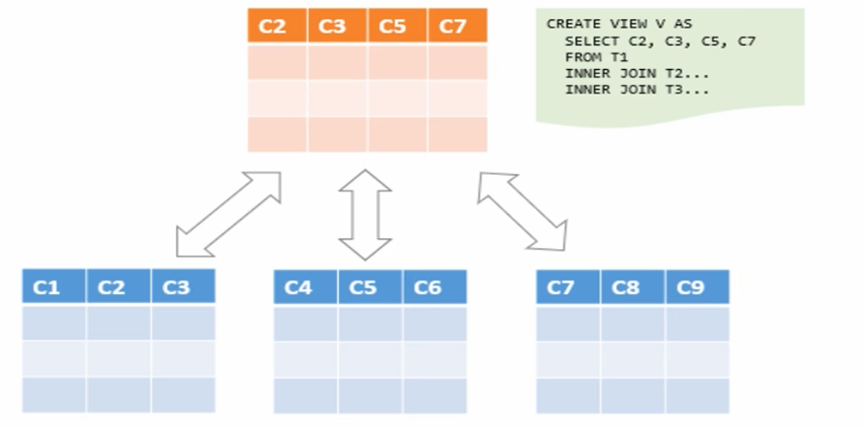
11.1 概述

不支持删除修改
11.2 创建视图
--1、创建视图
create view v_usa_covid19 as select count_date, county,state,deaths from t_usa_covid19 limit 5;--2、从已有的视图中创建视图
create view v_usa_covid19_from_view as select * from v_usa_covid19 limit 2;
11.3 显示当前已有的视图
show tables;
show views;--hive v2.2.0之后支持
11.4 视图的查询使用
select * from v_usa_covid19;
11.5 查看视图定义
show create table v_usa_covid19;
11.6 删除视图
drop view v_usa_covid19_from_view;
11.7 更改视图属性
alter view v_usa_covid19 set TBLPROPERTIES ('comment' = 'This is a view');
11.8 更改视图定义
alter view v_usa_covid19 as select county,deaths from t_usa_covid19 limit 2;
11.9 好处
- 通过视图来限制数据访问可以用来保护信息不被随意查询
create table userinfo(firstname string, lastname string, ssn string, password string);create view safer_user_info as select firstname, lastname from userinfo;
- 降低查询的复杂度,优化查询语句
from (select * from people join carton(cart.pepople_id = people.id) where firstname = 'join')a select a.lastname where a.id = 3;--把嵌套子查询变成一个视图
create view shorter_join as
select * from people join carton (cart.pepople_id = people.id) where firstname = 'join';--基于视图查询
select lastname from shorter_join where id = 3;
12 物化视图(materialized view)
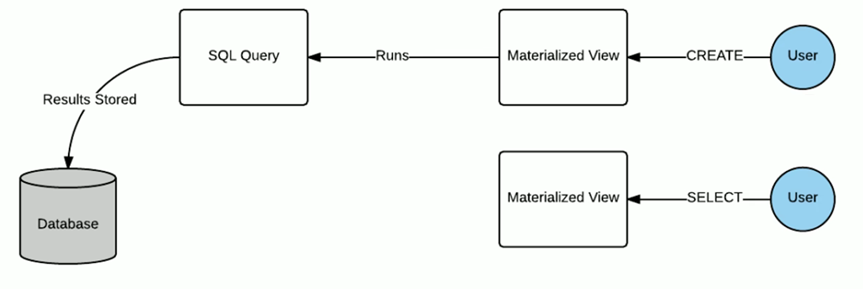
12.1 概述



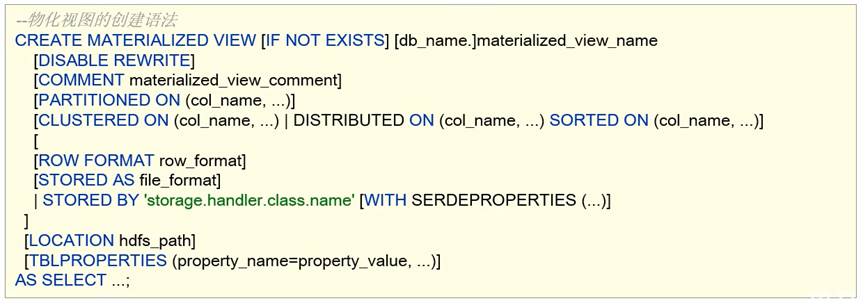
12.2 语法



 ## 12.3 物化视图、视图的区别

12.4 物化视图查询重写


12.5 案例
create table student(num int,name string,sex string,age int,dept string)row format delimitedfields terminated by ',';
select * from student;
12.5.2 创建事务表
CREATE TABLE student_trans (sno int,sname string,sdept string
)
clustered by (sno) into 2 buckets stored as orc TBLPROPERTIES('transactional'='true');
12.5.3 通过普通表 向事务表导入数据
insert overwrite table student_trans
select num,name,dept
from student;
12.5.4 查询事务表(耗时20s)
SELECT sdept, count(*) as sdept_cnt from student_trans group by sdept;
12.5.5 创建物化视图
CREATE MATERIALIZED VIEW student_trans_agg
AS SELECT sdept, count(*) as sdept_cnt from student_trans group by sdept;

12.5.6 再次查询事务表,查询重写,高效查询(耗时240ms)
SELECT sdept, count(*) as sdept_cnt from student_trans group by sdept;
12.5.7 禁止物化视图自动重写,再次查询事务表
--禁用物化视图自动重写
ALTER MATERIALIZED VIEW student_trans_agg DISABLE REWRITE;
--启用物化视图自动重写
ALTER MATERIALIZED VIEW student_trans_agg ENABLE REWRITE;
SELECT sdept, count(*) as sdept_cnt from student_trans group by sdept;
禁用后,无法查询命中,查询效率低下
12.5.8 删除物化视图
drop materialized view student_trans_agg;
12.5.9 查看物化视图
show materialized views;

北向开发项目编译问题汇总)
![[数据集][目标检测]芝麻杂草目标检测数据集VOC+YOLO格式1300张2类别](http://pic.xiahunao.cn/[数据集][目标检测]芝麻杂草目标检测数据集VOC+YOLO格式1300张2类别)


![“ABCD“[(int)qrand() % 4]作用](http://pic.xiahunao.cn/“ABCD“[(int)qrand() % 4]作用)

)


