文章目录
- 1. Distillation 基本概念
- 2. Distillation MNIST CNN分类代码实战
- 3. Progressive Distillation Diffusion生成代码实战
- 3.1 Progressive Distillation原理
- 3.2 v-parameterization
- 3.2 渐进蒸馏 cifar 代码实战
1. Distillation 基本概念
知识蒸馏被广泛的用于模型压缩和迁移学习。开山之作应该是”Distilling the Knowledge in a Neural Network“。这篇文章中,作者的motivation是找到一种方法,把多个模型的知识提炼给单个模型。通常用一个已经训练好的Teacher Model A 去教另一个 Student Model B。通常 Model A 比 Model B更强,在Model A 的引导下,Model B可以比自学 学的更好。
做法:先训练一个teacher网络,然后使用这个teacher网络的输出和数据的真实标签去训练student网络。知识蒸馏,可以用来将网络从大网络转化成一个小网络,并保留接近于大网络的性能;也可以将多个网络的学到的知识转移到一个网络中,使得单个网络的性能接近emsemble的结果。
如对于如下的图像分类任务:
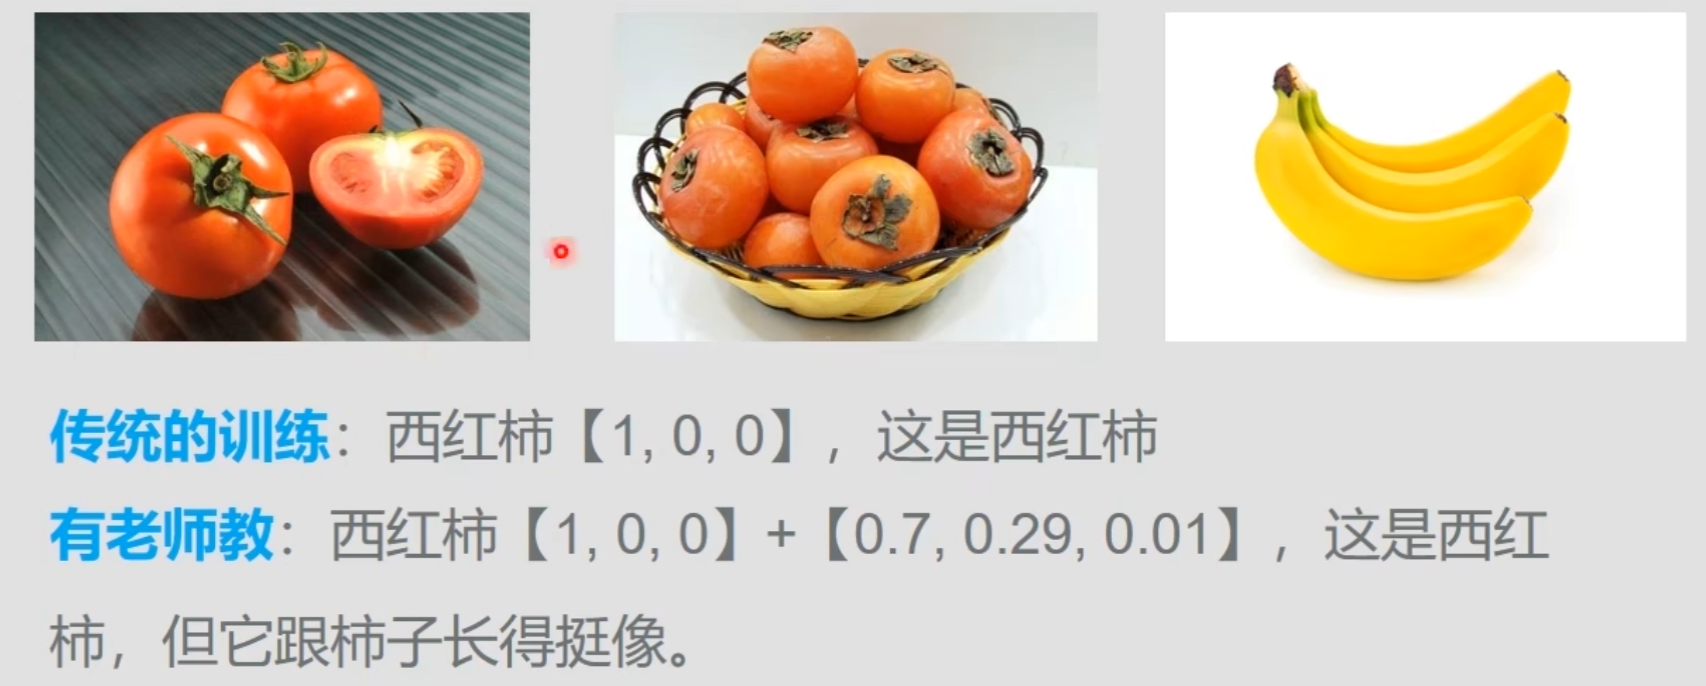
-
传统训练:当没有 Teacher 网络时候,仅仅将 data 经过 Student 网络,在softmax之后,输出概率分布值 q,将
q与label p求 cross_entropy loss 就是称为Hard loss,因为这个p是真实值的one-hot向量,我们希望q和p越接近越好。 -
知识蒸馏:当有 Teacher 的帮助下的时候,loss来自 Student 和 Teacher 网络。且Teacher 输出的
q'要经过带温度的Softmax之后(让它更加平滑,思想类似于label smooth)得到q''再与q求loss,总loss=Teacher q'' 和 Student q 的 loss+Student q 和 label p 的 loss。
L = α ⋅ H a r d _ L o s s + ( 1 − α ) ⋅ S o f t _ L o s s = α ⋅ C E ( p , q ) + ( 1 − α ) ⋅ C E ( q ′ ′ , q ) L=\alpha\cdot Hard\_Loss+(1-\alpha)\cdot Soft\_Loss=\alpha\cdot CE(p,q) + (1-\alpha)\cdot CE(q'',q) L=α⋅Hard_Loss+(1−α)⋅Soft_Loss=α⋅CE(p,q)+(1−α)⋅CE(q′′,q)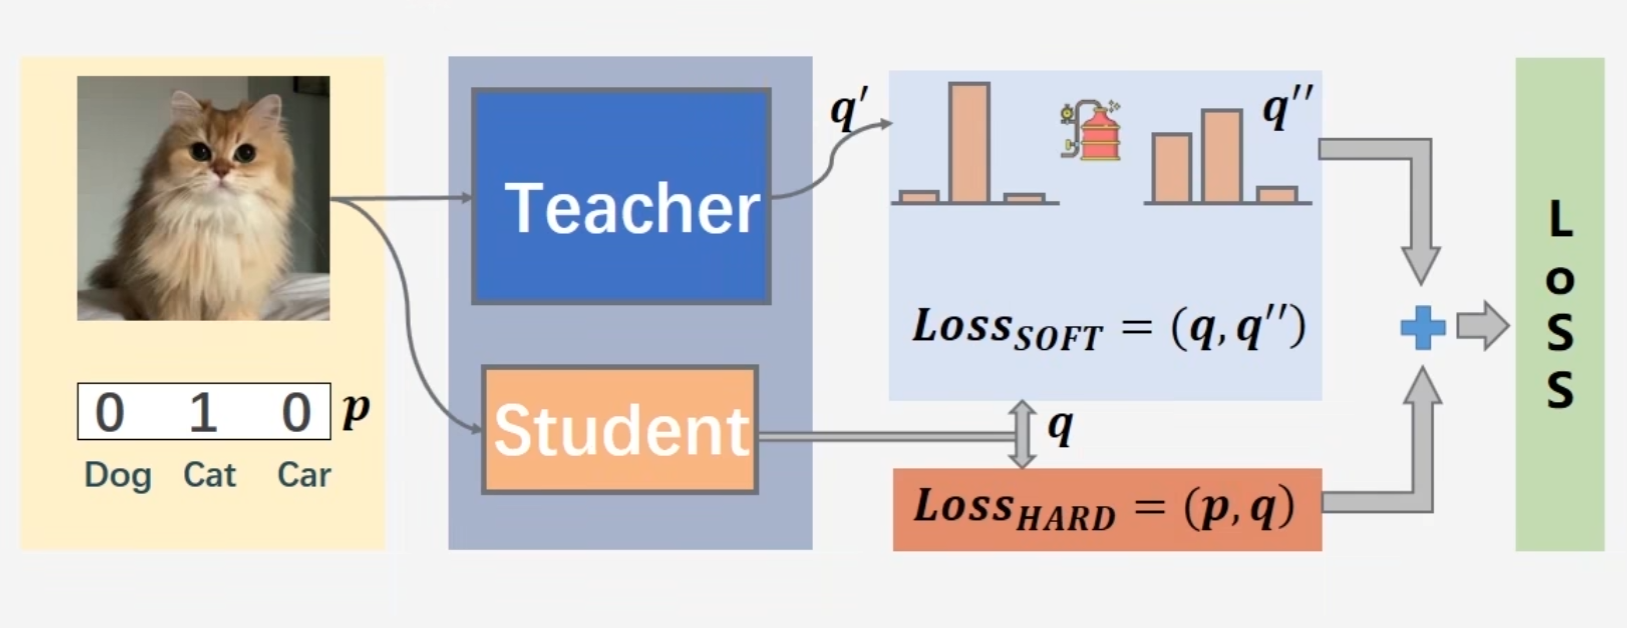
-
SoftMax问题:
普通的Cross Entropy Loss是由NLL Loss、Log、Softmax组成的:
F.cross_entropy(p,target)) = F.nll_loss(torch.log(torch.softmax(p)), target)
这个 cross_entropy loss 中的 softmax 其实没有那么 soft,输出的概率分布,使得对于正确类别会有一个很高的置信度,而对于其他的类别的概率几乎为0。这样的话,teacher网络学到数据的相似信息(例如数字2和3,7很类似,这种soft label信息)很难传达给student网络。 因此,文章提出了带温度系数T的Softmax:Softmax-T

这里 q i q_i qi 是student网络学习的对象(soft targets), z i z_i zi 是神经网络softmax前的输出logit。如果将T取1,这个公式就是softmax,根据logit输出各个类别的概率。如果T接近于0,则最大的值会越近1,其它值会接近0,近似于onehot编码。如果T越大,则输出的结果的分布越平缓,相当于平滑的一个作用,起到保留相似信息的作用。如果T等于无穷,就是一个均匀分布。
对比Softmax(上) 和 Softmax-T(下) 对模型预测结果概率分布的可视化:
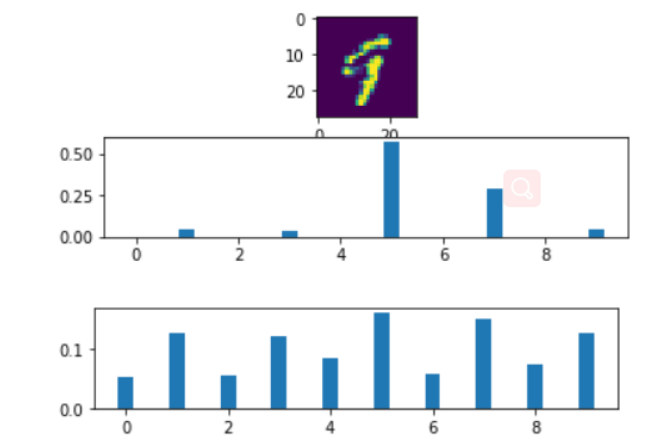
最终的蒸馏损失,就是将原本的CE Loss中Soft Loss的Softmax换成Softmax_T,得到 KD Loss:
K D _ L o s s = α ⋅ H a r d _ L o s s + ( 1 − α ) ⋅ S o f t _ L o s s = α ⋅ C E ( p , q ) + ( 1 − α ) ⋅ C E ( q ′ ′ , q ) KD\_Loss=\alpha\cdot Hard\_Loss+(1-\alpha)\cdot Soft\_Loss=\alpha\cdot CE(p,q) + (1-\alpha)\cdot CE(q'',q) KD_Loss=α⋅Hard_Loss+(1−α)⋅Soft_Loss=α⋅CE(p,q)+(1−α)⋅CE(q′′,q)
p是真实标签label,q是Student输出,q’'是Teacher输出。
def distillation_loss(y,labels,teacher_scores,temp,alpha):soft_loss = nn.KLDivLoss()(F.log_softmax(y/temp, dim=1), F.softmax(teacher_scores/temp,dim=1))hard_loss = F.cross_entropy(y,labels)return soft_loss *(temp*temp*2.0*alpha) + hard_loss *(1. - alpha)
2. Distillation MNIST CNN分类代码实战
- Import libs:
import torch
from torch import nn
import torch.nn.functional as F
from torch.utils.data import DataLoader
from tqdm import tqdm
import torchvision
from torchvision import transforms
- Define Teacher CNN Model(
big) and Student CNN Model(small):
class TeacherModel(nn.Module):def __init__(self, in_channels=1, num_classes=10):super(TeacherModel, self).__init__()self.relu = nn.ReLU()self.fc1 = nn.Linear(784, 1200)self.fc2 = nn.Linear(1200, 1200)self.fc3 = nn.Linear(1200, num_classes)self.dropout = nn.Dropout(p=0.5)def forward(self, x):x = x.view(-1, 784)x = self.relu(self.dropout(self.fc1(x)))x = self.relu(self.dropout(self.fc2(x)))x = self.fc3(x)return xclass StudentModel(nn.Module):def __init__(self, in_channels=1, num_classes=10):super(StudentModel, self).__init__()self.relu = nn.ReLU()self.fc1 = nn.Linear(784, 20)self.fc2 = nn.Linear(20, 20)self.fc3 = nn.Linear(20, num_classes)self.dropout = nn.Dropout(p=0.5)def forward(self, x):x = x.view(-1, 784)x = self.relu(self.dropout(self.fc1(x)))x = self.relu(self.dropout(self.fc2(x)))x = self.fc3(x)return x
- Function of Train Teacher Model:
def teacher(device, train_loader, test_loader):print('--------------teachermodel start--------------')model = TeacherModel()model = model.to(device)criterion = nn.CrossEntropyLoss()optimizer = torch.optim.Adam(model.parameters(), lr=1e-4)epochs = 6for epoch in range(epochs):model.train()for data, target in tqdm(train_loader):data = data.to(device)target = target.to(device)preds = model(data)loss = criterion(preds, target)optimizer.zero_grad()loss.backward()optimizer.step()model.eval()num_correct = 0num_samples = 0with torch.no_grad():for x, y in test_loader:x = x.to(device)y = y.to(device)preds = model(x)predictions = preds.max(1).indicesnum_correct += (predictions.eq(y)).sum().item()num_samples += predictions.size(0)acc = num_correct / num_samplesmodel.train()print('Epoch:{}\t Acc:{:.4f}'.format(epoch + 1, acc))torch.save(model, 'teacher.pkl')print('--------------teachermodel end--------------')
- Function of Train Stuent Model
independently:
def student(device, train_loader, test_loader):print('--------------studentmodel start--------------')model = StudentModel()model = model.to(device)criterion = nn.CrossEntropyLoss()optimizer = torch.optim.Adam(model.parameters(), lr=1e-4)epochs = 3for epoch in range(epochs):model.train()for data, target in tqdm(train_loader):data = data.to(device)target = target.to(device)preds = model(data)loss = criterion(preds, target)optimizer.zero_grad()loss.backward()optimizer.step()model.eval()num_correct = 0num_samples = 0with torch.no_grad():for x, y in test_loader:x = x.to(device)y = y.to(device)# print(y)preds = model(x)# print(preds)predictions = preds.max(1).indices# print(predictions)num_correct += (predictions.eq(y)).sum().item()num_samples += predictions.size(0)acc = num_correct / num_samplesmodel.train()print('Epoch:{}\t Acc:{:.4f}'.format(epoch + 1, acc))print('--------------studentmodel prediction end--------------')
- Function of
DistillingTeacher Model to Student Model:(核心)
def kd(teachermodel, device, train_loader, test_loader):print('--------------kdmodel start--------------')teachermodel.eval()studentmodel = StudentModel()studentmodel = studentmodel.to(device)studentmodel.train()temp = 7 #蒸馏温度alpha = 0.3hard_loss = nn.CrossEntropyLoss()soft_loss = nn.KLDivLoss(reduction='batchmean')optimizer = torch.optim.Adam(studentmodel.parameters(), lr=1e-4)epochs = 20for epoch in range(epochs):for data, target in tqdm(train_loader):data = data.to(device)target = target.to(device)with torch.no_grad():teacher_preds = teachermodel(data)student_preds = studentmodel(data)student_loss = hard_loss(student_preds, target) #hard_lossdistillation_loss = soft_loss(F.log_softmax(student_preds / temp, dim=1),F.softmax(teacher_preds / temp, dim=1)) #soft_lossloss = alpha * student_loss + (1 - alpha) * distillation_lossoptimizer.zero_grad()loss.backward()optimizer.step()studentmodel.eval()num_correct = 0num_samples = 0with torch.no_grad():for x, y in test_loader:x = x.to(device)y = y.to(device)preds = studentmodel(x)predictions = preds.max(1).indicesnum_correct += (predictions.eq(y)).sum().item()num_samples += predictions.size(0)acc = num_correct / num_samplesstudentmodel.train()print('Epoch:{}\t Acc:{:.4f}'.format(epoch + 1, acc))print('--------------kdmodel end--------------')
- Main function (load data, implement train function):
if __name__ == '__main__':torch.manual_seed(0)device = torch.device("cuda" if torch.cuda.is_available else "cpu")torch.backends.cudnn.benchmark = True#加载数据集X_train = torchvision.datasets.MNIST(root="dataset/",train=True,transform=transforms.ToTensor(),download=True)X_test = torchvision.datasets.MNIST(root="dataset/",train=False,transform=transforms.ToTensor(),download=True)train_loader = DataLoader(dataset=X_train, batch_size=32, shuffle=True)test_loader = DataLoader(dataset=X_test, batch_size=32, shuffle=False)#从头训练教师模型,并预测teacher(device, train_loader, test_loader)#从头训练学生模型,并预测student(device, train_loader, test_loader)#知识蒸馏训练学生模型model = torch.load('teacher.pkl')kd(model, device, train_loader, test_loader)
最终训练结果,对比Teacher Mdeol、Stuent Model without Distillation、Stuent Model with Distillation的Accuracy:可以看出,①使用Teacher蒸馏训练出的Student,比独立训练的Student更强。②实际场景中,大部分情况下,student本身都是显著弱于teacher的,因此很难超越teacher的表现。
Teacher Mdeol:Epoch:3 Acc:0.9689,Epoch:6 Acc:0.9764Stuent Model without Distillation:Epoch:3 Acc:0.8173Stuent Model with Distillation:Epoch:3 Acc:0.8387,Epoch:20 Acc:0.9015
3. Progressive Distillation Diffusion生成代码实战
通过跨步蒸馏减少扩散模型采样步数的方法,主要内容包括:progressive distillation、guided diffusion distillation、step distillation、Data-free Distillation、Latent Consistency Models。
本节主要讲解渐进式蒸馏 Progressive Distillation: 因为本文提出的 v-parameterization 在后续的Diffusion工作中被广泛的应用,来加快推理速度,如Imagen video, Imagen, Stable Diffusion, Dall E等。
3.1 Progressive Distillation原理
渐进式蒸馏的目标:是将一个步骤很多的Teacher Diffusion蒸馏为一个步骤较少的Student Diffusion,一般通过反复迭代的方式进行。每次迭代,Student企图1步学习Teacher模型2步的结果。每次迭代蒸馏后,Student需要的Sample步数都会比原来少一半,而当前的Student将会变成下一次的Teacher。
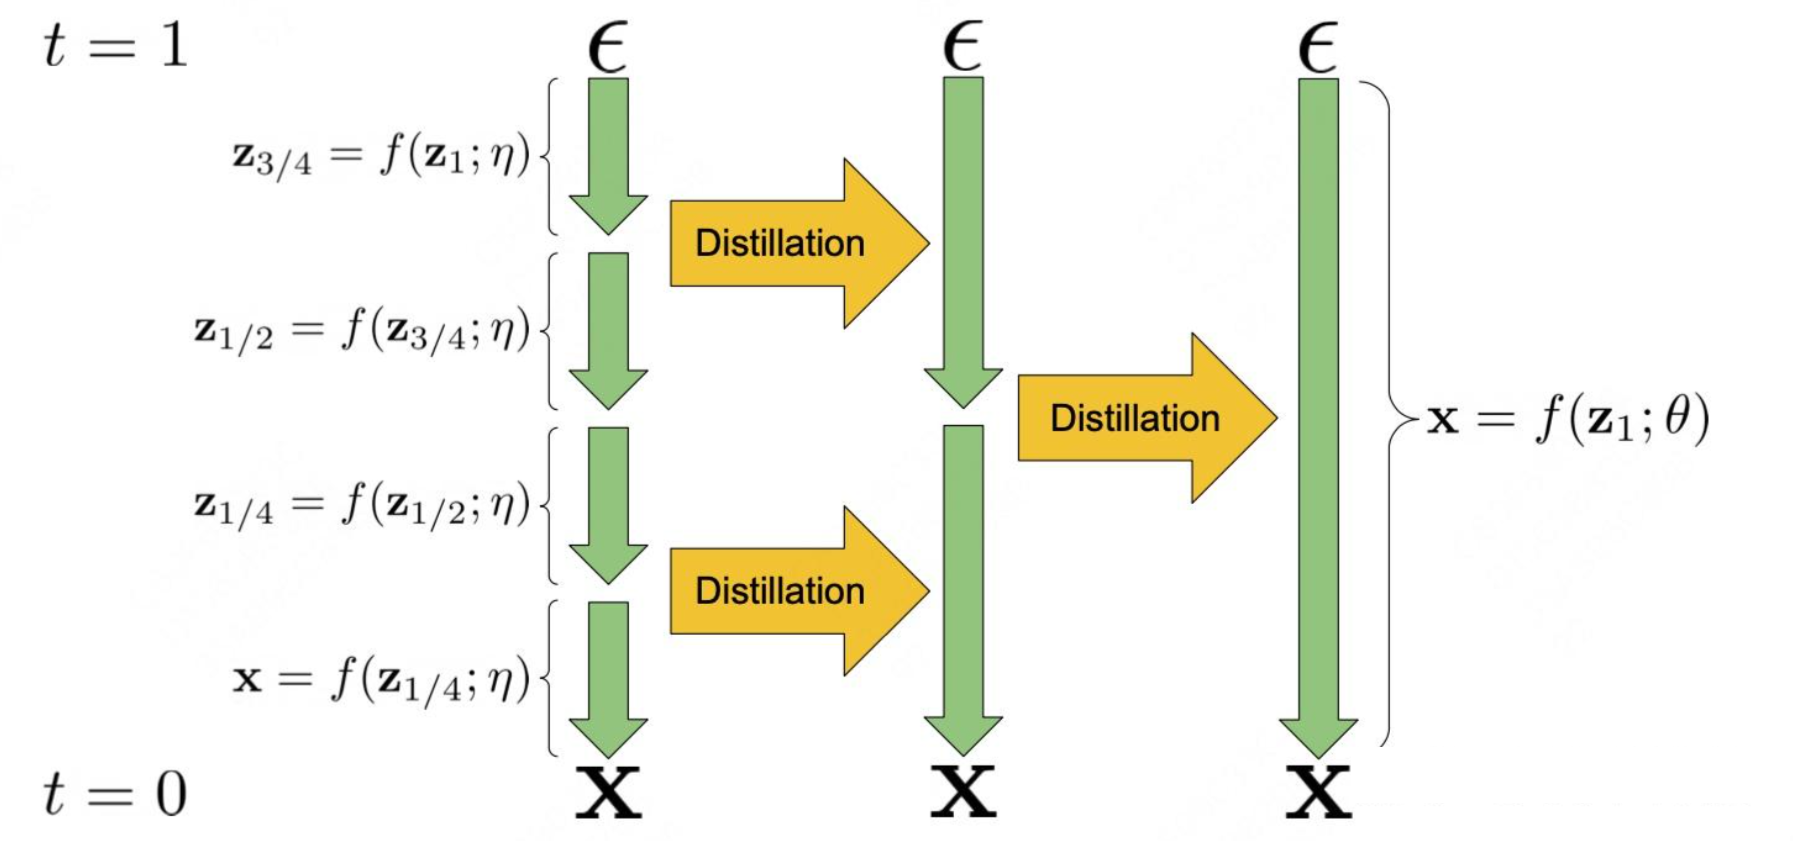
如上图所示,Teacher Diffusion f ( z , η ) f(z,\eta) f(z,η) 通过 4 个确定性步骤将随机噪声 ε 映射到样本 x,Student Diffusion f ( z , θ ) f(z,\theta) f(z,θ) 只需1步即可学习到这种映射关系。
渐进蒸馏方法:
-
训练Teacher Diffusion:Teacher模型的训练使用
标准Diffusion模型训练方法,它的训练Loss函数定义为Noise的 ε 空间中的均方误差:

相关变量定义:

注意:除了通过直接预测 x 进行训练(x-parameterization),还可以通过分别预测 x 和 ε(ε-parameterization),再合并为:

,或者通过预测 v(v-parameterization),再计算 :

-
渐进蒸馏Student Diffusion:蒸馏前,用Teacher Diffusion的权重初始化Student Diffusion,且模型结构一样。
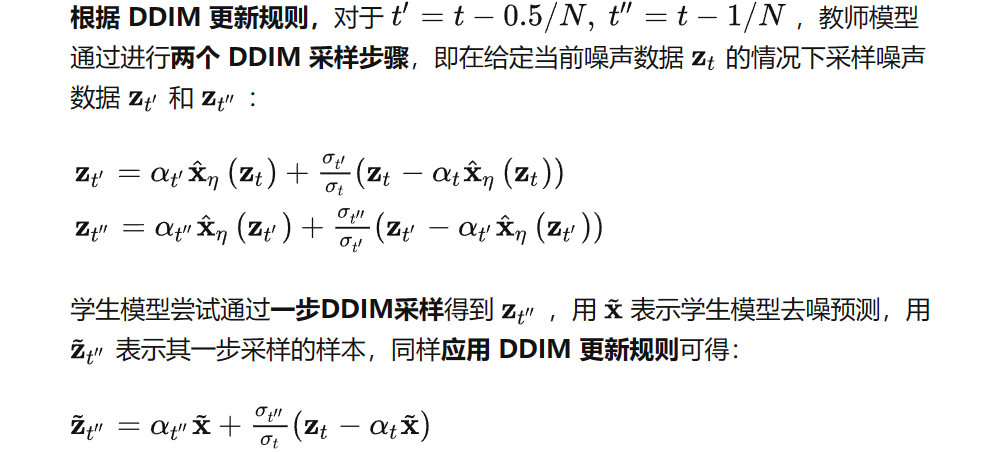
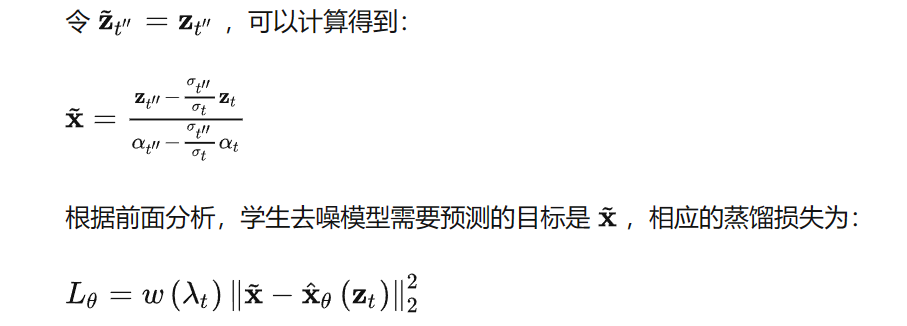
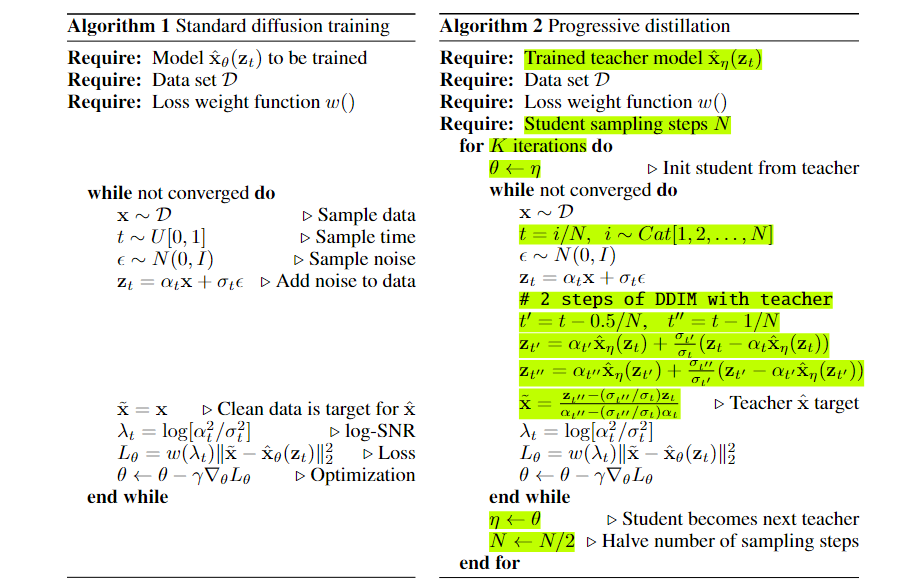
渐进蒸馏Diffusion方法与标准Diffusion模型训练方法的主要区别在于如何确定去噪模型的 Label 值。- 在标准Diffusion训练中:Diffusion去噪的 Label 是
DDIM每个step的预定义好的Noise, - 在渐进式蒸馏Diffusion中:Student Diffusion去噪模型需要预测的 Label 是
Teacher模型预测的Noise。且Student Diffusion企图用1步的预测Noise匹配Teacher Diffusion 2步的预测Noise,即Student Diffusion在 ε 空间的Label是Teacher Diffusion 2步的预测Noise z t ′ ′ z_t^{''} zt′′(ε-parameterization)。再利用 z ˉ t ′ ′ = z t ′ ′ \bar z_t^{''} = z_t^{''} zˉt′′=zt′′还可以变换到 x 空间(x-parameterization):
- 在标准Diffusion训练中:Diffusion去噪的 Label 是
总结:传统Diffusion训练 和 渐进蒸馏Diffusion
3.2 v-parameterization
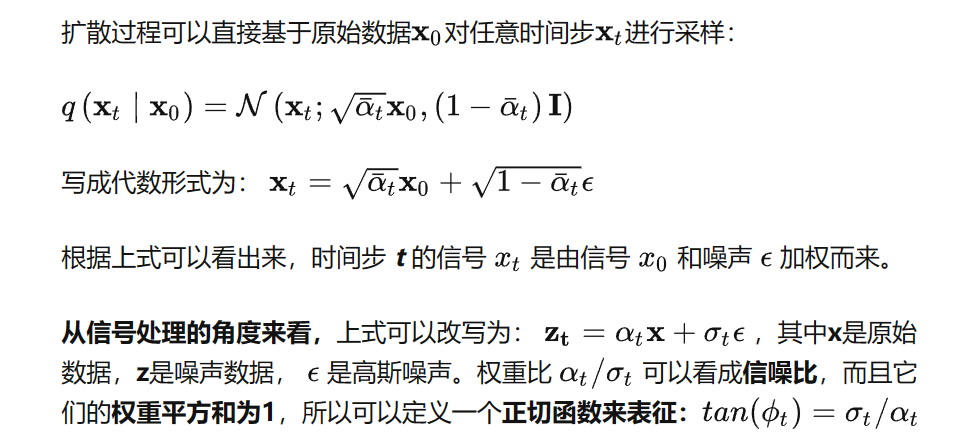
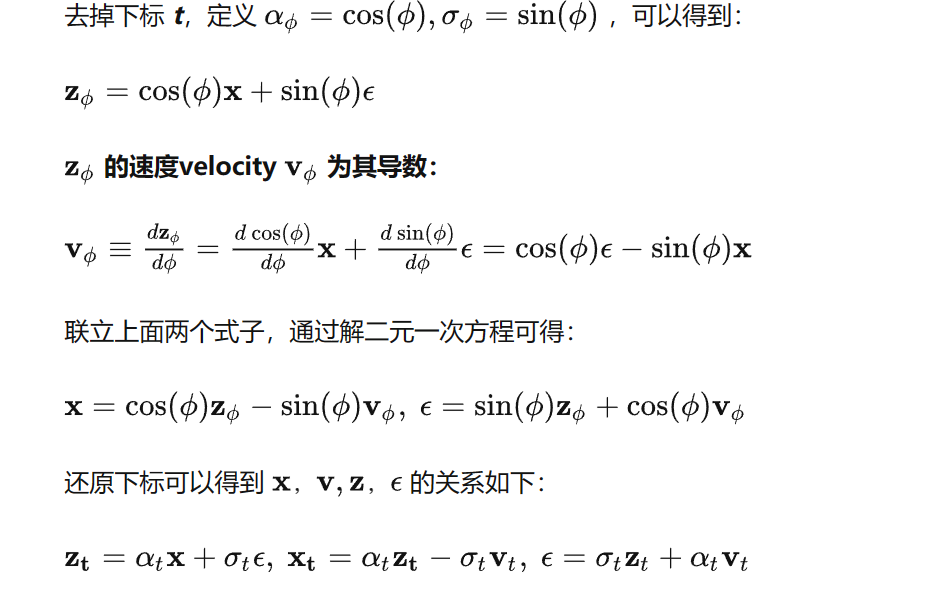
我们都知道常规的扩散模型都是通过噪声预测来进行去噪的,即 ε-parameterization-prediction,那么什么是速度预测 v-parameterization-prediction,为什么要用速度预测?
与常规的基于噪声预测的扩散模型不同,基于速度预测的扩散模型的输出是速度 v ^ θ \hat v_{\theta} v^θ ,相应的优化目标函数为:

其中 v 是速度真值,可以从真实样本 x 和噪声 ε 根据噪声级别计算得到:

由于在扩散模型蒸馏中,v-parameterization 模型往往比 ε-parameterization表现更好,一般将 ε-parameterization 微调为 v-parameterization。
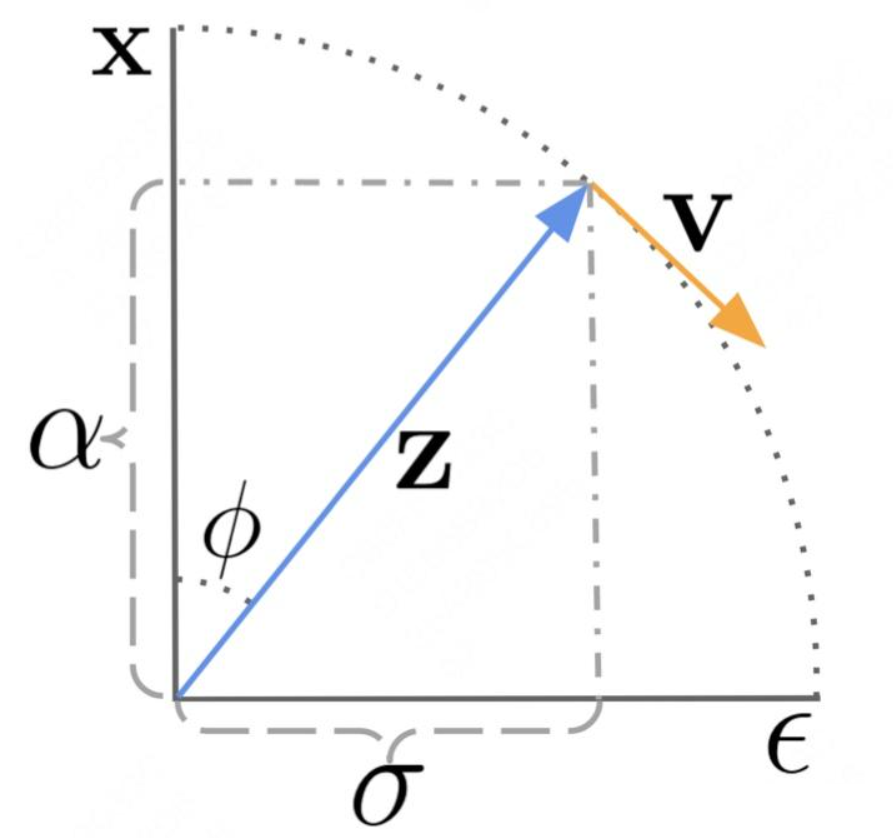
下面将介绍 x, v, z, ε 的关系(结合上图):
总结三种 parameterization:

3.2 渐进蒸馏 cifar 代码实战
参考Colab:diffusion_distillation.ipynb
Downloadcodes and libs, and import libs:
!apt-get -qq install subversion
!svn checkout https://github.com/google-research/google-research/trunk/diffusion_distillation
!pip install -r diffusion_distillation/diffusion_distillation/requirements.txt --quietimport os
import time
import requests
import functools
import jax
from jax import config
import jax.numpy as jnp
import flax
from matplotlib import pyplot as plt
import numpy as onp
import tensorflow.compat.v2 as tf
tf.enable_v2_behavior()
from diffusion_distillation import diffusion_distillation
- configure
JAXto use the TPU:JAX是谷歌开源的、可以在CPU、GPU和TPU上运行的numpy,是针对机器学习研究的高性能自微分计算加速框架。
if 'TPU_DRIVER_MODE' not in globals():url = 'http://' + os.environ['COLAB_TPU_ADDR'].split(':')[0] + ':8475/requestversion/tpu_driver_nightly'resp = requests.post(url)time.sleep(5)TPU_DRIVER_MODE = 1
config.FLAGS.jax_xla_backend = "tpu_driver"
config.FLAGS.jax_backend_target = "grpc://" + os.environ['COLAB_TPU_ADDR']
print(config.FLAGS.jax_backend_target)
Traina new diffusion model:
# create model
config = diffusion_distillation.config.cifar_base.get_config()
model = diffusion_distillation.model.Model(config)# init params
state = jax.device_get(model.make_init_state())
state = flax.jax_utils.replicate(state)# JIT compile training step
train_step = functools.partial(model.step_fn, jax.random.PRNGKey(0), True)
train_step = functools.partial(jax.lax.scan, train_step)  # for substeps
train_step = jax.pmap(train_step, axis_name='batch', donate_argnums=(0,))# build input pipeline
total_bs = config.train.batch_size
device_bs = total_bs // jax.device_count()
train_ds = model.dataset.get_shuffled_repeated_dataset(split='train',batch_shape=(jax.local_device_count(),  # for pmapconfig.train.substeps,  # for lax.scan over multiple substepsdevice_bs,  # batch size per device),local_rng=jax.random.PRNGKey(0),augment=True)
train_iter = diffusion_distillation.utils.numpy_iter(train_ds)# run training
for step in range(10):batch = next(train_iter)state, metrics = train_step(state, batch)metrics = jax.device_get(flax.jax_utils.unreplicate(metrics))metrics = jax.tree_map(lambda x: float(x.mean(axis=0)), metrics)print(metrics)
Distilla trained diffusion model:(核心)
# create model
config = diffusion_distillation.config.cifar_distill.get_config()
model = diffusion_distillation.model.Model(config)# load the teacher params
model.load_teacher_state(config.distillation.teacher_checkpoint_path)# init student state
init_params = diffusion_distillation.utils.copy_pytree(model.teacher_state.ema_params)
optim = model.make_optimizer_def().create(init_params)
state = diffusion_distillation.model.TrainState(step=model.teacher_state.step,optimizer=optim,ema_params=diffusion_distillation.utils.copy_pytree(init_params),num_sample_steps=model.teacher_state.num_sample_steps//2)
# build input pipeline
total_bs = config.train.batch_size
device_bs = total_bs // jax.device_count()
train_ds = model.dataset.get_shuffled_repeated_dataset(split='train',batch_shape=(jax.local_device_count(),  # for pmapconfig.train.substeps,  # for lax.scan over multiple substepsdevice_bs,  # batch size per device),local_rng=jax.random.PRNGKey(0),augment=True)
train_iter = diffusion_distillation.utils.numpy_iter(train_ds)steps_per_distill_iter = 10  # number of distillation steps per iteration of progressive distillation
end_num_steps = 4  # eventual number of sampling steps we want to use
while state.num_sample_steps >= end_num_steps:# compile training steptrain_step = functools.partial(model.step_fn, jax.random.PRNGKey(0), True)train_step = functools.partial(jax.lax.scan, train_step)  # for substepstrain_step = jax.pmap(train_step, axis_name='batch', donate_argnums=(0,))# train the student against the teacher modelprint('distilling teacher using %d sampling steps into student using %d steps'% (model.teacher_state.num_sample_steps, state.num_sample_steps))state = flax.jax_utils.replicate(state)for step in range(steps_per_distill_iter):batch = next(train_iter)state, metrics = train_step(state, batch)metrics = jax.device_get(flax.jax_utils.unreplicate(metrics))metrics = jax.tree_map(lambda x: float(x.mean(axis=0)), metrics)print(metrics)# student becomes new teacher for next distillation iterationmodel.teacher_state = jax.device_get(flax.jax_utils.unreplicate(state).replace(optimizer=None))# reset student optimizer for next distillation iterationinit_params = diffusion_distillation.utils.copy_pytree(model.teacher_state.ema_params)optim = model.make_optimizer_def().create(init_params)state = diffusion_distillation.model.TrainState(step=model.teacher_state.step,optimizer=optim,ema_params=diffusion_distillation.utils.copy_pytree(init_params),num_sample_steps=model.teacher_state.num_sample_steps//2)
- Load a distilled model checkpoint and sample from it:
# list all available distilled checkpoints
!gsutil ls gs://gresearch/diffusion-distillation# create imagenet model
config = diffusion_distillation.config.imagenet64_base.get_config()
model = diffusion_distillation.model.Model(config)# load distilled checkpoint for 8 sampling steps
loaded_params = diffusion_distillation.checkpoints.restore_from_path('gs://gresearch/diffusion-distillation/imagenet_8', target=None)['ema_params']# fix possible flax version errors
ema_params = jax.device_get(model.make_init_state()).ema_params
loaded_params = flax.core.unfreeze(loaded_params)
loaded_params = jax.tree_map(lambda x, y: onp.reshape(x, y.shape) if hasattr(y, 'shape') else x,loaded_params,flax.core.unfreeze(ema_params))
loaded_params = flax.core.freeze(loaded_params)
del ema_params# sample from the model
imagenet_classes = {'malamute': 249, 'siamese': 284, 'great_white': 2,'speedboat': 814, 'reef': 973, 'sports_car': 817,'race_car': 751, 'model_t': 661, 'truck': 867}
labels = imagenet_classes['truck'] * jnp.ones((4,), dtype=jnp.int32)
samples = model.samples_fn(rng=jax.random.PRNGKey(0), labels=labels, params=loaded_params, num_steps=8)
samples = jax.device_get(samples).astype(onp.uint8)# visualize samples
padded_samples = onp.pad(samples, ((0,0), (1,1), (1,1), (0,0)), mode='constant', constant_values=255)
nrows = int(onp.sqrt(padded_samples.shape[0]))
ncols = padded_samples.shape[0]//nrows
_, height, width, channels = padded_samples.shape
img_grid = padded_samples.reshape(nrows, ncols, height, width, channels).swapaxes(1,2).reshape(height*nrows, width*ncols, channels)
img = plt.imshow(img_grid)
plt.axis('off')
(-0.5, 131.5, 131.5, -0.5)
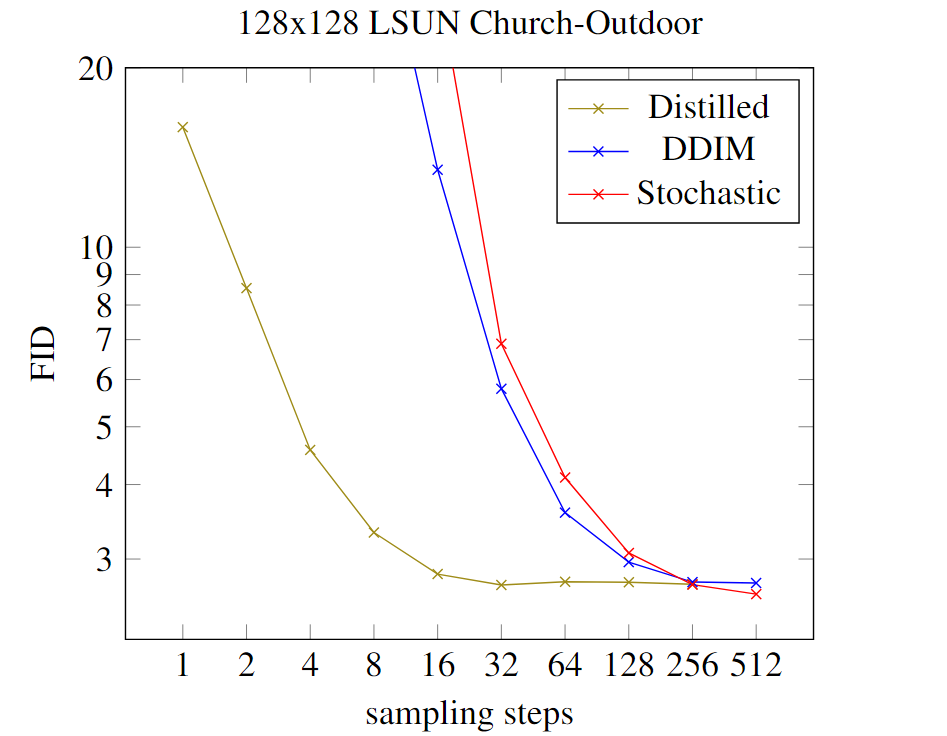
可以看出蒸馏过的Diffusion相较于原始的Diffusion,可以在更少的step下得到不错的生成质量FID。(DDIM 采样器 vs 优化的stochastic随机采样器 vs 蒸馏)


:VSCode配置python,并安装open3d教程)


风格的物品和BUFF效果(附项目源码))

)


![2023-简单点-机器学习中常用的特殊函数,激活函数[sigmoid tanh ]](http://pic.xiahunao.cn/2023-简单点-机器学习中常用的特殊函数,激活函数[sigmoid tanh ])