Arduino 红外线控制器
红外线小车
You’ve likely encountered the infrared remote controller, also known as the IR remote controller, while using home electronic devices like TVs and air conditioners… In this tutorial, we are going to learn how to use infrared (IR) remote controller and infrared receiver to control Arduino. In detail, we will learn:
您可能在使用电视和空调等家用电子设备时遇到过红外遥控器,也称为红外遥控器…在本教程中,我们将学习如何使用红外(IR)遥控器和红外接收器来控制Arduino。详细来说,我们将学习:
- How to connect an IR receiver to Arduino board
如何将红外接收器连接到Arduino板 - How to program Arduino to read the command from IR remote controller via IR receiver
如何对Arduino进行编程,使其通过红外接收器从红外遥控器读取命令
Then you can modify the code to control LED, fan, pump, actuator… via IR remote controller.
然后你可以修改代码来控制LED、风扇、泵、执行器…通过红外遥控器。
Hardware Required 所需硬件
| 1 | × | Arduino UNO or Genuino UNO Arduino UNO 或 Genuino UNO | |
|---|---|---|---|
| 1 | × | USB 2.0 cable type A/B USB 2.0 电缆 A/B 型 | |
| 1 | × | IR Kit (Remote Controller and Receiver) 红外套件(遥控器和接收器) | |
| 1 | × | CR2025 Battery CR2025 电池 | |
| 1 | × | Jumper Wires 跳线 | |
| 1 | × | (Optional) 9V Power Adapter for Arduino (可选)用于Arduino的9V电源适配器 | |
| 1 | × | (Recommended) Screw Terminal Block Shield for Arduino Uno (推荐)用于Arduino Uno的螺钉接线端子屏蔽层 | |
| 1 | × | (Optional) Transparent Acrylic Enclosure For Arduino Uno (可选)Arduino Uno透明亚克力外壳 |
About IR Remote Control 关于红外遥控器
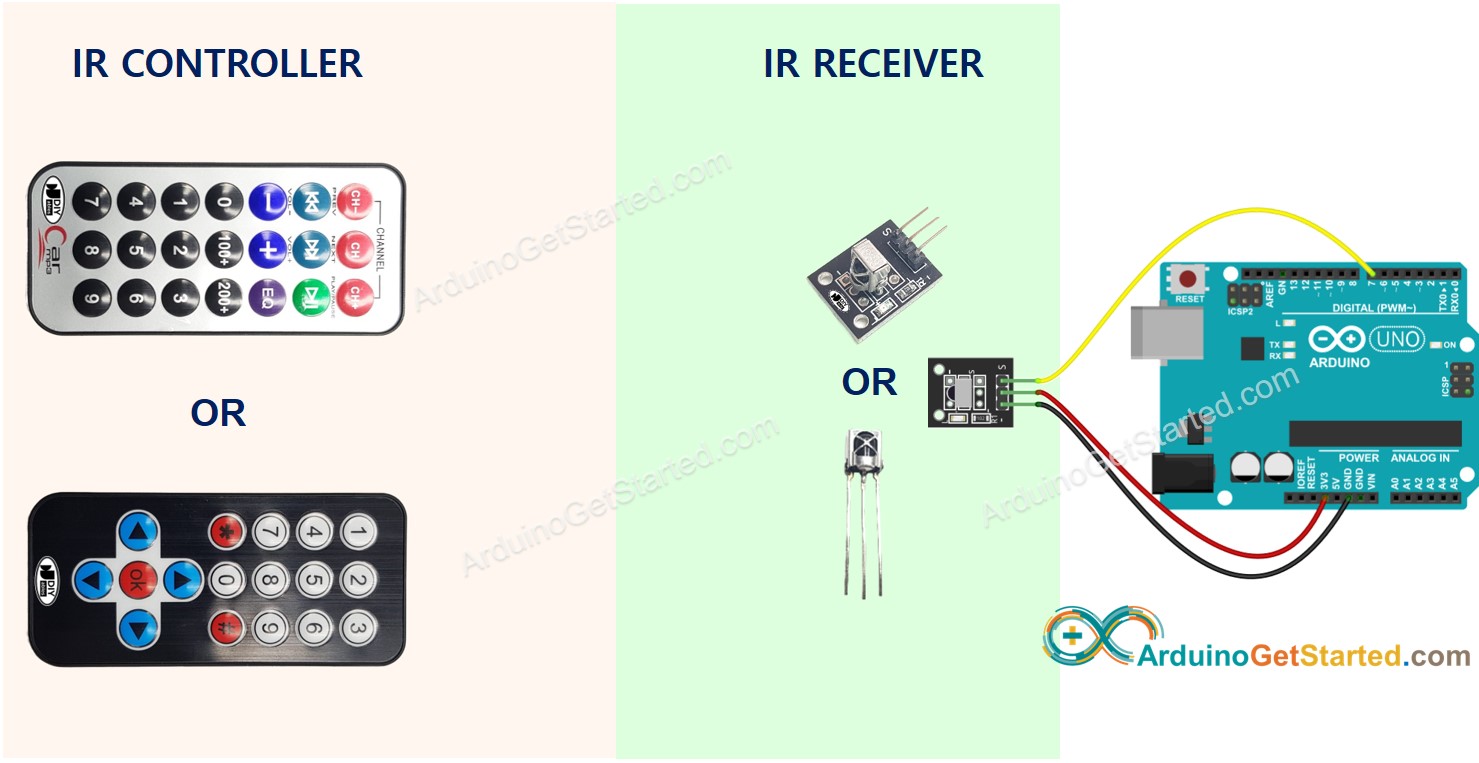
An IR control system includes two components:
红外控制系统包括两个组件:
- IR remote controller 红外遥控器
- IR receiver 红外接收器
An IR kit usually includes two above components.
红外套件通常包括上述两个组件。
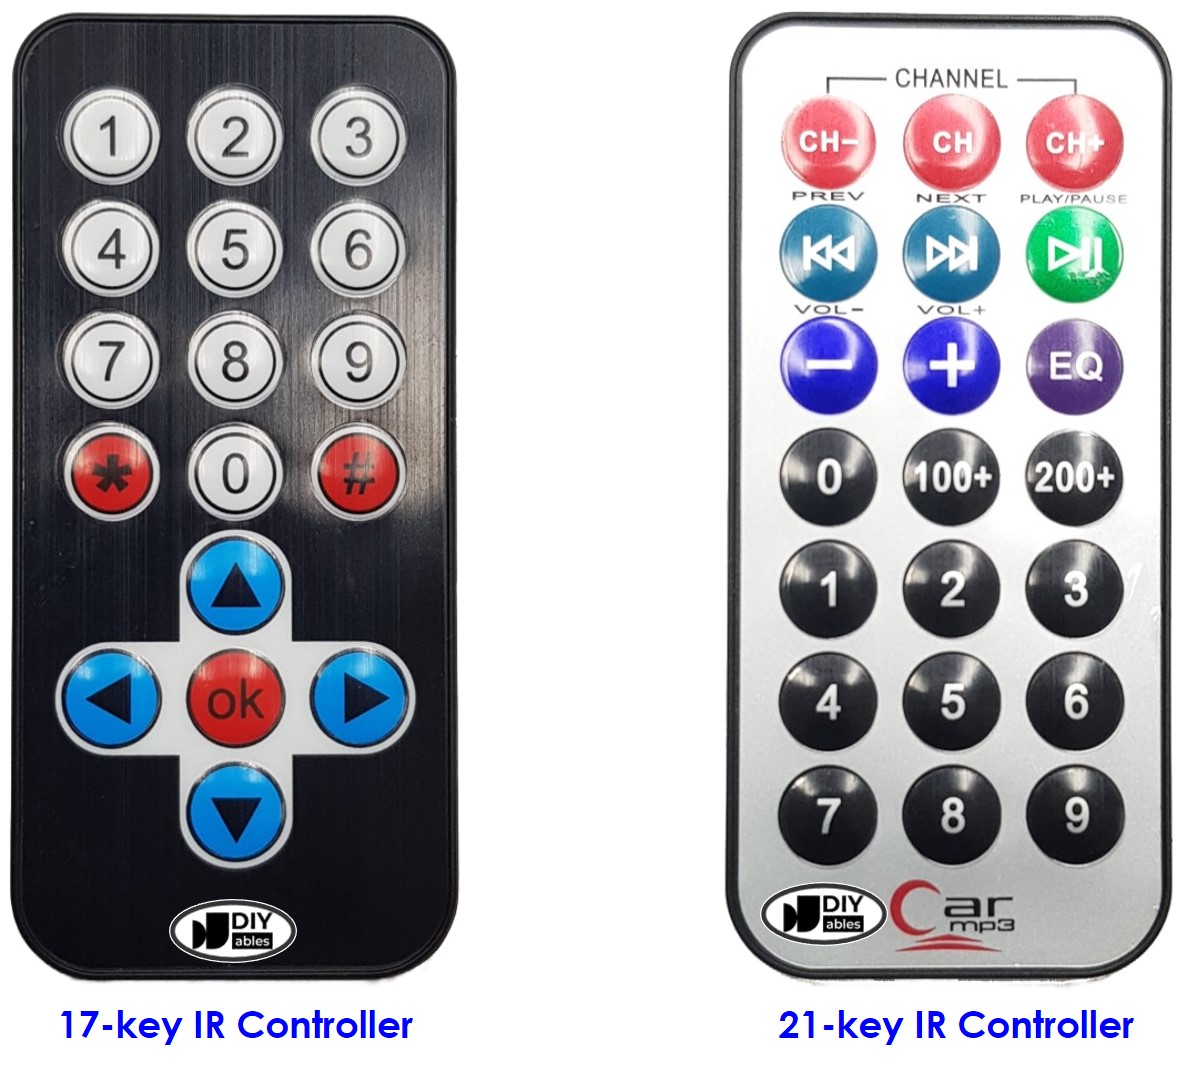
IR remote controller 红外遥控器
The IR remote controller is a handheld device that emits infrared signals. The IR remote controller consists of a keypad with various buttons:
红外遥控器是一种发射红外信号的手持设备。红外遥控器由一个带有各种按钮的键盘组成:
- Each button on the remote controller corresponds to a specific function or command.
遥控器上的每个按钮都对应一个特定的功能或命令。 - When a button is pressed, the remote emits an infrared signal that carries a unique code or pattern associated with the pressed button.
按下按钮时,遥控器会发出红外信号,该信号带有与按下按钮相关联的唯一代码或图案。 - These infrared signals are not visible to the human eye as they are in the infrared spectrum.
这些红外信号在红外光谱中是人眼不可见的。
IR Receiver 红外接收器
The IR receiver module is a sensor that detects and receives the infrared signals emitted by the remote controller.
红外接收器模块是检测和接收遥控器发出的红外信号的传感器。
The infrared receiver detects the incoming infrared signals and converts them into the code (command) representing the button pressed on the remote controller.
红外接收器检测输入的红外信号,并将其转换为代表遥控器上按下的按钮的代码(命令)。
The IR Receiver can be a sensor or a module. You can use the following choices:
红外接收器可以是传感器或模块。您可以使用以下选项:
- IR Receiver Module only 仅限红外接收器模块
- IR Receiver Sensor only 仅限红外接收器传感器
- IR Receiver Sensor + Adapter
红外接收器传感器 + 适配器
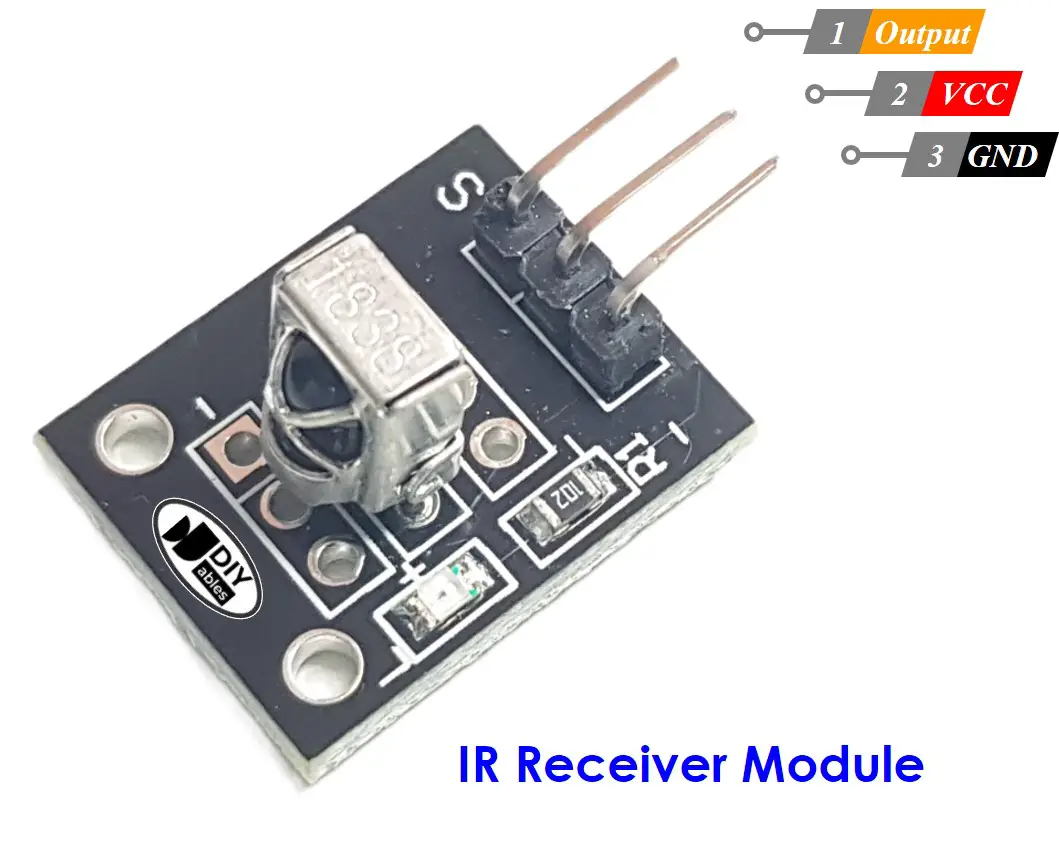
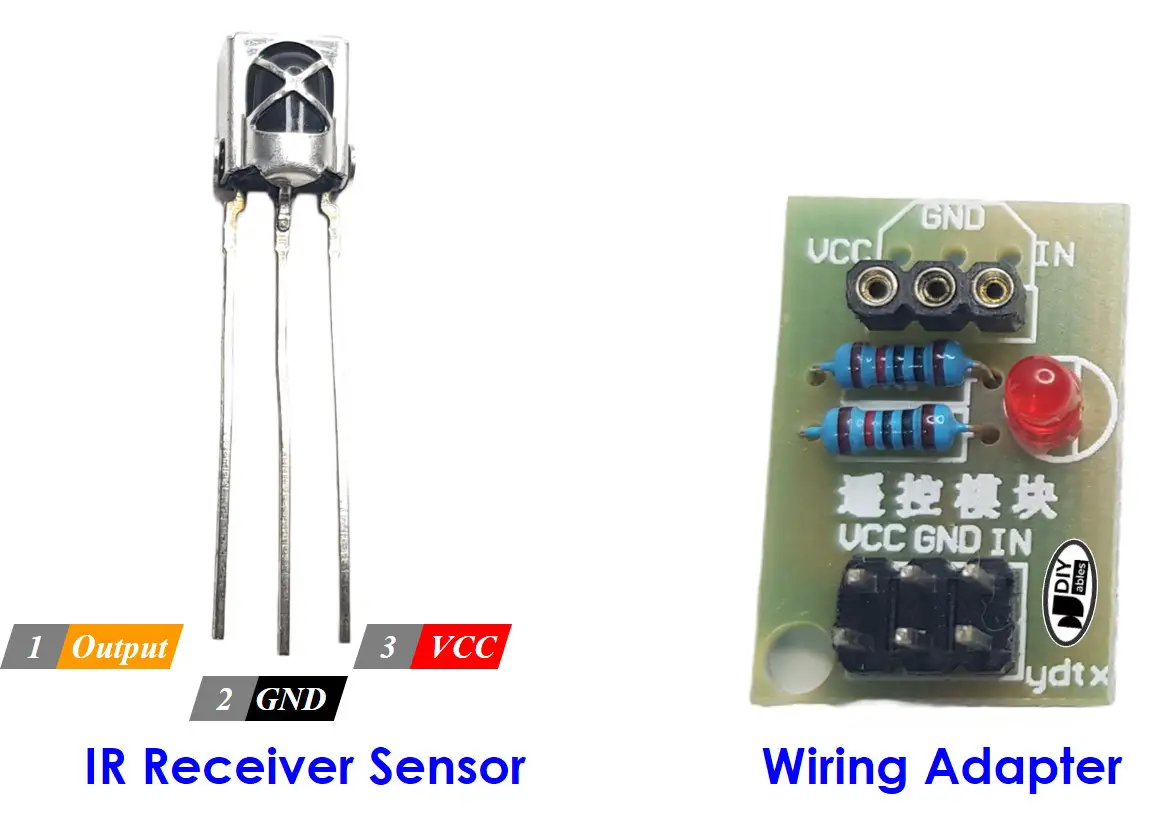
IR Receiver Pinout 红外接收器引脚排列
IR receiver module or sensor has three pins:
红外接收器模块或传感器有三个引脚:
- VCC pin: Connect this pin to the 3.3V or 5V pin of the Arduino or external power source.
VCC引脚:将此引脚连接到Arduino或外部电源的3.3V或5V引脚。 - GND pin: Connect this pin to GND pin of the Arduino or external power source…
GND引脚:将此引脚连接到Arduino或外部电源的GND引脚。 - OUT (Output) pin: This pin is the output pin of the IR receiver module. Connected to a digital input pin on the Arduino.
OUT(输出)引脚:此引脚是红外接收器模块的输出引脚。连接到Arduino上的数字输入引脚。
How It Works 它是如何工作的
When user presses a button on the IR remote controller
当用户按下红外遥控器上的按钮时
- The IR remote controller encodes the command corresponding to the button to the infrared signal via a specific protocol
红外遥控器通过特定协议将对应按钮的命令编码为红外信号 - The IR remote controller emits the encoded infrared signal
红外遥控器发出编码后的红外信号 - The IR receiver receives the encoded infrared signal
红外接收器接收编码的红外信号 - The IR receiver decoded the encoded infrared signal in to the command
红外接收器将编码的红外信号解码到命令中 - The Arduino reads the command from the IR receiver
Arduino从红外接收器读取命令 - The Arduino maps the command to the key pressed
Arduino将命令映射到按下的键
It seems to be complicated but don’t worry. With the help of DIYables_IRcontroller library, it is a piece of cake.
这似乎很复杂,但不要担心。在图书馆的帮助下,DIYables_IRcontroller这是小菜一碟。
Wiring Diagram 接线图
Wiring diagram between Arduino and IR Receiver Module Arduino和红外接收器模块之间的接线图

This image is created using Fritzing. Click to enlarge image
此图像是使用 Fritzing 创建的。点击放大图片
Wiring diagram between Arduino and IR Receiver Sensor Arduino和红外接收器传感器之间的接线图
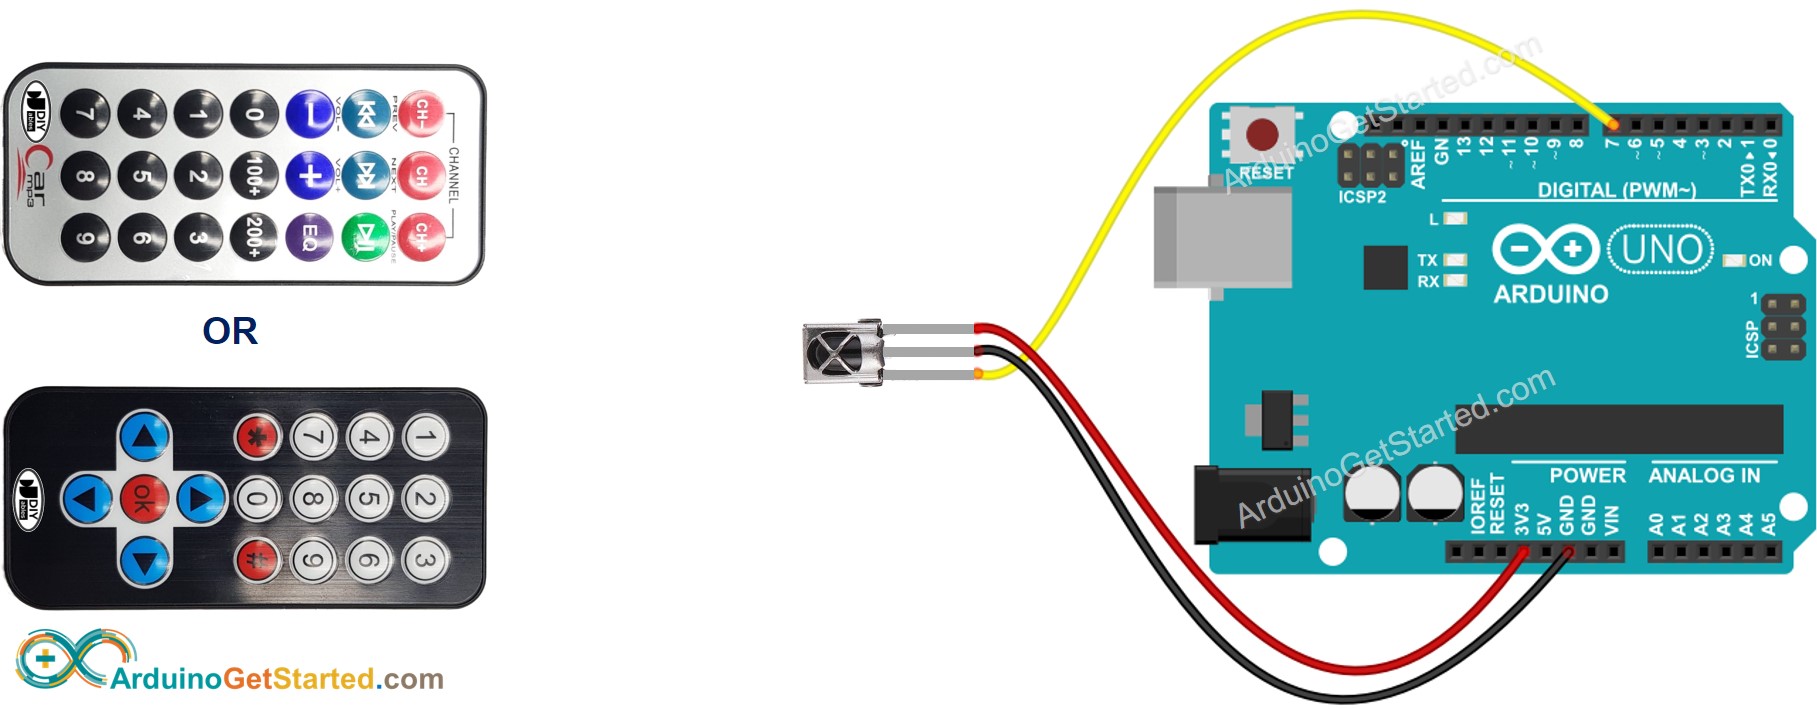
Wiring diagram between Arduino and IR Receiver Sensor and Adapter Arduino和红外接收器传感器和适配器之间的接线图
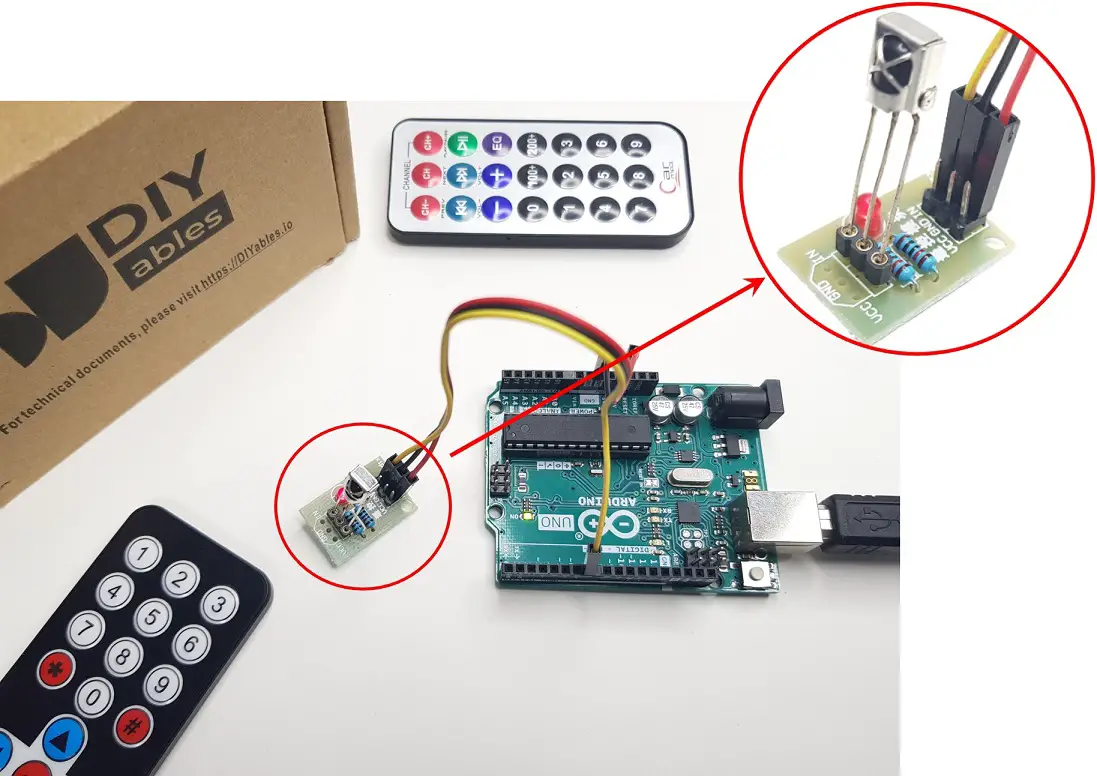
You can also connect The IR receiver sensor to the adapter before connecting to the Arduino.
您也可以在连接到 Arduino 之前将 IR 接收器传感器连接到适配器。
How To Program For IR Remote Controller 如何为红外遥控器编程
- Include the library: 包括库:
#include <DIYables_IRcontroller.h> // Library for IR Receiver#include <DIYables_IRcontroller.h> // Library for IR Receiver
#include <DIYables_IRcontroller.h> // 红外接收器库
Declare a DIYables_IRcontroller_17 or DIYables_IRcontroller_21 object corresponds with 17-key or 21-key IR remote controllers:
声明DIYables_IRcontroller_17或DIYables_IRcontroller_21对象对应于 17 键或 21 键红外遥控器:
DIYables_IRcontroller_17 irController(IR_RECEIVER_PIN, 200); // debounce time is 200ms
// OR
DIYables_IRcontroller_21 irController(IR_RECEIVER_PIN, 200); // debounce time is 200ms- Initialize the IR Controller.
初始化 IR 控制器。
irController.begin();In the loop, check if a key is pressed or not. If yes, get the key
在循环中,检查是否按下了某个键。如果是,请获取密钥
Key17 key = irController.getKey(); // if using 17-key IR controller
// OR
Key21 key = irController.getKey(); // if using 21-key IR controller- Once you have detected a key press, you can perform specific actions based on each key.
检测到按键后,您可以根据每个键执行特定操作。
Arduino Code Arduino代码
- Arduino code for DIYables 17-key IR remote controller
DIYables 17键红外遥控器的Arduino代码
/** Created by ArduinoGetStarted.com** This example code is in the public domain** Tutorial page: https://arduinogetstarted.com/tutorials/arduino-ir-remote-control*/#include <DIYables_IRcontroller.h> // DIYables_IRcontroller library
#define IR_RECEIVER_PIN 7 // The Arduino pin connected to IR controllerDIYables_IRcontroller_17 irController(IR_RECEIVER_PIN, 200); // debounce time is 200msvoid setup() {Serial.begin(9600);irController.begin();
}void loop() {Key17 key = irController.getKey();if (key != Key17::NONE) {switch (key) {case Key17::KEY_1:Serial.println("1");// TODO: YOUR CONTROLbreak;case Key17::KEY_2:Serial.println("2");// TODO: YOUR CONTROLbreak;case Key17::KEY_3:Serial.println("3");// TODO: YOUR CONTROLbreak;case Key17::KEY_4:Serial.println("4");// TODO: YOUR CONTROLbreak;case Key17::KEY_5:Serial.println("5");// TODO: YOUR CONTROLbreak;case Key17::KEY_6:Serial.println("6");// TODO: YOUR CONTROLbreak;case Key17::KEY_7:Serial.println("7");// TODO: YOUR CONTROLbreak;case Key17::KEY_8:Serial.println("8");// TODO: YOUR CONTROLbreak;case Key17::KEY_9:Serial.println("9");// TODO: YOUR CONTROLbreak;case Key17::KEY_STAR:Serial.println("*");// TODO: YOUR CONTROLbreak;case Key17::KEY_0:Serial.println("0");// TODO: YOUR CONTROLbreak;case Key17::KEY_SHARP:Serial.println("#");// TODO: YOUR CONTROLbreak;case Key17::KEY_UP:Serial.println("UP");// TODO: YOUR CONTROLbreak;case Key17::KEY_DOWN:Serial.println("DOWN");// TODO: YOUR CONTROLbreak;case Key17::KEY_LEFT:Serial.println("LEFT");// TODO: YOUR CONTROLbreak;case Key17::KEY_RIGHT:Serial.println("RIGHT");// TODO: YOUR CONTROLbreak;case Key17::KEY_OK :Serial.println("OK");// TODO: YOUR CONTROLbreak;default:Serial.println("WARNING: undefined key:");break;}}
}- Arduino code for DIYables 21-key IR remote controller
DIYables 21键红外遥控器的Arduino代码
/** Created by ArduinoGetStarted.com** This example code is in the public domain** Tutorial page: https://arduinogetstarted.com/tutorials/arduino-ir-remote-control*/#include <DIYables_IRcontroller.h> // DIYables_IRcontroller library
#define IR_RECEIVER_PIN 7 // The Arduino pin connected to IR controllerDIYables_IRcontroller_21 irController(IR_RECEIVER_PIN, 200); // debounce time is 200msvoid setup() {Serial.begin(9600);irController.begin();
}void loop() {Key21 key = irController.getKey();if (key != Key21::NONE) {switch (key) {case Key21::KEY_CH_MINUS:Serial.println("CH-");// TODO: YOUR CONTROLbreak;case Key21::KEY_CH:Serial.println("CH");// TODO: YOUR CONTROLbreak;case Key21::KEY_CH_PLUS:Serial.println("CH+");// TODO: YOUR CONTROLbreak;case Key21::KEY_PREV:Serial.println("<<");// TODO: YOUR CONTROLbreak;case Key21::KEY_NEXT:Serial.println(">>");// TODO: YOUR CONTROLbreak;case Key21::KEY_PLAY_PAUSE:Serial.println(">||");// TODO: YOUR CONTROLbreak;case Key21::KEY_VOL_MINUS:Serial.println("–");// TODO: YOUR CONTROLbreak;case Key21::KEY_VOL_PLUS:Serial.println("+");// TODO: YOUR CONTROLbreak;case Key21::KEY_EQ:Serial.println("EQ");// TODO: YOUR CONTROLbreak;case Key21::KEY_100_PLUS:Serial.println("100+");// TODO: YOUR CONTROLbreak;case Key21::KEY_200_PLUS:Serial.println("200+");// TODO: YOUR CONTROLbreak;case Key21::KEY_0:Serial.println("0");// TODO: YOUR CONTROLbreak;case Key21::KEY_1:Serial.println("1");// TODO: YOUR CONTROLbreak;case Key21::KEY_2:Serial.println("2");// TODO: YOUR CONTROLbreak;case Key21::KEY_3:Serial.println("3");// TODO: YOUR CONTROLbreak;case Key21::KEY_4:Serial.println("4");// TODO: YOUR CONTROLbreak;case Key21::KEY_5:Serial.println("5");// TODO: YOUR CONTROLbreak;case Key21::KEY_6:Serial.println("6");// TODO: YOUR CONTROLbreak;case Key21::KEY_7:Serial.println("7");// TODO: YOUR CONTROLbreak;case Key21::KEY_8:Serial.println("8");// TODO: YOUR CONTROLbreak;case Key21::KEY_9:Serial.println("9");// TODO: YOUR CONTROLbreak;default:Serial.println("WARNING: undefined key:");break;}}
}
Quick Steps 快速步骤
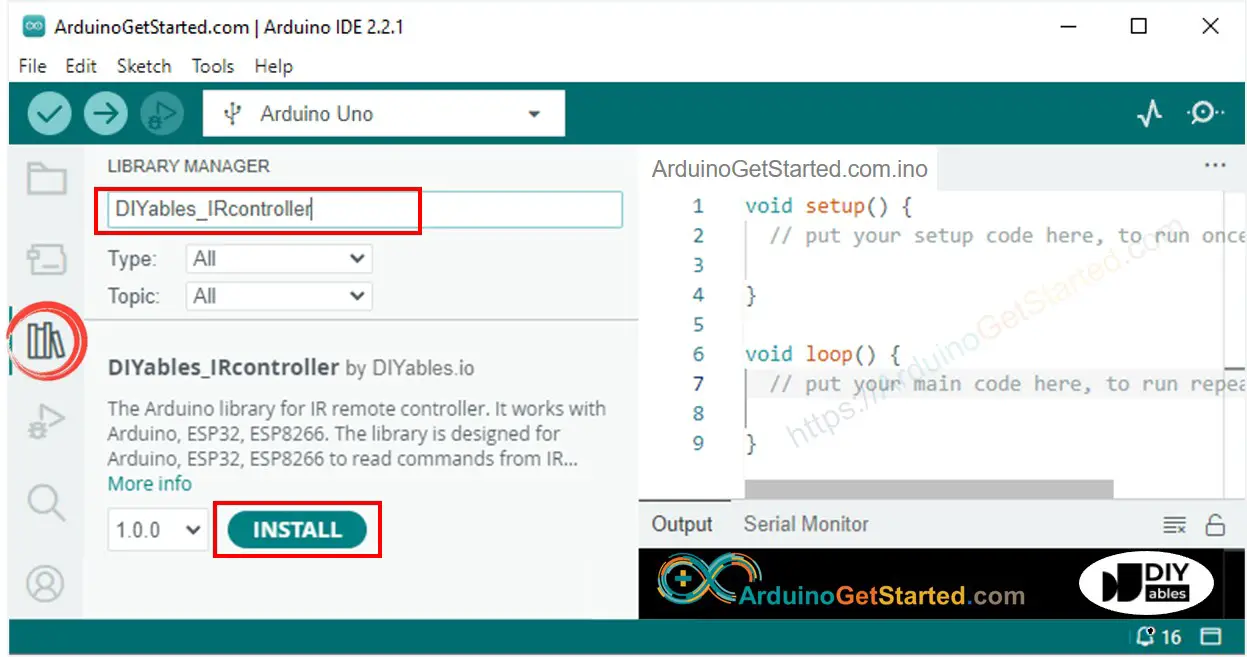
- Navigate to the Libraries icon on the left bar of the Arduino IDE.
导航到 Arduino IDE 左侧栏上的 Libraries 图标。 - Search “DIYables_IRcontroller”, then find the DIYables_IRcontroller library by DIYables
搜索“DIYables_IRcontroller”,然后通过DIYables找到DIYables_IRcontroller图书馆 - Click Install button to install DIYables_IRcontroller library.
单击“安装”按钮安装DIYables_IRcontroller库。
-
You will be asked for installing the library dependency as below image:
系统将要求您安装库依赖项,如下图所示:
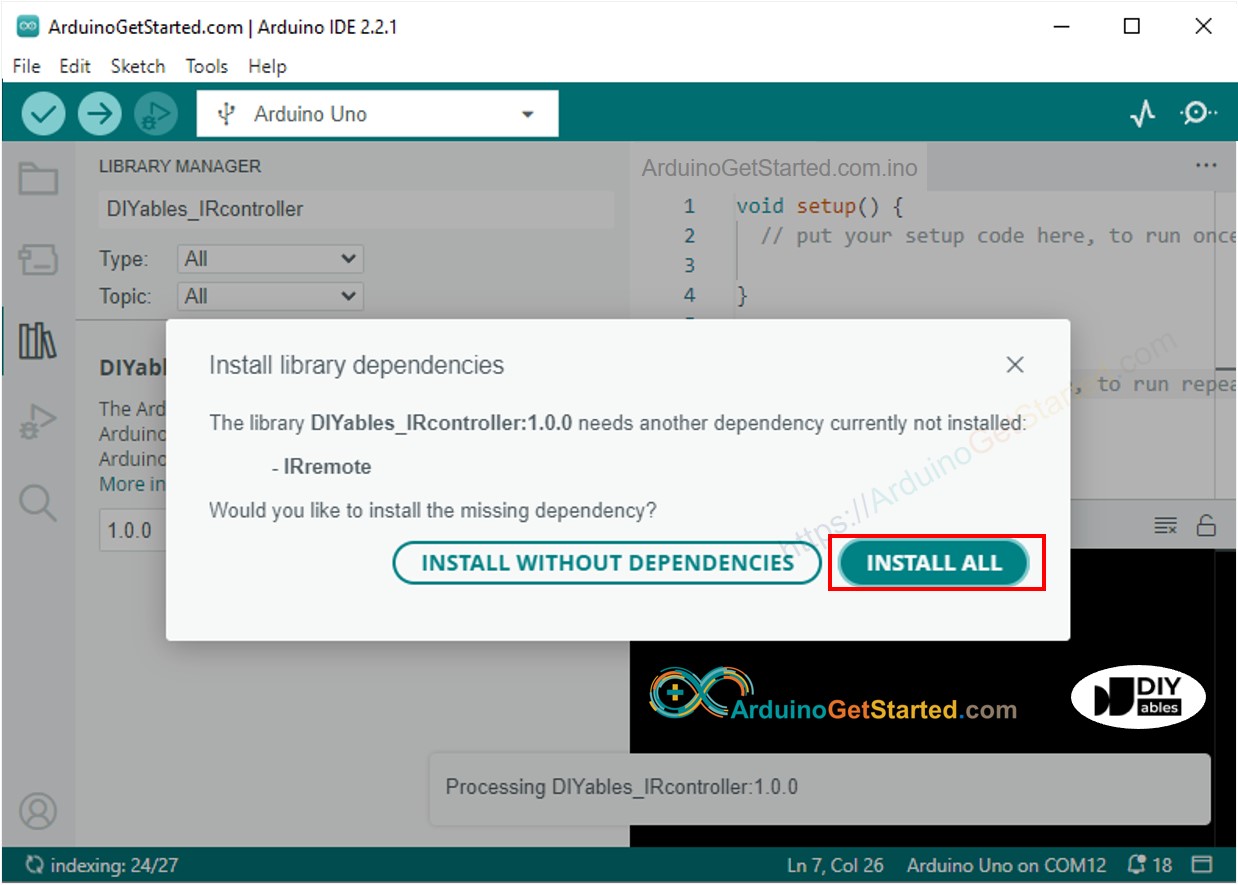
-
Click Install all button to install the dependency
单击“全部安装”按钮安装依赖项 -
Copy the above code and open with Arduino IDE
复制上面的代码并使用Arduino IDE打开 -
Click Upload button on Arduino IDE to upload code to Arduino
单击Arduino IDE上的“上传”按钮,将代码上传到Arduino -
Press keys on the remote controller one by one
按遥控器上的一个键一个接 -
See the result on Serial Monitor.
在串行监视器上查看结果。 -
The below is the result when you press keys on 21-key IR controller one by one:
以下是逐个按下 21 键红外控制器上的键时的结果:
Now you can modify the code to control LED, fan, pump, actuator… via IR remote controllers.
现在您可以修改代码来控制 LED、风扇、泵、执行器…通过红外遥控器。
Video Tutorial 视频教程
We are considering to make the video tutorials. If you think the video tutorials are essential, please subscribe to our YouTube channel to give us motivation for making the videos.
我们正在考虑制作视频教程。如果您认为视频教程是必不可少的,请订阅我们的 YouTube 频道,为我们制作视频提供动力。
The Best Arduino Starter Kit 最好的Arduino入门套件
- See the best Arduino kit for beginner
查看最适合初学者的 Arduino 套件
See Also 另见
- Arduino - Motion Sensor
Arduino - 运动传感器 - Arduino - Car Arduino - 汽车
- Arduino - Flame Sensor
Arduino - 火焰传感器 - Arduino Fire Alarm Arduino火灾报警器
- Arduino - Infrared Obstacle Avoidance Sensor
Arduino - 红外避障传感器


—— Rasa中config.yml)


)


)

【中等】)


