环境准备
- 介绍:create-vue是Vue官方提供的最新的脚手架工具,用于快速生成一个工程化的Vue项目
- create-vue提供如下功能:
统一的目录结构
本地调试
热部署
单元测试
集成打包 - 依赖环境:NodeJS
安装NodeJS
一、 创建vue工程
npm 类似maven
npm init vue@latest
根据命令提示
cd 项目名
npm install
然后用vscode打开项目
二、Vue项目的目录结构

vite.config.js :Vue项目的配置信息,如:端口号等
package.json :等同于maven里的pom文件,配置文件,包括项目名、版本号、依赖包、版本等。
package-lock.json :项目配置文件(不需要修改)
index.html :默认首页
public: 公共资源
node_modules :下载的第三方包存在目录
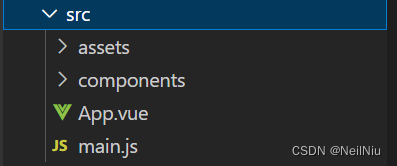
src:源代码存放目录

src下面又有四个目录
assets : 静态资源目录、存放图片、字体
components:组件目录、存放通用组件
App.vue:根组件
main.js :入口文件
三、Vue项目-启动
执行命令 npm run dev ,就可以启动项目
然后输入http://127.0.0.1:5137
重点编写Vue文件
主要包含三部分内容
控制模板的数据及行为
<script setup>import {ref} from 'vue';//调用ref函数,定义响应式数据const msg = ref('西安');
</script>
模板部分,由它生成HTML
<template><h1>{{ msg }}</h1>
</template>
当前组件的CSS样式
<style scoped>/* 样式 */h1{color: red;}
</style>
Vue项目的入口文件,是什么
main.js
Vue的单文件组件中包含那些
三个部分,
<script setup>
</script><template><h1>{{ msg }}</h1>
</template>
<style scoped>/* 样式 */h1{color: red;}
</style>
四、API风格
Vue的组件有两种不同的风格:组合式API 和 选项式API
选项式API,选项式API,可以用包含多个选项的对象来描述组件的逻辑,如:data,methods,mounted等。
<script>export default {data(){ //声明响应式对象return {count: 0}},methods: { //声明方法,可以通过组件实例访问increment: function(){this.count++ ;}},mounted(){ //声明钩子函数console.log('Vue mounted ...');}}
</script>
<template><button @click="increment">count:{{ count }}</button>
</template>
组合式API
<script setup>import { onMounted, ref } from 'vue’; const count = ref(0);  //声明响应式变量function increment(){  //声明函数count.value++;}    onMounted(()=>{ //声明钩子函数console.log('Vue Mounted ...’);})
</script>
<template><button @click="increment">count:{{ count }}</button>
</template>
Api.vue
<script setup>import {ref,onMounted} from 'vue'//声明响应式数据 ref  响应式对象有一个内部的属性valueconst count = ref(0); //在组合式api中,一般需要把数据定义为响应式数据//const count=0;//声明函数function increment(){count.value++;}//声明钩子函数 onMountedonMounted(()=>{console.log('vue 已经挂载完毕了...');});
</script><template><!-- 写html元素 --><button @click="increment">count: {{ count }}</button>
</template>
然后把这个Api.vue 在App.vue中引入
<!-- <script>//写数据export default{data(){return {msg:'上海'}}}
</script> -->
<script setup>import {ref} from 'vue';//调用ref函数,定义响应式数据const msg = ref('西安');//导入 Api.vue文件import ApiVue from './Api.vue'//导入Article.vue文件import ArticleVue from './Article.vue'
</script><template><!-- html --><!-- <h1>北京</h1> --><!-- <h1>{{ msg }}</h1><br><ApiVue/> --><ArticleVue/>
</template><style scoped>/* 样式 */h1{color: red;}
</style>
组合式Api,一般需要把数据定义为响应式数据
const count = ref(0)
Vue的组件书写分为几种风格
选项式API
组合式API,推荐使用组合式API,用起来更加灵活
Element Plus
Element :是饿了么团队研发的,基于Vue3,面向设计师和开发者的组件库。
组件:组成网页的部件,例如 超链接、按钮、图片、表格、表单、分页条等
Element Plus快速入门
准备工作:
1、创建一个工程的vue项目
2、参照官方文档,安装Element Plus组件库:
npm install element-plus --save
3、main.js中引入Element Plus 组件库,参考官方文档。
import { createApp } from 'vue'     //导入vue
import ElementPlus from 'element-plus'     //导入element-plus
import 'element-plus/dist/index.css'		 //导入element-plus的样式
import App from './App.vue'                   //导入app.vue
const app = createApp(App)                 //创建应用实例
app.use(ElementPlus)					//使用element-plus
app.mount('#app')						//控制html元素
4、制作组件:
访问Element官方文档,复制组件代码,调整
常用组件-分页条
常用组件-表格组件
常用组件-表单组件
常用组件-Card卡片


![【Linux】- HBase集群部署 [19]](http://pic.xiahunao.cn/【Linux】- HBase集群部署 [19])
【独一无二】)


-- 算法导论20.1 4题)
、引用折叠与完美转发)
)
——FFmpeg源码解析BMP格式图片的底层实现原理)


)