=================================================================
音视频入门基础:像素格式专题系列文章:
音视频入门基础:像素格式专题(1)——RGB简介
音视频入门基础:像素格式专题(2)——不通过第三方库将RGB24格式视频转换为BMP格式图片
音视频入门基础:像素格式专题(3)——FFmpeg源码解析BMP格式图片的底层实现原理
音视频入门基础:像素格式专题(4)——YUV简介
音视频入门基础:像素格式专题(5)——使用OpenGL实现yuv420p转rgb播放视频(三重纹理实现)
=================================================================
一、引言
FFmpeg可以将图片或者媒体文件中的信息(比如图片或视频的分辨率,像素格式等信息)解析出来。本文以BMP格式的图片为例子,讲解FFmpeg解析图片的底层实现原理,通过本文也可以了解到FFmpeg的avformat_open_input函数和avformat_find_stream_info函数的内部实现原理。
二、通过FFmpeg命令获取BMP格式图片的信息
通过FFmpeg命令获取BMP格式图片的信息非常简单,仅需要执行命令:
ffmpeg -i XXX.bmp
即可得到BMP图片的信息。从上图中可以看到该图片的格式为bmp,像素格式为bgr24,分辨率为1280x720
三、通过FFmpeg api获取BMP格式图片的信息
Linux平台下使用C++调用FFmpeg api 编写获取BMP格式图片的信息。例子如下:
#include <iostream>extern "C" {
#include "libavformat/avformat.h"
#include "libavcodec/avcodec.h"
}using namespace std;int main()
{string strPath = "output_0.bmp";AVFormatContext *ic = NULL;    //AVFormatContext是描述一个媒体文件或媒体流的构成和基本信息的结构体int re = avformat_open_input(&ic, strPath.c_str(), NULL, NULL);if (re != 0)  //如果打开媒体文件失败,打印失败原因。比如,如果上面没有调用函数av_register_all,则会打印“XXX failed!:Invaliddata found when processing input”{char buf[1024] = { 0 };av_strerror(re, buf, sizeof(buf) - 1);cout << "open " << strPath << " failed!: " << buf << endl;}else         //打开媒体文件成功{cout << "open " << strPath << " success!" << endl;avformat_find_stream_info(ic, NULL); //调用该函数可以进一步读取一部分视音频数据并且获得一些相关的信息。调用avformat_open_input之后,我们无法获取到正确和所有的媒体参数,所以还得要调用avformat_find_stream_info进一步的去获取。for (int i = 0; i < ic->nb_streams; i++) //通过遍历的方式读取媒体文件视频和音频的信息,新版本的FFmpeg新增加了函数av_find_best_stream,也可以取得同样的效果,但这里为了兼容旧版本还是用这种遍历的方式{AVStream *as = ic->streams[i];if (AVMEDIA_TYPE_VIDEO == as->codecpar->codec_type)  //如果是视频流,则打印视频的信息{cout << "图片宽度:" << as->codecpar->width << " 图片高度:" << as->codecpar->height << endl;AVCodec *codec =  (AVCodec *)avcodec_find_decoder(as->codecpar->codec_id);cout << "图片格式:" << codec->long_name << endl;AVCodecContext *codec_ctx = avcodec_alloc_context3(codec);//需要使用avcodec_free_context释放
//事实上codecpar包含了大部分解码器相关的信息,这里是直接从AVCodecParameters复制到AVCodecContextavcodec_parameters_to_context(codec_ctx, as->codecpar);if(AV_PIX_FMT_BGR24 == codec_ctx->pix_fmt){cout << "像素格式:" << "BGR24" << endl;}//avcodec_open2(codec_ctx, codec, nullptr);if(codec_ctx){avcodec_free_context(&codec_ctx);}}}//av_dump_format(ic, 0, path, 0);}if (ic){avformat_close_input(&ic); //关闭一个AVFormatContext,和函数avformat_open_input()成对使用}return 0;
}
输出:

可以看到上述代码非常简单,流程跟FFmpeg对媒体文件进行解封装/解复用一样,仅需要调用avformat_open_input函数和avformat_find_stream_info函数。下面讲解FFmpeg源码获取BMP格式图片信息的底层实现原理。
四、FFmpeg源码解析BMP格式图片的底层实现原理
(一)打开BMP格式图片
执行avformat_open_input函数,首先内部会调用avpriv_open(const char *filename, int flags, ...)函数,打开需要被解析的BMP格式图片。
整个调用堆栈为:
err = avformat_open_input(&ic, filename, file_iformat, &o->g->format_opts); ->
if ((ret = init_input(s, filename, &tmp)) < 0) ->
if ((ret = s->io_open(s, &s->pb, filename, AVIO_FLAG_READ | s->avio_flags, options)) < 0) ->
return ffio_open_whitelist(pb, url, flags, &s->interrupt_callback, options, s->protocol_whitelist, s->protocol_blacklist); ->
err = ffurl_open_whitelist(&h, filename, flags, int_cb, options, whitelist, blacklist, NULL); ->
ret = ffurl_connect(*puc, options); ->
uc->prot->url_open(uc, uc->filename, uc->flags); ->
fd = avpriv_open(filename, access, 0666); ->
avpriv_open(const char *filename, int flags, ...)函数的源码为:
int avpriv_open(const char *filename, int flags, ...)
{int fd;unsigned int mode = 0;va_list ap;va_start(ap, flags);if (flags & O_CREAT)mode = va_arg(ap, unsigned int);va_end(ap);#ifdef O_CLOEXECflags |= O_CLOEXEC;
#endif
#ifdef O_NOINHERITflags |= O_NOINHERIT;
#endiffd = open(filename, flags, mode);
#if HAVE_FCNTLif (fd != -1) {if (fcntl(fd, F_SETFD, FD_CLOEXEC) == -1)av_log(NULL, AV_LOG_DEBUG, "Failed to set close on exec\n");}
#endifreturn fd;
}
可以看到函数avpriv_open内部通过系统调用 fd = open(filename, flags, mode) 打开需要被解析的BMP图片,得到文件描述符fd。
通过VSCode调试FFmpeg源码,可以看到avformat_open_input函数的最底层确实执行了open函数。(关于用VSCode调试C/C++代码的教程可以参考《VsCode + gdb + gdbserver远程调试C++程序》)

(二)读取BMP格式图片的数据
然后函数avformat_open_input内部会调用函数file_read 读取BMP格式图片的内容。
整个调用堆栈为:
avformat_open_input ->
if ((ret = init_input(s, filename, &tmp)) < 0) ->
return av_probe_input_buffer2(s->pb, &s->iformat, filename,
s, 0, s->format_probesize); ->
if ((ret = avio_read(pb, buf + buf_offset,
probe_size - buf_offset)) < 0) ->
fill_buffer(s); ->
len = read_packet_wrapper(s, dst, len); ->
int ffurl_read(URLContext *h, unsigned char *buf, int size) ->
return retry_transfer_wrapper(h, buf, size, 1, h->prot->url_read); ->
ret = transfer_func(h, buf + len, size - len); ->
file_read(URLContext *h, unsigned char *buf, int size)
file_read(URLContext *h, unsigned char *buf, int size)函数的源码为:
static int file_read(URLContext *h, unsigned char *buf, int size)
{FileContext *c = h->priv_data;int ret;size = FFMIN(size, c->blocksize);ret = read(c->fd, buf, size);if (ret == 0 && c->follow)return AVERROR(EAGAIN);if (ret == 0)return AVERROR_EOF;return (ret == -1) ? AVERROR(errno) : ret;
}
可以看到函数file_read内部通过系统调用 ret = read(c->fd, buf, size)读取BMP格式图片的内容,并将其保存到缓存区buf中。
通过VSCode调试FFmpeg源码,可以看到avformat_open_input函数的最底层确实执行了read函数。

(三)得到BMP格式图片在FFmpeg中的AVInputFormat结构
AVInputFormat是FFmpeg中的解复用器结构体,每种作为输入的封装格式(例如BMP、FLV、MP4、TS等)都对应一种AVInputFormat 结构。
以BMP这种图片的封装格式为例,它对应的AVInputFormat 结构为:
IMAGEAUTO_DEMUXER(bmp, AV_CODEC_ID_BMP)将该宏定义展开即为:
const AVInputFormat ff_image_bmp_pipe_demuxer = {
.name           = "bmp_pipe",
.long_name      = "piped bmp sequence",
.priv_data_size = 1208,
.read_probe     = bmp_probe,
.read_header    = ff_img_read_header,
.read_packet    = ff_img_read_packet,
.priv_class     = &imagepipe_class,
.flags          = 256,
.raw_codec_id   = AV_CODEC_ID_BMP,
};
具体可以参考:《FFmpeg源码:#define IMAGEAUTO_DEMUXER(imgname, codecid) 宏定义分析》
FFmpeg的avformat_open_input函数内部会根据媒体/图片封装格式的特点,通过一个while循环,对全部已知的格式进行判断,然后根据是否能被解析为该AVInputFormat对应的容器格式,来关联到对应的文件容器格式 ,这个while循环就是:while ((fmt1 = av_demuxer_iterate(&i))) 。
简单来讲,函数avformat_open_input内部会调用函数av_probe_input_format3,而后者是FFmpeg中实现媒体/图片格式探测的函数,该函数内部通过循环while ((fmt1 = av_demuxer_iterate(&i))) 拿到所有容器格式对应的AVInputFormat结构,然后通过score = fmt1->read_probe(&lpd)语句执行不同容器格式对应的解析函数,根据是否能被解析,来判断出这是哪种容器格式。
整个调用堆栈为:
avformat_open_input ->
if ((ret = init_input(s, filename, &tmp)) < 0) ->
return av_probe_input_buffer2(s->pb, &s->iformat, filename,
s, 0, s->format_probesize); ->
*fmt = av_probe_input_format2(&pd, 1, &score); ->
const AVInputFormat *fmt = av_probe_input_format3(pd, is_opened, &score_ret); ->
av_probe_input_format3函数的源码为:
/*** Guess the file format.** @param is_opened Whether the file is already opened; determines whether*                  demuxers with or without AVFMT_NOFILE are probed.* @param score_ret The score of the best detection.*/
const AVInputFormat *av_probe_input_format3(const AVProbeData *pd,int is_opened, int *score_ret);
const AVInputFormat *av_probe_input_format3(const AVProbeData *pd,int is_opened, int *score_ret)
{AVProbeData lpd = *pd;const AVInputFormat *fmt1 = NULL;const AVInputFormat *fmt = NULL;int score, score_max = 0;void *i = 0;const static uint8_t zerobuffer[AVPROBE_PADDING_SIZE];enum nodat {NO_ID3,ID3_ALMOST_GREATER_PROBE,ID3_GREATER_PROBE,ID3_GREATER_MAX_PROBE,} nodat = NO_ID3;if (!lpd.buf)lpd.buf = (unsigned char *) zerobuffer;if (lpd.buf_size > 10 && ff_id3v2_match(lpd.buf, ID3v2_DEFAULT_MAGIC)) {int id3len = ff_id3v2_tag_len(lpd.buf);if (lpd.buf_size > id3len + 16) {if (lpd.buf_size < 2LL*id3len + 16)nodat = ID3_ALMOST_GREATER_PROBE;lpd.buf += id3len;lpd.buf_size -= id3len;} else if (id3len >= PROBE_BUF_MAX) {nodat = ID3_GREATER_MAX_PROBE;} elsenodat = ID3_GREATER_PROBE;}while ((fmt1 = av_demuxer_iterate(&i))) {if (fmt1->flags & AVFMT_EXPERIMENTAL)continue;if (!is_opened == !(fmt1->flags & AVFMT_NOFILE) && strcmp(fmt1->name, "image2"))continue;score = 0;if (fmt1->read_probe) {score = fmt1->read_probe(&lpd);if (score)av_log(NULL, AV_LOG_TRACE, "Probing %s score:%d size:%d\n", fmt1->name, score, lpd.buf_size);if (fmt1->extensions && av_match_ext(lpd.filename, fmt1->extensions)) {switch (nodat) {case NO_ID3:score = FFMAX(score, 1);break;case ID3_GREATER_PROBE:case ID3_ALMOST_GREATER_PROBE:score = FFMAX(score, AVPROBE_SCORE_EXTENSION / 2 - 1);break;case ID3_GREATER_MAX_PROBE:score = FFMAX(score, AVPROBE_SCORE_EXTENSION);break;}}} else if (fmt1->extensions) {if (av_match_ext(lpd.filename, fmt1->extensions))score = AVPROBE_SCORE_EXTENSION;}if (av_match_name(lpd.mime_type, fmt1->mime_type)) {if (AVPROBE_SCORE_MIME > score) {av_log(NULL, AV_LOG_DEBUG, "Probing %s score:%d increased to %d due to MIME type\n", fmt1->name, score, AVPROBE_SCORE_MIME);score = AVPROBE_SCORE_MIME;}}if (score > score_max) {score_max = score;fmt = fmt1;} else if (score == score_max)fmt = NULL;}if (nodat == ID3_GREATER_PROBE)score_max = FFMIN(AVPROBE_SCORE_EXTENSION / 2 - 1, score_max);*score_ret = score_max;return fmt;
}下面以BMP格式图片为例子。调试FFmpeg源码,可以发现当i等于299时, AVInputFormat 类型的结构体变量fmt1即为BMP格式图片对应的AVInputFormat 结构,其成员变量name的值为 "bmp_pipe"。

这时候变量fmt1的值即为本文上面讲到的“(三)得到BMP格式图片在FFmpeg中的AVInputFormat结构”中的IMAGEAUTO_DEMUXER(bmp, AV_CODEC_ID_BMP),也就是:
const AVInputFormat ff_image_bmp_pipe_demuxer = {
.name           = "bmp_pipe",
.long_name      = "piped bmp sequence",
.priv_data_size = 1208,
.read_probe     = bmp_probe,
.read_header    = ff_img_read_header,
.read_packet    = ff_img_read_packet,
.priv_class     = &imagepipe_class,
.flags          = 256,
.raw_codec_id   = AV_CODEC_ID_BMP,
};
这时候执行score = fmt1->read_probe(&lpd)语句,会执行回调函数bmp_probe(const AVProbeData *p),该函数即为BMP格式图片的探测函数,用来判断被打开的文件是否为BMP格式图片。
bmp_probe(const AVProbeData *p) 函数的源码为:
static int bmp_probe(const AVProbeData *p)
{const uint8_t *b = p->buf;int ihsize;if (AV_RB16(b) != 0x424d)return 0;ihsize = AV_RL32(b+14);if (ihsize < 12 || ihsize > 255)return 0;if (!AV_RN32(b + 6)) {return AVPROBE_SCORE_EXTENSION + 1;}return AVPROBE_SCORE_EXTENSION / 4;
}
可以很清楚的看到,函数bmp_probe是根据输入文件的第一、第二个字节是否为0x424d("BM")来判断其是否为BMP格式图片的:

BMP格式图片的header结构如下。其第一、第二个字节必须为0x424d :

关于BMP格式图片的header可以参考:《音视频入门基础:像素格式专题(2)——不通过第三方库将RGB24格式视频转换为BMP格式图片》
(四)解析BMP格式图片的信息
如果FFmpeg通过上一步判断出输入文件为BMP格式图片,则会执行
函数bmp_decode_frame(AVCodecContext *avctx,void *data, int *got_frame,AVPacket *avpkt)
将图片中的信息解析出来。
整个调用堆栈为:
avformat_find_stream_info ->
try_decode_frame(ic, st, pkt,(options && i < orig_nb_streams) ? &options[i] : NULL); ->
ret = avcodec_send_packet(avctx, &pkt); ->
ret = decode_receive_frame_internal(avctx, avci->buffer_frame); ->
ret = decode_simple_receive_frame(avctx, frame); ->
ret = decode_simple_internal(avctx, frame, &discarded_samples); ->
ret = avctx->codec->decode(avctx, frame, &got_frame, pkt); ->
bmp_decode_frame(AVCodecContext *avctx,void *data, int *got_frame,AVPacket *avpkt)
函数bmp_decode_frame的源码为:
static int bmp_decode_frame(AVCodecContext *avctx,void *data, int *got_frame,AVPacket *avpkt)
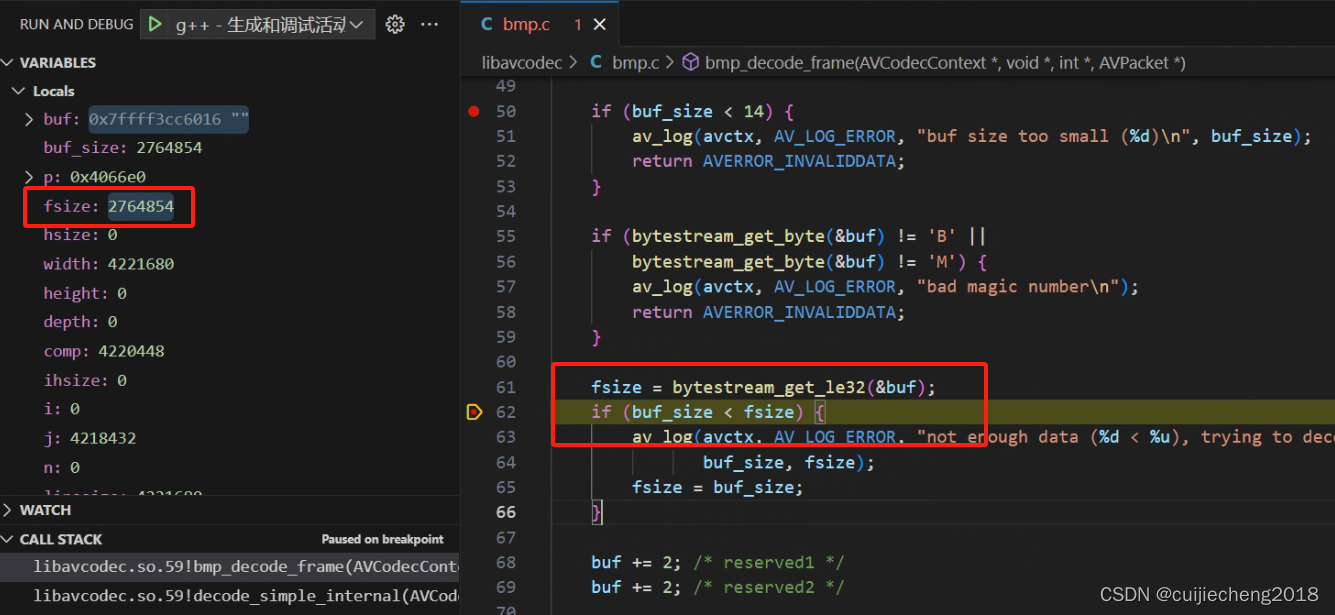
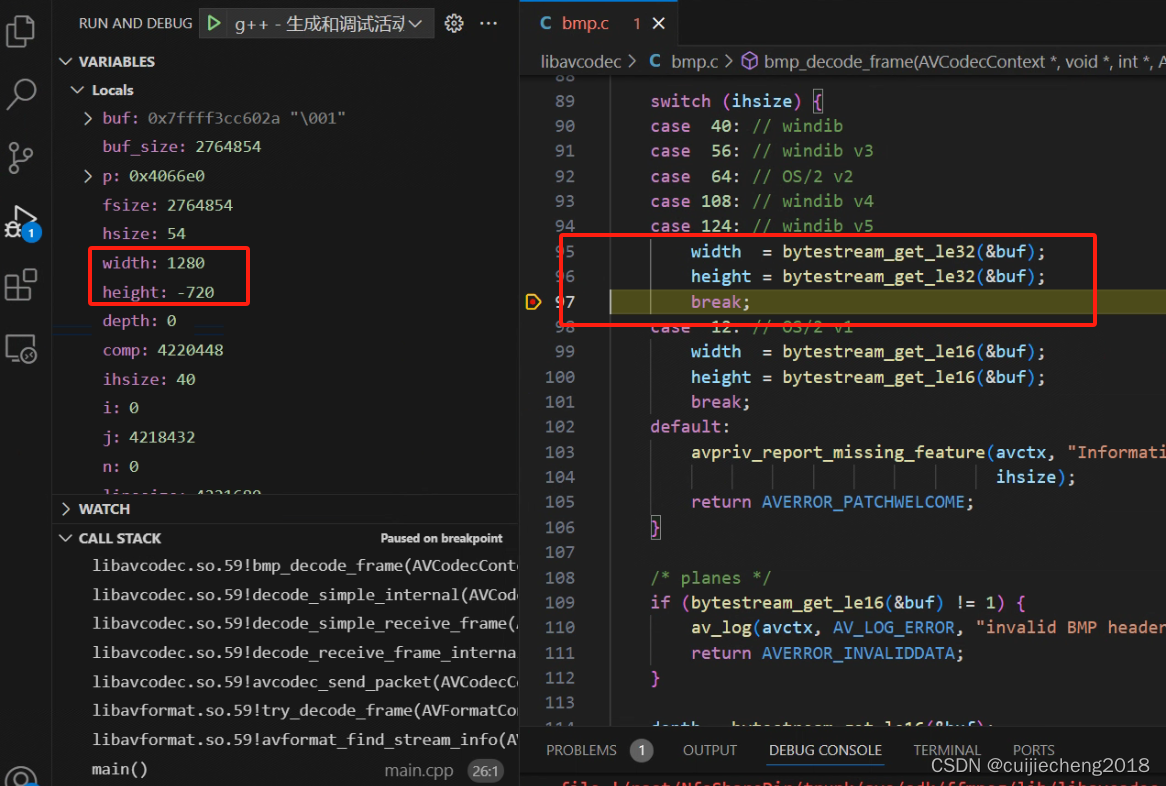
{const uint8_t *buf = avpkt->data;int buf_size = avpkt->size;AVFrame *p = data;unsigned int fsize, hsize;int width, height;unsigned int depth;BiCompression comp;unsigned int ihsize;int i, j, n, linesize, ret;uint32_t rgb[3] = {0};uint32_t alpha = 0;uint8_t *ptr;int dsize;const uint8_t *buf0 = buf;GetByteContext gb;if (buf_size < 14) {av_log(avctx, AV_LOG_ERROR, "buf size too small (%d)\n", buf_size);return AVERROR_INVALIDDATA;}if (bytestream_get_byte(&buf) != 'B' ||bytestream_get_byte(&buf) != 'M') {av_log(avctx, AV_LOG_ERROR, "bad magic number\n");return AVERROR_INVALIDDATA;}fsize = bytestream_get_le32(&buf);if (buf_size < fsize) {av_log(avctx, AV_LOG_ERROR, "not enough data (%d < %u), trying to decode anyway\n",buf_size, fsize);fsize = buf_size;}buf += 2; /* reserved1 */buf += 2; /* reserved2 */hsize = bytestream_get_le32(&buf); /* header size */ihsize = bytestream_get_le32(&buf); /* more header size */if (ihsize + 14LL > hsize) {av_log(avctx, AV_LOG_ERROR, "invalid header size %u\n", hsize);return AVERROR_INVALIDDATA;}/* sometimes file size is set to some headers size, set a real size in that case */if (fsize == 14 || fsize == ihsize + 14)fsize = buf_size - 2;if (fsize <= hsize) {av_log(avctx, AV_LOG_ERROR,"Declared file size is less than header size (%u < %u)\n",fsize, hsize);return AVERROR_INVALIDDATA;}switch (ihsize) {case 40: // windibcase 56: // windib v3case 64: // OS/2 v2case 108: // windib v4case 124: // windib v5width = bytestream_get_le32(&buf);height = bytestream_get_le32(&buf);break;case 12: // OS/2 v1width = bytestream_get_le16(&buf);height = bytestream_get_le16(&buf);break;default:avpriv_report_missing_feature(avctx, "Information header size %u",ihsize);return AVERROR_PATCHWELCOME;}/* planes */if (bytestream_get_le16(&buf) != 1) {av_log(avctx, AV_LOG_ERROR, "invalid BMP header\n");return AVERROR_INVALIDDATA;}depth = bytestream_get_le16(&buf);if (ihsize >= 40)comp = bytestream_get_le32(&buf);elsecomp = BMP_RGB;if (comp != BMP_RGB && comp != BMP_BITFIELDS && comp != BMP_RLE4 &&comp != BMP_RLE8) {av_log(avctx, AV_LOG_ERROR, "BMP coding %d not supported\n", comp);return AVERROR_INVALIDDATA;}if (comp == BMP_BITFIELDS) {buf += 20;rgb[0] = bytestream_get_le32(&buf);rgb[1] = bytestream_get_le32(&buf);rgb[2] = bytestream_get_le32(&buf);if (ihsize > 40)alpha = bytestream_get_le32(&buf);}ret = ff_set_dimensions(avctx, width, height > 0 ? height : -(unsigned)height);if (ret < 0) {av_log(avctx, AV_LOG_ERROR, "Failed to set dimensions %d %d\n", width, height);return AVERROR_INVALIDDATA;}avctx->pix_fmt = AV_PIX_FMT_NONE;switch (depth) {case 32:if (comp == BMP_BITFIELDS) {if (rgb[0] == 0xFF000000 && rgb[1] == 0x00FF0000 && rgb[2] == 0x0000FF00)avctx->pix_fmt = alpha ? AV_PIX_FMT_ABGR : AV_PIX_FMT_0BGR;else if (rgb[0] == 0x00FF0000 && rgb[1] == 0x0000FF00 && rgb[2] == 0x000000FF)avctx->pix_fmt = alpha ? AV_PIX_FMT_BGRA : AV_PIX_FMT_BGR0;else if (rgb[0] == 0x0000FF00 && rgb[1] == 0x00FF0000 && rgb[2] == 0xFF000000)avctx->pix_fmt = alpha ? AV_PIX_FMT_ARGB : AV_PIX_FMT_0RGB;else if (rgb[0] == 0x000000FF && rgb[1] == 0x0000FF00 && rgb[2] == 0x00FF0000)avctx->pix_fmt = alpha ? AV_PIX_FMT_RGBA : AV_PIX_FMT_RGB0;else {av_log(avctx, AV_LOG_ERROR, "Unknown bitfields ""%0"PRIX32" %0"PRIX32" %0"PRIX32"\n", rgb[0], rgb[1], rgb[2]);return AVERROR(EINVAL);}} else {avctx->pix_fmt = AV_PIX_FMT_BGRA;}break;case 24:avctx->pix_fmt = AV_PIX_FMT_BGR24;break;case 16:if (comp == BMP_RGB)avctx->pix_fmt = AV_PIX_FMT_RGB555;else if (comp == BMP_BITFIELDS) {if (rgb[0] == 0xF800 && rgb[1] == 0x07E0 && rgb[2] == 0x001F)avctx->pix_fmt = AV_PIX_FMT_RGB565;else if (rgb[0] == 0x7C00 && rgb[1] == 0x03E0 && rgb[2] == 0x001F)avctx->pix_fmt = AV_PIX_FMT_RGB555;else if (rgb[0] == 0x0F00 && rgb[1] == 0x00F0 && rgb[2] == 0x000F)avctx->pix_fmt = AV_PIX_FMT_RGB444;else {av_log(avctx, AV_LOG_ERROR,"Unknown bitfields %0"PRIX32" %0"PRIX32" %0"PRIX32"\n",rgb[0], rgb[1], rgb[2]);return AVERROR(EINVAL);}}break;case 8:if (hsize - ihsize - 14 > 0)avctx->pix_fmt = AV_PIX_FMT_PAL8;elseavctx->pix_fmt = AV_PIX_FMT_GRAY8;break;case 1:case 4:if (hsize - ihsize - 14 > 0) {avctx->pix_fmt = AV_PIX_FMT_PAL8;} else {av_log(avctx, AV_LOG_ERROR, "Unknown palette for %u-colour BMP\n",1 << depth);return AVERROR_INVALIDDATA;}break;default:av_log(avctx, AV_LOG_ERROR, "depth %u not supported\n", depth);return AVERROR_INVALIDDATA;}if (avctx->pix_fmt == AV_PIX_FMT_NONE) {av_log(avctx, AV_LOG_ERROR, "unsupported pixel format\n");return AVERROR_INVALIDDATA;}if ((ret = ff_get_buffer(avctx, p, 0)) < 0)return ret;p->pict_type = AV_PICTURE_TYPE_I;p->key_frame = 1;buf = buf0 + hsize;dsize = buf_size - hsize;/* Line size in file multiple of 4 */n = ((avctx->width * depth + 31) / 8) & ~3;if (n * avctx->height > dsize && comp != BMP_RLE4 && comp != BMP_RLE8) {n = (avctx->width * depth + 7) / 8;if (n * avctx->height > dsize) {av_log(avctx, AV_LOG_ERROR, "not enough data (%d < %d)\n",dsize, n * avctx->height);return AVERROR_INVALIDDATA;}av_log(avctx, AV_LOG_ERROR, "data size too small, assuming missing line alignment\n");}// RLE may skip decoding some picture areas, so blank picture before decodingif (comp == BMP_RLE4 || comp == BMP_RLE8)memset(p->data[0], 0, avctx->height * p->linesize[0]);if (height > 0) {ptr = p->data[0] + (avctx->height - 1) * p->linesize[0];linesize = -p->linesize[0];} else {ptr = p->data[0];linesize = p->linesize[0];}if (avctx->pix_fmt == AV_PIX_FMT_PAL8) {int colors = 1 << depth;memset(p->data[1], 0, 1024);if (ihsize >= 36) {int t;buf = buf0 + 46;t = bytestream_get_le32(&buf);if (t < 0 || t > (1 << depth)) {av_log(avctx, AV_LOG_ERROR,"Incorrect number of colors - %X for bitdepth %u\n",t, depth);} else if (t) {colors = t;}} else {colors = FFMIN(256, (hsize-ihsize-14) / 3);}buf = buf0 + 14 + ihsize; //palette location// OS/2 bitmap, 3 bytes per palette entryif ((hsize-ihsize-14) < (colors << 2)) {if ((hsize-ihsize-14) < colors * 3) {av_log(avctx, AV_LOG_ERROR, "palette doesn't fit in packet\n");return AVERROR_INVALIDDATA;}for (i = 0; i < colors; i++)((uint32_t*)p->data[1])[i] = (0xFFU<<24) | bytestream_get_le24(&buf);} else {for (i = 0; i < colors; i++)((uint32_t*)p->data[1])[i] = 0xFFU << 24 | bytestream_get_le32(&buf);}buf = buf0 + hsize;}if (comp == BMP_RLE4 || comp == BMP_RLE8) {if (comp == BMP_RLE8 && height < 0) {p->data[0] += p->linesize[0] * (avctx->height - 1);p->linesize[0] = -p->linesize[0];}bytestream2_init(&gb, buf, dsize);ff_msrle_decode(avctx, p, depth, &gb);if (height < 0) {p->data[0] += p->linesize[0] * (avctx->height - 1);p->linesize[0] = -p->linesize[0];}} else {switch (depth) {case 1:for (i = 0; i < avctx->height; i++) {int j;for (j = 0; j < avctx->width >> 3; j++) {ptr[j*8+0] = buf[j] >> 7;ptr[j*8+1] = (buf[j] >> 6) & 1;ptr[j*8+2] = (buf[j] >> 5) & 1;ptr[j*8+3] = (buf[j] >> 4) & 1;ptr[j*8+4] = (buf[j] >> 3) & 1;ptr[j*8+5] = (buf[j] >> 2) & 1;ptr[j*8+6] = (buf[j] >> 1) & 1;ptr[j*8+7] = buf[j] & 1;}for (j = 0; j < (avctx->width & 7); j++) {ptr[avctx->width - (avctx->width & 7) + j] = buf[avctx->width >> 3] >> (7 - j) & 1;}buf += n;ptr += linesize;}break;case 8:case 24:case 32:for (i = 0; i < avctx->height; i++) {memcpy(ptr, buf, n);buf += n;ptr += linesize;}break;case 4:for (i = 0; i < avctx->height; i++) {int j;for (j = 0; j < n; j++) {ptr[j*2+0] = (buf[j] >> 4) & 0xF;ptr[j*2+1] = buf[j] & 0xF;}buf += n;ptr += linesize;}break;case 16:for (i = 0; i < avctx->height; i++) {const uint16_t *src = (const uint16_t *) buf;uint16_t *dst = (uint16_t *) ptr;for (j = 0; j < avctx->width; j++)*dst++ = av_le2ne16(*src++);buf += n;ptr += linesize;}break;default:av_log(avctx, AV_LOG_ERROR, "BMP decoder is broken\n");return AVERROR_INVALIDDATA;}}if (avctx->pix_fmt == AV_PIX_FMT_BGRA) {for (i = 0; i < avctx->height; i++) {int j;uint8_t *ptr = p->data[0] + p->linesize[0]*i + 3;for (j = 0; j < avctx->width; j++) {if (ptr[4*j])break;}if (j < avctx->width)break;}if (i == avctx->height)avctx->pix_fmt = p->format = AV_PIX_FMT_BGR0;}*got_frame = 1;return buf_size;
}可以看到其内部通过bytestream_get_byte和bytestream_get_le32等函数读取输入图片的header信息(关于这些bytestream_get_byte函数的内部实现,可以阅读《FFmpeg源码:bytestream_get_byte函数解析》)
比如通过语句 fsize = bytestream_get_le32(&buf) 读取BMP header里面的文件大小。
读取图片的宽度和高度
五、总结
简单的来讲,FFmpeg底层首先通过系统调用open函数打开图片,read函数读取图片数据,然后通过bmp_probe函数判断输入是否为BMP格式图片,如果确定是BMP图片,则会调用函数bmp_decode_frame将图片信息解析出来。
六、参考
《FFmpeg多媒体文件格式探测》


)


-查询优化(8)-嵌套联接优化)


)


