添加FreeModbus代码
首先准备一个空白的标准库项目。
下载FreeModbus源码。
将源码中的modbus文件夹复制到项目路径下,并把demo->BARE->port文件夹的内容也添加进来。


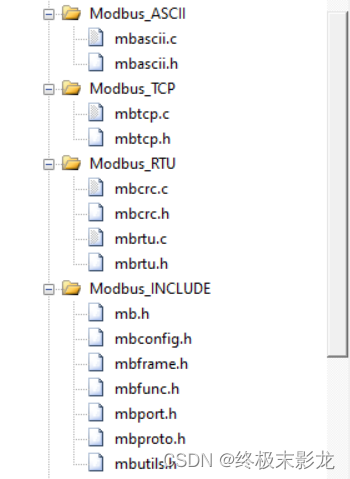
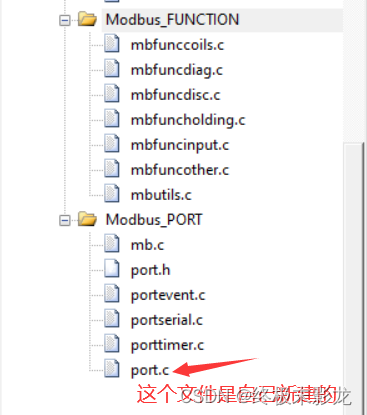
新建一个文件port.c备用。然后打开项目,将上述文件添加至项目,最好是按照文件夹建立不同分组。
完成后的项目结构如下:


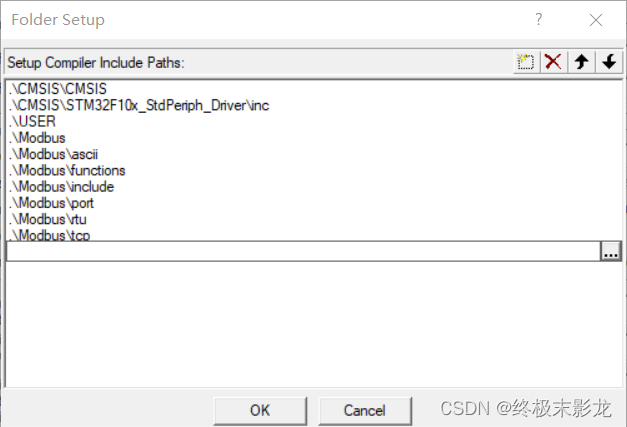
然后添加头文件路径,将modbus与port文件夹的内容包含。

修改代码
portserial.c
首先是串口文件portserial.c
void
vMBPortSerialEnable( BOOL xRxEnable, BOOL xTxEnable )
{
}BOOL
xMBPortSerialInit( UCHAR ucPORT, ULONG ulBaudRate, UCHAR ucDataBits, eMBParity eParity )
{return FALSE;
}BOOL
xMBPortSerialPutByte( CHAR ucByte )
{return TRUE;
}BOOL
xMBPortSerialGetByte( CHAR * pucByte )
{return TRUE;
}static void prvvUARTTxReadyISR( void )
{pxMBFrameCBTransmitterEmpty(  );
}static void prvvUARTRxISR( void )
{pxMBFrameCBByteReceived(  );
}
我们进行以下修改
在vMBPortSerialEnable函数进行串口中断的使能与失能,其实是切换发送或者接收。FreeModbus使用中断来进行数据的收发,但是由于Modbus协议特性,同时只能开启一种中断,即不能进行同时收发。
根据参数xRxEnable与xTxEnable的值,开启或关闭对应中断。这里发送中断选择TC、接收中断选择RXNE。
void
vMBPortSerialEnable( BOOL xRxEnable, BOOL xTxEnable )
{if (xTxEnable){USART_ITConfig(USART3,USART_IT_TC,ENABLE);}else{USART_ITConfig(USART3,USART_IT_TC,DISABLE);}if (xRxEnable){USART_ITConfig(USART3,USART_IT_RXNE,ENABLE);}else{USART_ITConfig(USART3,USART_IT_RXNE,DISABLE);}
}
xMBPortSerialInit函数进行串口初始化。传入的参数是串口、波特率、数据位与校验位。根据传入的参数对串口初始化,初始化成功返回TRUE,否则返回FALSE。
可以通过传入的参数进行灵活初始化,也可以不管参数,将初始化写死。这里使用UART3,波特率与参数一致,停止位1位,无校验位
BOOL
xMBPortSerialInit( UCHAR ucPORT, ULONG ulBaudRate, UCHAR ucDataBits, eMBParity eParity )
{RCC_APB2PeriphClockCmd(RCC_APB2Periph_GPIOB,ENABLE);//打开串口3的GPIO时钟RCC_APB1PeriphClockCmd(RCC_APB1Periph_USART3,ENABLE);//打开串口3时钟//配置USART3的RX,TX的GPIO口GPIO_InitTypeDef GPIO_InitStruct;GPIO_InitStruct.GPIO_Pin = GPIO_Pin_10; //将USART3_TX配置为复用推挽输出模式GPIO_InitStruct.GPIO_Mode = GPIO_Mode_AF_PP;GPIO_InitStruct.GPIO_Speed = GPIO_Speed_50MHz;GPIO_Init(GPIOB,&GPIO_InitStruct);GPIO_InitStruct.GPIO_Pin = GPIO_Pin_11; //将USART3_RX配置为浮空输入模式GPIO_InitStruct.GPIO_Mode = GPIO_Mode_IN_FLOATING;GPIO_InitStruct.GPIO_Speed = GPIO_Speed_50MHz;GPIO_Init(GPIOB,&GPIO_InitStruct);//配置USART3USART_InitTypeDef USART_InitStruct;USART_InitStruct.USART_WordLength = USART_WordLength_8b;USART_InitStruct.USART_StopBits = USART_StopBits_1;USART_InitStruct.USART_BaudRate = ulBaudRate;USART_InitStruct.USART_Parity = USART_Parity_No;USART_InitStruct.USART_HardwareFlowControl = USART_HardwareFlowControl_None;USART_InitStruct.USART_Mode = USART_Mode_Rx|USART_Mode_Tx;USART_Init(USART3,&USART_InitStruct);USART_Cmd(USART3,ENABLE);//配置中断NVIC_InitTypeDef NVIC_InitStruct;NVIC_InitStruct.NVIC_IRQChannelCmd = ENABLE;NVIC_InitStruct.NVIC_IRQChannelPreemptionPriority = 1;NVIC_InitStruct.NVIC_IRQChannelSubPriority = 1;NVIC_InitStruct.NVIC_IRQChannel = USART3_IRQn;NVIC_Init(&NVIC_InitStruct);return TRUE;
}
xMBPortSerialPutByte与xMBPortSerialGetByte实现单字节收发
BOOL
xMBPortSerialPutByte( CHAR ucByte )
{USART_SendData(USART3,ucByte);return TRUE;
}BOOL
xMBPortSerialGetByte( CHAR * pucByte )
{*pucByte = USART_ReceiveData(USART3);return TRUE;
}
实现串口的中断函数。要求是发生发送与接收中断时,调用对应的函数。
void USART3_IRQHandler(void)
{if(USART_GetITStatus(USART3, USART_IT_RXNE) == SET){prvvUARTRxISR();  USART_ClearITPendingBit(USART3, USART_IT_RXNE);   }if(USART_GetITStatus(USART3, USART_IT_TC) == SET){prvvUARTTxReadyISR();USART_ClearITPendingBit(USART3, USART_IT_TC);}
}
完整的portserial.c函数如下:
#include "port.h"
#include "stm32f10x.h"
/* ----------------------- Modbus includes ----------------------------------*/
#include "mb.h"
#include "mbport.h"/* ----------------------- static functions ---------------------------------*/
static void prvvUARTTxReadyISR( void );
static void prvvUARTRxISR( void );/* ----------------------- Start implementation -----------------------------*/
void
vMBPortSerialEnable( BOOL xRxEnable, BOOL xTxEnable )
{if (xTxEnable){USART_ITConfig(USART3,USART_IT_TC,ENABLE);}else{USART_ITConfig(USART3,USART_IT_TC,DISABLE);}if (xRxEnable){USART_ITConfig(USART3,USART_IT_RXNE,ENABLE);}else{USART_ITConfig(USART3,USART_IT_RXNE,DISABLE);}
}BOOL
xMBPortSerialInit( UCHAR ucPORT, ULONG ulBaudRate, UCHAR ucDataBits, eMBParity eParity )
{RCC_APB2PeriphClockCmd(RCC_APB2Periph_GPIOB,ENABLE);//打开串口3的GPIO时钟RCC_APB1PeriphClockCmd(RCC_APB1Periph_USART3,ENABLE);//打开串口3时钟//配置USART3的RX,TX的GPIO口GPIO_InitTypeDef GPIO_InitStruct;GPIO_InitStruct.GPIO_Pin = GPIO_Pin_10; //将USART3_TX配置为复用推挽输出模式GPIO_InitStruct.GPIO_Mode = GPIO_Mode_AF_PP;GPIO_InitStruct.GPIO_Speed = GPIO_Speed_50MHz;GPIO_Init(GPIOB,&GPIO_InitStruct);GPIO_InitStruct.GPIO_Pin = GPIO_Pin_11; //将USART3_RX配置为浮空输入模式GPIO_InitStruct.GPIO_Mode = GPIO_Mode_IN_FLOATING;GPIO_InitStruct.GPIO_Speed = GPIO_Speed_50MHz;GPIO_Init(GPIOB,&GPIO_InitStruct);//配置USART3USART_InitTypeDef USART_InitStruct;USART_InitStruct.USART_WordLength = USART_WordLength_8b;USART_InitStruct.USART_StopBits = USART_StopBits_1;USART_InitStruct.USART_BaudRate = ulBaudRate;USART_InitStruct.USART_Parity = USART_Parity_No;USART_InitStruct.USART_HardwareFlowControl = USART_HardwareFlowControl_None;USART_InitStruct.USART_Mode = USART_Mode_Rx|USART_Mode_Tx;USART_Init(USART3,&USART_InitStruct);USART_Cmd(USART3,ENABLE);//配置中断NVIC_InitTypeDef NVIC_InitStruct;NVIC_InitStruct.NVIC_IRQChannelCmd = ENABLE;NVIC_InitStruct.NVIC_IRQChannelPreemptionPriority = 1;NVIC_InitStruct.NVIC_IRQChannelSubPriority = 1;NVIC_InitStruct.NVIC_IRQChannel = USART3_IRQn;NVIC_Init(&NVIC_InitStruct);return TRUE;
}BOOL
xMBPortSerialPutByte( CHAR ucByte )
{USART_SendData(USART3,ucByte);return TRUE;
}BOOL
xMBPortSerialGetByte( CHAR * pucByte )
{*pucByte = USART_ReceiveData(USART3);return TRUE;
}/* Create an interrupt handler for the transmit buffer empty interrupt* (or an equivalent) for your target processor. This function should then* call pxMBFrameCBTransmitterEmpty( ) which tells the protocol stack that* a new character can be sent. The protocol stack will then call * xMBPortSerialPutByte( ) to send the character.*/
static void prvvUARTTxReadyISR( void )
{pxMBFrameCBTransmitterEmpty(  );
}/* Create an interrupt handler for the receive interrupt for your target* processor. This function should then call pxMBFrameCBByteReceived( ). The* protocol stack will then call xMBPortSerialGetByte( ) to retrieve the* character.*/
static void prvvUARTRxISR( void )
{pxMBFrameCBByteReceived(  );
}void USART3_IRQHandler(void)
{if(USART_GetITStatus(USART3, USART_IT_RXNE) == SET){prvvUARTRxISR();  USART_ClearITPendingBit(USART3, USART_IT_RXNE);   }if(USART_GetITStatus(USART3, USART_IT_TC) == SET){prvvUARTTxReadyISR();USART_ClearITPendingBit(USART3, USART_IT_TC);}
}
porttimer.c
本文件夹是初始化定时器,实现帧结束的截取。
xMBPortTimersInit初始化定时器,需要将计数间隔设定为50us(设时钟72MHz,这里将分频系数设置到3600-1,实现50us计时),定时周期按参数设置,并使能更新中断。这里我使用TIM1。
BOOL
xMBPortTimersInit( USHORT usTim1Timerout50us )
{RCC_APB2PeriphClockCmd(RCC_APB2ENR_TIM1EN,ENABLE);TIM_TimeBaseInitTypeDef tbit;tbit.TIM_Prescaler = 3600-1;tbit.TIM_Period = usTim1Timerout50us;tbit.TIM_ClockDivision = TIM_CKD_DIV1;tbit.TIM_CounterMode = TIM_CounterMode_Up;tbit.TIM_RepetitionCounter = 0;TIM_TimeBaseInit(TIM1,&tbit);TIM_ClearFlag(TIM1,TIM_IT_Update);NVIC_InitTypeDef nvic_inittypeddef;nvic_inittypeddef.NVIC_IRQChannel = TIM1_UP_IRQn;nvic_inittypeddef.NVIC_IRQChannelCmd = ENABLE;nvic_inittypeddef.NVIC_IRQChannelPreemptionPriority = 0;nvic_inittypeddef.NVIC_IRQChannelSubPriority = 3;NVIC_Init(&nvic_inittypeddef);return TRUE;
}
vMBPortTimersEnable与vMBPortTimersDisable函数进行定时器的使能与失能(去掉inline)。并写对应的中断函数,当中断触发时调用FreeModbus写好的处理函数。
void
vMBPortTimersEnable(  )
{TIM_ClearITPendingBit(TIM1, TIM_IT_Update);TIM_ITConfig(TIM1, TIM_IT_Update, ENABLE);TIM_SetCounter(TIM1, 0);TIM_Cmd(TIM1, ENABLE);/* Enable the timer with the timeout passed to xMBPortTimersInit( ) */
}void
vMBPortTimersDisable(  )
{TIM_ClearITPendingBit(TIM1, TIM_IT_Update);TIM_ITConfig(TIM1, TIM_IT_Update, DISABLE);TIM_SetCounter(TIM1, 0);TIM_Cmd(TIM1, DISABLE);/* Disable any pending timers. */
}void TIM1_UP_IRQHandler(void)
{if (TIM_GetITStatus(TIM1, TIM_IT_Update) != RESET){prvvTIMERExpiredISR();TIM_ClearITPendingBit(TIM1, TIM_IT_Update);}
}
以下是本文件全部内容:
/* ----------------------- Platform includes --------------------------------*/
#include "port.h"
#include "stm32f10x.h"
/* ----------------------- Modbus includes ----------------------------------*/
#include "mb.h"
#include "mbport.h"/* ----------------------- static functions ---------------------------------*/
static void prvvTIMERExpiredISR( void );/* ----------------------- Start implementation -----------------------------*/
BOOL
xMBPortTimersInit( USHORT usTim1Timerout50us )
{RCC_APB2PeriphClockCmd(RCC_APB2ENR_TIM1EN,ENABLE);TIM_TimeBaseInitTypeDef tbit;tbit.TIM_Prescaler = 3600-1;tbit.TIM_Period = usTim1Timerout50us;tbit.TIM_ClockDivision = TIM_CKD_DIV1;tbit.TIM_CounterMode = TIM_CounterMode_Up;tbit.TIM_RepetitionCounter = 0;TIM_TimeBaseInit(TIM1,&tbit);TIM_ClearFlag(TIM1,TIM_IT_Update);NVIC_InitTypeDef nvic_inittypeddef;nvic_inittypeddef.NVIC_IRQChannel = TIM1_UP_IRQn;nvic_inittypeddef.NVIC_IRQChannelCmd = ENABLE;nvic_inittypeddef.NVIC_IRQChannelPreemptionPriority = 0;nvic_inittypeddef.NVIC_IRQChannelSubPriority = 3;NVIC_Init(&nvic_inittypeddef);return TRUE;
}void
vMBPortTimersEnable(  )
{TIM_ClearITPendingBit(TIM1, TIM_IT_Update);TIM_ITConfig(TIM1, TIM_IT_Update, ENABLE);TIM_SetCounter(TIM1, 0);TIM_Cmd(TIM1, ENABLE);/* Enable the timer with the timeout passed to xMBPortTimersInit( ) */
}void
vMBPortTimersDisable(  )
{TIM_ClearITPendingBit(TIM1, TIM_IT_Update);TIM_ITConfig(TIM1, TIM_IT_Update, DISABLE);TIM_SetCounter(TIM1, 0);TIM_Cmd(TIM1, DISABLE);/* Disable any pending timers. */
}/* Create an ISR which is called whenever the timer has expired. This function* must then call pxMBPortCBTimerExpired( ) to notify the protocol stack that* the timer has expired.*/
static void prvvTIMERExpiredISR( void )
{( void )pxMBPortCBTimerExpired(  );
}void TIM1_UP_IRQHandler(void)
{if (TIM_GetITStatus(TIM1, TIM_IT_Update) != RESET){prvvTIMERExpiredISR();TIM_ClearITPendingBit(TIM1, TIM_IT_Update);}
}
mbconfig.h
第49行将宏MB_ASCII_ENABLED失能,因为我们这里只使用RTU。
这个文件可以选择使能Modbus功能码函数,实现功能裁剪。
此时进行编译,会发现会报以下错误:
 四种数据类型(线圈、离散量、输入寄存器、保持寄存器)的操作函数与断言的定义没有实现,所以需要继续实现它们。
port.c
这个文件是自己新建的,我们在这个文件实现上述缺少的函数。
如何实现这些函数?同样可以参考Demo文件夹中的示例。例如Demo->MSP430->demo.c中的内容,这一部分可以复制到port.c中:
#include "mb.h"
#define REG_INPUT_START   0
#define REG_INPUT_NREGS   10
#define REG_HOLDING_START 0
#define REG_HOLDING_NREGS 10static USHORT   usRegInputStart = REG_INPUT_START;
static USHORT   usRegInputBuf[REG_INPUT_NREGS];
static USHORT   usRegHoldingStart = REG_HOLDING_START;
static USHORT   usRegHoldingBuf[REG_HOLDING_NREGS];eMBErrorCode
eMBRegInputCB( UCHAR * pucRegBuffer, USHORT usAddress, USHORT usNRegs )
{eMBErrorCode    eStatus = MB_ENOERR;int             iRegIndex;if( ( (int16_t)usAddress >= REG_INPUT_START )&& ( usAddress + usNRegs <= REG_INPUT_START + REG_INPUT_NREGS ) ){iRegIndex = ( int )( usAddress - usRegInputStart );while( usNRegs > 0 ){*pucRegBuffer++ = ( unsigned char )( usRegInputBuf[iRegIndex] >> 8 );*pucRegBuffer++ = ( unsigned char )( usRegInputBuf[iRegIndex] & 0xFF );iRegIndex++;usNRegs--;}}else{eStatus = MB_ENOREG;}return eStatus;
}eMBErrorCode
eMBRegHoldingCB( UCHAR * pucRegBuffer, USHORT usAddress, USHORT usNRegs, eMBRegisterMode eMode )
{eMBErrorCode    eStatus = MB_ENOERR;int             iRegIndex;if( ( (int16_t)usAddress >= REG_HOLDING_START ) &&( usAddress + usNRegs <= REG_HOLDING_START + REG_HOLDING_NREGS ) ){iRegIndex = ( int )( usAddress - usRegHoldingStart );switch ( eMode ){/* Pass current register values to the protocol stack. */case MB_REG_READ:while( usNRegs > 0 ){*pucRegBuffer++ = ( unsigned char )( usRegHoldingBuf[iRegIndex] >> 8 );*pucRegBuffer++ = ( unsigned char )( usRegHoldingBuf[iRegIndex] & 0xFF );iRegIndex++;usNRegs--;}break;/* Update current register values with new values from the* protocol stack. */case MB_REG_WRITE:while( usNRegs > 0 ){usRegHoldingBuf[iRegIndex] = *pucRegBuffer++ << 8;usRegHoldingBuf[iRegIndex] |= *pucRegBuffer++;iRegIndex++;usNRegs--;}}}else{eStatus = MB_ENOREG;}return eStatus;
}
前面的数组usRegInputBuf与usRegHoldingBuf就是操作的输入寄存器与保持寄存器,而REG_INPUT_START与REG_HOLDING_START是这两类寄存器的起始地址。当从机收到特定的功能码时,会转为对这些数据变量的操作。
下面的eMBRegInputCB与eMBRegHoldingCB就是输入寄存器与保持寄存器对应的处理函数。在Modbus协议层面来讲就是实现了对应的功能码。虽然目前看不懂具体实现,但是只需要贴进来用即可。
下面打开源码Demo->STR71X->excolis.c与exdisc.c,线圈量与离散量的处理函数就在里面。与寄存器类似,将它们复制到port.c。
#include "mbutils.h"
#define REG_COILS_START     0
#define REG_COILS_SIZE      16
static unsigned char ucRegCoilsBuf[REG_COILS_SIZE / 8];eMBErrorCode
eMBRegCoilsCB( UCHAR * pucRegBuffer, USHORT usAddress, USHORT usNCoils,eMBRegisterMode eMode )
{eMBErrorCode    eStatus = MB_ENOERR;int             iNCoils = ( int )usNCoils;unsigned short  usBitOffset;/* Check if we have registers mapped at this block. */if( ( (int16_t)usAddress >= REG_COILS_START ) &&( usAddress + usNCoils <= REG_COILS_START + REG_COILS_SIZE ) ){usBitOffset = ( unsigned short )( usAddress - REG_COILS_START );switch ( eMode ){/* Read current values and pass to protocol stack. */case MB_REG_READ:while( iNCoils > 0 ){*pucRegBuffer++ =xMBUtilGetBits( ucRegCoilsBuf, usBitOffset,( unsigned char )( iNCoils >8 ? 8 :iNCoils ) );iNCoils -= 8;usBitOffset += 8;}break;/* Update current register values. */case MB_REG_WRITE:while( iNCoils > 0 ){xMBUtilSetBits( ucRegCoilsBuf, usBitOffset, ( unsigned char )( iNCoils > 8 ? 8 : iNCoils ),*pucRegBuffer++ );iNCoils -= 8;usBitOffset += 8;}break;}}else{eStatus = MB_ENOREG;}return eStatus;
}#define REG_DISC_START     0
#define REG_DISC_SIZE      16
static unsigned char ucRegDiscBuf[REG_DISC_SIZE / 8] = { 0, 0 };eMBErrorCode
eMBRegDiscreteCB( UCHAR * pucRegBuffer, USHORT usAddress, USHORT usNDiscrete )
{eMBErrorCode    eStatus = MB_ENOERR;short           iNDiscrete = ( short )usNDiscrete;unsigned short  usBitOffset;/* Check if we have registers mapped at this block. */if( ( (int16_t)usAddress >= REG_DISC_START ) &&( usAddress + usNDiscrete <= REG_DISC_START + REG_DISC_SIZE ) ){usBitOffset = ( unsigned short )( usAddress - REG_DISC_START );while( iNDiscrete > 0 ){*pucRegBuffer++ =xMBUtilGetBits( ucRegDiscBuf, usBitOffset,( unsigned char )( iNDiscrete >8 ? 8 : iNDiscrete ) );iNDiscrete -= 8;usBitOffset += 8;}}else{eStatus = MB_ENOREG;}return eStatus;
}
注意,开关量与离散量都是位数据,因此数组长度会除以8。
然后再给断言函数加上,整个port.c就写好了。
void __aeabi_assert(const char * x1, const char * x2, int x3)
{}
实现上述函数与数据,就实现了Modbus绝大多数功能码。
mbrtu.c的eMBRTUSend函数
第213行后面添加代码:
xMBPortSerialPutByte( ( CHAR )*pucSndBufferCur );
pucSndBufferCur++;  /* next byte in sendbuffer. */
usSndBufferCount--;
更新后的eMBRTUSend函数:
eMBErrorCode
eMBRTUSend( UCHAR ucSlaveAddress, const UCHAR * pucFrame, USHORT usLength )
{eMBErrorCode    eStatus = MB_ENOERR;USHORT          usCRC16;ENTER_CRITICAL_SECTION(  );/* Check if the receiver is still in idle state. If not we where to* slow with processing the received frame and the master sent another* frame on the network. We have to abort sending the frame.*/if( eRcvState == STATE_RX_IDLE ){/* First byte before the Modbus-PDU is the slave address. */pucSndBufferCur = ( UCHAR * ) pucFrame - 1;usSndBufferCount = 1;/* Now copy the Modbus-PDU into the Modbus-Serial-Line-PDU. */pucSndBufferCur[MB_SER_PDU_ADDR_OFF] = ucSlaveAddress;usSndBufferCount += usLength;/* Calculate CRC16 checksum for Modbus-Serial-Line-PDU. */usCRC16 = usMBCRC16( ( UCHAR * ) pucSndBufferCur, usSndBufferCount );ucRTUBuf[usSndBufferCount++] = ( UCHAR )( usCRC16 & 0xFF );ucRTUBuf[usSndBufferCount++] = ( UCHAR )( usCRC16 >> 8 );/* Activate the transmitter. */eSndState = STATE_TX_XMIT;xMBPortSerialPutByte((CHAR)*pucSndBufferCur);pucSndBufferCur++;usSndBufferCount--;vMBPortSerialEnable( FALSE, TRUE );}else{eStatus = MB_EIO;}EXIT_CRITICAL_SECTION(  );return eStatus;
}
mbfunccoils.c,mbfuncdisc.c,mbfuncholding.c,mbfuncinput.c
首先去掉所有的usRegAddress++,否则实际操作会比期望地址大一。
然后mbfuncholding.c第185行,添加一个或负号:
usRegCount |= ( USHORT )( pucFrame[MB_PDU_FUNC_READ_REGCNT_OFF + 1] );
至此,代码修改完成,编译应该没有error了。
测试
main文件
#include "stm32f10x.h"
#include "mb.h"
int main(void){eMBInit(MB_RTU, 0X01, 3, 9600, MB_PAR_NONE);//初始化FreeModbuseMBEnable();//FreeModbus使能while (1){eMBPoll();//在while (1)循环调用eMBPoll()}
}
eMBInit进行初始化,其中第一个参数表示协议,第二个参数是从机地址,后面三个是初始化串口那个函数的参数,可以跳转到那里进行对照(这里配置为串口3,波特率9600,不校验)
eMBEnable()启动FreeModbus后,不断调用eMBPoll()即可。
port.c
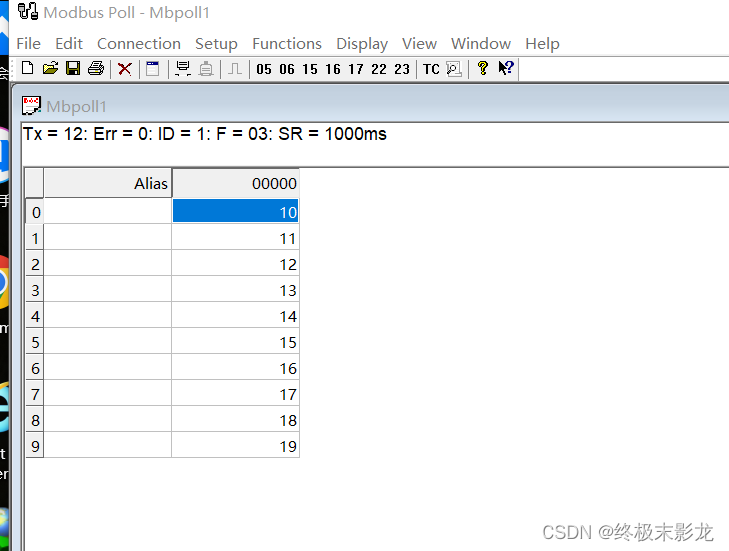
这里我们修改一下各个位数据与寄存器的初始值,方便观察结果。
static USHORT   usRegInputBuf[REG_INPUT_NREGS] = {0,1,2,3,4,5,6,7,8,9};
static USHORT   usRegHoldingBuf[REG_HOLDING_NREGS] = {10,11,12,13,14,15,16,17,18,19};
static unsigned char ucRegCoilsBuf[REG_COILS_SIZE / 8] = {0x12,0x34};
static unsigned char ucRegDiscBuf[REG_DISC_SIZE / 8] = {0x56,0x78};
使用ModbusPoll连接,看到可以正常读出数据:


![【PyTorch][chapter 25][李宏毅深度学习][ CycleGAN]【实战】](http://pic.xiahunao.cn/【PyTorch][chapter 25][李宏毅深度学习][ CycleGAN]【实战】)


)

卷积神经网络CNN)


)
)

