一、环境说明
[root@git ~]# getenforce
Disabled
[root@git ~]# systemctl status firewalld
● firewalld.service - firewalld - dynamic firewall daemonLoaded: loaded (/usr/lib/systemd/system/firewalld.service; disabled; vendor preset: enabled)Active: inactive (dead)Docs: man:firewalld(1)3月 23 09:35:07 localhost.localdomain systemd[1]: Starting firewalld - dynamic firewall daemon...
3月 23 09:35:08 localhost.localdomain systemd[1]: Started firewalld - dynamic firewall daemon.
3月 23 09:35:08 localhost.localdomain firewalld[1466]: WARNING: AllowZoneDrifting is enabled. This is co...ow.
3月 23 09:35:16 localhost.localdomain systemd[1]: Stopping firewalld - dynamic firewall daemon...
3月 23 09:35:16 localhost.localdomain systemd[1]: Stopped firewalld - dynamic firewall daemon.
Hint: Some lines were ellipsized, use -l to show in full.
[root@git ~]# uname -a
Linux git 3.10.0-1160.el7.x86_64 #1 SMP Mon Oct 19 16:18:59 UTC 2020 x86_64 x86_64 x86_64 GNU/Linux
[root@git ~]# rpm -qa centos-release
centos-release-7-9.2009.0.el7.centos.x86_64
二、git的两种安装方式
1、yum安装git
centos自带git
[root@git ~]# rpm -qa git
git-1.8.3.1-25.el7_9.x86_64
安装方法
[root@git ~]# yum install git -y2、编译安装
编译安装可以安装较新版本的git
Git下载地址: Releases · git/git · GitHub

# 安装依赖关系
[root@git ~]# yum install curl-devel expat-devel gettext-devel  openssl-devel zlib-devel autoconf gcc perl-ExtUtils-MakeMaker
# 编译安装
[root@git ~]# tar -zxf git-2.0.0.tar.gz
[root@git ~]# cd git-2.0.0
[root@git ~]# ./configure --prefix=/usr/local/git # 没有文件可以略过
[root@git ~]# make
[root@git ~]# make install
三、初次运行 Git 前的配置
配置git
git config --global user.name "username" #配置git使用用户
git config --global user.email "email@mail.com" #配置git使用邮箱
git config --global color.ui true #语法高亮
git config --list # 查看全局配置
 四、获取 Git 仓库(初始化仓库)
1、创建裸库
[root@git ~]# useradd git
[root@git ~]# passwd git
更改用户 git 的密码 。
新的 密码:
无效的密码: 密码是一个回文
重新输入新的 密码:
passwd:所有的身份验证令牌已经成功更新。
[root@git ~]# mkdir /git-root/
[root@git ~]# cd /git-root/
[root@git git-root]# git init --bare shell.git
初始化空的 Git 版本库于 /git-root/shell.git/
[root@git git-root]# chown -R git:git shell.git
[root@git git-root]# ll
总用量 0
drwxr-xr-x 7 git git 119 3月  23 10:32 shell.git
2、创建本地库
[root@git ~]# cd /opt/
[root@git opt]# ssh-keygen
[root@git opt]# ssh-copy-id git@10.12.153.234
[root@git opt]# git clone git@10.12.153.234:/git-root/shell.git
正克隆到 'shell'...
warning: 您似乎克隆了一个空版本库。
[root@git opt]# ls
shell
[root@git opt]# cd  shell/
[root@git shell]# ll
总用量 0
五、git的使用
1、添加新文件
git add * 添加到暂存区域
git commit 提交git仓库 -m 后面接上注释信息,内容关于本次提交的说明,方便自己或他人查看
[root@git shell]# pwd
/opt/shell
[root@git shell]# vim test1.sh
[root@git shell]# git add test1.sh
[root@git shell]# git commit -m 'first commit'
[master(根提交) 2b45ee9] first commit1 file changed, 0 insertions(+), 0 deletions(-)create mode 100644 test1.sh
[root@git shell]# git push origin master
Counting objects: 3, done.
Writing objects: 100% (3/3), 206 bytes | 0 bytes/s, done.
Total 3 (delta 0), reused 0 (delta 0)
To git@10.12.153.234:/git-root/shell.git* [new branch]      master -> master
常用操作示意图 
2、删除git内的文件
命令说明:
• 没有添加到暂存区的数据直接rm删除即可。

• 已经添加到暂存区数据:
git rm --cached database

#→将文件从git暂存区域的追踪列表移除(并不会删除当前工作目录内的数据文件)
git rm -f database
#→将文件数据从git暂存区和工作目录一起删除
3、查看历史记录
• git log #→查看提交历史记录
• git log -2 #→查看最近几条记录
• git log -p -1 #→-p显示每次提交的内容差异,例如仅查看最近一次差异
• git log --stat -2 #→--stat简要显示数据增改行数,这样能够看到提交中修改过的内容,对文件添加或移动的行数,并在最后列出所有增减行的概要信息
• git log --pretty=oneline #→--pretty根据不同的格式展示提交的历史信息
• git log --pretty=fuller -2 #→以更详细的模式输出提交的历史记录
• git log --pretty=fomat:"%h %cn" #→查看当前所有提交记录的简短SHA-1哈希字串与提交着的姓名
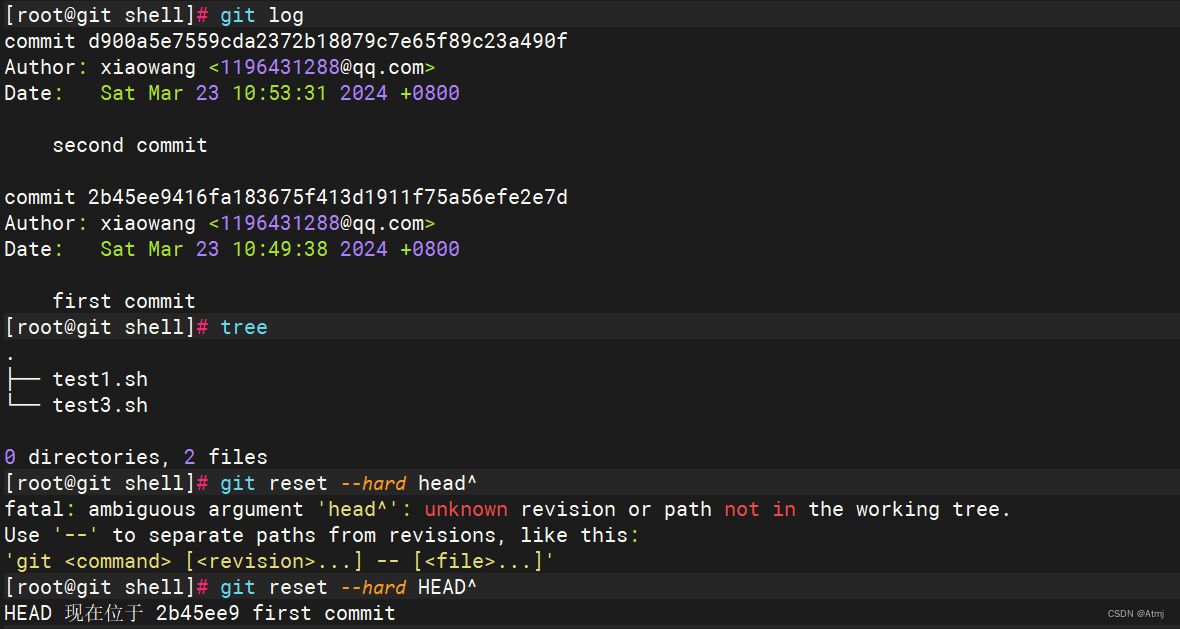
[root@git shell]# git log
commit d900a5e7559cda2372b18079c7e65f89c23a490f
Author: xiaowang <1196431288@qq.com>
Date:   Sat Mar 23 10:53:31 2024 +0800second commitcommit 2b45ee9416fa183675f413d1911f75a56efe2e7d
Author: xiaowang <1196431288@qq.com>
Date:   Sat Mar 23 10:49:38 2024 +0800first commit
4、还原历史数据
Git服务程序中有一个叫做HEAD的版本指针,当用户申请还原数据时,其实就是将HEAD指针指向到某个特定的提交版本,但是因为Git是分布式版本控制系统,为了避免历史记录冲突,故使用了SHA-1计算出十六进制的哈希字串来区分每个提交版本,另外默认的HEAD版本指针会指向到最近的一次提交版本记录,而上一个提交版本会叫HEAD^,上上一个版本则会叫做HEAD^^,当然一般会用HEAD~5来表示往上数第五个提交版本。
git reset --hard hash值
git reset --hard HEAD^ #→还原历史提交版本上一次
git reset --hard 3de15d4 #→找到历史还原点的SHA-1值后,就可以还原(值不写全,系统
会自动匹配)


5、还原未来数据
什么是未来数据?就是你还原到历史数据了,但是你后悔了,想撤销更改,但是git log已经找不到这个版本了。
git reflog #→查看未来历史更新点 (见上图)
6、标签使用
前面回滚使用的是一串字符串,又长又难记。
git tag v1.0 #→当前提交内容打一个标签(方便快速回滚),每次提交都可以打个tag。
git tag #→查看当前所有的标签
git show v1.0 #→查看当前1.0版本的详细信息
git tag v1.2 -m "version 1.2 release is test" #→创建带有说明的标签,-a指定标签名字,-m指定说明文字
git tag -d v1.0 #→我们为同一个提交版本设置了两次标签,删除之前的v1.0
7、对比数据
git diff可以对比当前文件与仓库已保存文件的区别,知道了对README作了什么修改
后,再把它提交到仓库就放⼼多了。
git diff README
git diff --name-only HEAD HEAD^
git diff --name-only head_id head_id2
六、分支结构
在实际的项目开发中,尽量保证master分支稳定,仅用于发布新版本,平时不要随便直接修改里面的数据文件。
那在哪干活呢?干活都在dev分支上。每个人从dev分支创建自己个人分支,开发完合并到dev分支,最后dev分支合并到master分支。所以团队的合作分支看起来会像下图那样。

1、切换分支/创建分支
 2、在newttt分支修改
[root@git shell]# git branchmasternewrain
* newttt
[root@git shell]# cat README
cat: README: 没有那个文件或目录
[root@git shell]# echo '1901' >> README
[root@git shell]#  git add .
[root@git shell]#  git commit -m '1901'
[newttt 938ad56] 19012 files changed, 1 insertion(+)create mode 100644 READMEcreate mode 100644 test3.sh
3、回到master分支
[root@git shell]# git checkout master
切换到分支 'master'
[root@git shell]# cat README
cat: README: 没有那个文件或目录
[root@git shell]# git log  -1
commit d900a5e7559cda2372b18079c7e65f89c23a490f
Author: xiaowang <1196431288@qq.com>
Date:   Sat Mar 23 10:53:31 2024 +0800second commit
4、合并代码
[root@git shell]# git merge newttt
更新 d900a5e..938ad56
Fast-forwardREADME   | 1 +test3.sh | 02 files changed, 1 insertion(+)create mode 100644 READMEcreate mode 100644 test3.sh
[root@git shell]# cat README
1901
[root@git shell]# git log -1
commit 938ad56feacac2e99487b7cb7ae561ae3ce49225
Author: xiaowang <1196431288@qq.com>
Date:   Sat Mar 23 12:09:12 2024 +08001901

(文末送书-进行中))


)
)


![每日一题 --- 移除链表元素[力扣][Go]](http://pic.xiahunao.cn/每日一题 --- 移除链表元素[力扣][Go])


