作用:在服务器CPU高负载时发送邮件通知
目录
一、功能代码
二、配置开机自启动该监控脚本
1,配置自启脚本
2,启动
三、功能测试
一、功能代码
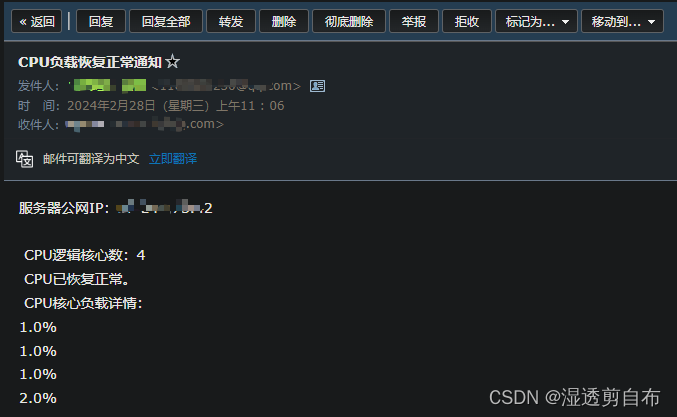
功能:在CPU负载超过预设置的90%阈值时就发送邮件通知!邮件内容显示服务器的公网IP、CPU逻辑核心数及每个逻辑核心数的负载详情
import psutil
import smtplib
from email.mime.text import MIMEText
from email.mime.multipart import MIMEMultipart
import requests
import time# 阈值设置
threshold = 90# 邮件服务器配置
smtp_server = 'smtp.qq.com'
smtp_port = 587  # QQ邮箱的端口号为587
# 发送方邮箱账号和密码
sender_email = 'xxxxxxx@qq.com'
sender_password = 'yxamfeswlsnijaie'
# 接收方邮箱地址
receiver_email = 'xxxxx@qq.com'# 全局变量
cpu_usage = None  # 每个逻辑处理器的负载def get_server_ip():server_ip = '未获取到公网ip'try:response1 = requests.get('https://ip.3322.net/', timeout=5)if response1.text:server_ip = response1.textexcept:passtry:response2 = requests.get('https://myip.ipip.net', timeout=5)if response2.text:unformat_server_ip = response2.textserver_ip = unformat_server_ip.split(':')[1]except:passtry:response3 = requests.get('https://ddns.oray.com/checkip', timeout=5)if response3.text:unformat_server_ip = response3.textserver_ip = unformat_server_ip.split(':')[1]except:passreturn server_ip# 监测CPU负载并发送邮件通知
def monitor_cpu_load():# 初始化标志变量last_email_sent = Nonewhile True:global cpu_usagetime.sleep(3)  # 这里睡眠3秒是因为服务器在重启开机时的瞬间cpu负载是比较高的,所以并不准确,等待3秒更准确cpu_usage = psutil.cpu_percent(interval=1, percpu=True)  # 每个逻辑处理器的负载if all(usage >= threshold for usage in cpu_usage) and last_email_sent != "high":subject = "CPU负载过高警告"body = '服务器公网IP:{0}\n CPU逻辑核心数:{1}\n CPU每个逻辑核心负载均已超90%,请登录服务器查看详情\n CPU核心负载详情:\n'send_email(subject, body)last_email_sent = "high"elif all(usage < threshold for usage in cpu_usage) and last_email_sent != "normal":subject = "CPU负载恢复正常通知"body = '服务器公网IP:{0}\n CPU逻辑核心数:{1}\n CPU已恢复正常。\n CPU核心负载详情:\n'send_email(subject, body)last_email_sent = "normal"# 发送邮件通知
def send_email(subject, body):# 创建邮件内容global cpu_usagecpu_count = psutil.cpu_count(logical=True)  # cpu逻辑核心数server_ip = get_server_ip()  # 获取公网ipfor i in range(cpu_count):body += "\t{%d}%%\n" % (i + 2)body = body.format(server_ip, cpu_count, *cpu_usage)message = MIMEMultipart()message['From'] = sender_emailmessage['To'] = receiver_emailmessage['Subject'] = subject# 添加邮件正文# MIMEText有三个参数第一个为文本内容,第二个 plain 设置文本格式,第三个 utf-8 设置编码可不填message.attach(MIMEText(body, 'plain'))# 发送邮件try:print("正在发送邮件...")smtp = smtplib.SMTP(smtp_server, smtp_port)smtp.starttls()  # 开启TLS加密连接smtp.login(sender_email, sender_password)smtp.sendmail(sender_email, receiver_email, message.as_string())print("邮件发送成功!")except smtplib.SMTPException as e:print("邮件发送失败:", e)finally:print("正在退出")smtp.quit()if __name__ == "__main__":monitor_cpu_load()
sender_email和receiver_email 填写自己的邮箱地址
sender_password 是登录QQ邮箱的授权码
详情参考:https://itutd.blog.csdn.net/article/details/131810368?spm=1001.2014.3001.5502
二、配置开机自启动该监控脚本
1,配置自启脚本
在服务器/usr/lib/systemd/system目录下创建一个新的.service文件
vi /usr/lib/systemd/system/autorun_python.service写入以下内容
[Unit]
Description=python_script - monitor cpu
After=network.target remote-fs.target nss-lookup.target
[Service]
Type=simple
ExecStart=/root/.virtualenvs/qubian/bin/python3 /home/monitor_cpu.py
Restart=always
[Install]
WantedBy=multi-user.target
修改配置后可能需要运行以下命令重新加载
systemctl daemon-reload参数解释:
-
[Unit]:这个部分主要用于定义服务单元的基本信息,包括服务的描述和启动顺序等。Description:描述这个服务的作用,通常是一个简短的描述。After:指定在启动这个服务之前需要先启动的其他服务单元。在本例中,指定了在启动这个服务之前需要先启动的服务有network.target、remote-fs.target和nss-lookup.target。
-
[Service]:这个部分定义了服务运行时的相关参数。Type:指定服务的类型,有 simple、forking、oneshot、dbus、notify 等类型。在这里,Type=simple表示这是一个简单类型的服务。ExecStart:定义服务启动时执行的命令或脚本。在这个例子中,指定了使用指定的 Python 虚拟环境中的 Python 解释器执行/home/monitor_cpu.py脚本。
-
Restart:指定服务异常退出时的重启策略,always表示始终重启。
-
[Install]:指定服务的安装相关信息。WantedBy:指定服务所属的 target,即服务启动的目标。在这里,multi-user.target表示这个服务是为了多用户模式下运行的。
对于Type参数的值有以下:
-
Type=forking:表示服务将以分叉(forking)方式运行,即服务会创建一个子进程来运行主要的服务进程。当主进程退出时,服务就会被认为是已经停止。但是,它还支持在主进程退出后,Systemd会等待一段时间,以便子进程可以执行一些清理工作。 -
Type=simple:它表示这个服务是一个简单的服务,即它只有一个主进程,当这个主进程退出时,服务就会被认为是已经停止。 -
Type=oneshot:这种类型的服务是指它只需要在启动时运行一次。当主进程退出时,服务就会被认为是已经停止。 -
Type=dbus:这种类型的服务是指它需要一个D-Bus名称,以便Systemd可以监控它。 -
Type=notify:这种类型的服务是指它会在主进程准备好接受请求时,发送一个通知给Systemd。当Systemd接收到这个通知时,它就会认为服务已经启动。 -
Type=idle:这种类型的服务是指它会在所有其他类型的服务都已经启动后,才会启动。
2,启动
# 设置开机自启动
systemctl enable autorun_python.service
# 运行服务
systemctl start autorun_python.service
# 查看服务运行状态
systemctl status autorun_python.service
查看服务运行状态,显示active(running)正在运行中...
更多相关命令
# 关闭开机自启
systemctl disable autorun_python.service
# 停止运行服务
systemctl stop autorun_python.service
# 重启服务
systemctl restart autorun_python.service
三、功能测试
写一个让CPU满载的程序测试上面监控CPU的代码功能是否能正常工作
from multiprocessing import cpu_count
from multiprocessing import Processdef func():  # 死循环函数,让cpu满载while True:passif __name__ == '__main__':p_lst = []  # 定义一个列表core_count = cpu_count()  # CPU核心数for i in range(core_count):p = Process(target=func)  # 子进程调用函数p.start()  # 启动子进程p_lst.append(p)  # 将所有进程写入列表中for p in p_lst:p.join()  # 检测p是否结束,如果没有结束就阻塞直到结束,否则不阻塞print('结束')
使用htop命令查看cpu的负载状态

这时四个核心全被干满了!
也收到了超负载的邮件通知

当CPU负载恢复正常时也收到了相应的邮件


)
:Redis实现分布式ID生成)
)


——使用MRTK在Unity中设置混合现实场景并进行程序模拟)


)
- RefreshEvent 事件处理)