一:介绍:
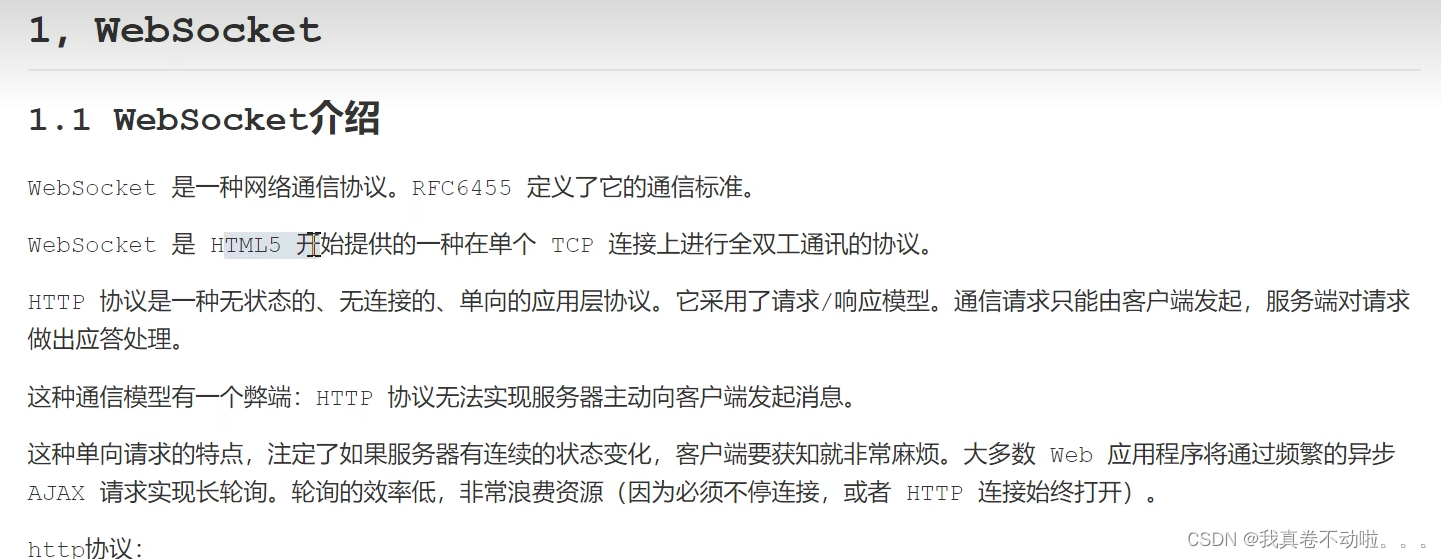
二:http协议与websocket对比:
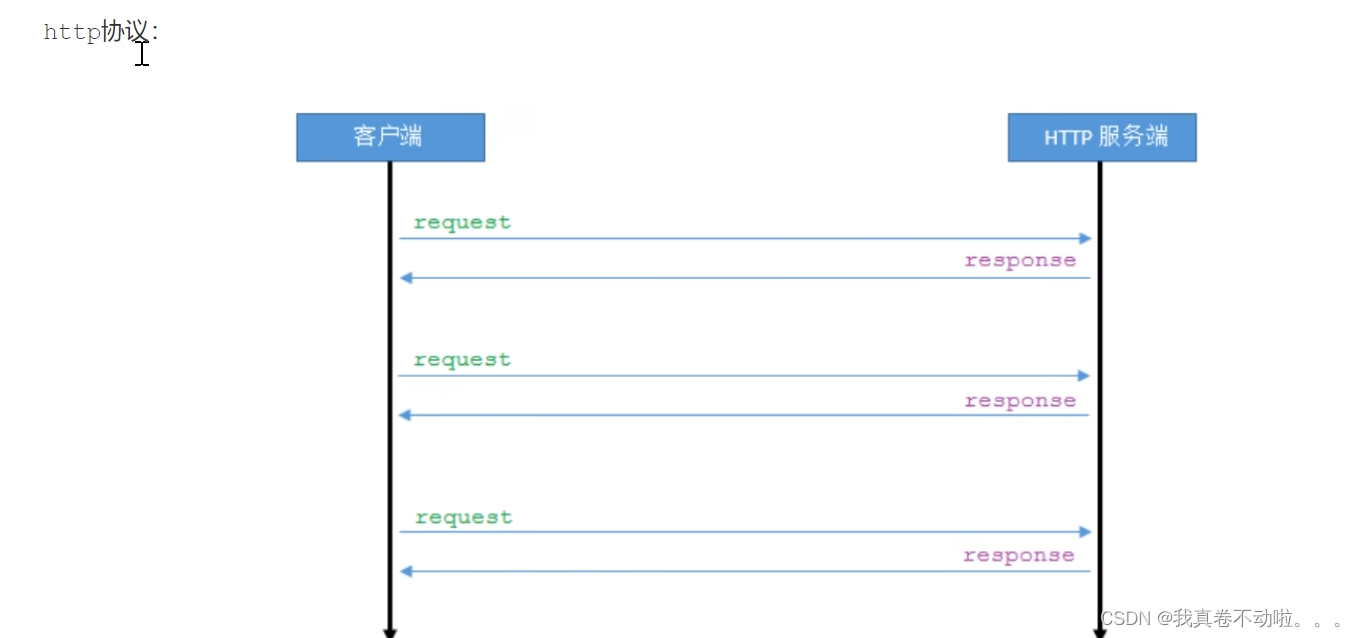
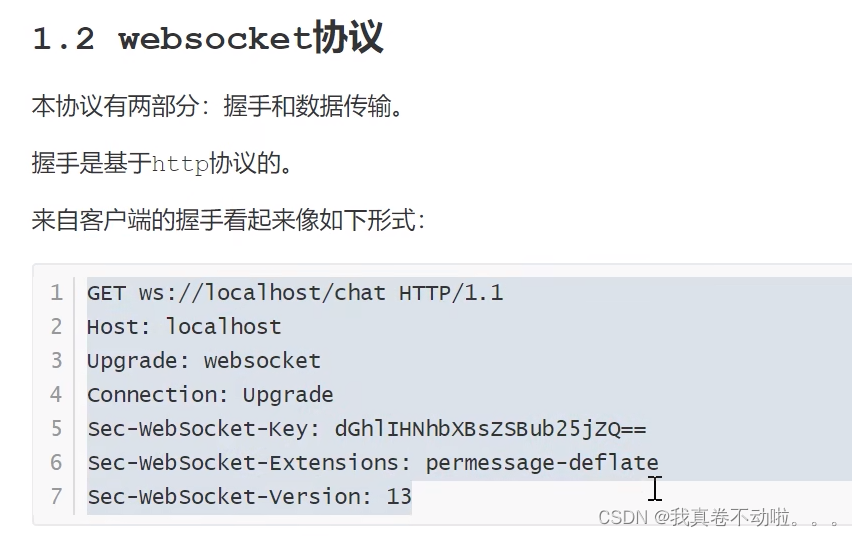
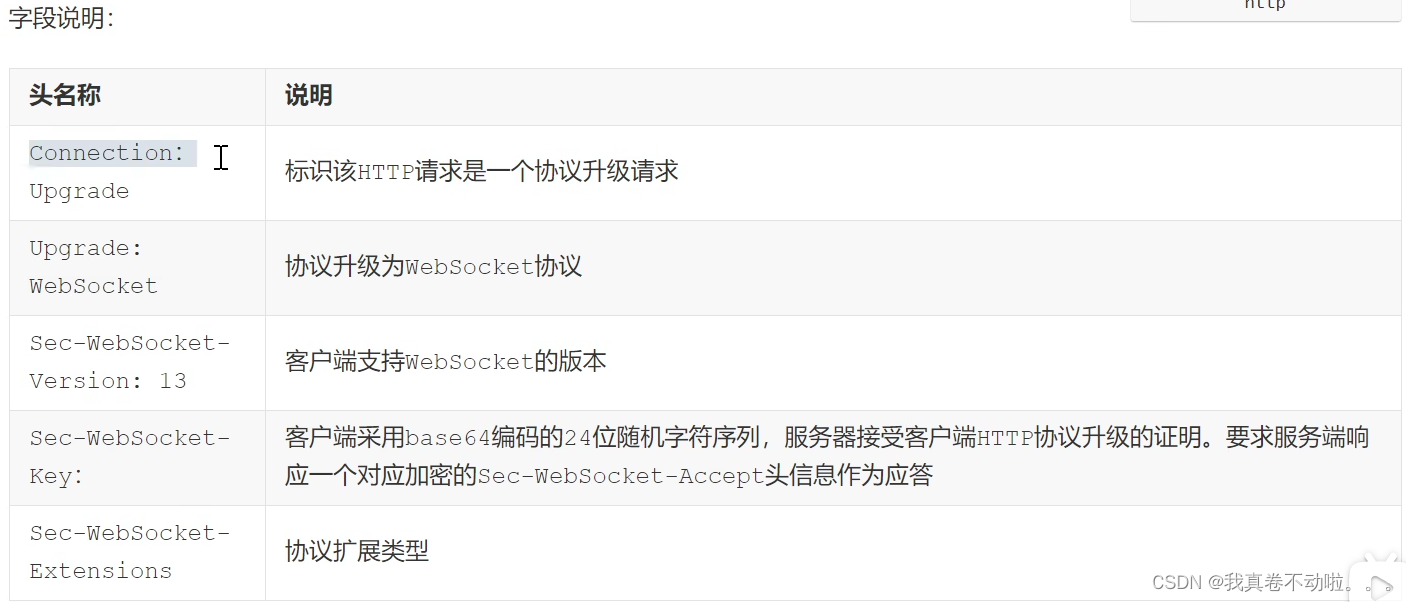
 三:websocket协议:

四:实现:
4.1客户端:
4.2服务端:
五:案例:
环境:做一个书店项目时想加一个用户联系客服的功能,寻思可以实现消息的实时通信和把聊天记录保存下来的效果,从网上找了找,决定使用websocket,并把消息保存到redis中。
5.1功能分析:
历史聊天记录查询:客服在打开消息中心点击某个用户的时候,可以向后端发送请求,从redis中查询自己与该用户的消息记录并渲染到页面上
发送消息与接收消息:需要用户先向客服发送消息,客服才能回应。在前端上,我们可以写一个方法来发送消息,由服务端接收消息,处理保存在redis中,并转发给客服,客服的回复也是这样的流程
5.3代码概要:
5.3.1服务端代码:
一个message实体类(ChatMessage)用于规定消息的格式,
一个配置类(WebSocketConfig)启用WebSocket功能,注册处理器,添加拦截器,指定访问路径,
一个拦截器(WebSocketInterceptor),拦截websocket请求,从URL中获取用户id,方便在处理消息逻辑中设置转发消息的目标用户,
一个消息接收处理的类(ChatMessageHandler),接收前端的消息,发送到redis中,转给目标用户,
一个控制器(ChatController),前端发送http请求从redis中获取数据
5.3.2客户端代码:
一个用户端的页面,满足基本的发送接收消息和渲染页面
一个客服端的页面,满足发送接收消息和渲染页面,当接收到用户发送的消息时会更新用户列表,显示有对话消息的用户
5.4全部代码:
5.4.提示:服务端记得导入依赖
<!-- websocket--><dependency><groupId>org.springframework.boot</groupId><artifactId>spring-boot-starter-websocket</artifactId><version>2.7.3</version></dependency>
5.4.提示:前端使用vue native websocket库,在main.js中
import VueNativeSock from 'vue-native-websocket';Vue.use(VueNativeSock, 'ws://localhost:8082/chat', {format: 'json',
});
5.4.1服务端代码:
import lombok.AllArgsConstructor;
import lombok.Data;
import lombok.NoArgsConstructor;/*** 这是一个实体类,用于表示聊天消息的数据结构。包括消息的ID、发送者ID、接收者ID、消息内容和发送时间等信息。*/@Data
@NoArgsConstructor
@AllArgsConstructor
public class ChatMessage {private String senderId;private String receiverId;private String content;}
import com.bookstore.handler.ChatMessageHandler;
import com.bookstore.interceptor.WebSocketInterceptor;
import lombok.extern.slf4j.Slf4j;
import org.springframework.beans.factory.annotation.Autowired;
import org.springframework.context.annotation.Bean;
import org.springframework.context.annotation.Configuration;
import org.springframework.messaging.Message;
import org.springframework.messaging.MessageChannel;
import org.springframework.messaging.simp.SimpMessagingTemplate;
import org.springframework.messaging.simp.config.MessageBrokerRegistry;
import org.springframework.web.socket.config.annotation.EnableWebSocket;
import org.springframework.web.socket.config.annotation.WebSocketConfigurer;
import org.springframework.web.socket.config.annotation.WebSocketHandlerRegistry;
import org.springframework.web.socket.server.HandshakeInterceptor;import java.util.Arrays;
import java.util.List;/*** 通过@EnableWebSocket注解启用WebSocket功能,* 实现WebSocketConfigurer接口来注册WebSocket处理器。在这里,* 我们将ChatMessageHandler注册为处理WebSocket消息的处理器,* 并指定了访问路径为"/chat"。*/@Configuration
@EnableWebSocket
@Slf4j
public class WebSocketConfig implements WebSocketConfigurer {@Autowiredprivate ChatMessageHandler chatMessageHandler;@Autowiredprivate WebSocketInterceptor webSocketInterceptor;@Beanpublic SimpMessagingTemplate messagingTemplate() {SimpMessagingTemplate template = new SimpMessagingTemplate(new MessageChannel() {@Overridepublic boolean send(Message<?> message, long timeout) {// 设置超时时间为5秒return false;}@Overridepublic boolean send(Message<?> message) {// 设置超时时间为5秒return false;}});template.setSendTimeout(5000); // 设置发送消息的超时时间为5秒return template;}@Overridepublic void registerWebSocketHandlers(WebSocketHandlerRegistry registry) {System.out.println("注册WebSocket处理器...");registry.addHandler(chatMessageHandler, "/chat").setAllowedOrigins("*").addInterceptors(webSocketInterceptor);}}import lombok.extern.slf4j.Slf4j;
import org.springframework.http.server.ServerHttpRequest;
import org.springframework.http.server.ServerHttpResponse;
import org.springframework.http.server.ServletServerHttpRequest;
import org.springframework.stereotype.Component;
import org.springframework.web.socket.WebSocketHandler;
import org.springframework.web.socket.server.HandshakeInterceptor;import java.util.Map;/*** 拦截器,拦截websocket连接请求,从URL中获取传过来的用户id,添加到属性中,方便消息处理的逻辑*/@Component
@Slf4j
public class WebSocketInterceptor implements HandshakeInterceptor {@Overridepublic boolean beforeHandshake(ServerHttpRequest request, ServerHttpResponse response, WebSocketHandler wsHandler, Map<String, Object> attributes) throws Exception {System.out.println(request);if (request instanceof ServletServerHttpRequest) {// 获取连接中的 URL 参数String userId = ((ServletServerHttpRequest) request).getServletRequest().getParameter("userId");System.out.println("WebSocket连接用户: " + userId);// 将参数存储到 attributes 中,以便后续处理attributes.put("userId", userId);}return true;}@Overridepublic void afterHandshake(ServerHttpRequest request, ServerHttpResponse response, WebSocketHandler wsHandler, Exception exception) {// Do nothing}
}
import com.bookstore.pojo.entity.ChatMessage;
import com.fasterxml.jackson.databind.ObjectMapper;
import org.springframework.beans.factory.annotation.Autowired;
import org.springframework.data.redis.core.RedisTemplate;
import org.springframework.messaging.simp.SimpMessagingTemplate;
import org.springframework.stereotype.Component;
import org.springframework.web.socket.CloseStatus;
import org.springframework.web.socket.TextMessage;
import org.springframework.web.socket.WebSocketSession;
import org.springframework.web.socket.handler.TextWebSocketHandler;import java.util.Map;
import java.util.concurrent.ConcurrentHashMap;/*** 这是一个WebSocket处理器,继承自TextWebSocketHandler。* 它负责接收前端发送的消息,并将消息内容解析为ChatMessage对象,然后将该消息发布到Redis中。* 转发给目标用户*/@Component
public class ChatMessageHandler extends TextWebSocketHandler {@Autowiredprivate RedisTemplate redisTemplate;@Autowiredprivate SimpMessagingTemplate messagingTemplate; // 注入SimpMessagingTemplate// 定义一个存储WebSocketSession的Map   根据这个找到转发消息的目的地    admin=StandardWebSocketSession[id=7754d01c-1283-e1c4-aeac-20cd7febba77, uri=ws://localhost:8082/chat?userId=admin]private Map<String, WebSocketSession> userSessions = new ConcurrentHashMap<>();// 在连接建立时将 WebSocketSession 添加到 Map 中@Overridepublic void afterConnectionEstablished(WebSocketSession session) throws Exception {// 获取属性中的用户idObject userIdObj = session.getAttributes().get("userId");String userId = userIdObj != null ? userIdObj.toString() : null;// 将 WebSocketSession 添加到 Map 中userSessions.put(userId, session);System.out.println("userSessions--------->" + userSessions);}// 在连接关闭时从 Map 中移除 WebSocketSession@Overridepublic void afterConnectionClosed(WebSocketSession session, CloseStatus status) throws Exception {Object userIdObj = session.getAttributes().get("userId");String userId = userIdObj != null ? userIdObj.toString() : null;userSessions.remove(userId);}// 处理收到的文本消息@Overrideprotected void handleTextMessage(WebSocketSession session, TextMessage message) throws Exception {// 解析消息内容ObjectMapper objectMapper = new ObjectMapper();ChatMessage chatMessage = objectMapper.readValue(message.getPayload(), ChatMessage.class);System.out.println(chatMessage);// 获取消息中的相关数据String senderId = chatMessage.getSenderId();String receiverId = chatMessage.getReceiverId();String chatMessageJson = objectMapper.writeValueAsString(chatMessage);// 将消息添加到有序集合中  admin:user1String key = senderId.compareTo(receiverId) < 0 ? senderId+":"+receiverId : receiverId+":"+senderId;// 获取当前时间戳作为消息的分值long timestamp = System.currentTimeMillis();// 将消息添加到有序集合中,将时间戳作为分值     保持聊天记录的顺序redisTemplate.opsForZSet().add(key, chatMessageJson, timestamp);// 构造要转发的消息ChatMessage newMessage = new ChatMessage();newMessage.setSenderId(senderId);newMessage.setReceiverId(receiverId);newMessage.setContent(chatMessage.getContent());// 将消息转换为 JSON 格式ObjectMapper objectMapper1 = new ObjectMapper();String jsonMessage = objectMapper1.writeValueAsString(newMessage);// 获取目标用户的 WebSocketSessionWebSocketSession targetSession = findTargetSession(receiverId);if (targetSession == null || !targetSession.isOpen()) {// 目标用户不在线,或者连接已经关闭return;}// 发送消息targetSession.sendMessage(new TextMessage(jsonMessage));}// 根据接收者的 ID 查找对应的 WebSocketSessionprivate WebSocketSession findTargetSession(String receiverId) {return userSessions.get(receiverId);}
}
import com.alibaba.fastjson.JSON;
import com.bookstore.pojo.entity.ChatMessage;
import org.springframework.beans.factory.annotation.Autowired;
import org.springframework.data.redis.core.RedisTemplate;
import org.springframework.web.bind.annotation.*;import java.util.ArrayList;
import java.util.List;
import java.util.Set;/*** 前端发送请求从redis中获取数据*/@CrossOrigin(origins = "http://localhost:8081")
@RestController
@RequestMapping("/api/chat")
public class ChatController {@Autowiredprivate RedisTemplate redisTemplate;@GetMapping("/messages/{senderId}/{receiverId}")public List<ChatMessage> getMessages(@PathVariable String senderId, @PathVariable String receiverId) {// 获取最近的30条消息String key = senderId.compareTo(receiverId) < 0 ? senderId+":"+receiverId : receiverId+":"+senderId;Set<String> recentMessages = redisTemplate.opsForZSet().range(key, -30, -1);List<ChatMessage> chatMessages = new ArrayList<>();for (String messageJson : recentMessages) {ChatMessage chatMessage = JSON.parseObject(messageJson, ChatMessage.class);chatMessages.add(chatMessage);}return chatMessages;}@GetMapping("/messages/all")public List<ChatMessage> getAllMessages() {String keyPattern = "admin:*"; // 匹配所有管理员和用户的键名Set<String> keys = redisTemplate.keys(keyPattern);List<ChatMessage> chatMessages = new ArrayList<>();for (String key : keys) {Set<String> messages = redisTemplate.opsForZSet().range(key, 0, -1);for (String msgJson : messages) {ChatMessage chatMessage = JSON.parseObject(msgJson, ChatMessage.class);chatMessages.add(chatMessage);}}return chatMessages;}}
5.4.2前端用户端代码:
前端这两个代码中有一些是我自己写好的组件,对聊天这部分逻辑没什么影响,大家主要看看script中的逻辑就行,style里面的样式也很杂乱,我也不太懂,凑合看吧,样式部分太难了我也不会
<template><div class="container"><AdminNav></AdminNav><Header><MyDialog>欢迎登录网上书店管理端系统</MyDialog></Header><div class="message-container"><div class="user-list-container"><h3>用户列表</h3><ul><li v-for="user in userList" :key="user" @click="selectUser(user)">{{ user }}</li></ul></div><div class="chat-container" v-if="this.selectedUser !== null"><h3style="margin-bottom: 5px;background-color: #e0e0e0;padding-bottom: 5px;padding-top: 5px;">与{{ selectedUser }}的聊天记录</h3><div class="messages-container"><ul class="messages"><liv-for="msg in messages":key="msg.id":class="[msg.senderId !== userInfo.userName ? 'received' : 'sent',]">{{msg.senderId === userInfo.userName? "我:": msg.senderId + ":"}}<divclass="message-box":class="{ 'sent-message': msg.senderId === userInfo.userName }">{{ msg.content }}</div></li></ul><div class="input-container"><input type="text" v-model="message" placeholder="请输入消息..." /><button @click="sendMessage">Send</button></div></div></div></div><Footer class="Footer"></Footer></div>
</template><script>
import axios from "axios";
import AdminNav from "../../components/AdminAbout/AdminNav";
import Footer from "../../components/Common/Footer";
import Header from "../../components/Common/HeadNav";export default {name: "adminIndex",components: {AdminNav,Footer,Header,},data() {return {userInfo: JSON.parse(localStorage.getItem("userInfo")),message: "",messages: [],ws: null,selectedUser: null, // 当前选中的用户userList: [],};},methods: {sendMessage() {//发送消息if (this.ws.readyState === WebSocket.OPEN) {// 构造聊天消息对象const chatMessage = {senderId: this.userInfo.userName,receiverId: this.selectedUser,content: this.message,};// 发送WebSocket消息this.ws.send(JSON.stringify(chatMessage));// 将发送的消息添加到消息列表中this.messages.push(chatMessage);this.message = ""; // 清空输入框} else {console.log("WebSocket连接未建立");}},selectUser(senderId) {//选择聊天的用户获取聊天记录this.selectedUser = senderId;console.log(this.selectedUser);// 发送请求获取Redis中的数据axios.get(`http://localhost:8082/api/chat/messages/${this.selectedUser}/${this.userInfo.userName}`).then((response) => {this.messages = response.data;console.log(this.messages);}).catch((error) => {console.error("从Redis中获取消息失败:", error);});},updateFilteredUsers() {// 过滤掉已经存在于 messages 数组中的用户,并且过滤掉当前用户this.userList = this.filteredUsers.filter((user) => user !== this.userInfo.userName);},},computed: {filteredUsers() {// 过滤掉已经存在于 messages 数组中的用户,并且过滤掉当前用户return [...new Set(this.messages.map((msg) => msg.senderId))].filter((user) => user !== this.userInfo.userName);},},mounted() {const userId = this.userInfo.userName;this.ws = new WebSocket(`ws://localhost:8082/chat?userId=${userId}`); // 创建 WebSocket 连接对象this.ws.onopen = () => {console.log("WebSocket connected");// 发送请求获取Redis中的数据axios.get("http://localhost:8082/api/chat/messages/all").then((response) => {this.messages = response.data;console.log(this.messages);// 获取成功后更新用户列表this.$nextTick(() => {this.updateFilteredUsers();console.log(this.userList);});}).catch((error) => {console.error("从Redis中获取消息失败:", error);});};this.ws.onmessage = (event) => {console.log("Received message: " + event.data);// 获取成功后更新用户列表this.$nextTick(() => {this.updateFilteredUsers();console.log(this.userList);});const message = JSON.parse(event.data); // 解析接收到的消息this.messages.push(message); // 将解析后的消息添加到 messages 数组中};this.ws.onerror = (error) => {console.error("WebSocket error: " + error);};this.ws.onclose = () => {console.log("WebSocket closed");};},beforeDestroy() {if (this.ws) {this.ws.close(); // 在组件销毁前关闭 WebSocket 连接}},
};
</script><style scoped>
/* 确保Footer组件始终固定在底部 */
.Footer {position: fixed;left: 0;bottom: 0;width: 100%;
}
.container {display: flex;flex-direction: column;height: 100vh; /* 设置容器高度为 100% 视口高度 */
}
.message-container {display: flex;flex-grow: 1;
}
.user-list-container {width: 15%;background-color: #f5f5f5;padding: 10px;border: skyblue solid 2px;
}
.user-list-container h3 {font-size: 18px;margin-bottom: 10px;
}
.user-list-container ul {list-style-type: none;padding: 0;margin: 0;
}
.user-list-container li {margin-bottom: 10px;cursor: pointer;transition: all 0.2s ease-in-out;color: red;height: 30px;font-size: 20px;margin-top: 10px;margin-left: 20px;border: skyblue solid 2px;
}
.user-list-container li:hover {background-color: #e0e0e0;
}.chat-container {flex-grow: 1;padding: 10px;
}
.chat-container ul {height: calc(100% - 50px); /* 减去输入框和按钮的高度 */overflow-y: auto; /* 添加滚动条 */
}.messages-container {flex-grow: 1;display: flex;flex-direction: column;overflow-y: auto;
}
.received {align-self: flex-start;
}.sent {align-self: flex-end;
}
.messages {list-style-type: none;padding: 0;margin: 0;overflow-y: auto;max-height: 400px; /* 设置最大高度,超出部分将显示滚动条 */border: #4caf50 solid 2px;
}.input-container {position: relative;width: 100%;height: 100px;background-color: #f5f5f5;display: flex;padding: 10px;padding-left: 0px;margin-top: auto; /* 将上边距设为auto */
}.input-container > input {flex-grow: 1;height: 40px; /* 调整输入框的高度 */padding: 5px; /* 调整输入框的内边距 */font-size: 16px;border: none;outline: none;border-radius: 5px;
}.input-container > button {height: 40px;width: 100px;margin-left: 10px; /* 调整按钮和输入框之间的间距 */background-color: #4caf50;color: white;border: none;font-size: 16px;border-radius: 5px;cursor: pointer;
}/* 消息样式 */
.messages li {padding: 5px;
}.message-box {display: inline-block;padding: 10px;border-radius: 10px;
}.sent-message {background-color: lightgreen;
}
</style>
5.4.3前端客服端代码:
<template><div class="container"><Nav></Nav><Header><MyDialog>请在这里与您的专属客服联系!</MyDialog></Header><div class="message-container"><ul class="messages"><p style="padding-top: 10px; padding-left: 5px; padding-bottom: 10px; font-size: 17px;">系统消息:你好,请问有什么需要吗?</p><li v-for="msg in messages" :key="msg.id" :class="[msg.senderId !== userInfo.userName ? 'received' : 'sent']">{{ msg.senderId === userInfo.userName ? '我' : '客服-' + msg.senderId }}:<div class="message-box" :class="{'sent-message': msg.senderId === userInfo.userName}">{{ msg.content }}</div></li></ul><div class="input-container"><input type="text" v-model="message" placeholder="请输入消息..."/><button @click="sendMessage">Send</button></div></div><Footer class="Footer"></Footer></div>
</template><script>
import axios from "axios";
import Nav from "../../components/Common/Nav";
import Footer from "../../components/Common/Footer";
import Header from "../../components/Common/HeadNav";export default {name: "ContactMerchant",components: {Nav,Footer,Header,},data() {return {userInfo: JSON.parse(localStorage.getItem("userInfo")),message: "",messages: [],ws: null,};},methods: {sendMessage() {if (this.ws.readyState === WebSocket.OPEN) {// 构造聊天消息对象const chatMessage = {senderId: this.userInfo.userName,receiverId: "admin",content: this.message,};// 发送WebSocket消息this.ws.send(JSON.stringify(chatMessage));// 将发送的消息添加到消息列表中this.messages.push(chatMessage);this.message = ""; // 清空输入框} else {console.log("WebSocket连接未建立");}},},mounted() {const userId = this.userInfo.userName;this.ws = new WebSocket(`ws://localhost:8082/chat?userId=${userId}`); // 创建 WebSocket 连接对象this.ws.onopen = () => {console.log("WebSocket connected");// 发送请求获取Redis中的数据axios.get(`http://localhost:8082/api/chat/messages/admin/${this.userInfo.userName}`).then((response) => {this.messages = response.data;}).catch((error) => {console.error("从Redis中获取消息失败:", error);});};this.ws.onmessage = (event) => {console.log("Received message: " + event.data);const message = JSON.parse(event.data); // 解析接收到的消息this.messages.push(message); // 将解析后的消息添加到 messages 数组中};this.ws.onerror = (error) => {console.error("WebSocket error: " + error);};this.ws.onclose = () => {console.log("WebSocket closed");};},beforeDestroy() {if (this.ws) {this.ws.close(); // 在组件销毁前关闭 WebSocket 连接}},
};
</script><style scoped>
/* 布局样式 */
.container {display: flex;flex-direction: column;height: 100vh;
}.message-container {flex-grow: 1;display: flex;flex-direction: column;
}.messages {list-style-type: none;padding: 0;margin: 0;overflow-y: auto;max-height: 450px; /* 设置最大高度,超出部分将显示滚动条 */border: #4caf50 solid 2px;
}.input-container {position: absolute;bottom: 0;left: 0;width: 100%;height: 120px; /* 调整输入框容器的高度 */background-color: #f5f5f5;display: flex;padding: 10px; /* 添加一些内边距 */
}.input-container > input {flex-grow: 1;padding: 5px; /* 调整输入框的内边距 */font-size: 16px;border: none;outline: none;border-radius: 5px;height: 40px;
}.input-container > button {height: 40px;width: 100px;margin-left: 10px; /* 调整按钮和输入框之间的间距 */background-color: #4caf50;color: white;border: none;font-size: 16px;border-radius: 5px;cursor: pointer;
}/* 消息样式 */
.messages li {padding: 5px;
}.received {align-self: flex-start;
}.sent {align-self: flex-end;
}.message-box {display: inline-block;padding: 10px;border-radius: 10px;
}.sent-message {background-color: lightgreen;
}/* 确保Footer组件始终固定在底部 */
.Footer {position: fixed;left: 0;bottom: 0;width: 100%;
}
</style>




)


- Yarn)
)


是什么?如何在 Python 中实现一个简单的 ORM(对象关系映射)?)
)