定位属性 position
可以将元素定位到你想要放到位置,使用方位值来进行移动(top,left,right,bottom)。
1.相对定位
position: relative; top: 20px; left: 20px;
以自身为定点进行移动,不会脱离文档流。
不会影响元素本身的性质;块级元素支持auto自适应居中。
2.绝对定位
position: absolute; top: 0px; left: 0px;
会脱离文档流,原本位置不会继续占有。
支持自定义高宽,元素高宽默认为0,暂不支持auto自适应居中。
找不到最近的定位父级,默认参考浏览器 (body) 来移动。
子绝父相
子级是绝对定位,父级是相对定位,子级参考父级来进行移动。
方位属性
left和top优先级高于right和bottom
若一个元素只拥有left和right属性,以left为准
3.固定定位
position: fixed;
以浏览器窗口为参考(滚动屏幕时固定不动)
元素高宽默认,margin: auto;失效
若在相同位置,看谁的优先级高,谁覆盖。
z-index:1; 定位为1级(改变级数来进行强制覆盖)
子元素在父级里面居中:
第一种:
position: absolute;
top: 0px;
left: 0px;
right: 0px;
bottom: 0px;
margin: auto;
第二种:
position: absolute;
top: 50%;
left: 50%;
/* 负自身宽度的一半 */
margin-left: -50px;
/* 负自身高度的一半 */
margin-top: -50px;
width: 100px;
height: 100px;
background-cololr: pink;
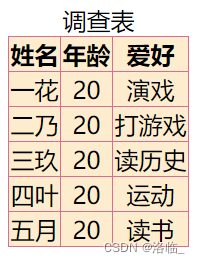
表格(浅谈)
<!DOCTYPE html>
<html lang="en">
<head><meta charset="UTF-8"><meta name="viewport" content="width=device-width, initial-scale=1.0"><title>Document</title><style>table{border: 1px solid palevioletred;background-color: blanchedalmond;border-collapse: collapse;}td,th,tr{border: 1px solid palevioletred;text-align: center;}</style>
</head>
<body><!-- table: 定义表格标签 --><table><!-- caption: 表格标题 --><caption>调查表</caption><!-- tr: 表格里面的一行 --><tr><!-- th: 表头(自带加粗 居中) --><th>姓名</th><th>年龄</th><th>爱好</th></tr><tr><!-- td: 一行里面的单元格 --><td>一花</td><td>20</td><td>演戏</td></tr><tr><td>二乃</td><td>20</td><td>打游戏</td></tr><tr><td>三玖</td><td>20</td><td>读历史</td></tr><tr><td>四叶</td><td>20</td><td>运动</td></tr><tr><td>五月</td><td>20</td><td>读书</td></tr></table><!-- 规范:tr里面的标签只能是td或th一行里面单元格的高度取决于一行中最大的那个一行里面单元格的宽度是按照内容长度来分配的 -->
</body>
</html>
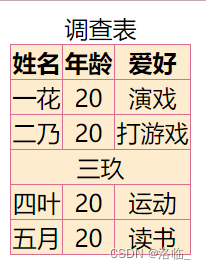
选一个将<td>20</td>改成:<td rowspan='3'>20</td> ,同时要将更改的这一行的下两段中的<td>20</td>删掉可以向下合并三行年龄。
也可以将某一段改为:
<tr><td colspan='3'>三玖</td></tr>可以合并那一行的三列:

表单样式
表单标签form
action: 表单的提交地址
method:提交格式
name:表单的名称
target:提交完这个表单后,新页面在哪里打开
<!DOCTYPE html>
<html lang="en">
<head><meta charset="UTF-8"><meta name="viewport" content="width=device-width, initial-scale=1.0"><title>Document</title><style>#form{width: 400px;height: 400px;background-color: antiquewhite;margin: auto;}input{width: 99px;height: 20px;background-color: darkgrey;}</style>
</head>
<body><!-- form: 表单标签action: 表单的提交地址method: 提交格式  https请求格式:post/get等get请求:从指定的资源请求数据,用于获取数据,一般用于搜索排序和筛选之类的操作。post请求:向指定的资源提交要被处理的数据,用于将数据发送服务器,一般用于修改和写入数据。name: 表单的名称target: 提交这个表单后新页面在哪里打开 --><form action="" method="" name="login" target="" id="form"><!-- 单行文本输入框 -->账号:<input type="text"><br><!-- 密码输入框(输入的数据会隐藏为小黑点) -->密码:<input type="password"></form>
</body>
</html>
input输入控件
通过type属性展示不同的输入效果
- text --> 单行文本输入框
- password -> 密码输入框
- submit --> 提交按钮(具有刷新功能)
- radio --> 单选框
- checkbox --> 多选框
- reset --> 重置按钮
- button --> 空按钮(可以通过value来给这个按钮取名字)
- file --> 文件上传按钮
- number --> 数字输入框(e约等于2.71828..也可以输入)
- email --> 邮件输入框
placeholder属性 文本提示,告诉用户输入什么
name属性 控件名称
账号:<input type="text" placeholder="请输入账号" name="username">value属性 改变控件里面的值
radio
<form action=""><input type="text"><input type="radio" name="sex">男<input type="radio" name="sex"><!-- label:一般用来放文字,规定input控件标题描述 --><label for="">女</label><!-- 单选的话name属性只能是一个 --></form>checked属性 默认被选中
<input type="radio" name="sex" checked>多行文本输入框
<textarea name="" id="" cols="30" rows="10"></textarea>下拉列表标签
<select name="" id=""><!-- 下拉列表项 --><option value="">星期一</option><option value="">星期二</option><option value="">星期三</option><option value="">星期四</option><option value="">星期五</option></select>高级选择器
属性选择器
选择标签来添加样式
选择a标签中带有target属性的a标签添加样式
a[target]{color: pink;}
给title为11的添加样式
a[title='11']{color: red;}
给a标签的herf属性中以h开头的添加样式
a[herf ^='h']{color: blue;}
给以k为结尾的添加样式
a[target $='k']{color: yellow;}
给包含字符中含有.com的添加样式
a[href *='.com']{color: skyblue;}
伪类选择器
可以改变元素状态
<!DOCTYPE html>
<html lang="en">
<head><meta charset="UTF-8"><meta name="viewport" content="width=device-width, initial-scale=1.0"><title>Document</title><style>.box{width: 200px;height: 300px;background-color: antiquewhite;}/* 鼠标悬停之后 改变背景颜色和宽(通用) */.box:hover{width: 300px;background-color: indianred;}/* 点击时改变背景颜色(通用) */.box:active{background-color: cadetblue;}/* 没有被访问的a标签 */a:link{color: darkseagreen;}/* 被访问过的a标签 */a:visited{color:bisque;}/* 点击input获取焦点 */.btn:focus{border: 1px solid pink;}.text{/* 消失 */display:none;width: 150px;height: 50px;background-color: rgb(190, 227, 250);}/* input和p标签是同级关系 */.btn:focus~.text{/* 显示 */display: block;}/* 点击勾选状态(只能单选或多选使用) */.rad:checked{width: 20px;height: 20px;}.pic{display: none;}.rad:checked~.pic{display: block;}</style>
</head>
<body><div class="box"></div><a href="https://www.bilibili.com/">这里是a标签</a><a href="https://www.bilibili.com/" target="_blank" rel="zxcvbnm">这里是a标签2</a><br><input type="text" class="btn"><p class="text">点击后就看到我啦</p><input type="radio" class="rad"><input type="checkbox" name="" id="" class="rad"><img src="./11.jpg" alt="" width="100px" class="pic">
</body>
</html>
结构选择器
子元素选择器
通过父级给子元素添加样式
.list>li:nth-child(1){color: pink}
给类为list的列表父级的第一个子级的字体设置为粉色。
可以简写为:.list>li:nth-child(1){color: pink}
全选:.list>li:nth-child(n+1){color: pink}
给第奇数个子级(1,3,5..)设置 (odd/2n-1)
.list>li:nth-child(odd){color: pink}
给第偶数个子级(2,4,6..)设置(even/2n)
.list>li:nth-child(2n){color: pink}
选择最后一个子元素添加样式
.list>li:last-child{color: blue}
注意:要满足父子关系。比如,ul的众多li标签之间有一个span标签,这个子元素选择器就起不了作用了。
同类别选择器
选择类为box的div标签下方的p标签
.box>p:nth-child(3){color: pink;}
如果p标签中间夹了span标签,这样写无视其他元素影响
.box>p:nth-of-type(3){color: red;}
选择最后一个p标签
p:last-of-type{color: blue;}
伪元素选择器
是一个行内元素,不支持设定高宽
/* 伪元素创建,在元素前进行插入 */
.box::before{
/* 伪元素必备 开启伪元素的一个钥匙 */
content: '你好!';
float: left;
width: 50px;
height: 50px;
background-color: antiquewhite;
}
/* 在元素内容后插入 */
.box::after{
/* 伪元素内容 */
content: '耶!';
color: cadetblue;
}
/* 父元素可以利用伪元素来清除浮动塌陷 */
.wrap::after{
content: '';
display: block;
clear: both;
}
阿里图标的使用:
1.进入阿里图标官网 https://www.iconfont.cn/
2.注册,登录
3.可以选择需要用到的图标,加入购物车
4.找到购物车,点击下载即可
5.解压文件,可以找到demo_index页面三种方式添加图标
第一种方式:
style标签中:
@font-face{font-family: 'iconfont';
src: url('./阿里图标/iconfont.ttf') format('truetype');}
.iconfont{
font-family: "iconfont" !important;
font-size: 16px;
font-style: normal;}
body标签中:
<span class="iconfont">(图标号)</span>
第二种方式:
引入外部格式使用阿里css样式
<link rel="stylesheet" href="./阿里图标/iconfont.css">
style中:
.iconfont{font-size: 30px;
color: red;}
body中:
<span class="iconfont"></span>
第三种方式(支持有颜色的图标):
引入js样式
<script src="./阿里图标/iconfont.js"></script>
style中:
.icon{width: 1em;
height:1em;
vertical-align: -0.15em;
fill: currentColor;
overflow: hidden;}
body中:
<svg class="icon" aria-hidden="true">
<use xlink:href="#icon-xxx"></use>
</svg>
flex布局(弹性盒模型)
传统布局:浮动 定位 行内块等
flex布局:方法简单,能自动分配父级里面子元素的对齐方式。可以适应不同屏幕的布局。
.wrap{/* 开启flex布局 */display: flex;/* 规定子元素在x轴居中对齐 */justify-content: center;/* 规定子元素在y轴居中对齐 */align-items: center;width: 200px;height: 200px;background-color: antiquewhite;}父级盒子开启flex(display: flex;) 后
子元素默认横向排列,假如总宽度大于父级盒子,不会换行排列,会等比例缩放。
行内元素在父级盒子里面支持写高宽,没写会默认分配。
flex布局属性
1.display: flex 给父级开启flex布局
2.flex-direction 控制子元素排列方式
控制子元素排列方式,默认从左至右。
flex-direction: row;
从右至左排列
flex-direction: row-reverse;
垂直方向 主轴向下排列
flex-direction: column;
主轴向上
flex-direction: column-reverse;
3.flex-wrap 控制子元素是否换行显示
默认不换行显示
flex-wrap: nowrap;
超出父级宽度就换行
flex-wrap: wrap;
主轴方向和换行显示 复合写法
flex-flow: row-reverse wrap;
4.justify-content 控制子元素在主轴的对齐方式(x轴)
默认子元素在起点左对齐
justify-content: flex-start;
右对齐(主轴终点对齐)
justify-content: flex-end;
在主轴居中对齐
justify-content: center;
两端对齐,中间间隔均分
justify-content: space-between;
所有子元素间隔相同且相等
justify-content: space-around;
所有间隔平均分配
justify-content: space-evenly;
5.align-items 控制子元素在侧轴的对齐方式(y轴)
侧轴默认值(若没写高度,则高度与父级相同)
align-items: stretch;
y轴顶部对齐(起点对齐)
align-items: flex-start;
y轴底部对齐(终点对齐)
align-items: flex-end
y轴方向垂直居中对齐
align-items: center;
与文本基线对齐
align-items: baseline;
6. align-content 控制行与行之间的对齐
行与行之间在起点对齐,上下没有间隔
align-content: flex-start;
行与行之间在底部对齐
align-content: flex-end;
行与行之间居中对齐
align-content: center;
行与行之间两端对齐
align-content: space-between;
行与行之间间隔平均分配
align-content: space-around;
所有行之间间隔相等
align-content: space-evenly;
子元素属性
order: 子元素展示顺序,值越小越先展示,默认是0。
flex-grow: 在主轴还有剩余空间时,子元素分配剩下的部分比例,如1,2..默认是0。
flex-shrink: 在主轴空间不足时,子元素缩小的比例,默认是1(均分缩小)。
align-self: flex-start/end/ center (顶部对齐、底部对齐、居中对齐)


)


)