Spring MVC
Java 是第一大编程语言和开发平台。它有助于企业降低成本、缩短开发周期、推动创新以及改善应用服务。如今全球有数百万开发人员运行着超过 51 亿个 Java 虚拟机,Java 仍是企业和开发人员的首选开发平台。
课程内容的介绍
1. Spring MVC 入门案例
2. 基于注解的使用方式
3. 处理及响应请求
4. 文件上传下载操作
5. 静态资源处理
6. 服务端数据校验
7. 数据回写操作
8. 异常处理
9. JSON数据操作
10. Restful风格编程
11. 拦截器
12. Spring和Spring MVC整合操作
一、Spring MVC 入门案例
1. 什么是MVC?
模型-视图-控制器(MVC 是一个众所周知的以设计界面应用程序为基础的设计模式。它主要通过分离模型、视图及控制器在应用程序中的角色将业务逻辑从界面中解耦。通常,模型负责封装应用程序数据在视图层展示。视图仅仅只是展示这些数据,不包含任何业务逻辑。控制器负责接收来自用户的请求,并调用后台服务(manager或者dao)来处理业务逻辑。处理后,后台业务层可能会返回了一些数据在视图层展示。控制器收集这些数据及准备模型在视图层展示。MVC模式的核心思想是将业务逻辑从界面中分离出来,允许它们单独改变而不会相互影响。
2. Spring MVC
Spring Web MVC是一种基于Java的实现了Web MVC设计模式的请求驱动类型的轻量级Web框架。
使用了MVC架构模式的思想,将Web层进行职责解耦。
基于请求驱动指的就是使用请求-响应模型。
框架的目的就是帮助我们简化开发。
Spring Web MVC也是要简化我们日常Web开发的。
SpringMVC的优点
性能比Struts2好。
简单、便捷,易学。
和Spring无缝衔接【IoC,AOP】。
使用约定优于配置。
支持Restful。
异常处理,国际化,数据验证,类型转换等。
使用的人多,使用的公司多。
3.第一个Spring MVC 案例
3.1 创建一个Web项目
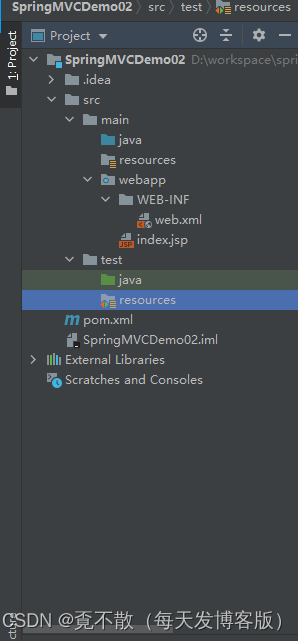
创建一个基于Maven的Web项目,添加相关的项目结构。
3.2 添加对应的依赖
<dependency><groupId>org.springframework</groupId><artifactId>spring-webmvc</artifactId><version>4.3.2.RELEASE</version>
</dependency>
<dependency><groupId>javax.servlet</groupId><artifactId>servlet-api</artifactId><version>2.5</version><scope>provided</scope>
</dependency>
Maven的依赖管理具有传递性。

3.3 添加一个Spring MVC的配置文件
添加一个Spring MVC的配置文件,该配置文件的内容和我们前面介绍的Spring的配置文件的内容是一致的。
<?xml version="1.0" encoding="UTF-8"?>
<beans xmlns="http://www.springframework.org/schema/beans"xmlns:xsi="http://www.w3.org/2001/XMLSchema-instance"xsi:schemaLocation="http://www.springframework.org/schema/beans
http://www.springframework.org/schema/beans/spring-beans.xsd"></beans>
然后在配置文件中向Spring IoC容器中注入两个实例。
<?xml version="1.0" encoding="UTF-8"?>
<beans xmlns="http://www.springframework.org/schema/beans"xmlns:xsi="http://www.w3.org/2001/XMLSchema-instance"xsi:schemaLocation="http://www.springframework.org/schema/beans
http://www.springframework.org/schema/beans/spring-beans.xsd"><!-- 注入一个处理器映射器 --><bean
class="org.springframework.web.servlet.handler.BeanNameUrlHandlerMapping" /><!-- 注入一个处理器适配器 --><bean
class="org.springframework.web.servlet.mvc.SimpleControllerHandlerAdapter" /></beans>
3.4 配置前端控制器
Spring MVC是一个控制层框架,那么需要处理所有的请求,那么我们需要在web.xml文件中配置对应的拦截。
<!DOCTYPE web-app PUBLIC"-//Sun Microsystems, Inc.//DTD Web Application 2.3//EN""http://java.sun.com/dtd/web-app_2_3.dtd" ><web-app><display-name>Archetype Created Web Application</display-name><!--配置一个Spring MVC 的前端控制器目的是所有的客户端的请求都会被 DispatcherServlet 处理--><servlet><servlet-name>springmvc</servlet-name><servlet-class>org.springframework.web.servlet.DispatcherServlet</servlet-class><!-- 关联自定义的Spring MVC的配置文件 --><init-param><param-name>contextConfigLocation</param-name><param-value>classpath:spring-mvc.xml</param-value></init-param></servlet><servlet-mapping><servlet-name>springmvc</servlet-name><url-pattern>/</url-pattern></servlet-mapping>
</web-app>
3.5 创建自定义的控制器
package com.bobo.controller;import org.springframework.web.servlet.ModelAndView;
import org.springframework.web.servlet.mvc.Controller;import javax.servlet.http.HttpServletRequest;
import javax.servlet.http.HttpServletResponse;public class UserController implements Controller {/*** 具体处理请求的方法* @param httpServletRequest* @param httpServletResponse* @return* @throws Exception*/@Overridepublic ModelAndView handleRequest(HttpServletRequest httpServletRequest,HttpServletResponse httpServletResponse) throws Exception {System.out.println("请求进来了...");ModelAndView mm = new ModelAndView();mm.setViewName("/index.jsp");return mm;}
}
3.6 自定义控制器的注入
<?xml version="1.0" encoding="UTF-8"?>
<beans xmlns="http://www.springframework.org/schema/beans"xmlns:xsi="http://www.w3.org/2001/XMLSchema-instance"xsi:schemaLocation="http://www.springframework.org/schema/beans
http://www.springframework.org/schema/beans/spring-beans.xsd"><!-- 注入一个处理器映射器 --><bean
class="org.springframework.web.servlet.handler.BeanNameUrlHandlerMapping" /><!-- 注入一个处理器适配器 --><bean
class="org.springframework.web.servlet.mvc.SimpleControllerHandlerAdapter" /><!-- 将自定义的控制器注入到IoC容器中 name="/user" 用户访问的请求地址 --><bean class="com.bobo.controller.UserController" name="/user" /></beans>
3.7 Tomcat插件
通过Tomcat插件来运行项目
<plugins><!-- tomcat插件 --><plugin><groupId>org.apache.tomcat.maven</groupId><artifactId>tomcat7-maven-plugin</artifactId><version>2.2</version><configuration><!-- 端口号 --><port>8082</port><!-- /表示访问路径 省略项目名 --><path>/</path><!-- 设置编码方式 --><uriEncoding>utf-8</uriEncoding></configuration></plugin>
</plugins>
3.8 测试
启动成功

http://localhost:8082/user
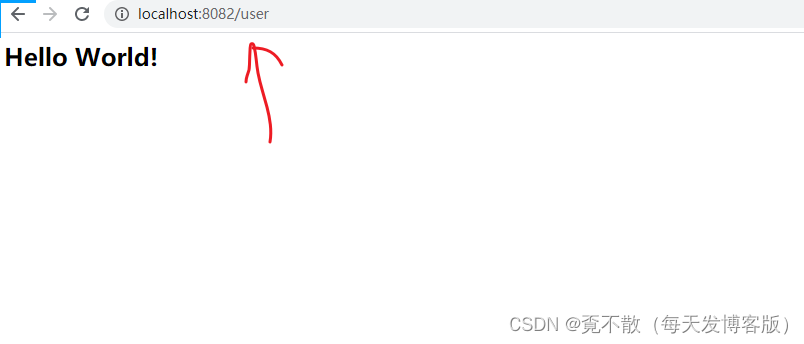

访问成功!!!
4. 基于注解的实现
通过上一个普通实现的方式大家会发现其实现步骤比较繁琐,而且自定义的Controller也只有一个默认的方法被调用,不是很方便。我们在开发中常用的是基于注解的方式实现的,接下来就实现。
4.1 修改Spring MVC 的配置文件
<?xml version="1.0" encoding="UTF-8"?>
<beans xmlns="http://www.springframework.org/schema/beans"xmlns:xsi="http://www.w3.org/2001/XMLSchema-instance"xmlns:context="http://www.springframework.org/schema/context"xmlns:mvc="http://www.springframework.org/schema/mvc"xsi:schemaLocation="http://www.springframework.org/schema/beanshttp://www.springframework.org/schema/beans/spring-beans.xsdhttp://www.springframework.org/schema/contexthttp://www.springframework.org/schema/context/spring-context.xsdhttp://www.springframework.org/schema/mvchttp://www.springframework.org/schema/mvc/spring-mvc.xsd
"><!-- 添加对应的扫描路径 --><context:component-scan base-package="com.bobo.controller"/><!-- 开启Spring MVC 注解的使用方式 --><mvc:annotation-driven />
</beans>
4.2 创建控制器
package com.bobo.controller;import org.springframework.stereotype.Controller;
import org.springframework.web.bind.annotation.RequestMapping;
import org.springframework.web.servlet.ModelAndView;import javax.jws.WebParam;@Controller // 将当前类的对象交给容器管理
@RequestMapping("/user") // 配置的而是请求的路径
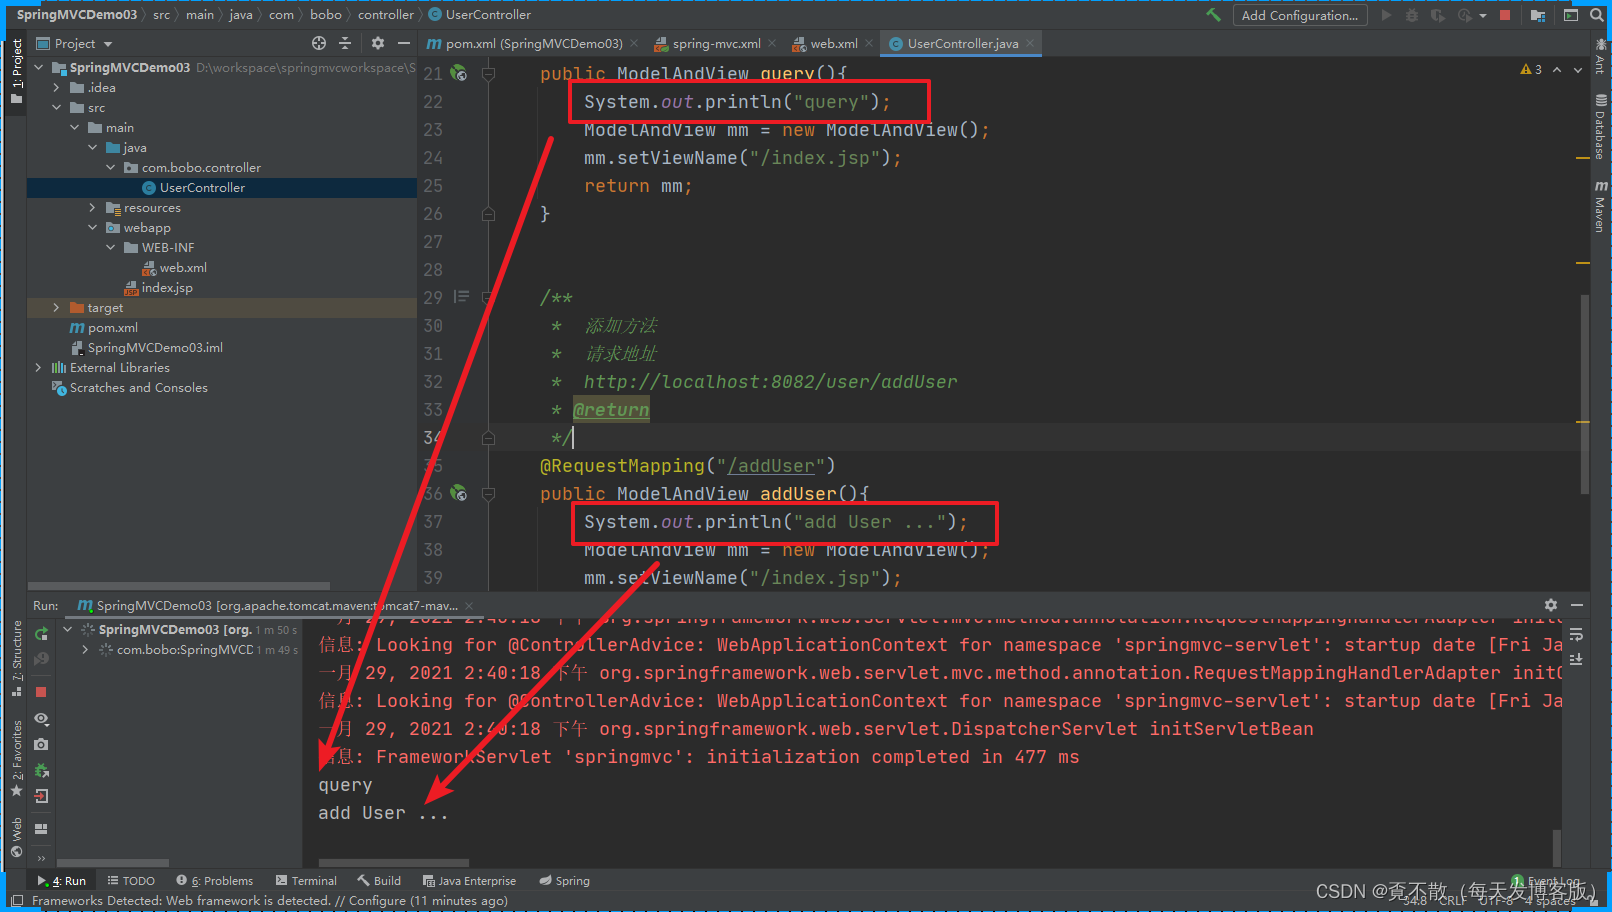
public class UserController {/*** 查询方法* 请求地址* http://localhost:8082/user/query* @return*/@RequestMapping("/query")public ModelAndView query(){System.out.println("query");ModelAndView mm = new ModelAndView();mm.setViewName("/index.jsp");return mm;}/***  添加方法*  请求地址*  http://localhost:8082/user/addUser* @return*/@RequestMapping("/addUser")public ModelAndView addUser(){System.out.println("add User ...");ModelAndView mm = new ModelAndView();mm.setViewName("/index.jsp");return mm;}
}
4.3测试

5.Spring MVC 的工作原理
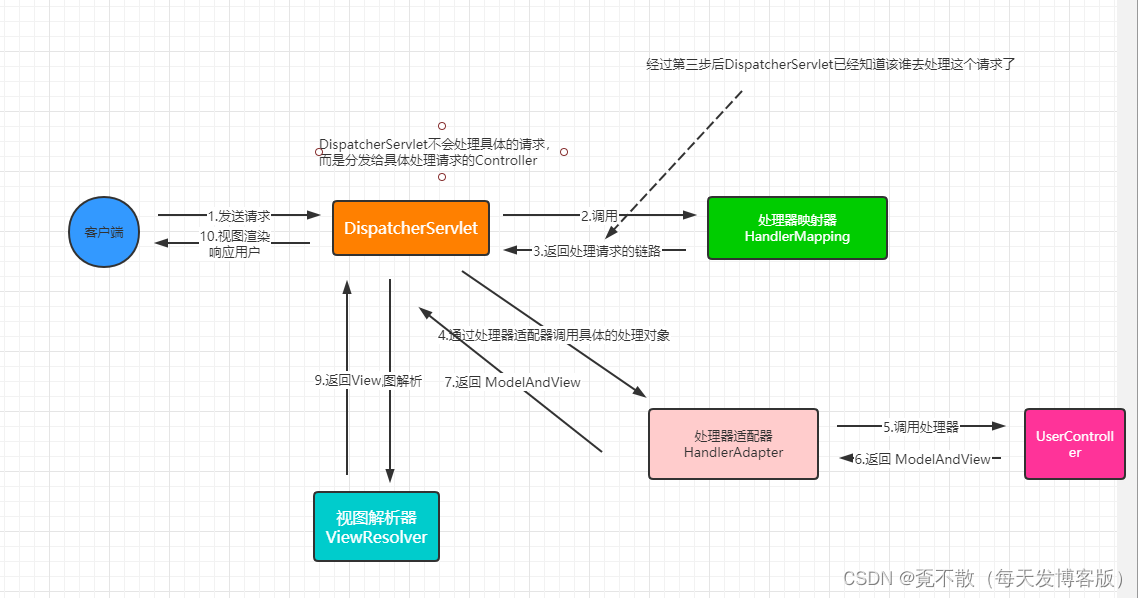
5.1 Spring MVC 原理图
Spring MVC 默认的配置信息
# Default implementation classes for DispatcherServlet's strategy interfaces.
# Used as fallback when no matching beans are found in the DispatcherServletcontext.
# Not meant to be customized by application developers.org.springframework.web.servlet.LocaleResolver=org.springframework.web.servlet.i18n.AcceptHeaderLocaleResolverorg.springframework.web.servlet.ThemeResolver=org.springframework.web.servlet.theme.FixedThemeResolverorg.springframework.web.servlet.HandlerMapping=org.springframework.web.servlet.handler.BeanNameUrlHandlerMapping,\org.springframework.web.servlet.mvc.annotation.DefaultAnnotationHandlerMappingorg.springframework.web.servlet.HandlerAdapter=org.springframework.web.servlet.mvc.HttpRequestHandlerAdapter,\org.springframework.web.servlet.mvc.SimpleControllerHandlerAdapter,\org.springframework.web.servlet.mvc.annotation.AnnotationMethodHandlerAdapterorg.springframework.web.servlet.HandlerExceptionResolver=org.springframework.web.servlet.mvc.annotation.AnnotationMethodHandlerExceptionResolver,\org.springframework.web.servlet.mvc.annotation.ResponseStatusExceptionResolver,\org.springframework.web.servlet.mvc.support.DefaultHandlerExceptionResolverorg.springframework.web.servlet.RequestToViewNameTranslator=org.springframework.web.servlet.view.DefaultRequestToViewNameTranslatororg.springframework.web.servlet.ViewResolver=org.springframework.web.servlet.view.InternalResourceViewResolverorg.springframework.web.servlet.FlashMapManager=org.springframework.web.servlet.support.SessionFlashMapManager
5.2 工作原理文字说明
用户向服务器发送请求,请求被Spring 前端控制Servelt DispatcherServlet捕获;
DispatcherServlet对请求URL进行解析,得到请求资源标识符(URI)。然后根据该URI,调用HandlerMapping获得该Handler配置的所有相关的对象(包括Handler对象以及Handler对象对应的拦截器),最后以HandlerExecutionChain对象的形式返回;
DispatcherServlet 根据获得的Handler,选择一个合适的HandlerAdapter。(附注:如果成功获得HandlerAdapter后,此时将开始执行拦截器的preHandler(…)方法)
提取Request中的模型数据,填充Handler入参,开始执行Handler(Controller)。 在填充Handler的入参过程中,根据你的配置,Spring将帮你做一些额外的工作:
HttpMessageConveter: 将请求消息(如Json、xml等数据)转换成一个对象,将对象转换为指定的响应信息。
数据转换:对请求消息进行数据转换。如String转换成Integer、Double等。
数据根式化:对请求消息进行数据格式化。 如将字符串转换成格式化数字或格式化日期等。
数据验证: 验证数据的有效性(长度、格式等),验证结果存储到BindingResult或Error中。
Handler执行完成后,向DispatcherServlet 返回一个ModelAndView对象;
根据返回的ModelAndView,选择一个适合的ViewResolver(必须是已经注册到Spring容器中的ViewResolver)返回给DispatcherServlet ;
ViewResolver 结合Model和View,来渲染视图。
将渲染结果返回给客户端。
5.3 相关核心组件的说明
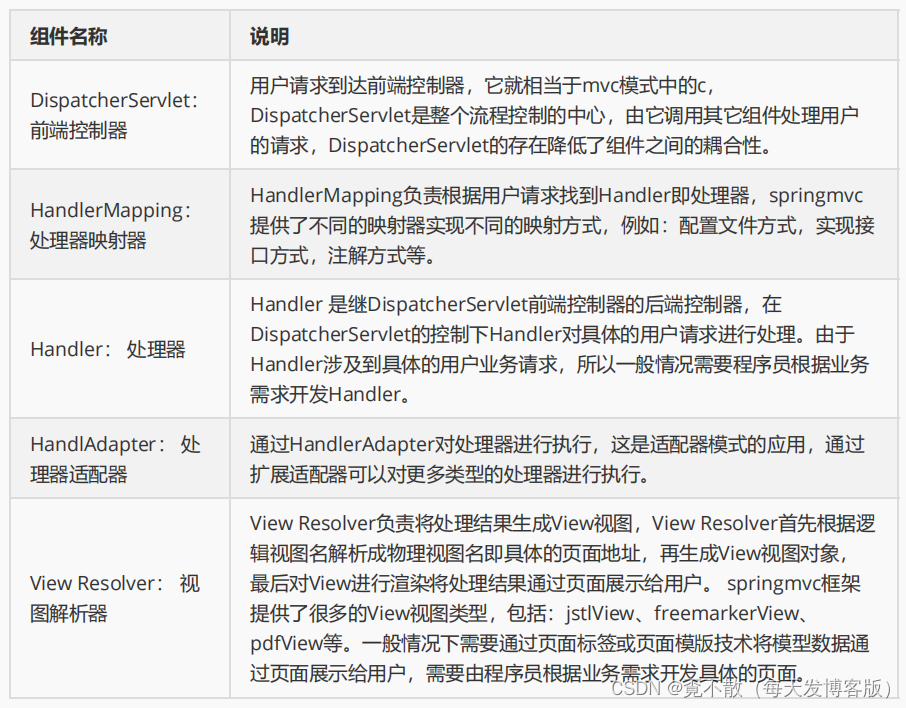
二、Spring MVC的核心操作
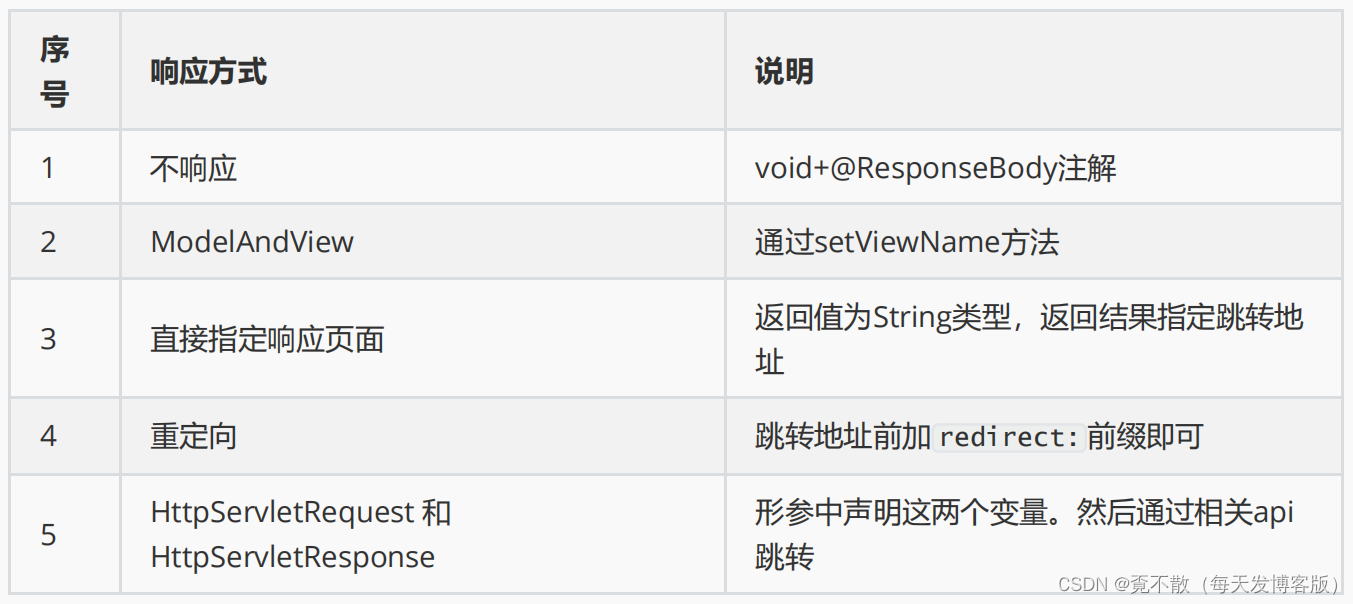
1.响应请求
1.1 ModelAndView
前面案例中使用的就是ModelAndView方式。
/*** 查询方法* 请求地址* http://localhost:8082/user/query* @return*/@RequestMapping("/query")public ModelAndView query(){System.out.println("query");ModelAndView mm = new ModelAndView();mm.setViewName("/index.jsp");return mm;}1.2 返回void
接收请求的方法如果没有要响应的资源,这时我们可以将方法的返回结果设置为 void。
@RequestMapping("/update")
public void updateUser(){System.out.println("update .... ");
}
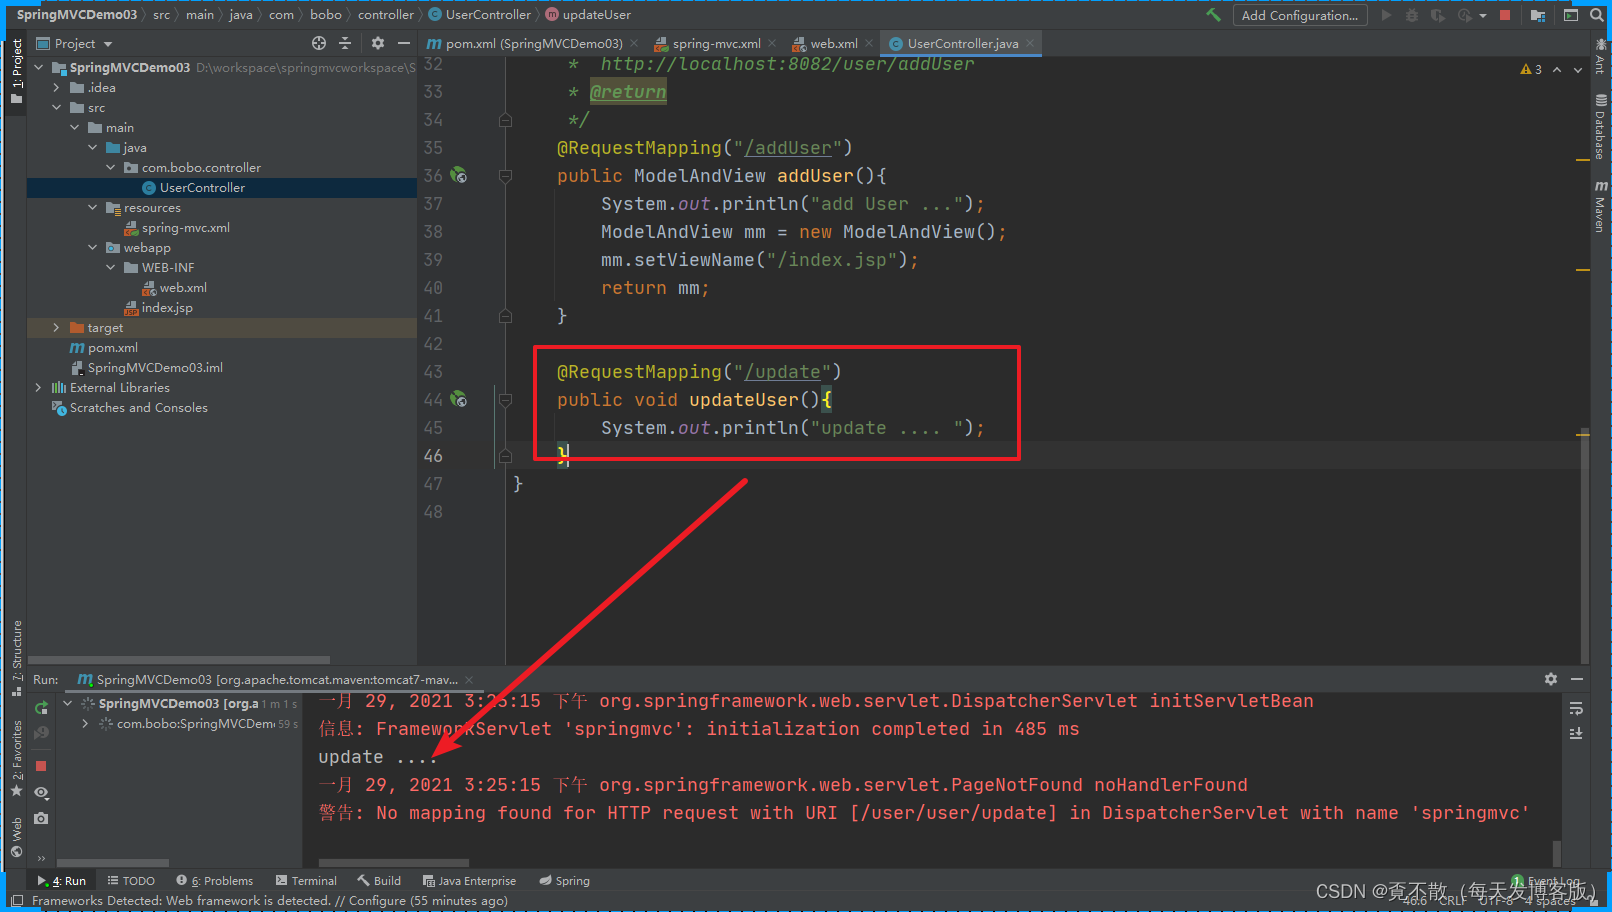
客户端发送了一个请求,服务器获取到请求后没有给客户端响应,那么课后会有错误提示,如果确实是服务器没有要响应的内容,那么我们需要添加一个 @ResponseBody 注解,表示请求到此为止。
/*** 返回结果信息为空* void + @ResponseBody*/@RequestMapping("/update")@ResponseBodypublic void updateUser(){System.out.println("update .... ");}1.3 返回一个字符串
为了简化响应操作,我们可以直接返回一个要调整的页面对应的字符串即可。
*** 要跳转到哪个页面我们直接返回该页面对应的字符串即可** @return*/@RequestMapping("/deleteUser")public String deleteUser(){System.out.println("delete .....");// "/index.jsp"中的 "/" 表示的是绝对路径return "redirect:/index.jsp";}
视图解析器在解析我们要返回的页面的时候我们可以给视图解析器配置对应的前后缀。来简化我们的响应。
<?xml version="1.0" encoding="UTF-8"?>
<beans xmlns="http://www.springframework.org/schema/beans"xmlns:xsi="http://www.w3.org/2001/XMLSchema-instance"xmlns:context="http://www.springframework.org/schema/context"xmlns:mvc="http://www.springframework.org/schema/mvc"xsi:schemaLocation="http://www.springframework.org/schema/beanshttp://www.springframework.org/schema/beans/spring-beans.xsdhttp://www.springframework.org/schema/contexthttp://www.springframework.org/schema/context/spring-context.xsdhttp://www.springframework.org/schema/mvchttp://www.springframework.org/schema/mvc/spring-mvc.xsd
"><!-- 添加对应的扫描路径 --><context:component-scan base-package="com.bobo.controller"/><!-- 开启Spring MVC 注解的使用方式 --><mvc:annotation-driven /><!-- 配置视图解析器 --><bean
class="org.springframework.web.servlet.view.InternalResourceViewResolver" ><!-- 配置视图解析器的前后缀--><property name="prefix" value="/" /><property name="suffix" value=".jsp" /></bean>
</beans>
响应页面的时候就可以简写了。
/*** 要跳转到哪个页面我们直接返回该页面对应的字符串即可** @return*/@RequestMapping("/deleteUser1")public String deleteUser1(){System.out.println("delete1 .....");// "/index.jsp"中的 "/" 表示的是绝对路径return "index";} 我们发现返回字符串的方式默认的跳转方式是请求转发,如果我们要实现重定向只需要在响应的字符串前面添加 redirect: 即可。
@RequestMapping("/deleteUser")
public String deleteUser(){System.out.println("delete .....");// "/index.jsp"中的 "/" 表示的是绝对路径return "redirect:/index.jsp";
}
1.4 通过Servlet处理响应
Spring MVC中的 DispatcherServlet本质上就是一个Servlet,所以我们当然也可以在控制器中使用Servlet来处理响应请求,只是这种方式比较繁琐,一般不用。
@RequestMapping("/queryAll")
public void queryAll(HttpServletRequest request, HttpServletResponse response) throws ServletException, IOException {System.out.println("query All ... ");request.getRequestDispatcher("/index.jsp").forward(request,response);//response.sendRedirect("/index.jsp");
}
2.接收请求数据
介绍用户发送请求中携带的各种参数。
2.1 简单数据类型
如果客户端传递的简单数据类型,我们可以直接在形参中声明要接收的信息。但是要注意声明的类型我们建议搭建都使用对应的包装类,因为传递过来的参数有可能为null。
/*** 接收的参数为简单数据类型* @param userName* @param age* @return*/@RequestMapping("/query1")public String query1(String userName, Integer age){System.out.println("query1 ....."+ userName + " " + age);return "/index.jsp";}
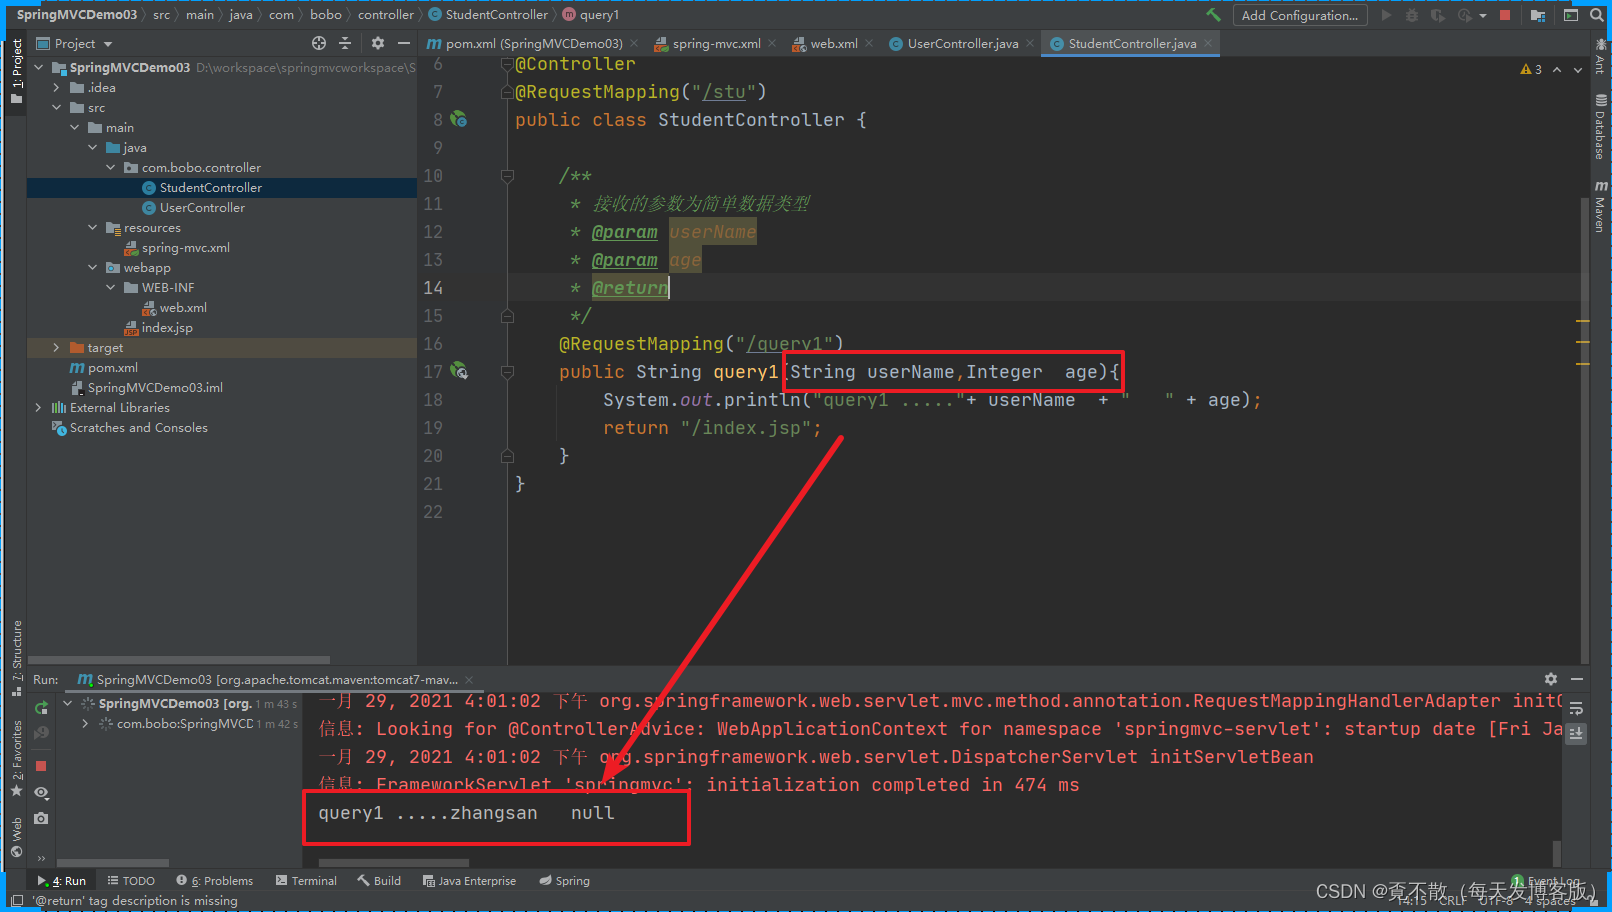
前面的方式要求形参和传递的参数名称要一致,如果不一致我们需要通过 @RequestParam 注解来设置映射。
/*** 接收的参数为简单数据类型* @param userName* @param age* @return*/@RequestMapping("/query1")public String query1(@RequestParam(value = "name",defaultValue = "lisi") String userName,@RequestParam(value = "userAge",defaultValue = "18") Integer age){System.out.println("query1 ....."+ userName + " " + age);return "/index.jsp";} 客户端访问的地址:http://localhost:8082/stu/query1?name=zhangsan&userAge=22。
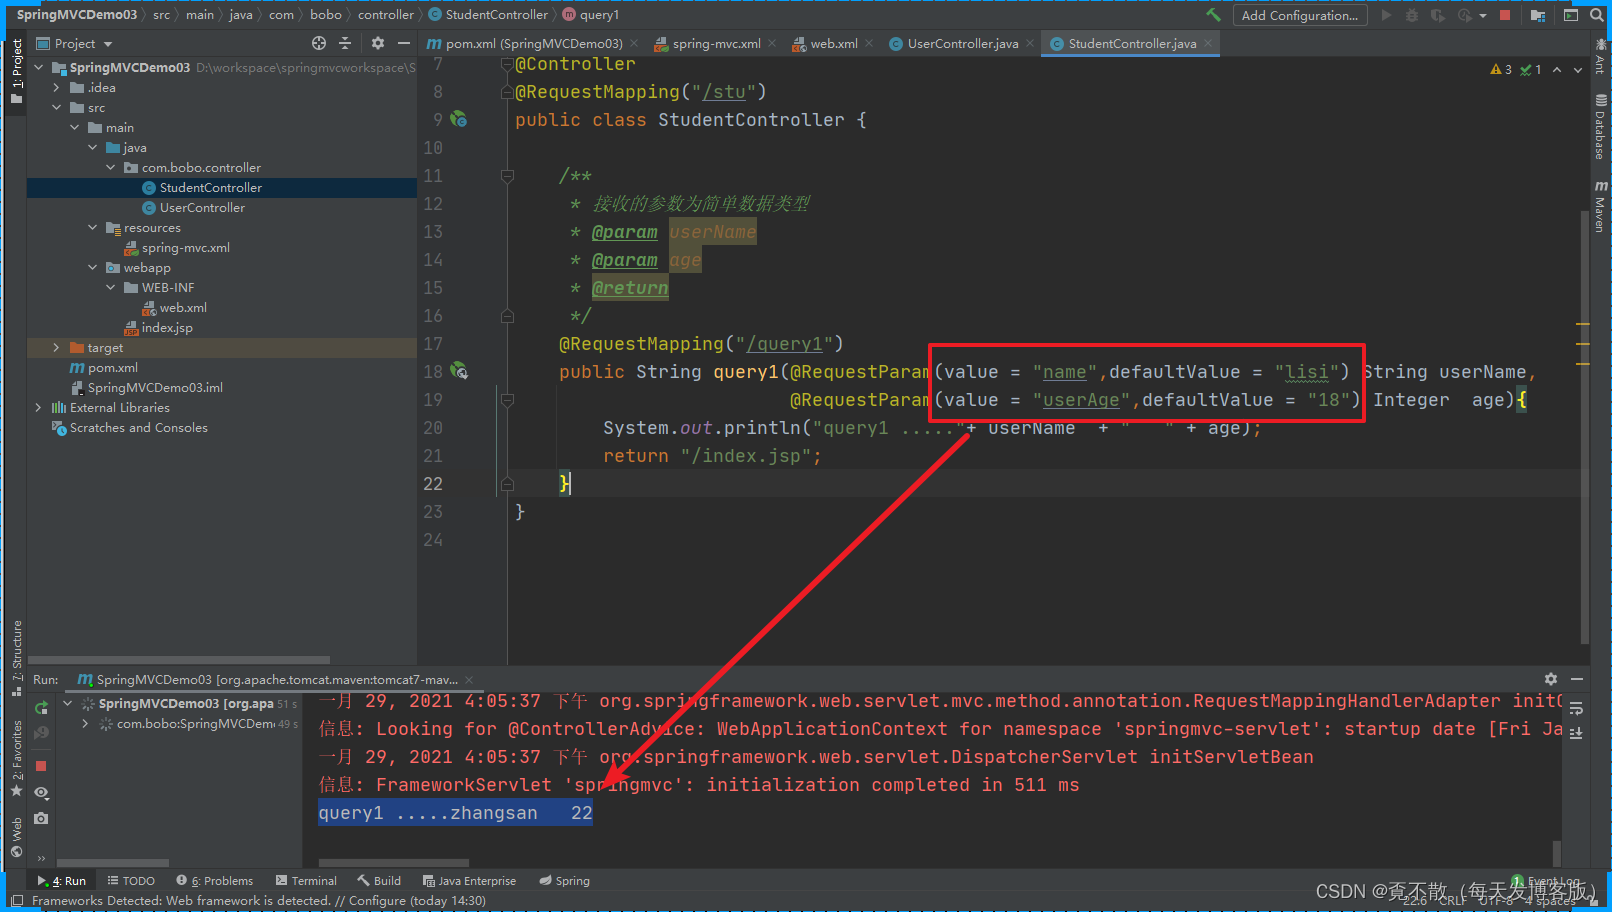
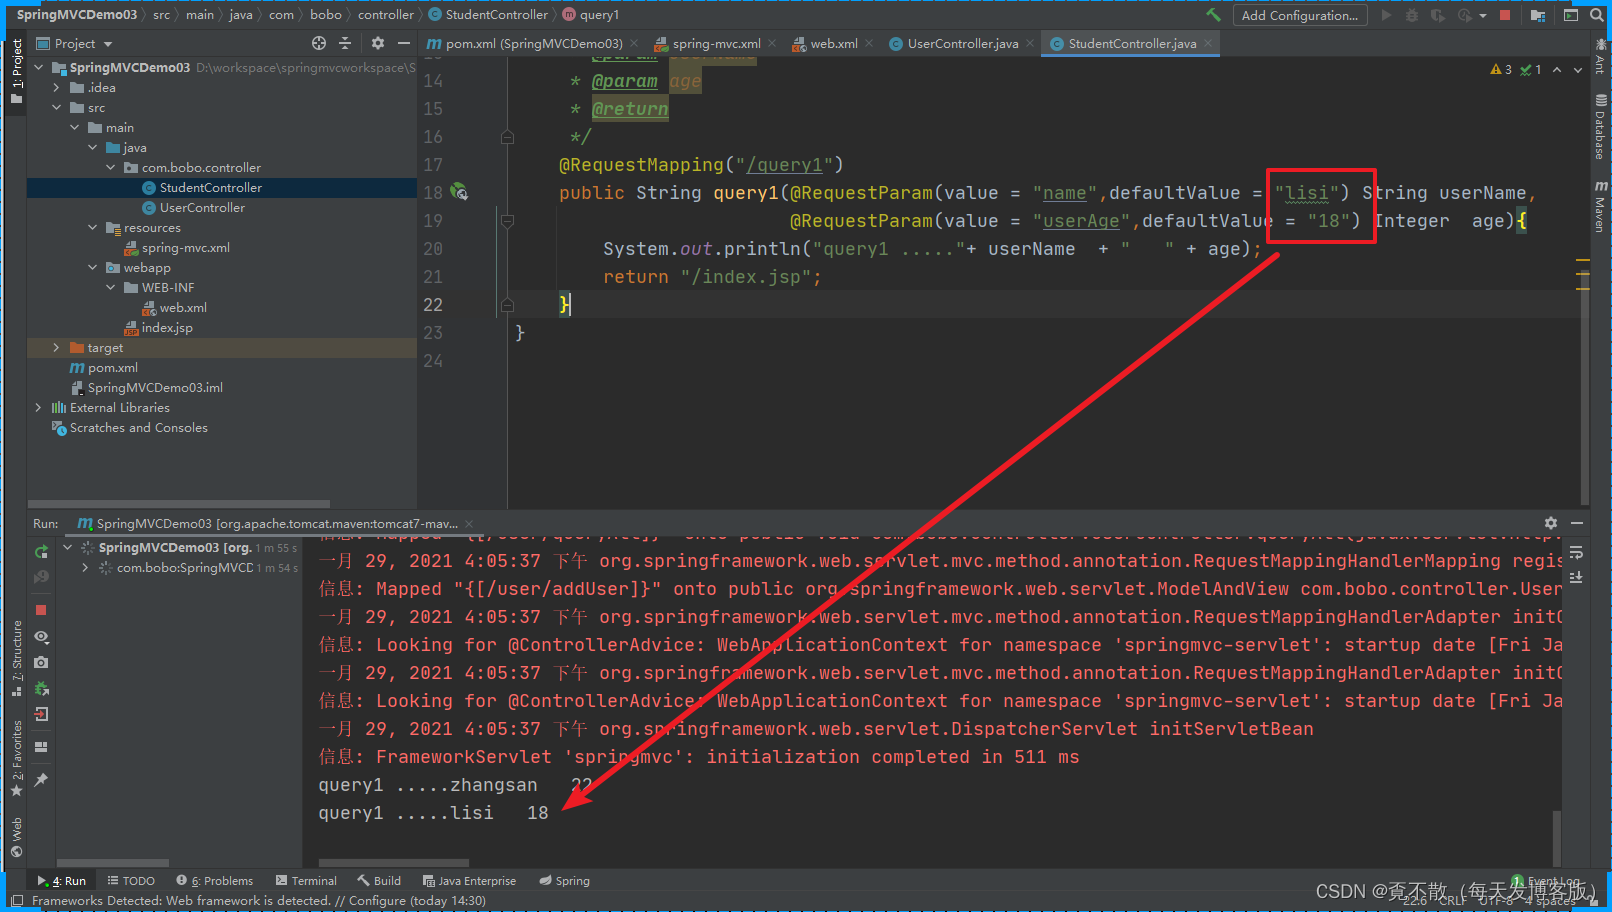
如果没有传递参数:http://localhost:8082/stu/query1
会使用设置的默认值覆盖。
2.2 简单对象
如果客户端传递的参数比较多,我们可以将传递的数据封装到自定义的对象中。
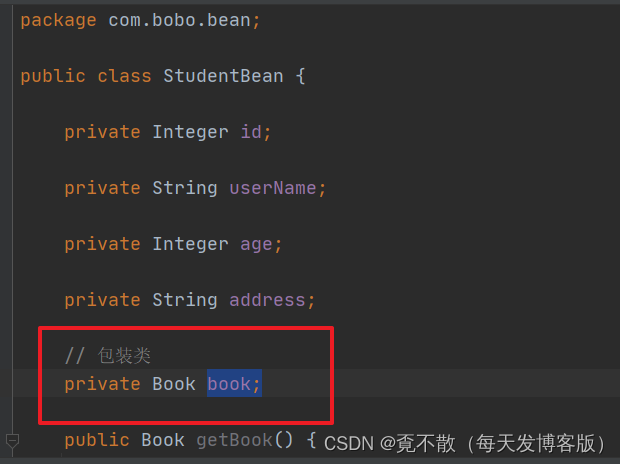
package com.bobo.bean;import org.springframework.web.bind.annotation.RequestParam;import java.util.List;public class StudentBean {private Integer id;private String userName;private Integer age;private String address;private List<String> favrites;public List<String> getFavrites() {return favrites;}public void setFavrites(List<String> favrites) {this.favrites = favrites;}// 包装类private Book book;public Book getBook() {return book;}public void setBook(Book book) {this.book = book;}public Integer getId() {return id;}public void setId(Integer id) {this.id = id;}public String getUserName() {return userName;}public void setUserName(String userName) {this.userName = userName;}public Integer getAge() {return age;}public void setAge(Integer age) {this.age = age;}public String getAddress() {return address;}public void setAddress(String address) {this.address = address;}@Overridepublic String toString() {return "StudentBean{" +"id=" + id +", userName='" + userName + '\'' +", age=" + age +", address='" + address + '\'' +", book=" + book +'}';}
}
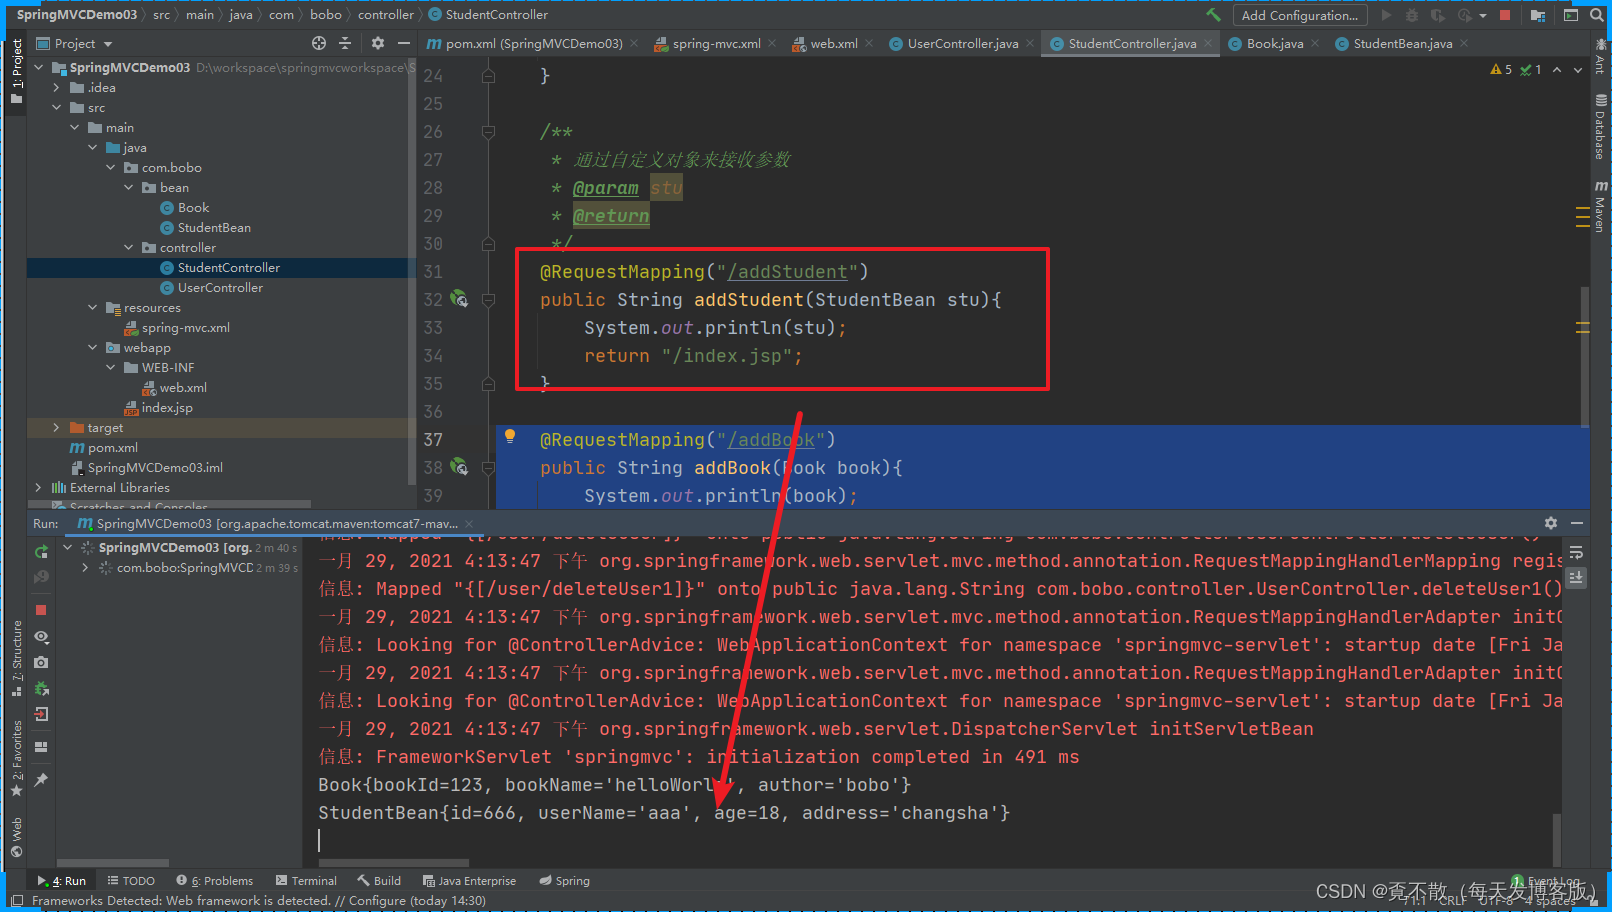
接收请求
/*** 通过自定义对象来接收参数* @param stu* @return*/@RequestMapping("/addStudent")public String addStudent(StudentBean stu){System.out.println(stu);return "/index.jsp";} http://localhost:8082/stu/addStudent?id=666&userName=aaa&age=18&address=changsha。
Book
package com.bobo.bean;public class Book {private Integer bookId;private String bookName;private String author;public Integer getBookId() {return bookId;}public void setBookId(Integer bookId) {this.bookId = bookId;}public String getBookName() {return bookName;}public void setBookName(String bookName) {this.bookName = bookName;}public String getAuthor() {return author;}public void setAuthor(String author) {this.author = author;}@Overridepublic String toString() {return "Book{" +"bookId=" + bookId +", bookName='" + bookName + '\'' +", author='" + author + '\'' +'}';}
}
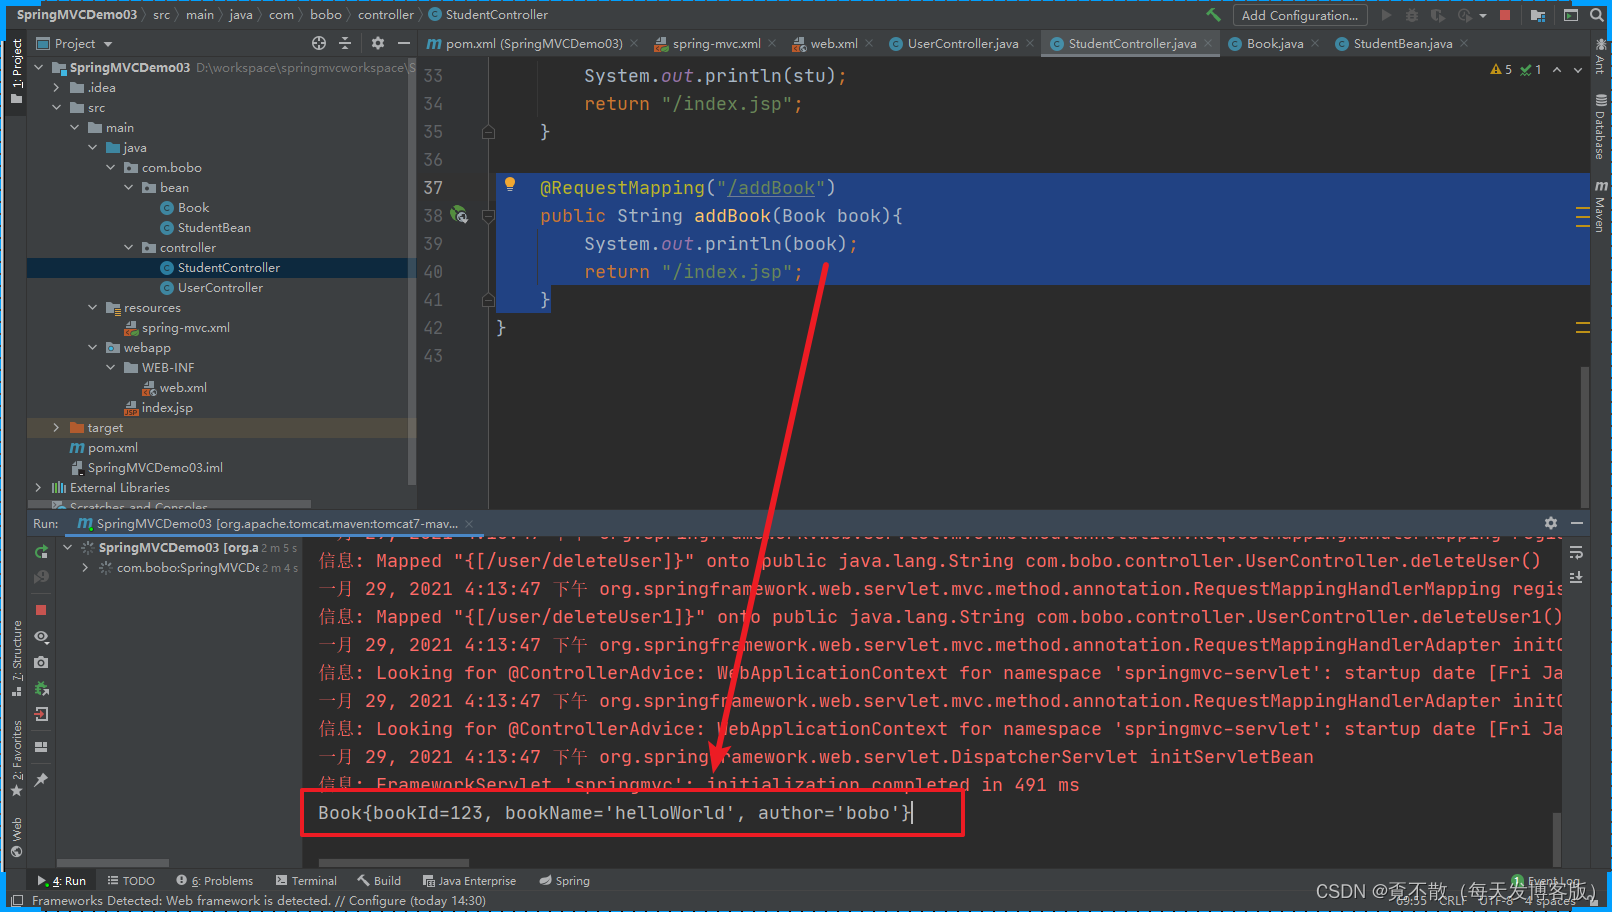
http://localhost:8082/stu/addBook?bookId=123&bookName=helloWorld&author=bobo。
2.3 包装对象
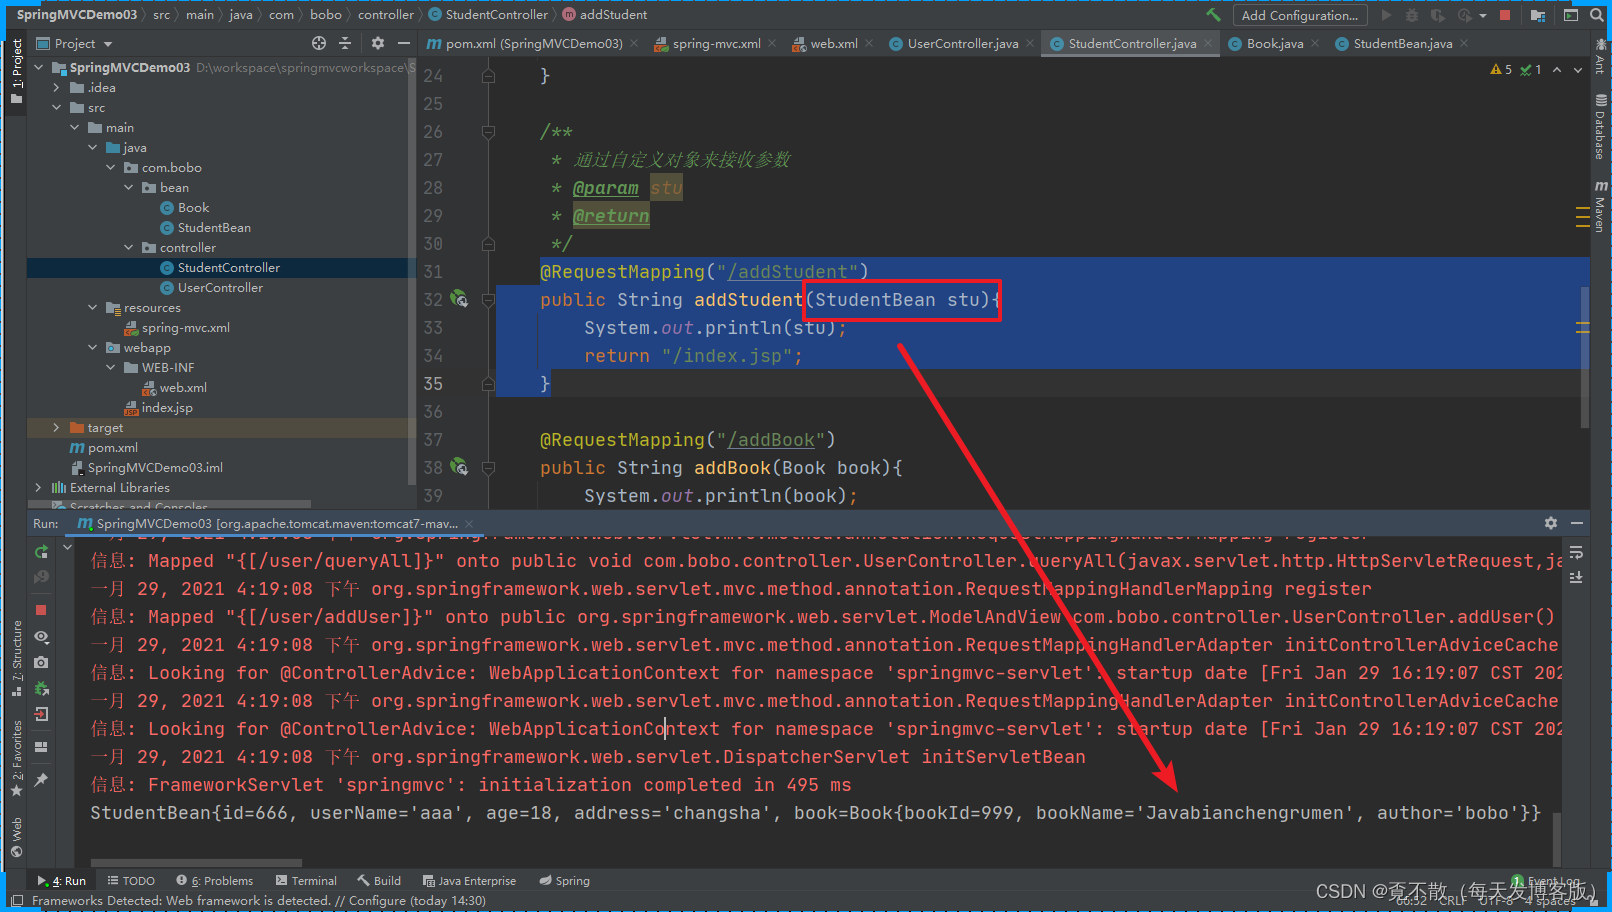
我们自定义的对象中的属性是另一个对象(自定义对象),那这种情况我们应该怎么传递及接收相关的数据。
请求:http://localhost:8082/stu/addStudent?id=666&userName=aaa&age=18&address=changsha&book.bookId=999&book.bookName=Javabianchengrumen&book.author=bobo
2.4 数组和集合类型
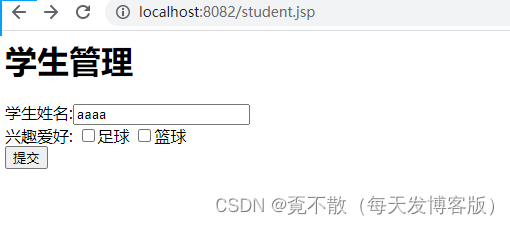
当我们在客户端通过表单提交复选框的数据的时候,我们可以通过数组的形式来接收。
<%--Created by IntelliJ IDEA.User: dpbDate: 2021/1/29Time: 16:36To change this template use File | Settings | File Templates.
--%>
<%@ page contentType="text/html;charset=UTF-8" language="java" %>
<html>
<head><title>Title</title>
</head>
<body><h1>学生管理</h1><form action="/stu/addStudentNew" method="post" ><label>学生姓名:</label><input type="text" name="userName"><br><label>兴趣爱好:</label><input type="checkbox" name="favrites" value="footerball">足球<input type="checkbox" name="favrites" value="basketball">篮球<br><input type="submit" value="提交"></form>
</body>
</html>
@RequestMapping("/addStudentNew")
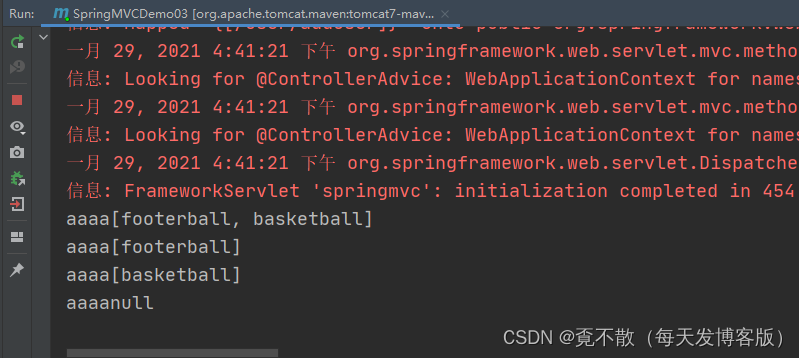
public String addStudentNew(String userName,String[] favrites){System.out.println(userName + ":" + Arrays.toString(favrites) );return "/index.jsp";
} 页面效果
那如果我们不用数组而是使用List集合呢
@RequestMapping("/addStudentList")
public String addStudentList(String userName, List<String> favrites){System.out.println(userName + ":" + favrites );return "/index.jsp";
}
报错
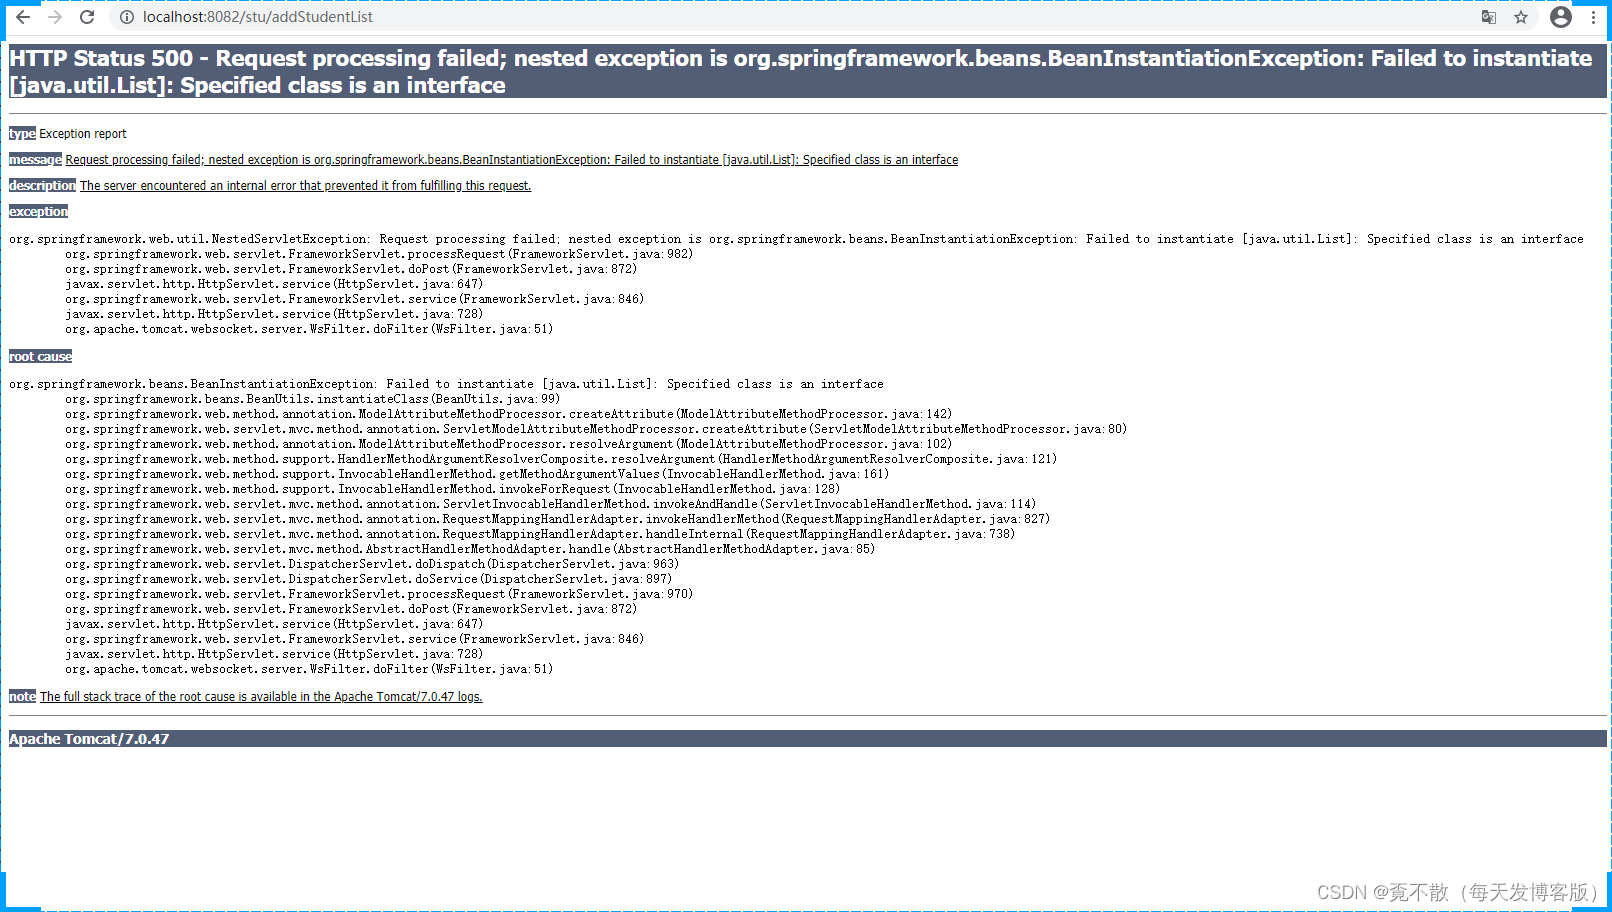
也就是告诉大家我们不能在形参中直接通过集合来接收参数!
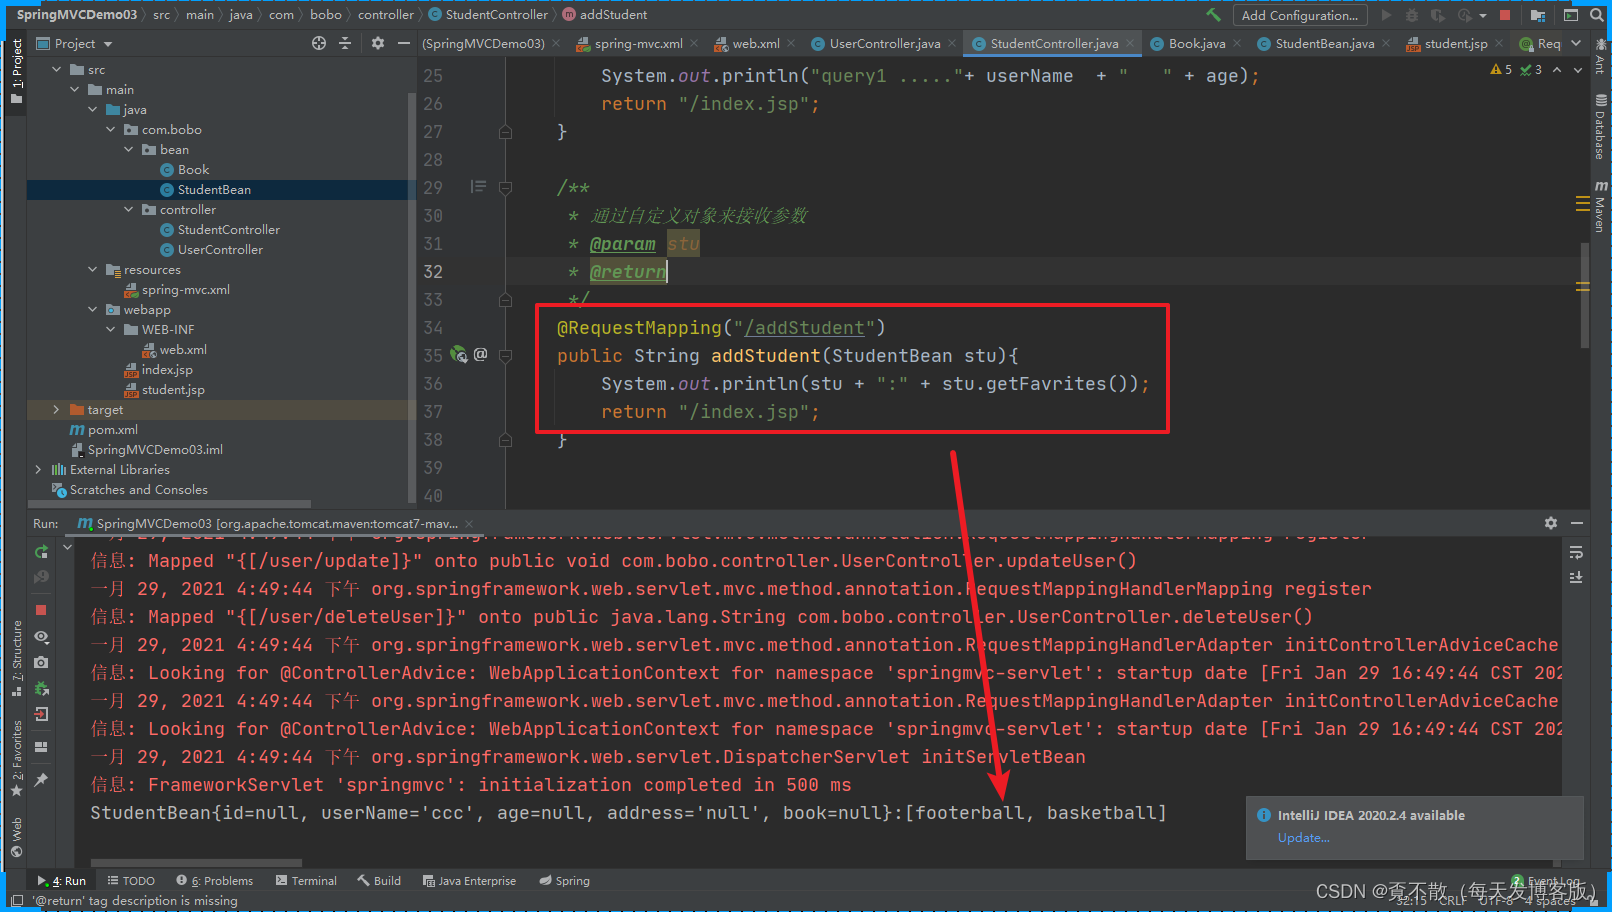
我们也可以通过自定义对来接收,在对象中声明数组或者集合类型的变量来接收。
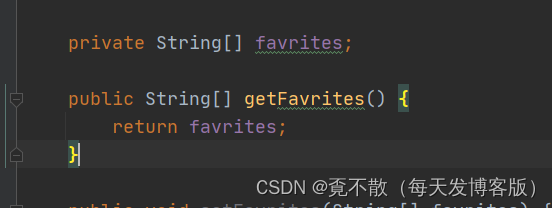
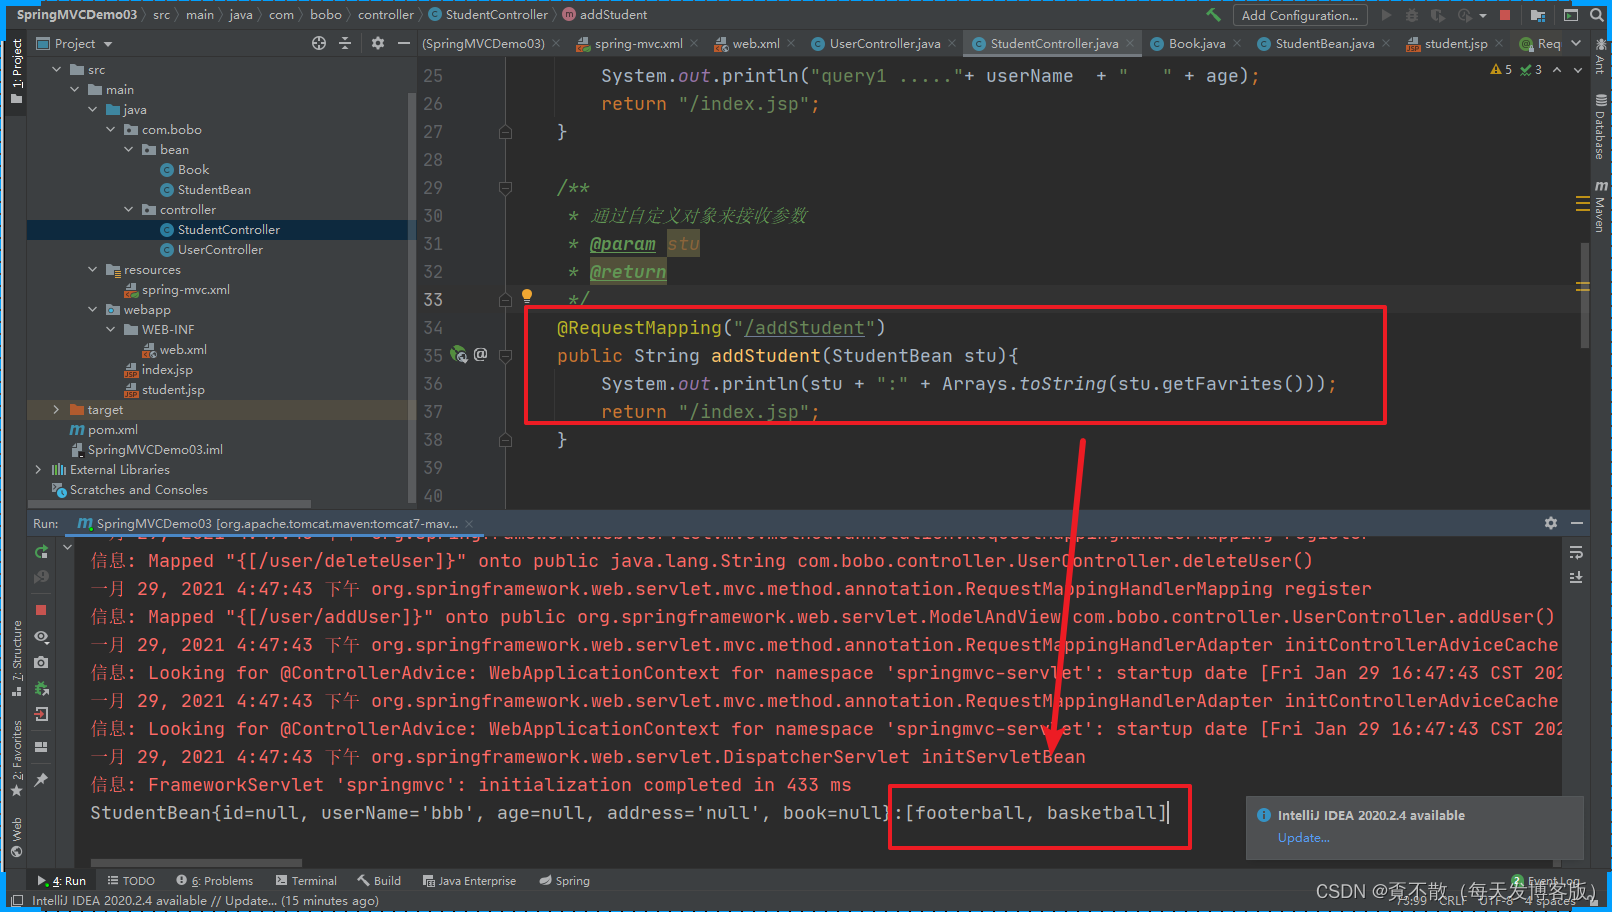
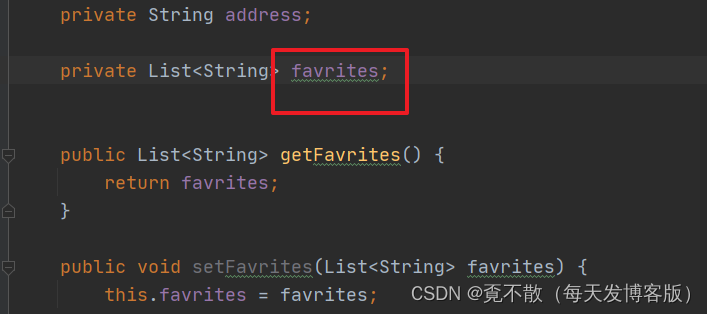
属性声明为List类型也可以。
2.5 Date类型
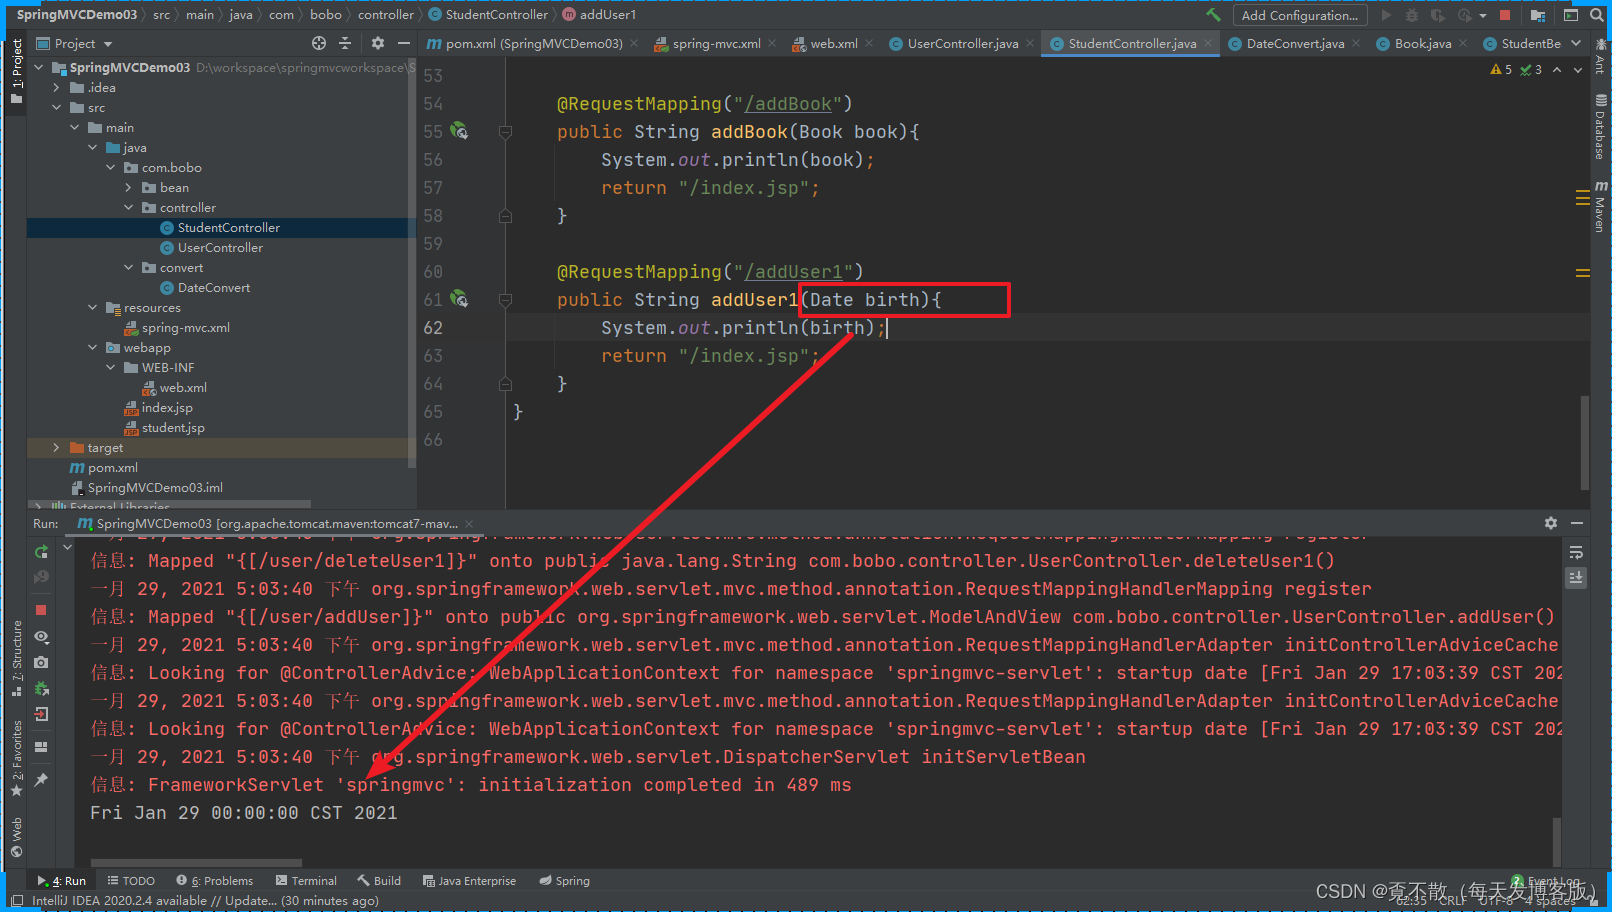
如果我们需要接收一个时间类型数据,直接在形参中声明 Date 类型,会抛出类型转换的异常。


自己实现转换器
package com.bobo.convert;import org.springframework.core.convert.converter.Converter;import java.text.ParseException;
import java.text.SimpleDateFormat;
import java.util.Date;/*** 自定义一个转换器* 实现 String到Date类型的转换*/
public class DateConvert implements Converter<String, Date> {@Overridepublic Date convert(String s) {SimpleDateFormat sdf = new SimpleDateFormat("yyyy-MM-dd");Date date = null;try {date = sdf.parse(s);} catch (ParseException e) {e.printStackTrace();}return date;}
}
配置自定义的转换器

<?xml version="1.0" encoding="UTF-8"?>
<beans xmlns="http://www.springframework.org/schema/beans"xmlns:xsi="http://www.w3.org/2001/XMLSchema-instance"xmlns:context="http://www.springframework.org/schema/context"xmlns:mvc="http://www.springframework.org/schema/mvc"xsi:schemaLocation="http://www.springframework.org/schema/beanshttp://www.springframework.org/schema/beans/spring-beans.xsdhttp://www.springframework.org/schema/contexthttp://www.springframework.org/schema/context/spring-context.xsdhttp://www.springframework.org/schema/mvchttp://www.springframework.org/schema/mvc/spring-mvc.xsd
"><!-- 添加对应的扫描路径 --><context:component-scan base-package="com.bobo.controller"/><!-- 开启Spring MVC 注解的使用方式 --><mvc:annotation-driven  conversion-service="conversionServiceFactoryBean"/><!-- 配置视图解析器 --><bean class="org.springframework.web.servlet.view.InternalResourceViewResolver" ><!--  配置视图解析器的前后缀<property name="prefix" value="/" /><property name="suffix" value=".jsp" />--></bean><!-- 注册自定义的转换器 --><bean class="org.springframework.format.support.FormattingConversionServiceFactoryBean"id="conversionServiceFactoryBean"><property name="converters"><set><bean class="com.bobo.convert.DateConvert"/></set></property></bean>
</beans>
测试
http://localhost:8082/stu/addUser1?birth=2021-01-29
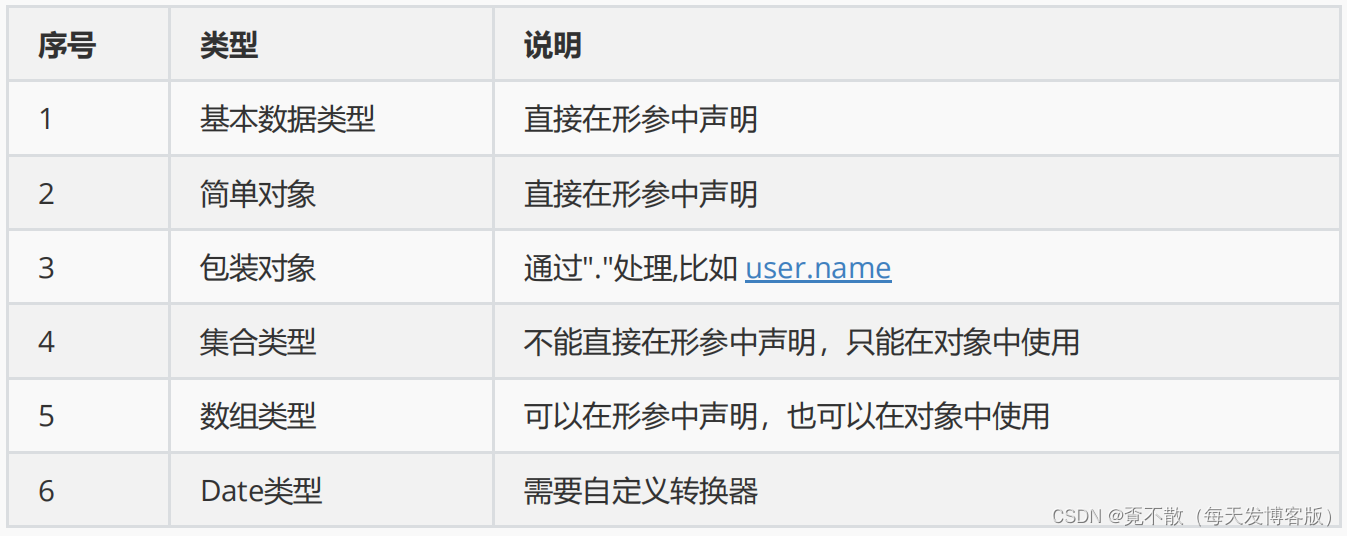
接收请求碰到的参数相关的类型小结。
3.响应用户数据
Maven项目创建的web.xml的schema不完整,我们修改如下。
<!DOCTYPE web-app PUBLIC"-//Sun Microsystems, Inc.//DTD Web Application 2.3//EN""http://java.sun.com/dtd/web-app_2_3.dtd" ><web-app  version="2.5"xmlns="http://java.sun.com/xml/ns/javaee"xmlns:xsi="http://www.w3.org/2001/XMLSchema-instance"xsi:schemaLocation="http://java.sun.com/xml/ns/javaeehttp://java.sun.com/xml/ns/javaee/web-app_2_5.xsd"><display-name>Archetype Created Web Application</display-name><!--配置一个Spring MVC 的前端控制器目的是所有的客户端的请求都会被  DispatcherServlet 处理--><servlet><servlet-name>springmvc</servlet-name><servlet-class>org.springframework.web.servlet.DispatcherServlet</servlet-class><!-- 关联自定义的Spring MVC的配置文件 --><init-param><param-name>contextConfigLocation</param-name><param-value>classpath:spring-mvc.xml</param-value></init-param></servlet><servlet-mapping><servlet-name>springmvc</servlet-name><url-pattern>/</url-pattern></servlet-mapping><!-- 配置设置编码的过滤器 --><filter><filter-name>encodingFilter</filter-name><filter-class>org.springframework.web.filter.CharacterEncodingFilter</filter-class><init-param><param-name>encoding</param-name><param-value>UTF-8</param-value></init-param><init-param><param-name>forceRequestEncoding</param-name><param-value>true</param-value></init-param><init-param><param-name>forceResponseEncoding</param-name><param-value>true</param-value></init-param></filter><filter-mapping><filter-name>encodingFilter</filter-name><url-pattern>/*</url-pattern></filter-mapping>
</web-app>
3.1 通过ModelAndView方式
@RequestMapping("/fun1")public ModelAndView fun1(){System.out.println("fun1...");ModelAndView mm = new ModelAndView();mm.setViewName("/person1.jsp");// 绑定一个回传信息mm.addObject("msg","Hello World");return mm;} 在页面中通过EL表达获取。
<%--Created by IntelliJ IDEA.User: dpbDate: 2021/1/29Time: 17:20To change this template use File | Settings | File Templates.
--%>
<%@ page contentType="text/html;charset=UTF-8" language="java" %>
<html>
<head><title>Title</title>
</head>
<body>
<h1>Person管理</h1><label>msg:</label> ${ msg } <br>
</body>
</html>
效果

3.2 Map集合
我们可以在形参中声明一个Map类型的变量,然后将要传递的数据保存在该变量中,注意我们自己不用去实例化该Map容器。
/*** 响应数据我们可以在形参中声明一个Map集合* 来保存要响应的数据* @return*/@RequestMapping("/fun2")public String fun2(Map<String,Object> map){map.put("msg","map类型数据");map.put("username","张三");System.out.println("fun2....");return "/person2.jsp";} 页面获取
<%--Created by IntelliJ IDEA.User: dpbDate: 2021/1/29Time: 17:20To change this template use File | Settings | File Templates.
--%>
<%@ page contentType="text/html;charset=UTF-8" language="java" %>
<html>
<head><title>Title</title>
</head>
<body>
<h1>Person管理</h1><label>msg:</label> ${ requestScope.msg } <br><label>msg:</label> ${ sessionScope.msg } <br><label>msg:</label> ${ applicationScope.msg } <br><label>userName:</label> ${ username } <br>
</body>
</html>

3.3 Model对象
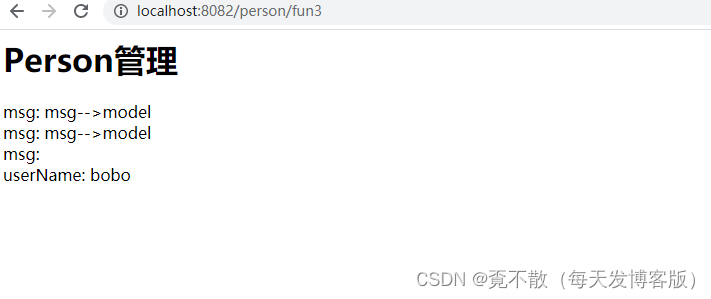
@RequestMapping("/fun3")public String fun3(Model model){model.addAttribute("msg","msg-->model");model.addAttribute("username","bobo");System.out.println("fun3....");return "/person2.jsp";}
3.4 ModelMap对象
ModelMap可以看成是Model和Map的组合,因为ModelMap提供了Model和Map的API。
@RequestMapping("/fun4")public String fun4(ModelMap model){model.addAttribute("msg","msg-->modelMap你好啊");model.addAttribute("username","bobo");System.out.println("fun4....");return "/person2.jsp";}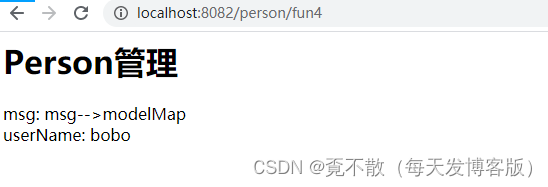
注意以上几种方式传递的数据都是保存在request作用域中的。
验证
<%--Created by IntelliJ IDEA.User: dpbDate: 2021/1/29Time: 17:20To change this template use File | Settings | File Templates.
--%>
<%@ page contentType="text/html;charset=UTF-8" language="java" %>
<html>
<head><title>Title</title>
</head>
<body>
<h1>Person管理</h1><label>msg:</label> ${ requestScope.msg } <br><label>msg:</label> ${ sessionScope.msg } <br><label>msg:</label> ${ applicationScope.msg } <br><label>userName:</label> ${ username } <br>
</body>
</html>
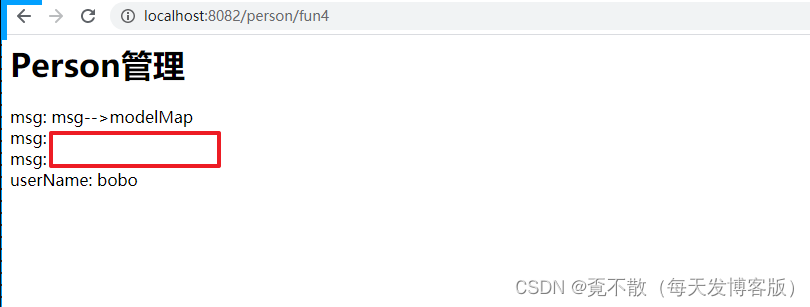
如果我们需要将某个参数保存到session作用域中我们只需要在类的头部添加 @SessionAttributes 注解即可。
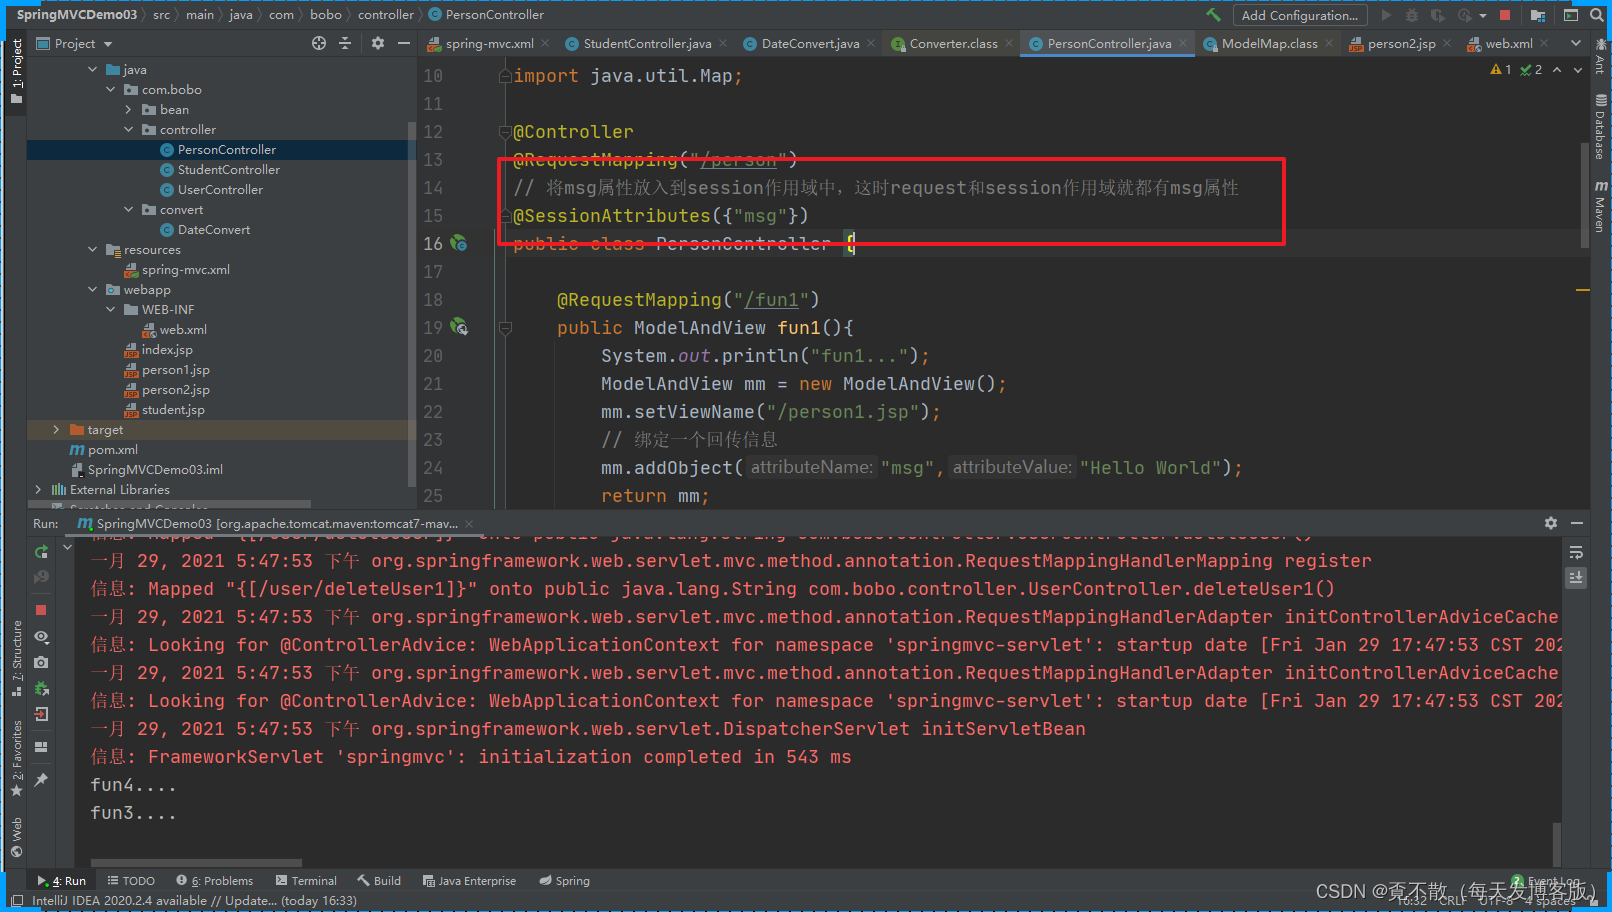
效果
4.中文乱码问题
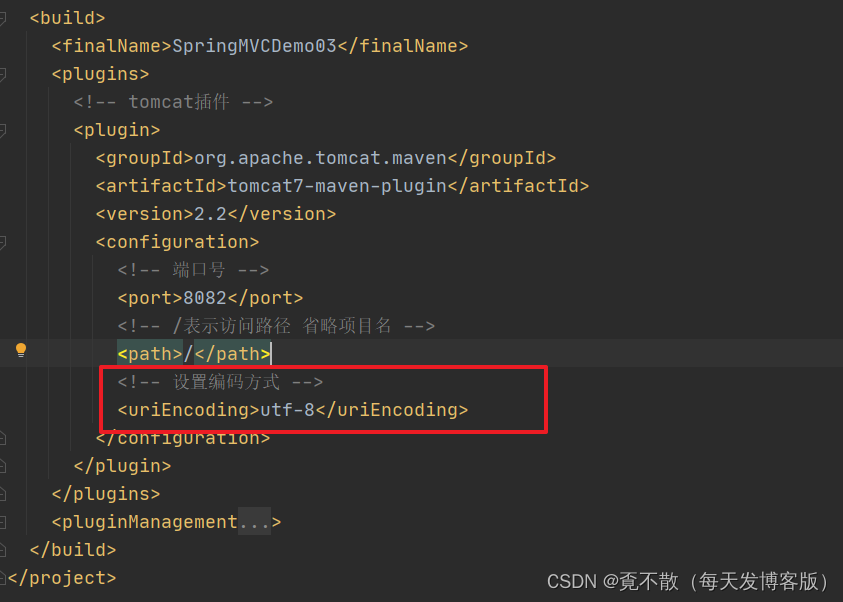
接收请求中的数据--> POST方式提交【在Request中设置对应的编码方式】 GET方式提交【在Web容器中设置 Tomcat】
响应请求中的数据--> Response设置对应的编码方式
GET方式提交设置编码:
POST方式提交及响应Response的设置。
在CharacterEncodingFilter这个过滤器中提供的有设置Request和response对应编码的方法。
protected void doFilterInternal(HttpServletRequest request, HttpServletResponse response, FilterChain filterChain) throws ServletException, IOException {String encoding = this.getEncoding();if (encoding != null) {if (this.isForceRequestEncoding() || request.getCharacterEncoding() == null) {request.setCharacterEncoding(encoding);}if (this.isForceResponseEncoding()) {response.setCharacterEncoding(encoding);}}filterChain.doFilter(request, response);
}
在web.xml文件中配置编码过滤器的设置。
<!DOCTYPE web-app PUBLIC"-//Sun Microsystems, Inc.//DTD Web Application 2.3//EN""http://java.sun.com/dtd/web-app_2_3.dtd" ><web-app  version="2.5"xmlns="http://java.sun.com/xml/ns/javaee"xmlns:xsi="http://www.w3.org/2001/XMLSchema-instance"xsi:schemaLocation="http://java.sun.com/xml/ns/javaeehttp://java.sun.com/xml/ns/javaee/web-app_2_5.xsd"><display-name>Archetype Created Web Application</display-name><!--配置一个Spring MVC 的前端控制器目的是所有的客户端的请求都会被  DispatcherServlet 处理--><servlet><servlet-name>springmvc</servlet-name><servlet-class>org.springframework.web.servlet.DispatcherServlet</servlet-class><!-- 关联自定义的Spring MVC的配置文件 --><init-param><param-name>contextConfigLocation</param-name><param-value>classpath:spring-mvc.xml</param-value></init-param></servlet><servlet-mapping><servlet-name>springmvc</servlet-name><url-pattern>/</url-pattern></servlet-mapping><!-- 配置设置编码的过滤器 --><filter><filter-name>encodingFilter</filter-name><filter-class>org.springframework.web.filter.CharacterEncodingFilter</filter-class><init-param><param-name>encoding</param-name><param-value>UTF-8</param-value></init-param><init-param><param-name>forceRequestEncoding</param-name><param-value>true</param-value></init-param><init-param><param-name>forceResponseEncoding</param-name><param-value>true</param-value></init-param></filter><filter-mapping><filter-name>encodingFilter</filter-name><url-pattern>/*</url-pattern></filter-mapping>
</web-app>
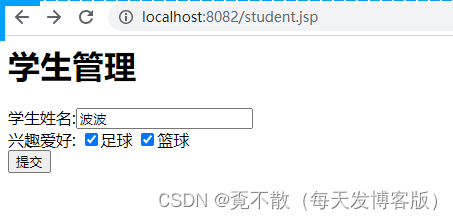
服务端获取的中文信息就没有乱码了。

三、常见应用
1.文件上传操作
1.1 添加fileUpload的依赖
<!-- 添加fileUpload的依赖 -->
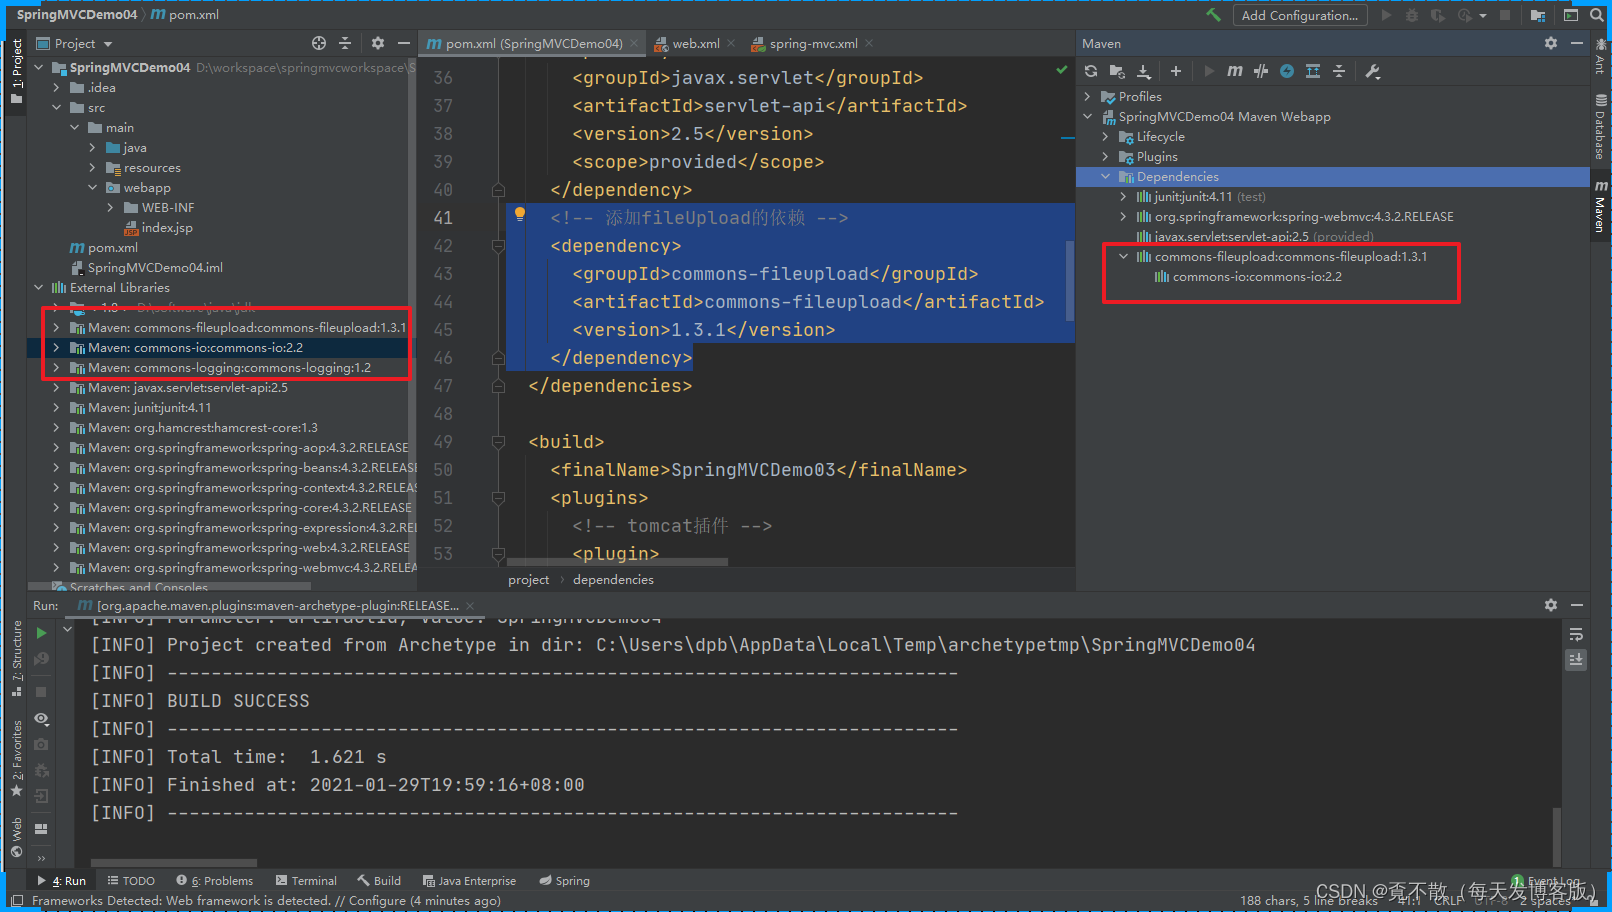
<dependency><groupId>commons-fileupload</groupId><artifactId>commons-fileupload</artifactId><version>1.3.1</version>
</dependency>
因为依赖的传递性会自动添加commons-io这个jar
1.2 创建表单
要实现文件上传操作,那么表单的提交方式必须是 POST 方式,同时enctype必须是multipart/form-data 二进制方式提交。
<%--Created by IntelliJ IDEA.User: dpbDate: 2021/1/29Time: 20:03To change this template use File | Settings | File Templates.
--%>
<%@ page contentType="text/html;charset=UTF-8" language="java" %>
<html>
<head><title>Title</title>
</head>
<body><h1>文件上传:</h1><form action="/user/fileUpload" method="post" enctype="multipart/form-data"><label>用户名:</label><input type="text" name="username"><br><label>头像:</label><input type="file" name="headFile"><br><input type="submit" value="上传"></form>
</body>
</html>
1.3 修改配置文件
我们可以在Spring MVC的配置文件中设置上传的相关参数。设置上传文件的大小,限制上传文件的类型等。
<?xml version="1.0" encoding="UTF-8"?>
<beans xmlns="http://www.springframework.org/schema/beans"xmlns:xsi="http://www.w3.org/2001/XMLSchema-instance"xmlns:context="http://www.springframework.org/schema/context"xmlns:mvc="http://www.springframework.org/schema/mvc"xsi:schemaLocation="http://www.springframework.org/schema/beanshttp://www.springframework.org/schema/beans/spring-beans.xsdhttp://www.springframework.org/schema/contexthttp://www.springframework.org/schema/context/spring-context.xsdhttp://www.springframework.org/schema/mvchttp://www.springframework.org/schema/mvc/spring-mvc.xsd
"><!-- 添加对应的扫描路径 --><context:component-scan base-package="com.bobo.controller"/><!-- 开启Spring MVC 注解的使用方式 --><mvc:annotation-driven  /><!-- 配置文件上传的解析器 --><bean class="org.springframework.web.multipart.commons.CommonsMultipartResolver"id="multipartResolver"><!--通过设值注入的方式设置上传的相关参数 --><property name="maxUploadSize" value="5232880"/></bean><!-- 防止资源文件被Spring MVC拦截。我们在Spring MVC设置资源的映射关系 --><!--  防止资源文件被spring MVC拦截<mvc:resources mapping="/img/**" location="/img/" cache-period="31556926"/><mvc:resources mapping="/js/**" location="/js/" cache-period="31556926"/><mvc:resources mapping="/css/**" location="/css/" cache-period="31556926"/>--></beans>
注意:
CommonsMultipartResolver这个Bean的id必须为multipartResolver,
原因:CommonsMultipartResolver Bean是在DispatcherServlet中加载的,而DispatcherServlet是通过名字来查找这个Bean的。而其他的,则是按照类型查找。
1.4 控制器中处理文件
在控制器中我们要接收上传的文件,我们只需要在形参中声明 MultipartFile类型即可。
package com.bobo.controller;import org.springframework.stereotype.Controller;
import org.springframework.web.bind.annotation.RequestMapping;
import org.springframework.web.multipart.MultipartFile;import java.io.File;
import java.io.IOException;@Controller
@RequestMapping("/user")
public class UserController {/*** 文件上传操作* @return*/@RequestMapping("/fileUpload")public String fileUpload(String username, MultipartFile headFile) throws IOException {System.out.println(username+"  : " + headFile.getOriginalFilename() );headFile.transferTo(new File("d:/tools/","123.jpg"));return "/index.jsp";}
}
2.文件下载操作
文件下载的操作关键是在服务端的处理。
/*** 文件下载*/@RequestMapping("/download")public void fileDownload(HttpServletRequest request, HttpServletResponse response) throws Exception {File file = new File("d:/tools/","123.jpg");// 设置响应头信息response.setCharacterEncoding("utf-8");response.setContentType("multipart/form-data");response.setHeader("Content-Disposition", "attachment;fileName=" + file.getName());// 打开需要下载的文件InputStream in = new FileInputStream(file);// 激活下载的操作ServletOutputStream outputStream = response.getOutputStream();// 实现下载操作--> 本质就是一个文件的复制操作byte[] b = new byte[1024*1024];int length= 0;while((length = in.read(b)) > 0){outputStream.write(b,0,length);}// 关闭连接outputStream.close();in.close();} SpringMVC中提供的下载方式
/*** 使用SpringMVC中提供的下载方式* @param request* @return* @throws Exception*/@RequestMapping("/download2")public ResponseEntity<byte[]> download2(HttpServletRequest request) throws Exception{File file = new File("d:/tools/","123.jpg");byte[] body = null;InputStream in = new FileInputStream(file);body = new byte[in.available()];in.read(body);HttpHeaders headers = new HttpHeaders();headers.add("Content-Disposition","attachment;fileName=" + file.getName());HttpStatus status = HttpStatus.OK;ResponseEntity<byte[]> entity = new ResponseEntity<>(body,headers,status);return entity;}
3.静态资源文件处理
其实我们在前面的课程里面都没有在Web项目中使用静态资源文件(html,css,js,图片等资源)。当我们添加了html页面后访问的时候发现404了。
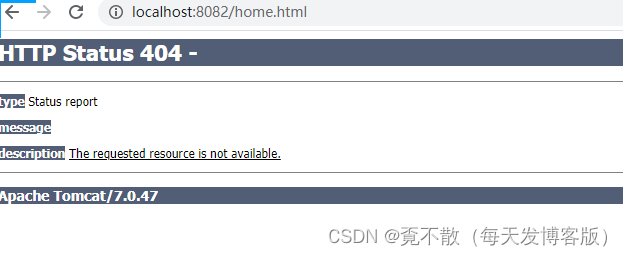
原因是什么呢?
我们自己配置的web.xml中的信息覆盖掉了Tomcat默认的配置。

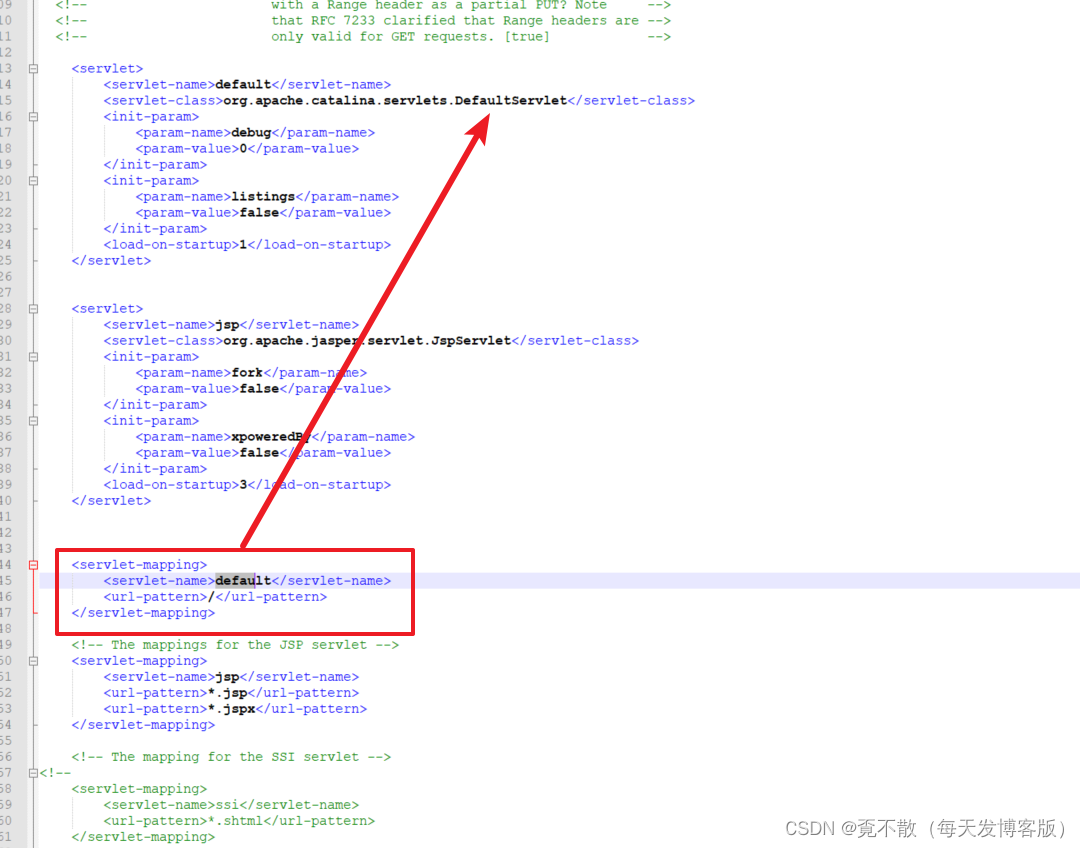
找到原因了,怎么解决了?我们在自己的web.xml专门制定不用覆盖的请求类型。
<!-- 防止资源文件被Spring MVC的前端控制器拦截 --><servlet-mapping><servlet-name>default</servlet-name><url-pattern>*.html</url-pattern></servlet-mapping><servlet-mapping><servlet-name>default</servlet-name><url-pattern>*.css</url-pattern></servlet-mapping><servlet-mapping><servlet-name>default</servlet-name><url-pattern>*.js</url-pattern></servlet-mapping><servlet-mapping><servlet-name>default</servlet-name><url-pattern>*.jpg</url-pattern></servlet-mapping><servlet-mapping><servlet-name>default</servlet-name><url-pattern>*.png</url-pattern></servlet-mapping> 重启在访问就可以了。
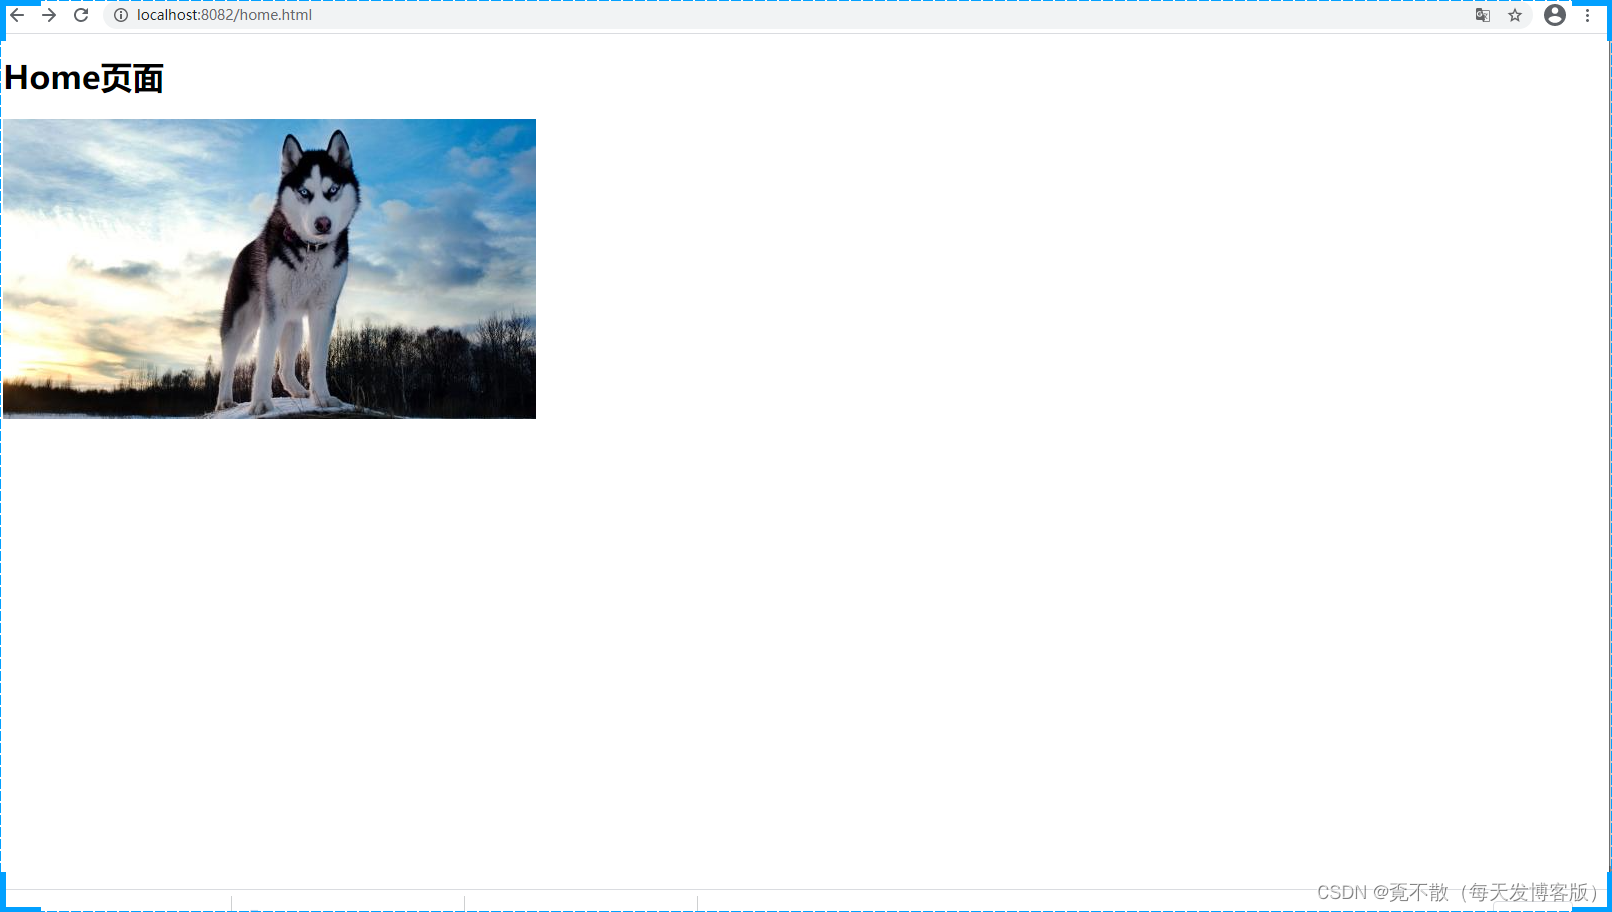
当然我们还可以在SpringMVC的配置文件中设置 资源的映射关系。
<!-- 防止资源文件被Spring MVC拦截。我们在Spring MVC设置资源的映射关系 -->
<!-- 防止资源文件被spring MVC拦截 -->
<mvc:resources mapping="/img/**" location="/img/" cache-period="31556926"/>
<mvc:resources mapping="/js/**" location="/js/" cache-period="31556926"/>
<mvc:resources mapping="/css/**" location="/css/" cache-period="31556926"/>
4.服务端数据校验
4.1 为什么需要服务端校验?
最早的校验,就是服务端校验。早期的网站,用户输入一个邮箱地址,校验邮箱地址需要将地址发送到服务端,服务端进行校验,校验成功后,给前端一个响应。有了JavaScript,校验工作可以放在前端去执行。那么为什么还需要服务端校验呢? 因为前端传来的数据不可信。前端很容易获取都后端的数据接口,如果有人绕过页面,就会出现非法数据,所以服务端也要数据校验,总的来说:
1. 前端校验要做,目的是为了提高用户体验。
2. 后端校验也要做,目的是为了数据安全。
4.2 普通校验
Springmvc本身没有校验功能,它使用Hibernate的校验框架,Hibernate的校验框架和orm没有关系。
引入hibernate相关的依赖
<dependency><groupId>org.hibernate</groupId><artifactId>hibernate-validator</artifactId><version>5.3.0.Alpha1</version>
</dependency>
将验证框架引入SpringMVC中
<?xml version="1.0" encoding="UTF-8"?>
<beans xmlns="http://www.springframework.org/schema/beans"xmlns:xsi="http://www.w3.org/2001/XMLSchema-instance"xmlns:context="http://www.springframework.org/schema/context"xmlns:mvc="http://www.springframework.org/schema/mvc"xsi:schemaLocation="http://www.springframework.org/schema/beanshttp://www.springframework.org/schema/beans/spring-beans.xsdhttp://www.springframework.org/schema/contexthttp://www.springframework.org/schema/context/spring-context.xsdhttp://www.springframework.org/schema/mvchttp://www.springframework.org/schema/mvc/spring-mvc.xsd
"><!-- 添加对应的扫描路径 --><context:component-scan base-package="com.bobo.controller"/><!-- 开启Spring MVC 注解的使用方式 --><mvc:annotation-driven  validator="validatorFactoryBean"/><!-- 配置Hibernate-validator验证框架 --><bean class="org.springframework.validation.beanvalidation.LocalValidatorFactoryBean" id="validatorFactoryBean"><property name="providerClass" value="org.hibernate.validator.HibernateValidator"/><property name="validationMessageSource" ref="bundleMessageSource"/></bean><!-- 添加Hibernate验证框架的相关属性信息 --><bean class="org.springframework.context.support.ReloadableResourceBundleMessageSource" id="bundleMessageSource"><property name="fileEncodings" value="utf-8"/><property name="cacheSeconds" value="120" /></bean></beans>
bean对象中设置验证规则
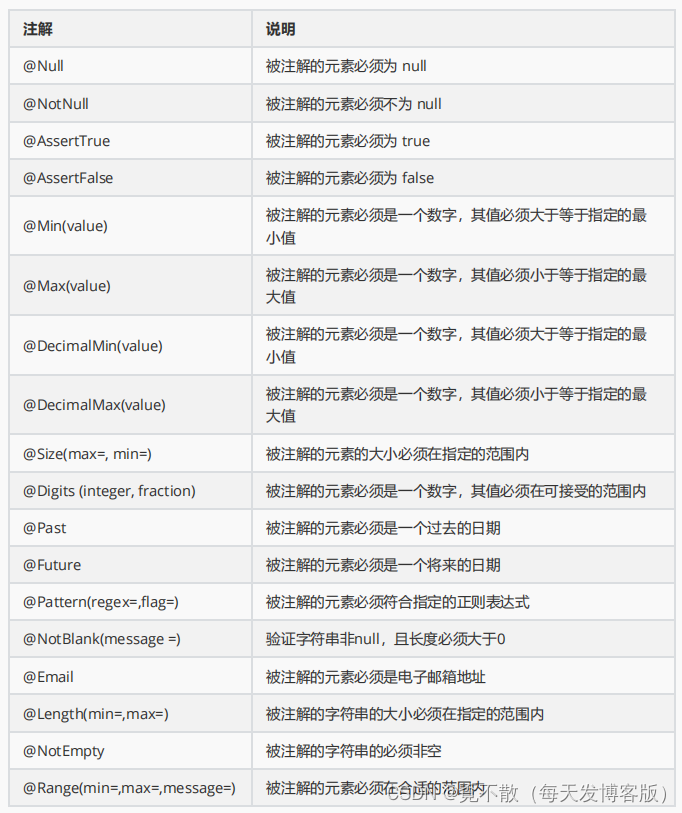
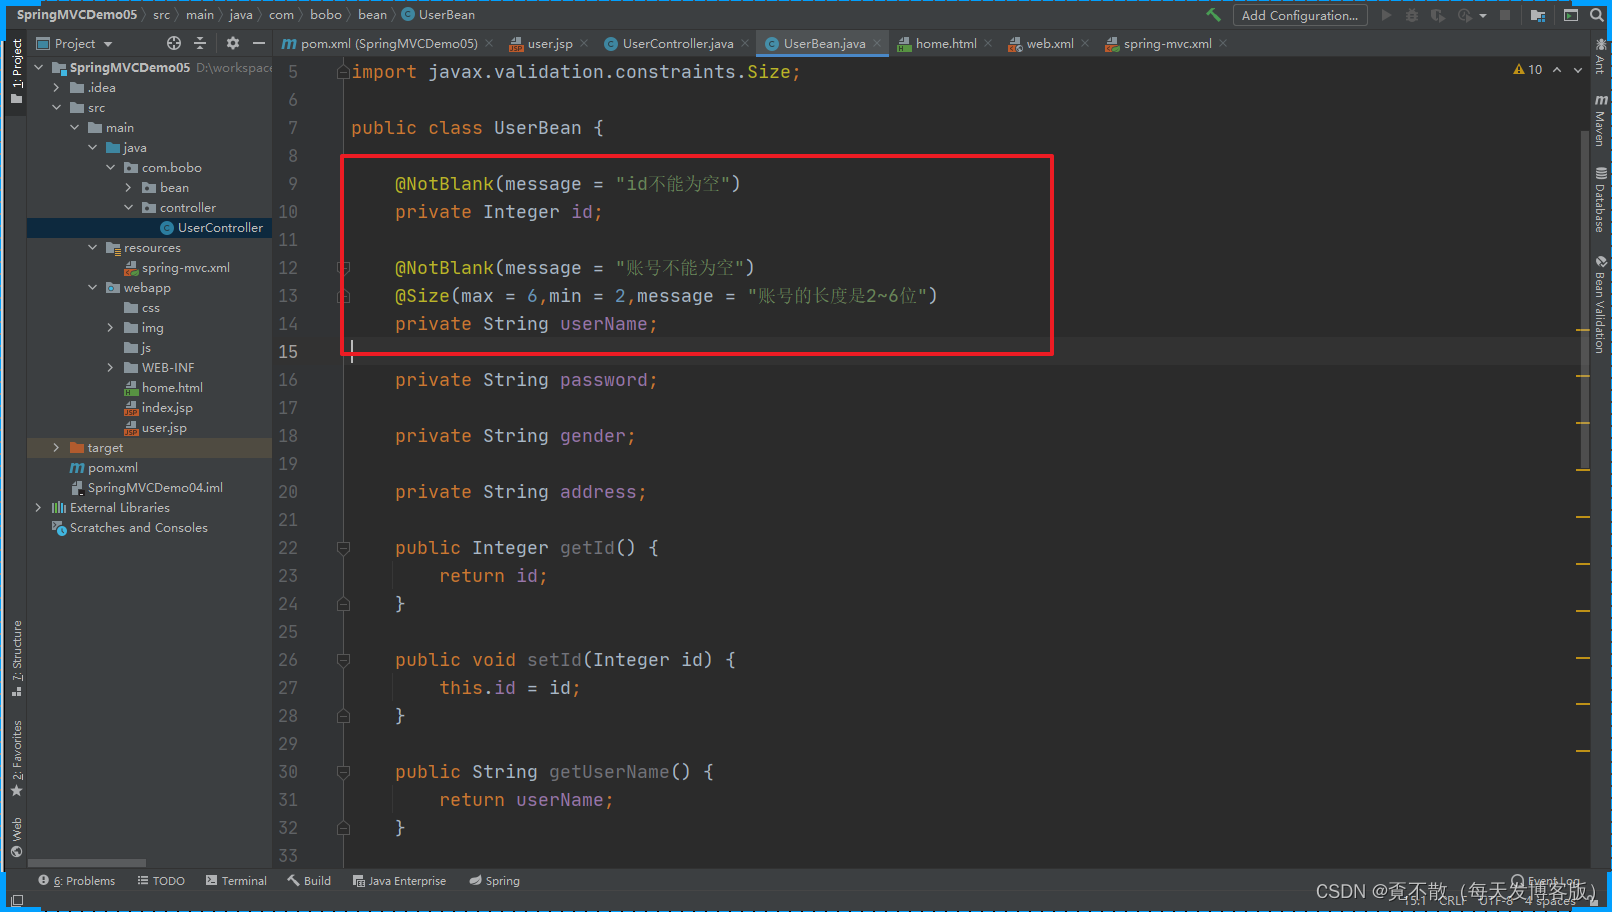
Controller设置校验
package com.bobo.controller;import com.bobo.bean.UserBean;
import org.springframework.stereotype.Controller;
import org.springframework.ui.Model;
import org.springframework.validation.BindingResult;
import org.springframework.validation.ObjectError;
import org.springframework.validation.annotation.Validated;
import org.springframework.web.bind.annotation.RequestMapping;import java.util.List;@Controller
@RequestMapping("/user")
public class UserController {/**** @param user @Validated 修饰表示user会被校验* @param br   校验的结果* @return*/@RequestMapping("/addUser")public String addUser(@Validated UserBean user, BindingResult br, Model m) {// 对客户端提交的用户数据检验/*if(user != null){if(user.getUserName().length() > 3 ){}}*/// 获取校验结果List<ObjectError> allErrors = br.getAllErrors();for (ObjectError allError : allErrors) {System.out.println(allError.getDefaultMessage());}m.addAttribute("errors",allErrors);return "/index.jsp";}
}
测试,提交的表单数据都为空的情况。

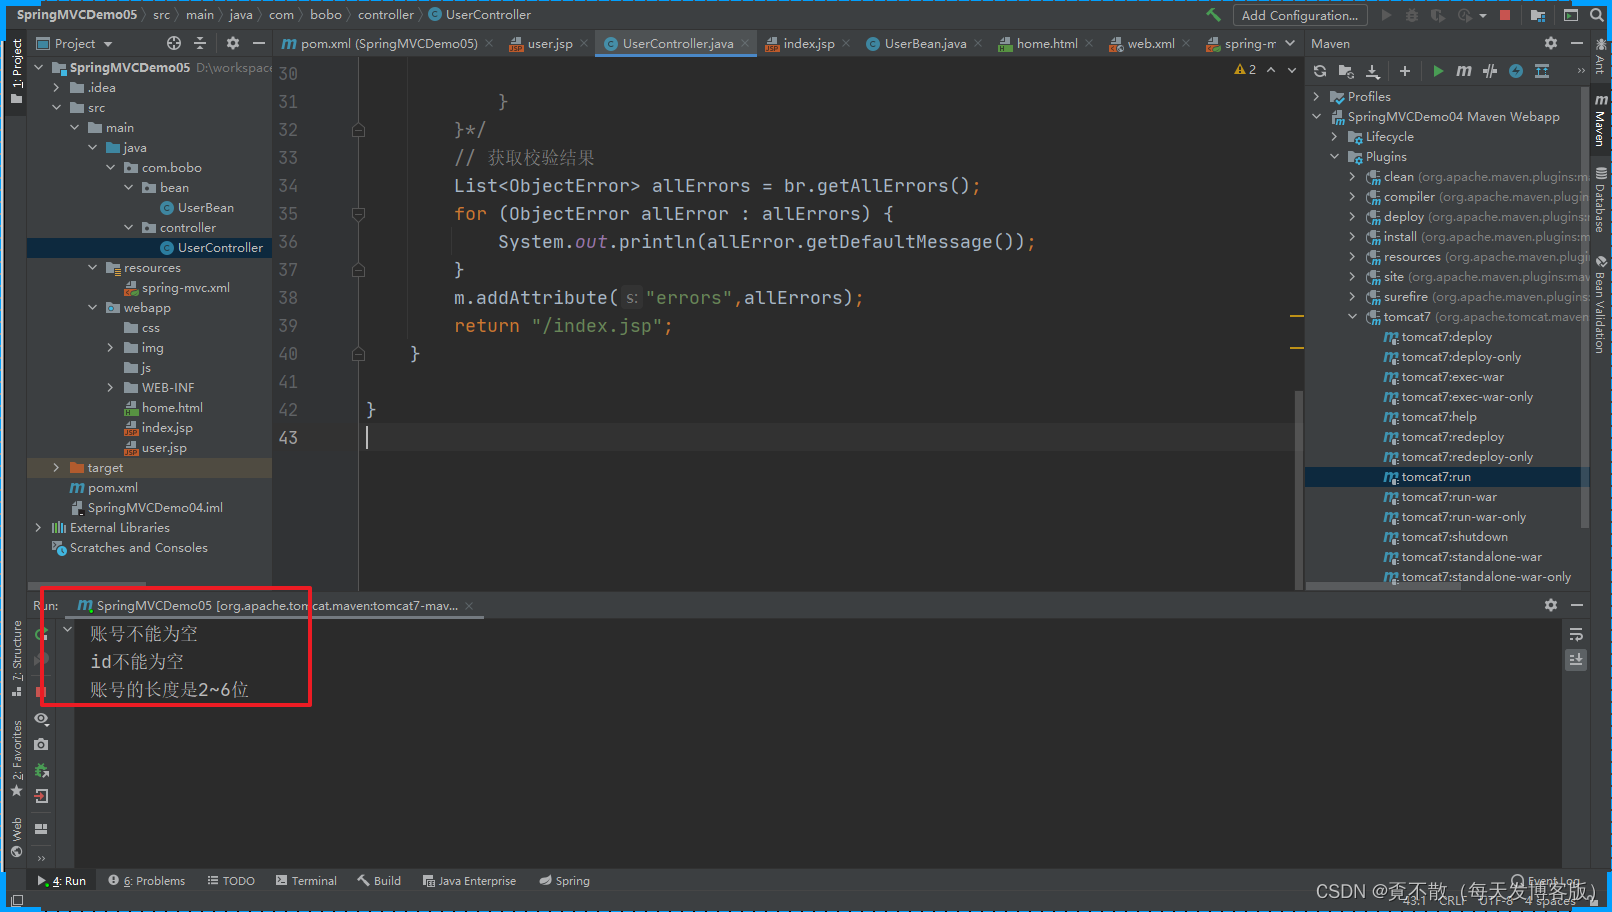
4.3 分组校验
为什么要使用分组校验
因为一个对象有多个属性,而不同的controller校验的需求是不一样的,必须c1只需要校验对象的账号是否为空就可以了,而c2不光要校验账号为空还需要校验手机号必须不能为空,这时分组校验就能解决这个问题了。实现步骤如下:
定义分组
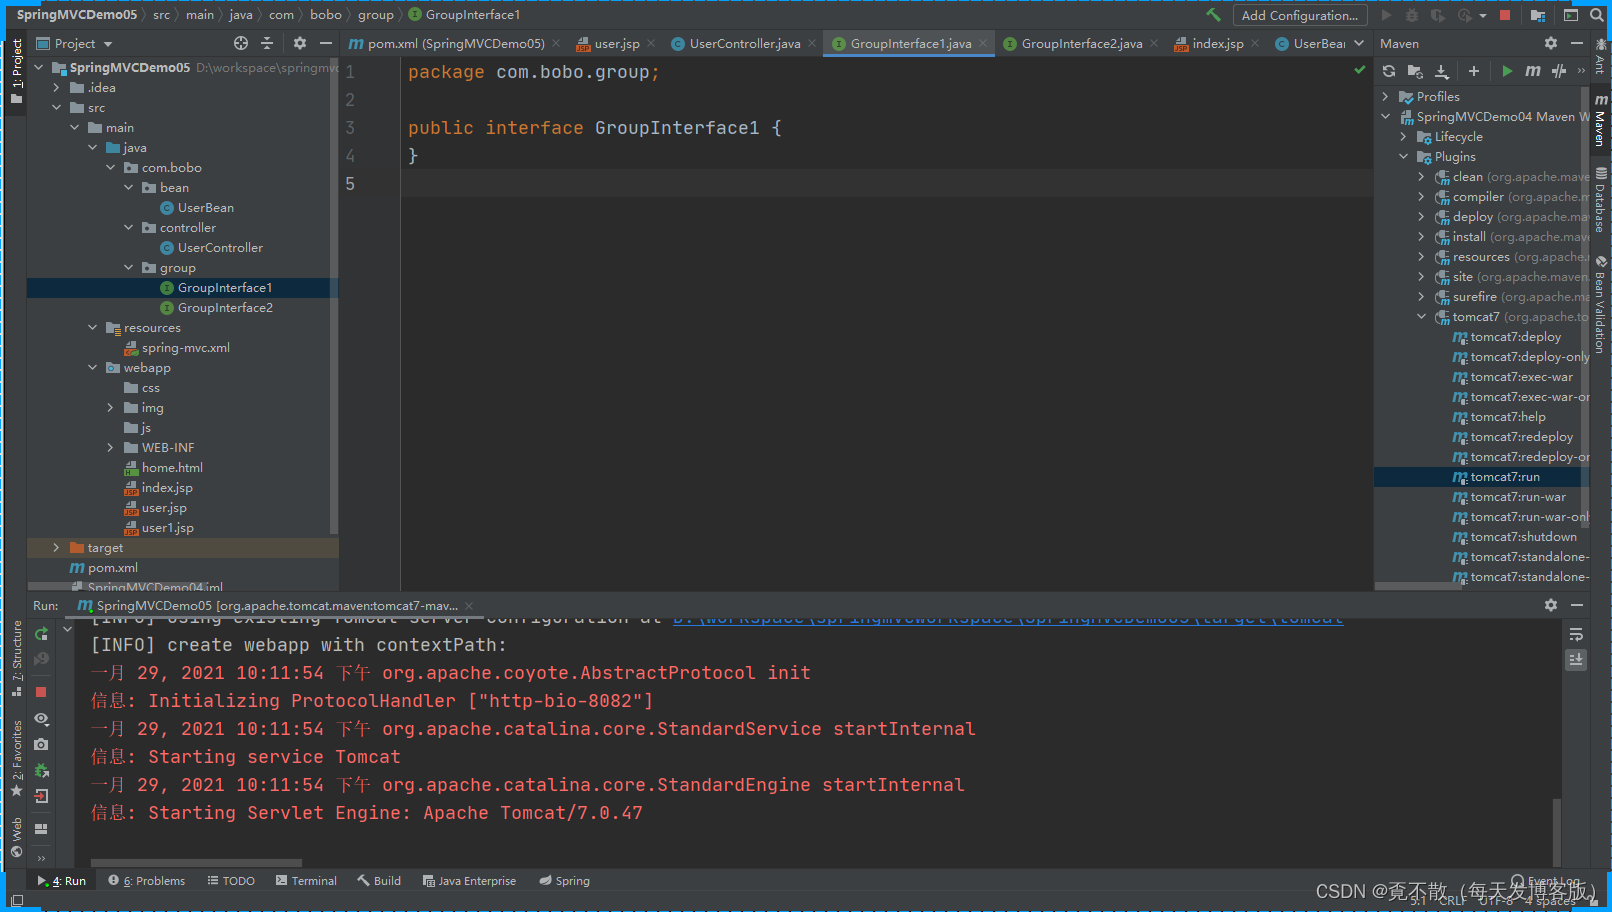
校验规则中使用分组
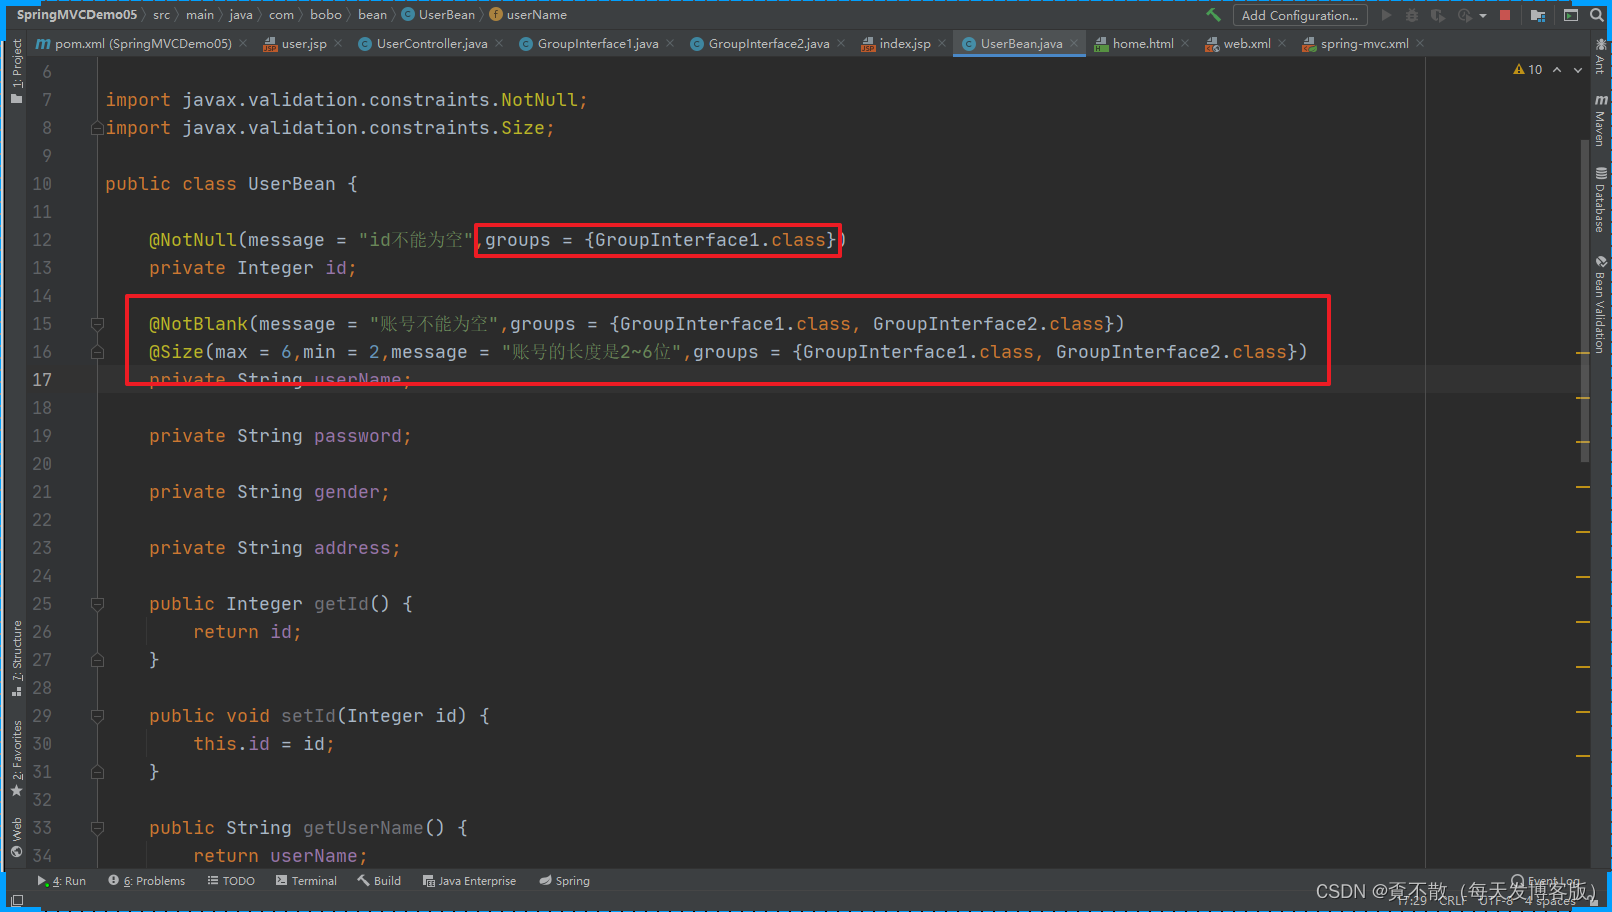
Controller中使用
package com.bobo.controller;import com.bobo.bean.UserBean;
import com.bobo.group.GroupInterface1;
import com.bobo.group.GroupInterface2;
import org.springframework.stereotype.Controller;
import org.springframework.ui.Model;
import org.springframework.validation.BindingResult;
import org.springframework.validation.ObjectError;
import org.springframework.validation.annotation.Validated;
import org.springframework.web.bind.annotation.RequestMapping;import java.util.List;@Controller
@RequestMapping("/user")
public class UserController {/**** @param user @Validated 修饰表示user会被校验* @param br   校验的结果* @return*/@RequestMapping("/addUser")public String addUser(@Validated(value = GroupInterface2.class) UserBean user, BindingResult br, Model m) {// 对客户端提交的用户数据检验/*if(user != null){if(user.getUserName().length() > 3 ){}}*/// 获取校验结果List<ObjectError> allErrors = br.getAllErrors();for (ObjectError allError : allErrors) {System.out.println(allError.getDefaultMessage());}m.addAttribute("errors",allErrors);return "/index.jsp";}@RequestMapping("/udpateUser")public String udpate(@Validated(value = GroupInterface1.class) UserBean user, BindingResult br, Model m){return "/index.jsp";}}
5.数据回写
5.1 普通实现方式
@Controller
@RequestMapping("/user")
public class UserController {@RequestMapping("/doLogin")public String doLogin(String userName, String password, Model model){model.addAttribute("userName",userName);model.addAttribute("password",password);return "forward:/login.jsp";}
}
<%--Created by IntelliJ IDEA.User: dpbDate: 2021/1/30Time: 14:14To change this template use File | Settings | File Templates.
--%>
<%@ page contentType="text/html;charset=UTF-8" language="java" %>
<html>
<head><title>Title</title>
</head>
<body><h1>登录页面</h1>获取全局配置信息:${as} <br><form action="/user/doLogin" method="post"><label>用户名:</label><input type="text" name="userName" value="${userName}"><br><label>密码:</label><input type="text" name="password" value="${password}"><br><input type="submit" value="提交"></form>
</body>
</html>

5.2 通过Model方式实现
如果使用对象去接收客户端传递的参数,那么对象默认会被自动放到Model中(Request作用域中),在前端页面可以直接使用对象的数据。这样开发效率会更高。
/*** 如果我们用对象去接收请求传递的参数。* 那么该对象默认会被保存到Model对象中* model.addAttribute("userBean",user)* @param user* @return*/@RequestMapping("/addUser")public String addUser(UserBean user) {System.out.println(user);return "/user.jsp";} 前端页面中的信息
<%--Created by IntelliJ IDEA.User: dpbDate: 2021/1/29Time: 20:03To change this template use File | Settings | File Templates.
--%>
<%@ page contentType="text/html;charset=UTF-8" language="java" %>
<html>
<head><title>Title</title>
</head>
<body>
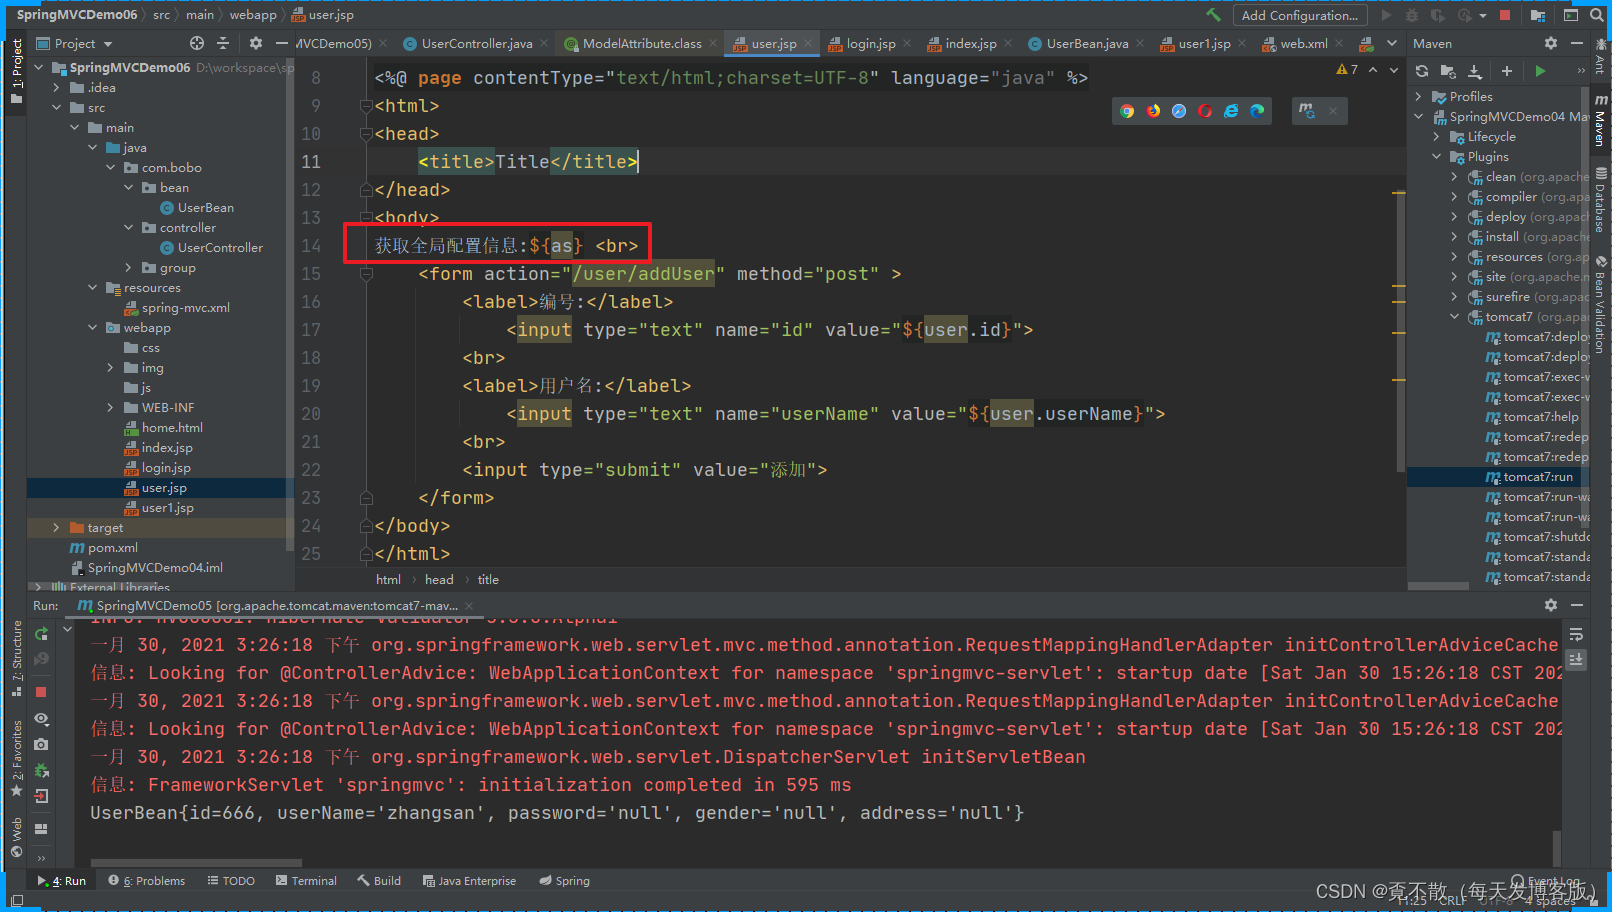
获取全局配置信息:${as} <br><form action="/user/addUser" method="post" ><label>编号:</label><input type="text" name="id" value="${user.id}"><br><label>用户名:</label><input type="text" name="userName" value="${user.userName}"><br><input type="submit" value="添加"></form>
</body>
</html>
效果

5.3 @ModelAttribute注解的实现
修改参数回写变量名
在需要回传的对象前添加@ModelAttribute注解可以设置对象在Model中的key值。实现更加灵活的操作。
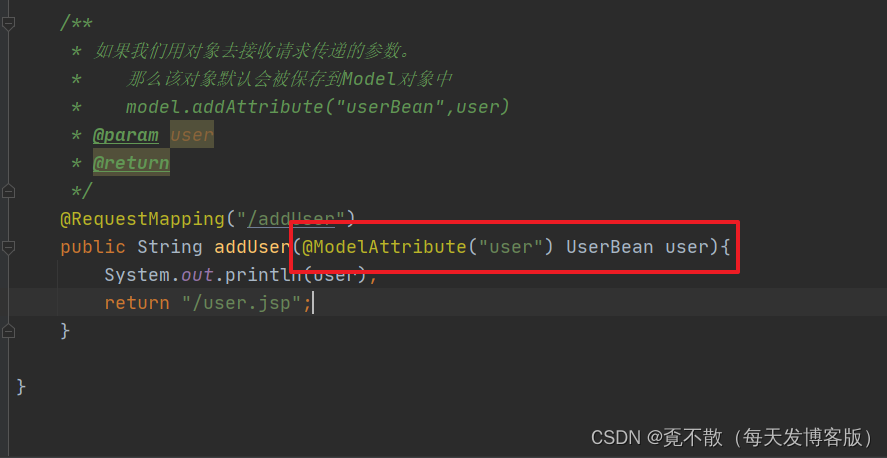
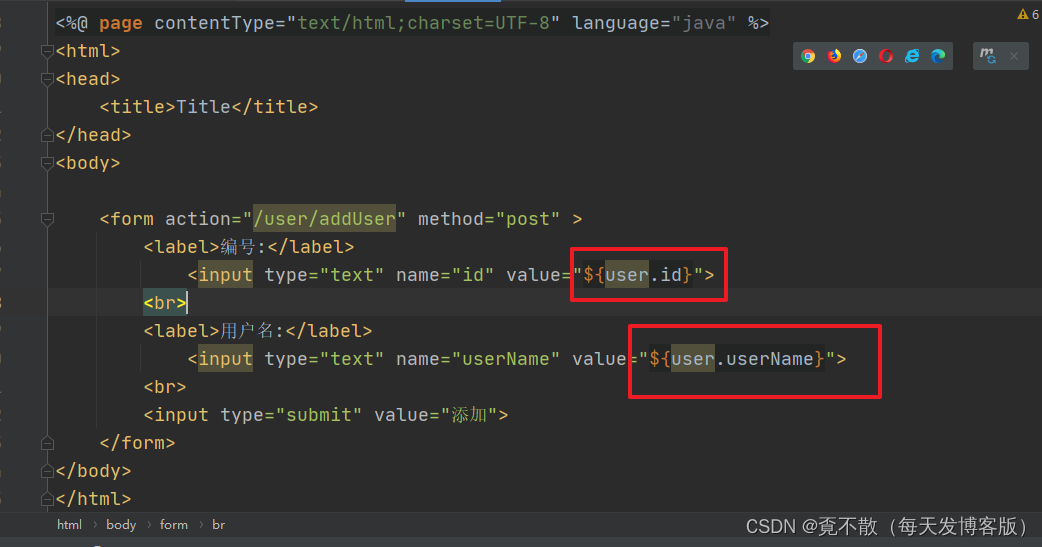
配置全局变量名
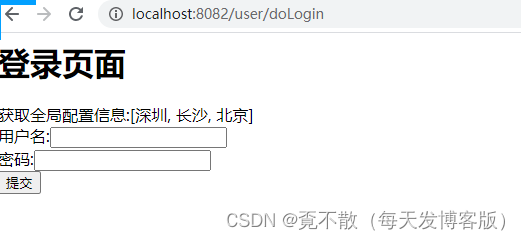
/*** 配置全局的信息* 该类中的其他方法在处理请求后都会绑定本方法的返回信息* @return*/@ModelAttribute("as")public List<String> getAllAddress(){return Arrays.asList("深圳","长沙","北京");}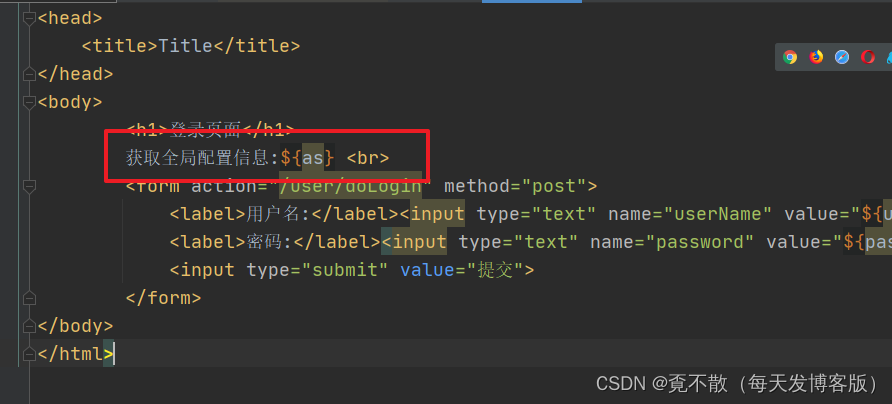

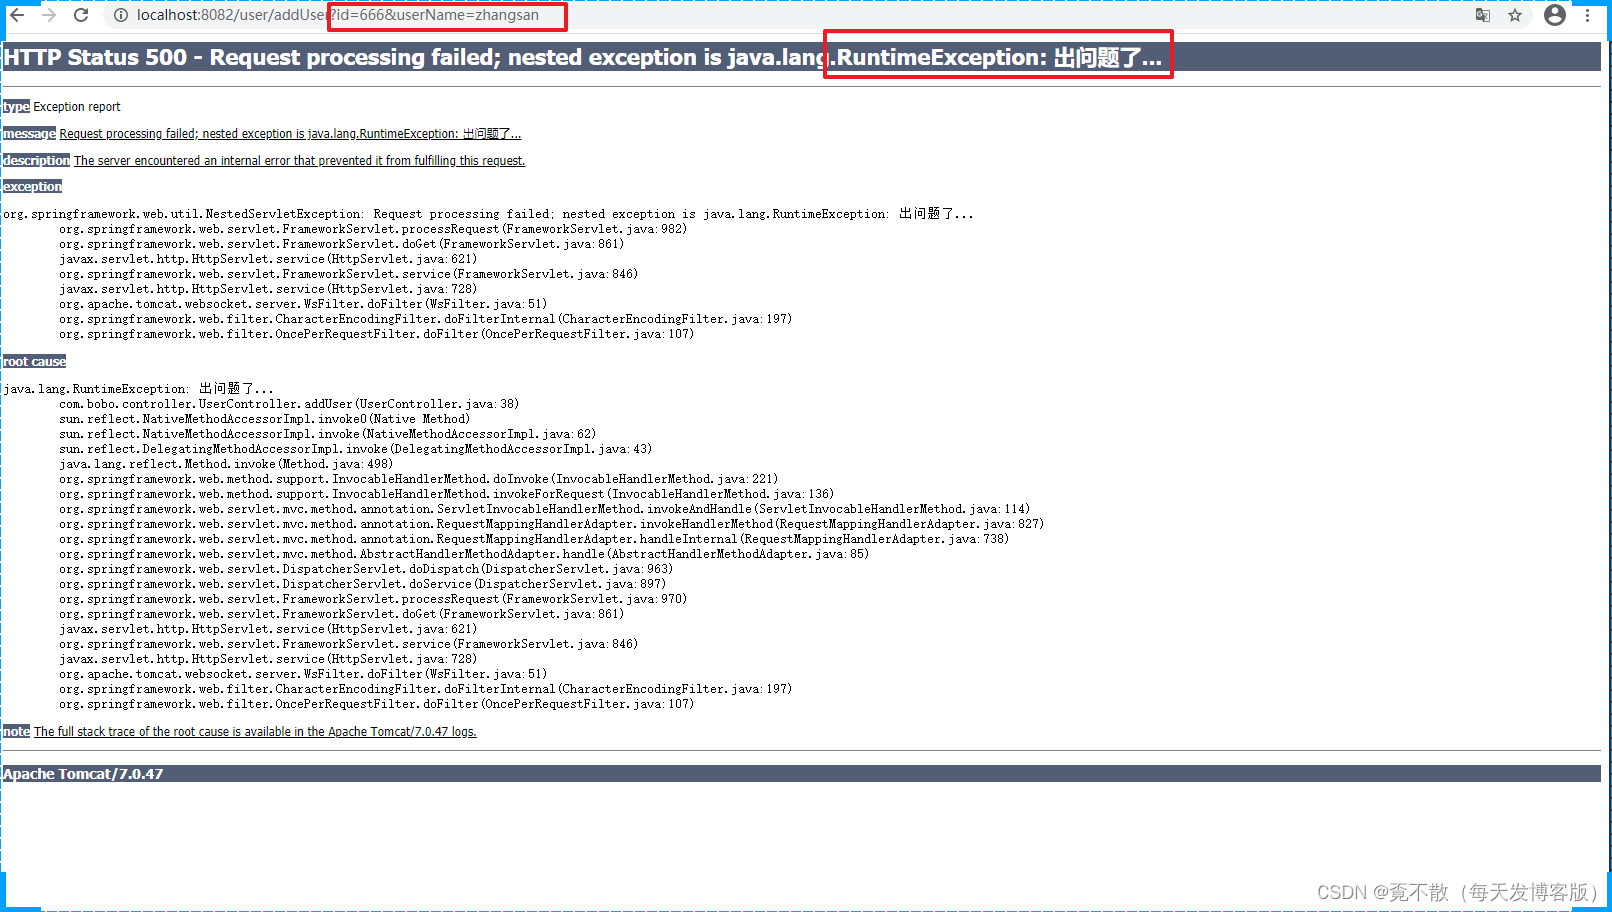
6.异常处理
如果我们对系统没有做统一的异常管理,那么当系统抛出异常信息的时候会给客户很不好的体验。
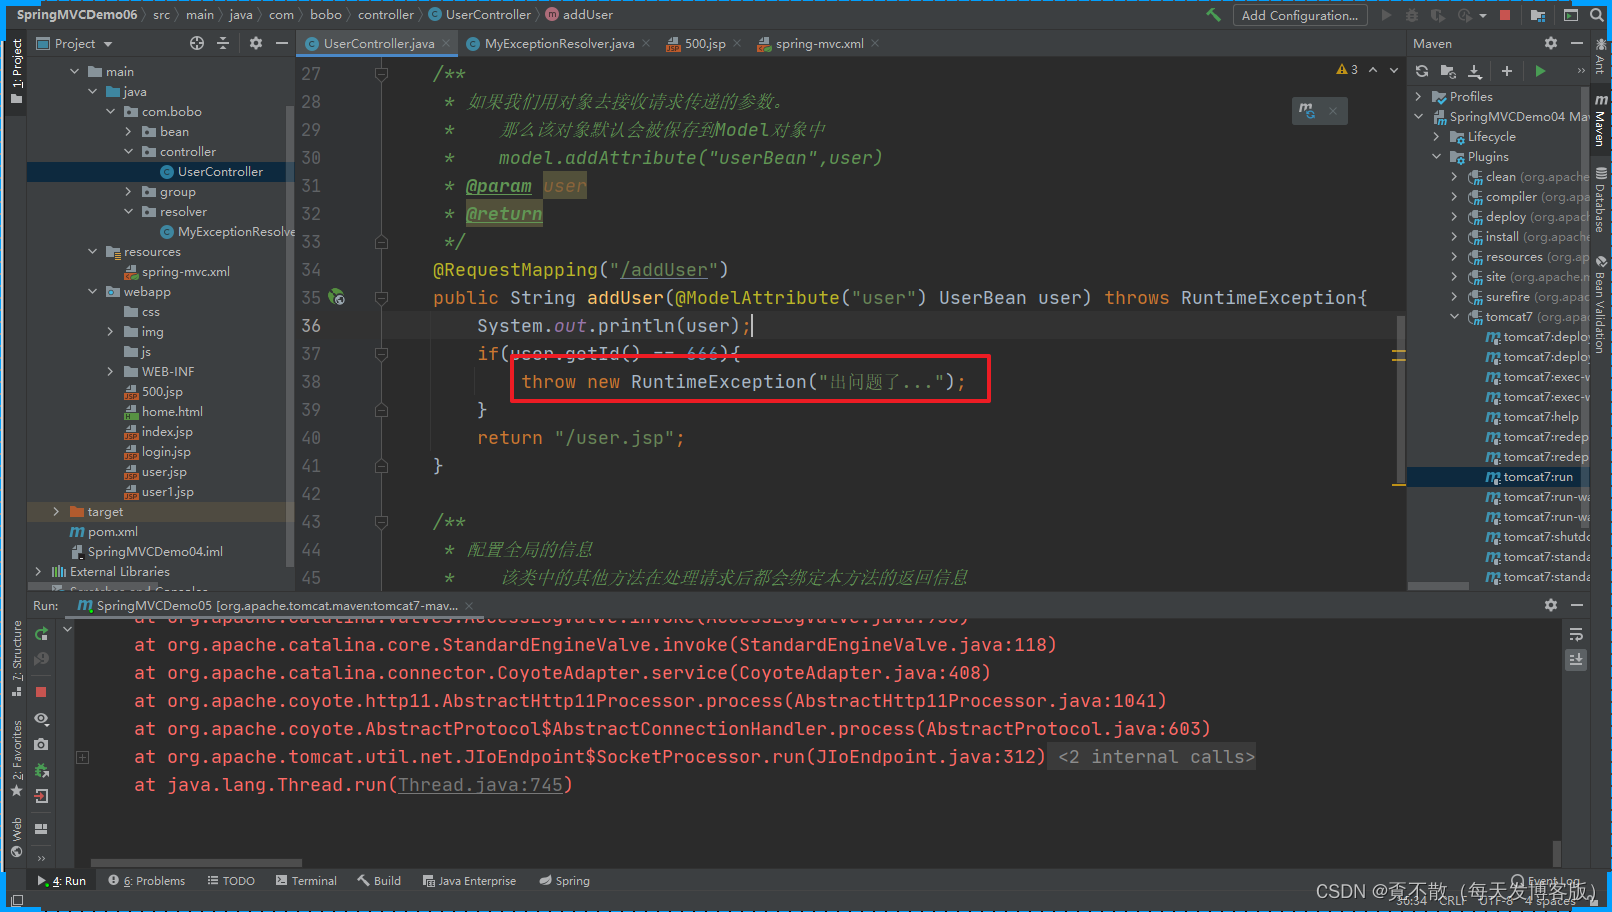
全局异常处理器处理
package com.bobo.resolver;import org.springframework.stereotype.Component;
import org.springframework.web.servlet.HandlerExceptionResolver;
import org.springframework.web.servlet.ModelAndView;import javax.servlet.http.HttpServletRequest;
import javax.servlet.http.HttpServletResponse;/*** 全局异常处理器*/
@Component
public class MyExceptionResolver implements HandlerExceptionResolver {/*** 处理异常* @param httpServletRequest* @param httpServletResponse* @param o* @param e* @return*/@Overridepublic ModelAndView resolveException(HttpServletRequest httpServletRequest, HttpServletResponse httpServletResponse, Object o, Exception e) {System.out.println(e.getMessage());ModelAndView mm = new ModelAndView();mm.setViewName("/500.jsp");return mm;}
}
不要忘了添加扫描路径

这时再抛出异常看到的就是我们自定义的错误页面了。

7.JSON数据操作

7.1 响应JSON数据
我们在本课程中使用的是Jackson.
添加依赖
<dependency><groupId>com.fasterxml.jackson.core</groupId><artifactId>jackson-core</artifactId><version>2.5.2</version>
</dependency>
<dependency><groupId>com.fasterxml.jackson.core</groupId><artifactId>jackson-databind</artifactId><version>2.5.2</version>
</dependency>
控制层中响应数据
@Controller
@RequestMapping("/person")
public class PersonController {@RequestMapping("/getUser")@ResponseBodypublic UserBean getUser(){UserBean user = new UserBean();user.setId(666);user.setUserName("波波");user.setGender("男");user.setAddress("湖南长沙");return user;}
}
@RequestMapping("/getAllUser")@ResponseBodypublic List<UserBean> getAllUser(){UserBean user = new UserBean();user.setId(666);user.setUserName("波波");user.setGender("男");user.setAddress("湖南长沙");UserBean user2 = new UserBean();user2.setId(123);user2.setUserName("波波1");user2.setGender("男1");user2.setAddress("湖南长沙1");List<UserBean> list = new ArrayList<>();list.add(user);list.add(user2);return list;}

通过以上案例可知,我们返回的任意的Java对象数据Jackson都会将其转换为JSON数据。
注意:
对于Gson和Jackson这两个json处理依赖,直接添加即可。 除此之外,其他的JSON解析器如Fastjson都需要手动配置HttpMessageConverter.
实际上,在SpringMVC中,是由一个名叫HttpMessageConverter的类来提供对象到JSON字符串的转换的。而SpringMVC默认就提供了Gson和Jackson的HttpMessageConverter,分别是org.springframework.http.converter.json.GsonHttpMessageConverter和MappingJackson2HttpMessageConverter。对于其他的JSON解析器,只需要开发者手动配置一
下HttpMessageConverter即可。
本案例使用 Jackson处理
FastJSON的配置案例:
<mvc:annotation-driven validator="validatorFactoryBean"><mvc:message-converters><beanclass="com.alibaba.fastjson.support.spring.FastJsonHttpMessageConverter"></bean></mvc:message-converters></mvc:annotation-driven>7.2 接收JSON数据
注意:JSON只能是在请求体中,因此JSON只能放在POST获取PUT请求中。
/*** 客户端发送的是JSON格式的字符串* @param user*/@RequestMapping("/addUser2")@ResponseBodypublic void addUser2(@RequestBody UserBean user){System.out.println(user);} 通过JQuery的ajax发送json数据
<%--Created by IntelliJ IDEA.User: dpbDate: 2021/1/30Time: 16:23To change this template use File | Settings | File Templates.
--%>
<%@ page contentType="text/html;charset=UTF-8" language="java" %>
<html>
<head><title>Title</title><script src="https://s3.pstatp.com/cdn/expire-1-M/jquery/3.3.1/jquery.min.js"></script>
</head>
<body>
<input type="button" value="提交JSON数据" onclick="fun1();">
<script type="text/javascript">function fun1(){$.ajax({type: 'POST',url: "person/addUser2",contentType: "application/json",//如果想以json格式把数据提交到后台的话,这个必须有,否则只会当做表单提交data: JSON.stringify({"userName":"bobo","password":"12345"}),//JSON.stringify()必须有,否则只会当做表单的格式提交dataType: "json",//期待返回的数据类型success: function(data){alert("success:"+data);},error:function(data){alert("error"+data);}});}
</script>
</body>
</html>
测试,当我们点击提交按钮,会把JSON数据发送给服务器,Jackson会将我们的JSON字符串转换为UserBean对象。

8、Restful风格
RESTful是一种软件设计规范,是客户端和服务端进行数据交互的一个规范。 早期使用JSP页面开发网页时,数据交互基本都是通过表单提交,然后通过内置对象传递。当HTML5兴起,移动互联网兴起,网站后端服务,不仅要考虑PC端的网页,也要考虑移动端数据的展示、小程序、HTML5页面等。如果需要多个终端(Android、iOS、小程序、Pad、HTML5页面)共用一个后端,一般来说主流方案就是使用JSON进行传递。RESTful则规范了请求的URL,注意RESTful只是一个规范,不是一个技术。
在RESTful中:
1. 一个URL操作一个资源。
2. 请求的URL中不能有动词。
3. 使用HTTP的请求方式来描述请求行为,例如:

在RESTful接口中,所有的方法都是返回JSON,没有返回页面的(ModelAndView),因此,所有的方法上都需要添加@ResponseBody注解。一个替代的简化方案,是使用 @RestController 代替@Controller。@RestController实际上是一个组合注解,是@Controller和@ResponseBody的组合:
@Target({ElementType.TYPE})
@Retention(RetentionPolicy.RUNTIME)
@Documented
@Controller
@ResponseBody
public @interface RestController {String value() default "";
}
Restful风格是使用

控制器中的编码
package com.bobo.controller;import com.bobo.bean.UserBean;
import org.springframework.stereotype.Controller;
import org.springframework.web.bind.annotation.*;import java.util.ArrayList;
import java.util.List;/*** Restful风格编程介绍*/
/*@ResponseBody
@Controller*/
@RestController
public class StudentController {/*** 查询用户的方法* 基于Restf风格的规范,该请求只能接受GET方式提交的请求* @return*///@RequestMapping("/getAll")@GetMapping("/stus/{id}")//@RequestMapping(value = "/stus",method = RequestMethod.POST)public List<UserBean> getAllUser(@PathVariable Integer id){System.out.println("查询数据--->"+id);List<UserBean> list = new ArrayList<>();list.add(new UserBean(1,"root","123456"));list.add(new UserBean(2,"admin","123456"));return list;}/*** 添加用户数据*    接受POST方式提交* @param user* @return*/@PostMapping("/stus")public String  addUser(@RequestBody UserBean user){System.out.println("添加数据"+user);return "数据添加成功...";}@DeleteMapping("/stus/{id}")public String deleteUser(@PathVariable Integer id){System.out.println("删除的编号:" + id);return "删除数据成功...";}@PutMapping("/stus")public String updateUser(@RequestBody UserBean user){System.out.println("更新数据:" + user);return "更新数据成功...";}
}
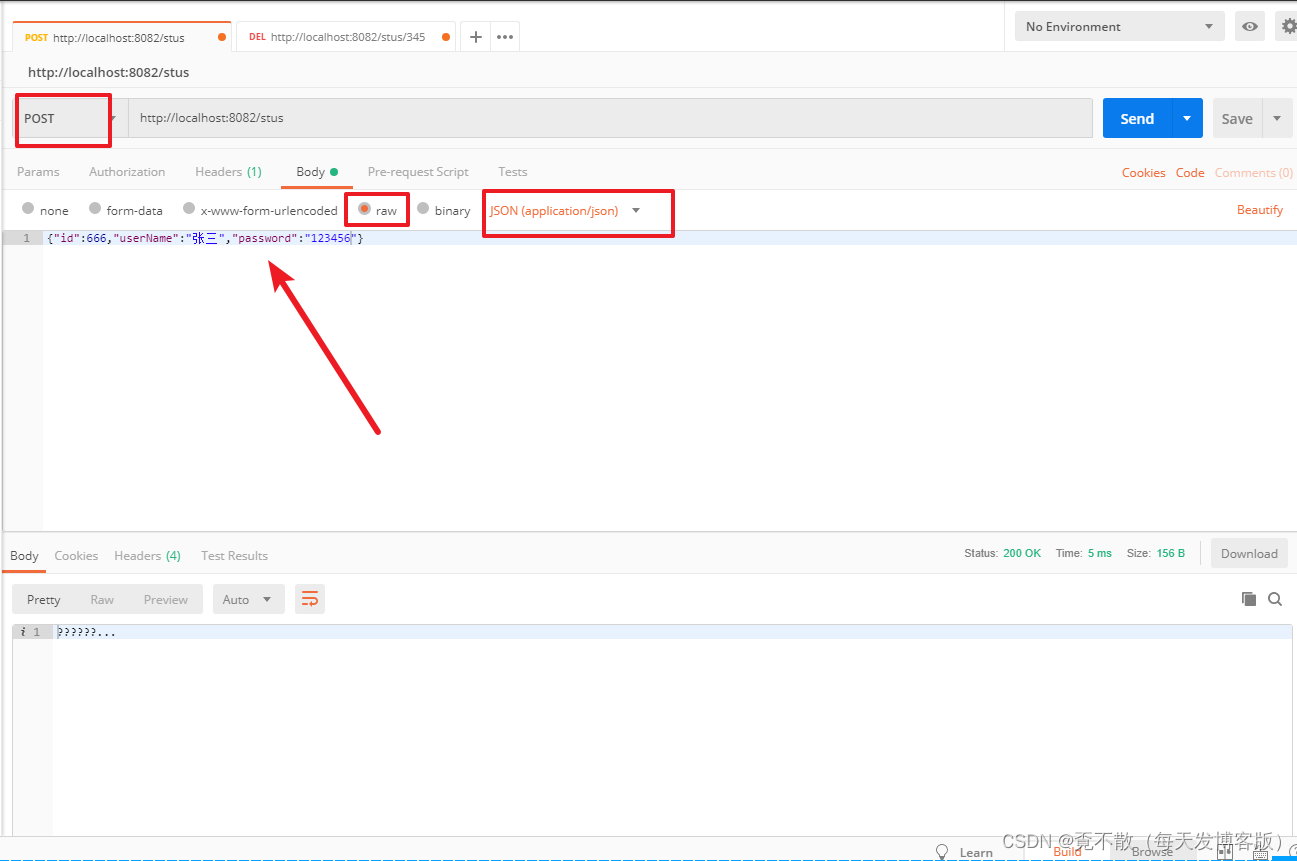
POSTMan中的提交设置
9、拦截器
9.1 简介
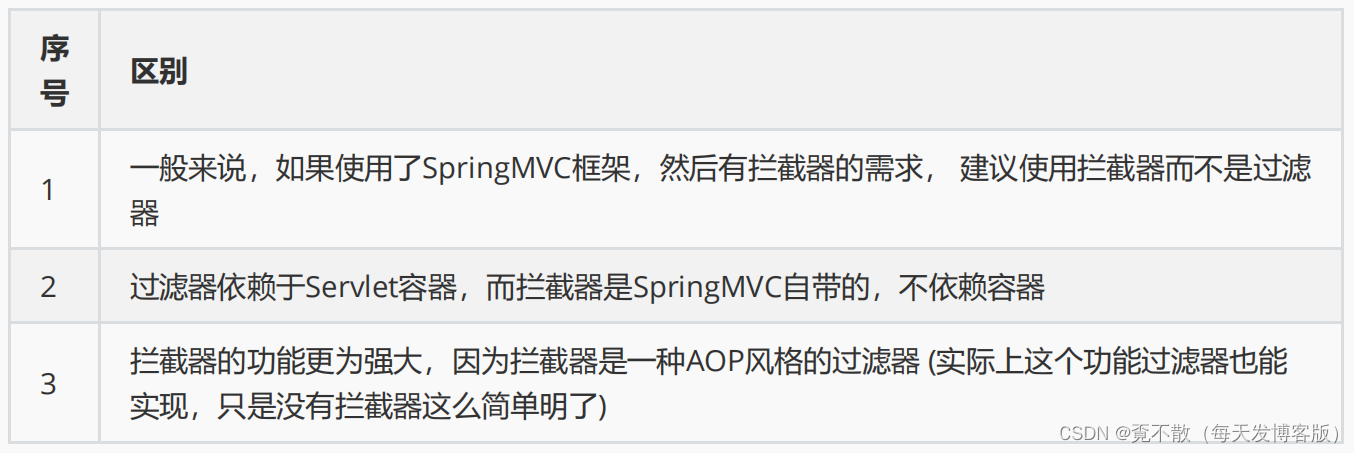
SpringMVC中的拦截器对应了Web基础中的过滤器。
拦截器和过滤器的区别:
9.2 使用
创建拦截器
package com.bobo.interceptor;import org.springframework.web.servlet.HandlerInterceptor;
import org.springframework.web.servlet.ModelAndView;import javax.servlet.http.HttpServletRequest;
import javax.servlet.http.HttpServletResponse;/*** 自定义的拦截器*/
public class MyInterceptor implements HandlerInterceptor {/*** 自定义处理器处理请求之前执行的方法* @param httpServletRequest* @param httpServletResponse* @param o* @return*    true 表示放过请求*    false 表示拦截请求* @throws Exception*/@Overridepublic boolean preHandle(HttpServletRequest httpServletRequest, HttpServletResponse httpServletResponse, Object o) throws Exception {System.out.println("preHandle .... ");return true;}/*** 在目标方法执行完成后执行的方法* postHandle 在afterCompletion之前执行*    返回ModelAndView之前执行*    我们可以修改ModelAndView中的信息* @param httpServletRequest* @param httpServletResponse* @param o* @param modelAndView* @throws Exception*/@Overridepublic void postHandle(HttpServletRequest httpServletRequest, HttpServletResponse httpServletResponse, Object o,ModelAndView modelAndView) throws Exception {System.out.println("ModelAndView执行之前操作...");modelAndView.setViewName("/index.jsp");System.out.println("postHandle ....");}/*** 在目标方法执行完成后执行的方法*    返回ModelAndView之后执行*    改变不了ModelAndView中的信息*    只能做一些资源回收相关的工作* @param httpServletRequest* @param httpServletResponse* @param o* @param e* @throws Exception*/@Overridepublic void afterCompletion(HttpServletRequest httpServletRequest, HttpServletResponse httpServletResponse, Object o, Exception e) throws Exception {System.out.println("afterCompletion ... ");}
}
需要将自定义的拦截器添加到IoC容器中,修改配置文件。
<?xml version="1.0" encoding="UTF-8"?>
<beans xmlns="http://www.springframework.org/schema/beans"xmlns:xsi="http://www.w3.org/2001/XMLSchema-instance"xmlns:context="http://www.springframework.org/schema/context"xmlns:mvc="http://www.springframework.org/schema/mvc"xsi:schemaLocation="http://www.springframework.org/schema/beanshttp://www.springframework.org/schema/beans/spring-beans.xsdhttp://www.springframework.org/schema/contexthttp://www.springframework.org/schema/context/spring-context.xsdhttp://www.springframework.org/schema/mvchttp://www.springframework.org/schema/mvc/spring-mvc.xsd
"><!-- 添加对应的扫描路径 --><context:component-scan base-package="com.bobo.controller,com.bobo.resolver"/><!-- 开启Spring MVC 注解的使用方式 --><mvc:annotation-driven  /><!-- 配置自定义的拦截器 --><mvc:interceptors><mvc:interceptor><!-- ;拦截的映射地址  /** 表示拦截根目录及其子目录下的所有的请求 --><mvc:mapping path="/user/**"/><bean class="com.bobo.interceptor.MyInterceptor" /></mvc:interceptor></mvc:interceptors></beans>
拦截器工作原理

四、Spring MVC 整合Spring框架
1.整合实现步骤
1.1 创建Web项目
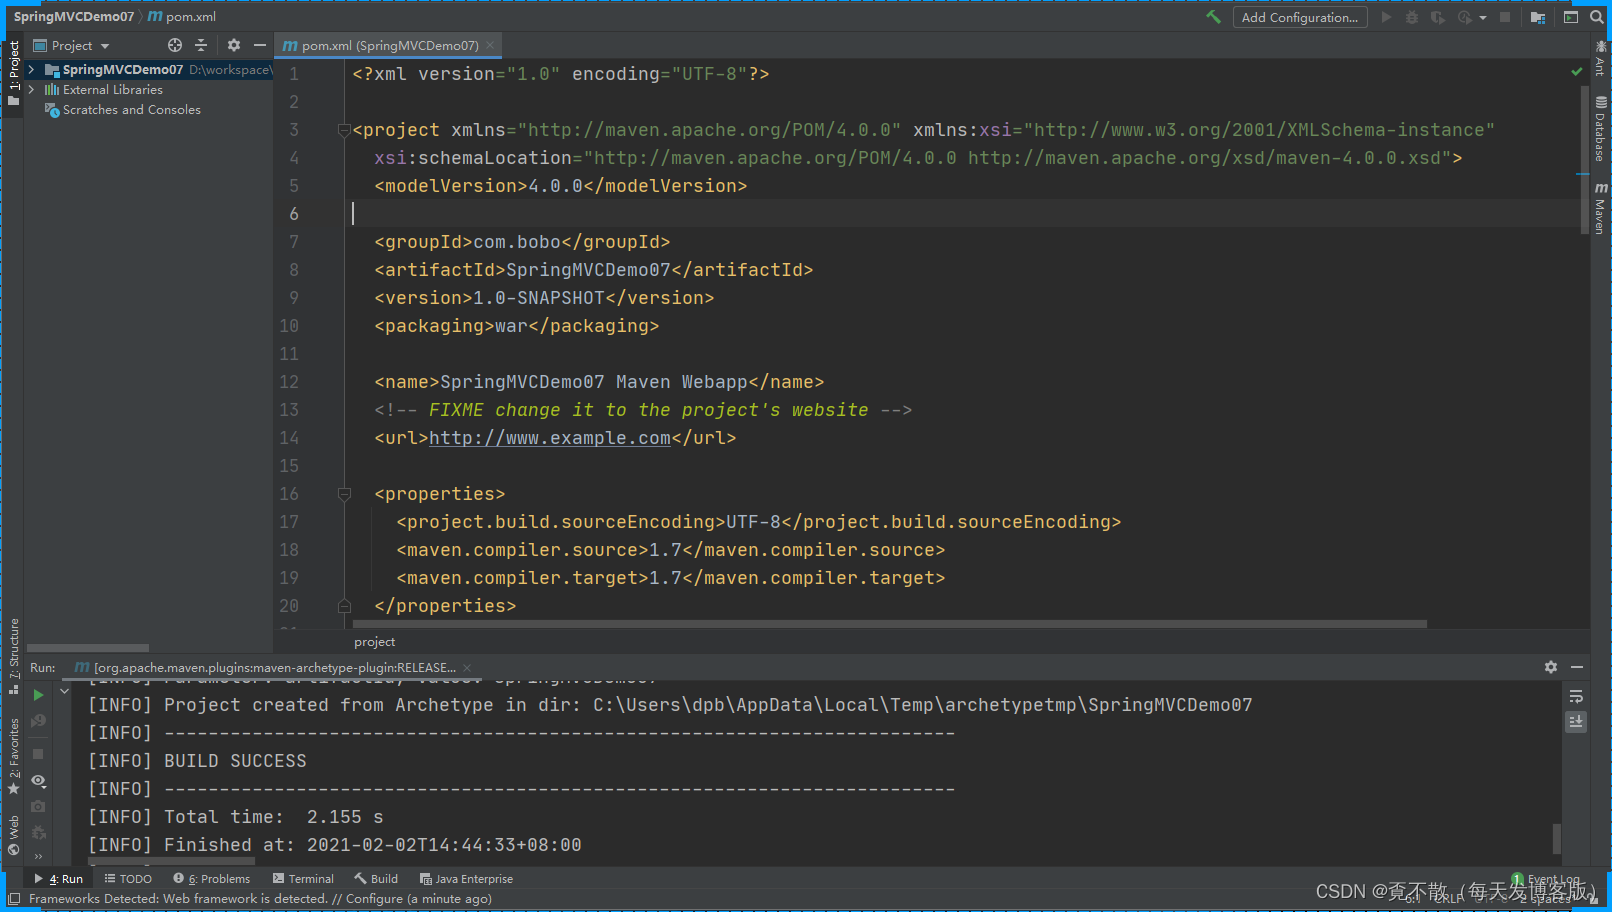
补全相关的目录结构

1.2 添加相关的依赖
我们需要在pom文件中添加对应的依赖。
<dependency><groupId>org.springframework</groupId><artifactId>spring-webmvc</artifactId><version>4.3.4.RELEASE</version>
</dependency>
<dependency><groupId>javax.servlet</groupId><artifactId>servlet-api</artifactId><version>2.5</version><scope>provided</scope>
</dependency>
1.3 添加Spring的配置文件
在Spring的配置文件中添加扫描路径。
<?xml version="1.0" encoding="UTF-8"?>
<beans xmlns="http://www.springframework.org/schema/beans"xmlns:xsi="http://www.w3.org/2001/XMLSchema-instance"xmlns:context="http://www.springframework.org/schema/context"xsi:schemaLocation="http://www.springframework.org/schema/beanshttp://www.springframework.org/schema/beans/spring-beans.xsdhttp://www.springframework.org/schema/contexthttp://www.springframework.org/schema/context/spring-context.xsd
"><!-- 配置扫描路径 --><context:component-scan base-package="com.bobo.service.impl,com.bobo.dao.impl"use-default-filters="true"><!-- 排除掉Controller注解的使用 --><context:exclude-filter type="annotation" expression="org.springframework.stereotype.Controller"/></context:component-scan></beans>
1.4 添加Spring MVC的配置文件
在Spring MVC 的配置文件中添加扫描和开启注解的使用。
<?xml version="1.0" encoding="UTF-8"?>
<beans xmlns="http://www.springframework.org/schema/beans"xmlns:xsi="http://www.w3.org/2001/XMLSchema-instance"xmlns:context="http://www.springframework.org/schema/context"xmlns:mvc="http://www.springframework.org/schema/mvc"xsi:schemaLocation="http://www.springframework.org/schema/beanshttp://www.springframework.org/schema/beans/spring-beans.xsdhttp://www.springframework.org/schema/contexthttp://www.springframework.org/schema/context/spring-context.xsdhttp://www.springframework.org/schema/mvchttp://www.springframework.org/schema/mvc/spring-mvc.xsd
"><!-- 配置扫描路径 --><context:component-scan base-package="com.bobo.controller" use-default-filters="false" ><context:include-filter type="annotation" expression="org.springframework.stereotype.Controller"/></context:component-scan><!-- 开启注解 --><mvc:annotation-driven ></mvc:annotation-driven>
</beans>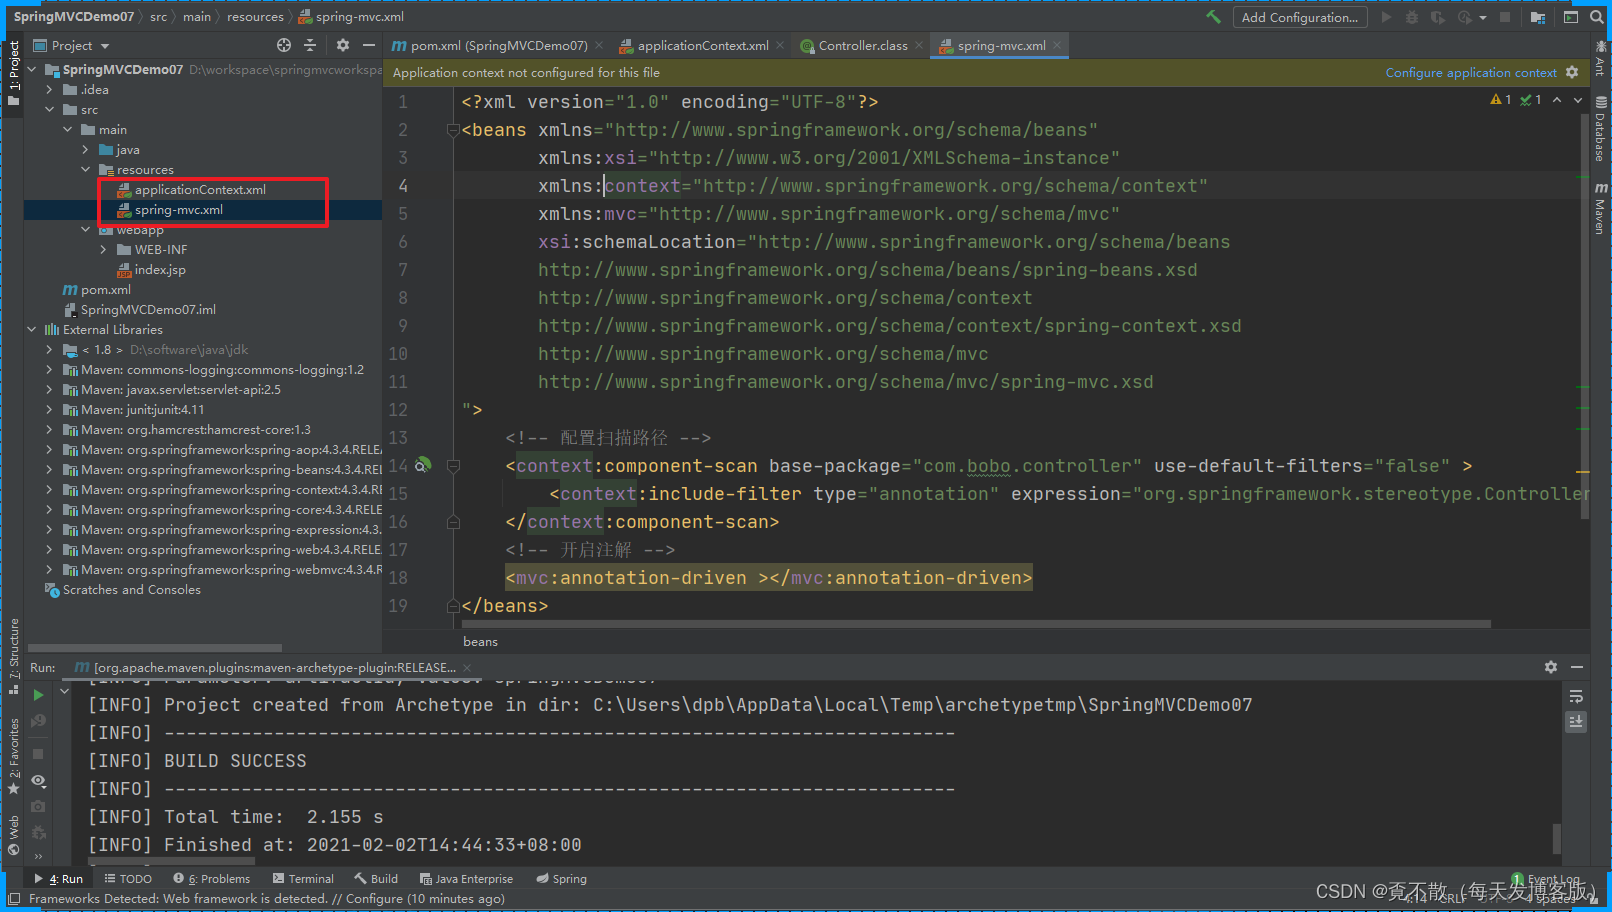
1.5 添加Tomcat的插件
<plugins><!-- tomcat插件 --><plugin><groupId>org.apache.tomcat.maven</groupId><artifactId>tomcat7-maven-plugin</artifactId><version>2.2</version><configuration><!-- 端口号 --><port>8082</port><!-- /表示访问路径 省略项目名 --><path>/</path><!-- 设置编码方式 --><uriEncoding>utf-8</uriEncoding></configuration></plugin></plugins>1.6 web.xml文件的配置
<!DOCTYPE web-app PUBLIC"-//Sun Microsystems, Inc.//DTD Web Application 2.3//EN""http://java.sun.com/dtd/web-app_2_3.dtd" ><web-app  version="2.5"xmlns="http://java.sun.com/xml/ns/javaee"xmlns:xsi="http://www.w3.org/2001/XMLSchema-instance"xsi:schemaLocation="http://java.sun.com/xml/ns/javaeehttp://java.sun.com/xml/ns/javaee/web-app_2_5.xsd"><display-name>Archetype Created Web Application</display-name><!-- 配置Spring --><context-param><param-name>contextConfigLocation</param-name><param-value>classpath:applicationContext.xml</param-value></context-param><listener><listener-class>org.springframework.web.context.ContextLoaderListener</listener-class></listener><!-- 配置Servlet的前端控制器 --><servlet><servlet-name>springmvc</servlet-name><servlet-class>org.springframework.web.servlet.DispatcherServlet</servlet-class><!-- 关联自定义的Spring MVC的配置文件 --><init-param><param-name>contextConfigLocation</param-name><param-value>classpath:spring-mvc.xml</param-value></init-param></servlet><servlet-mapping><servlet-name>springmvc</servlet-name><!-- 支持Restful风格编程 --><url-pattern>/</url-pattern></servlet-mapping><!-- 配置字符编码的过滤器 --><!-- 配置设置编码的过滤器 --><filter><filter-name>encodingFilter</filter-name><filter-class>org.springframework.web.filter.CharacterEncodingFilter</filter-class><init-param><param-name>encoding</param-name><param-value>UTF-8</param-value></init-param><init-param><param-name>forceRequestEncoding</param-name><param-value>true</param-value></init-param><init-param><param-name>forceResponseEncoding</param-name><param-value>true</param-value></init-param></filter><filter-mapping><filter-name>encodingFilter</filter-name><url-pattern>/*</url-pattern></filter-mapping><!-- default 防止静态资源拦截 --><servlet-mapping><servlet-name>default</servlet-name><url-pattern>*.html</url-pattern></servlet-mapping><servlet-mapping><servlet-name>default</servlet-name><url-pattern>*.css</url-pattern></servlet-mapping><servlet-mapping><servlet-name>default</servlet-name><url-pattern>*.js</url-pattern></servlet-mapping><servlet-mapping><servlet-name>default</servlet-name><url-pattern>*.jpg</url-pattern></servlet-mapping><servlet-mapping><servlet-name>default</servlet-name><url-pattern>*.png</url-pattern></servlet-mapping>
</web-app>
1.7创建对应的逻辑代码
创建JavaBean对象
package com.bobo.bean;public class UserBean {private Integer id;private String userName;public Integer getId() {return id;}public void setId(Integer id) {this.id = id;}public String getUserName() {return userName;}public void setUserName(String userName) {this.userName = userName;}@Overridepublic String toString() {return "UserBean{" +"id=" + id +", userName='" + userName + '\'' +'}';}public UserBean(Integer id, String userName) {this.id = id;this.userName = userName;}public UserBean() {}
}
创建Dao层
package com.bobo.dao;import com.bobo.bean.UserBean;public interface IUserDao {UserBean getUserBean();
}
创建实现
package com.bobo.dao.impl;import com.bobo.bean.UserBean;
import com.bobo.dao.IUserDao;
import org.springframework.stereotype.Repository;@Repository
public class UserDaoImpl implements IUserDao {@Overridepublic UserBean getUserBean() {return new UserBean(666,"bobo");}
}
创建Service接口
package com.bobo.service;import com.bobo.bean.UserBean;public interface IUserService {UserBean getUserBean();
}
创建对应的实现
package com.bobo.service.impl;import com.bobo.bean.UserBean;
import com.bobo.dao.IUserDao;
import com.bobo.service.IUserService;
import org.springframework.beans.factory.annotation.Autowired;
import org.springframework.stereotype.Service;@Service
public class UserServiceImpl implements IUserService {@Autowiredprivate IUserDao dao;@Overridepublic UserBean getUserBean() {return dao.getUserBean();}
}
创建Controller
package com.bobo.controller;import com.bobo.service.IUserService;
import org.springframework.beans.factory.annotation.Autowired;
import org.springframework.web.bind.annotation.GetMapping;
import org.springframework.web.bind.annotation.RestController;@RestController
public class UserController {@Autowiredprivate IUserService service;@GetMapping("/user/query")public String query(){return service.getUserBean().toString();}
}
1.8 测试效果
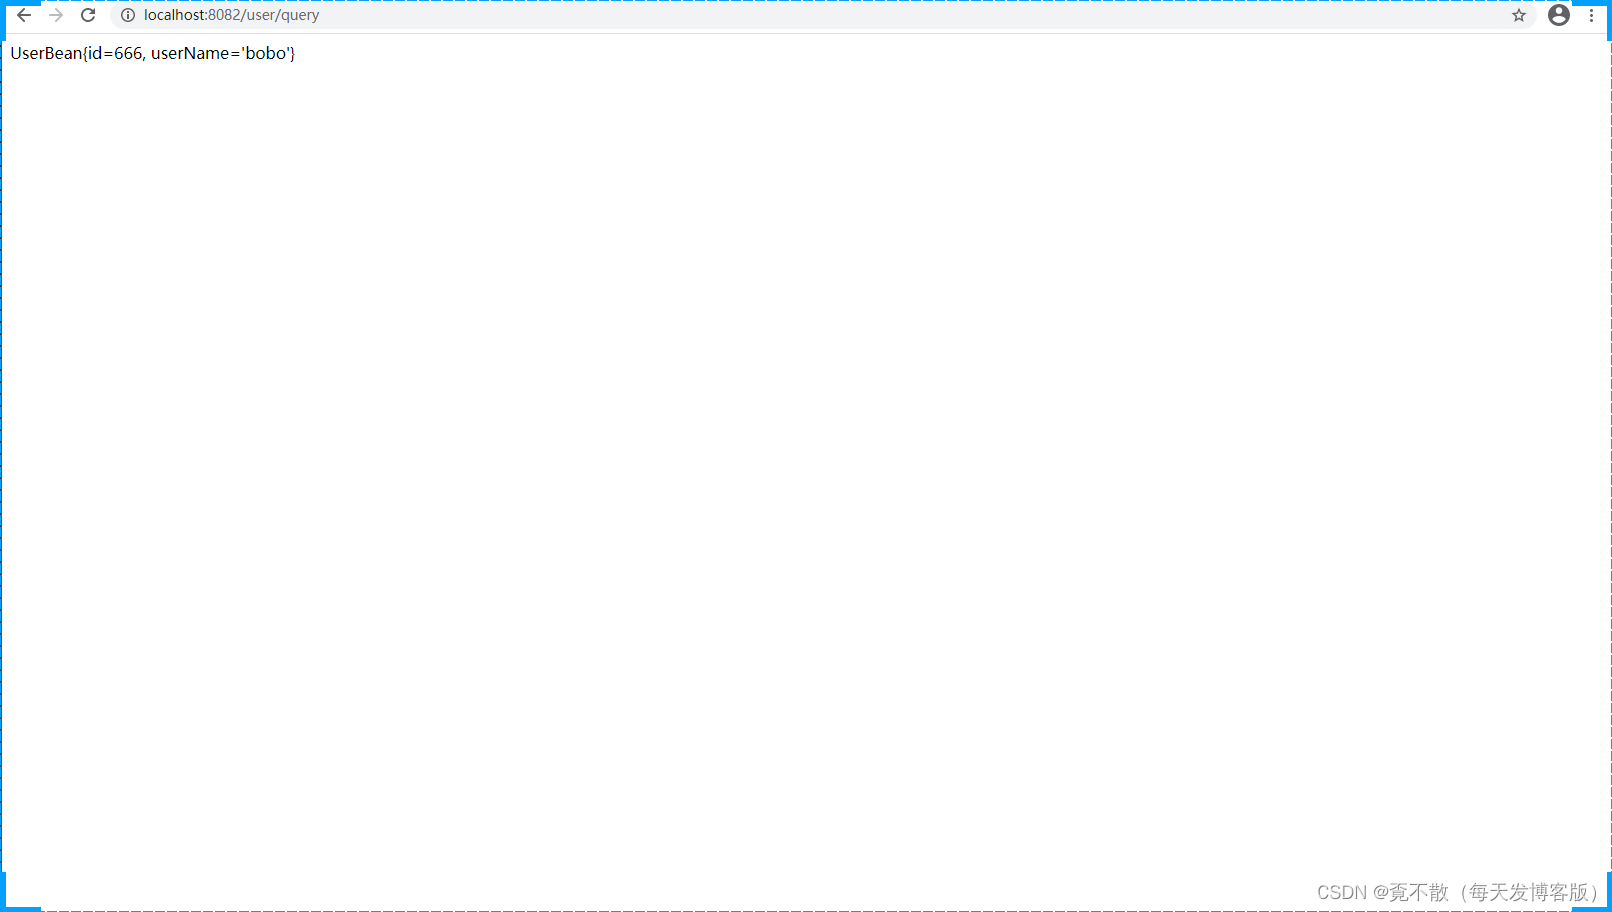
能够获取到Dao中返回的信息,那就说明访问到来Controller中的方法,说明Spring MVC没有问题,同时Controller可以获取Service对象,Service可以获取Dao中的对象,那说明Spring的IoC容器也是OK的!
2.Spring IoC 源码浅析
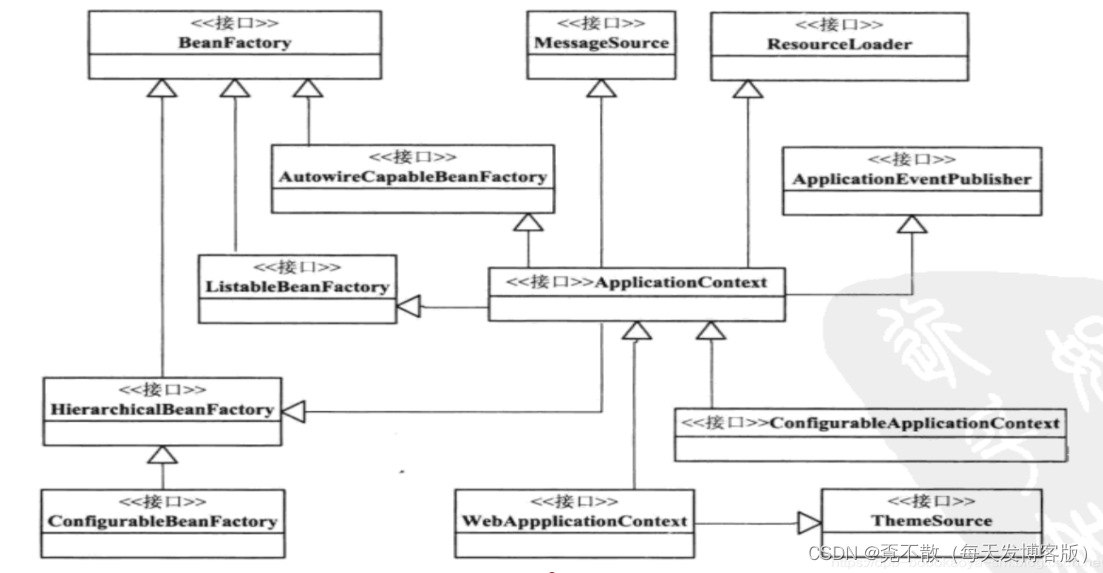
分析的入口代码
package com.bobo.test;import com.bobo.bean.UserBean;
import com.bobo.service.IUserService;
import com.bobo.service.impl.UserServiceImpl;
import org.junit.Test;
import org.springframework.context.ApplicationContext;
import org.springframework.context.support.ClassPathXmlApplicationContext;public class Test01 {@Testpublic void fun1(){// 进入源码 Ctrl+鼠标点击 进入ApplicationContext ac =new ClassPathXmlApplicationContext("applicationContext.xml");System.out.println(ac.getBean(IUserService.class));}
}
进入ClassPathXmlApplicationContext构造方法
public ClassPathXmlApplicationContext(String configLocation) throws BeansException {this(new String[]{configLocation}, true, (ApplicationContext)null);
}
再进入
public ClassPathXmlApplicationContext(String[] configLocations, boolean refresh,ApplicationContext parent) throws BeansException {// 初始化父类super(parent);// 设置本地配置信息this.setConfigLocations(configLocations);// 完成Spring容器的初始化操作if (refresh) {this.refresh();}
}
看源码的时候如果要回退那么就 Ctrl+Alt+ 方向键
public void refresh() throws BeansException, IllegalStateException {synchronized(this.startupShutdownMonitor) {// 准备工作this.prepareRefresh();// 获取BeanFactory工厂对象,并且完成 配置文件的而加重解析操作ConfigurableListableBeanFactory beanFactory = this.obtainFreshBeanFactory();this.prepareBeanFactory(beanFactory);try {this.postProcessBeanFactory(beanFactory);this.invokeBeanFactoryPostProcessors(beanFactory);this.registerBeanPostProcessors(beanFactory);this.initMessageSource();this.initApplicationEventMulticaster();this.onRefresh();this.registerListeners();this.finishBeanFactoryInitialization(beanFactory);this.finishRefresh();} catch (BeansException var9) {if (this.logger.isWarnEnabled()) {this.logger.warn("Exception encountered during contextinitialization - cancelling refresh attempt: " + var9);}this.destroyBeans();this.cancelRefresh(var9);throw var9;} finally {this.resetCommonCaches();}}
}
重点查看obtainFreshBeanFactory方法。
protected ConfigurableListableBeanFactory obtainFreshBeanFactory() {// 刷新BeanFactory对象this.refreshBeanFactory();// 获取BeanFactory对象 说明已经完成了 BeanFactory的创建和 配置文件的加载解析操作ConfigurableListableBeanFactory beanFactory = this.getBeanFactory();if (this.logger.isDebugEnabled()) {this.logger.debug("Bean factory for " + this.getDisplayName() + ": " +beanFactory);}return beanFactory;
}
进入
protected final void refreshBeanFactory() throws BeansException {// 判断BeanFactory是否已经存在if (this.hasBeanFactory()) {// 存在 就销毁和关闭this.destroyBeans();this.closeBeanFactory();}try {// 创建BeanFactory对象DefaultListableBeanFactory beanFactory = this.createBeanFactory();beanFactory.setSerializationId(this.getId());this.customizeBeanFactory(beanFactory);// 加载解析配置文件this.loadBeanDefinitions(beanFactory);synchronized(this.beanFactoryMonitor) {this.beanFactory = beanFactory;}} catch (IOException var5) {throw new ApplicationContextException("I/O error parsing bean definition source for " + this.getDisplayName(), var5);}
}
创建BeanFactory对象的具体方法。
protected DefaultListableBeanFactory createBeanFactory() {return new DefaultListableBeanFactory(this.getInternalParentBeanFactory());
}
protected void loadBeanDefinitions(DefaultListableBeanFactory beanFactory)
throws BeansException, IOException {XmlBeanDefinitionReader beanDefinitionReader = new XmlBeanDefinitionReader(beanFactory);beanDefinitionReader.setEnvironment(this.getEnvironment());beanDefinitionReader.setResourceLoader(this);beanDefinitionReader.setEntityResolver(new ResourceEntityResolver(this));this.initBeanDefinitionReader(beanDefinitionReader);// 核心代码 直接进入this.loadBeanDefinitions(beanDefinitionReader);
}
protected void loadBeanDefinitions(XmlBeanDefinitionReader reader) throws BeansException, IOException {Resource[] configResources = this.getConfigResources();if (configResources != null) {reader.loadBeanDefinitions(configResources);}String[] configLocations = this.getConfigLocations();if (configLocations != null) {reader.loadBeanDefinitions(configLocations);}
} 进入loadBeanDefinitions
public int loadBeanDefinitions(Resource... resources) throws BeanDefinitionStoreException {Assert.notNull(resources, "Resource array must not be null");int counter = 0;Resource[] var3 = resources;int var4 = resources.length;for(int var5 = 0; var5 < var4; ++var5) {Resource resource = var3[var5];counter += this.loadBeanDefinitions((Resource)resource);}// 统计解析的配置文件的个数return counter;
}
进入loadBeanDefinitions方法中。

public int loadBeanDefinitions(Resource resource) throws BeanDefinitionStoreException {return this.loadBeanDefinitions(new EncodedResource(resource));
}
public int loadBeanDefinitions(EncodedResource encodedResource) throws BeanDefinitionStoreException {Assert.notNull(encodedResource, "EncodedResource must not be null");if (this.logger.isInfoEnabled()) {this.logger.info("Loading XML bean definitions from " + encodedResource.getResource());}Set<EncodedResource> currentResources = (Set)this.resourcesCurrentlyBeingLoaded.get();if (currentResources == null) {currentResources = new HashSet(4);this.resourcesCurrentlyBeingLoaded.set(currentResources);}if (!((Set)currentResources).add(encodedResource)) {throw new BeanDefinitionStoreException("Detected cyclic loading of " + encodedResource + " - check your import definitions!");} else {int var5;try {// 获取配置文件对应的字节输入流InputStream inputStream = encodedResource.getResource().getInputStream();try {InputSource inputSource = new InputSource(inputStream);// 设置对应的编码方式if (encodedResource.getEncoding() != null) {inputSource.setEncoding(encodedResource.getEncoding());}// 核心代码 执行解析操作var5 = this.doLoadBeanDefinitions(inputSource, encodedResource.getResource());} finally {inputStream.close();}} catch (IOException var15) {throw new BeanDefinitionStoreException("IOException parsing XML document from " + encodedResource.getResource(), var15);} finally {((Set)currentResources).remove(encodedResource);if (((Set)currentResources).isEmpty()) {this.resourcesCurrentlyBeingLoaded.remove();}}return var5;}
}
protected int doLoadBeanDefinitions(InputSource inputSource, Resource resource)throws BeanDefinitionStoreException {try {// 将xml中的内容加载到Document对象中Document doc = this.doLoadDocument(inputSource, resource);// 完成配置文件的注册操作 将配置文件中的信息载入到BeanDefinition对象中return this.registerBeanDefinitions(doc, resource);} catch (BeanDefinitionStoreException var4) {throw var4;} catch (SAXParseException var5) {throw new XmlBeanDefinitionStoreException(resource.getDescription(),"Line " + var5.getLineNumber() + " in XML document from " + resource + " isinvalid", var5);} catch (SAXException var6) {throw new XmlBeanDefinitionStoreException(resource.getDescription(),"XML document from " + resource + " is invalid", var6);} catch (ParserConfigurationException var7) {throw new BeanDefinitionStoreException(resource.getDescription(),"Parser configuration exception parsing XML from " + resource, var7);} catch (IOException var8) {throw new BeanDefinitionStoreException(resource.getDescription(),"IOException parsing XML document from " + resource, var8);} catch (Throwable var9) {throw new BeanDefinitionStoreException(resource.getDescription(),"Unexpected exception parsing XML document from " + resource, var9);}
}
关键方法registerBeanDefinitions
public int registerBeanDefinitions(Document doc, Resource resource) throws BeanDefinitionStoreException {BeanDefinitionDocumentReader documentReader = this.createBeanDefinitionDocumentReader();int countBefore = this.getRegistry().getBeanDefinitionCount();// 具体注册的方法documentReader.registerBeanDefinitions(doc, this.createReaderContext(resource));return this.getRegistry().getBeanDefinitionCount() - countBefore;
}
public void registerBeanDefinitions(Document doc, XmlReaderContext readerContext) {this.readerContext = readerContext;this.logger.debug("Loading bean definitions");// 获取Document对象的root标签Element root = doc.getDocumentElement();// 具体操作的方法this.doRegisterBeanDefinitions(root);
}protected void doRegisterBeanDefinitions(Element root) {BeanDefinitionParserDelegate parent = this.delegate;this.delegate = this.createDelegate(this.getReaderContext(), root, parent);// 对profile标签处理if (this.delegate.isDefaultNamespace(root)) {String profileSpec = root.getAttribute("profile");if (StringUtils.hasText(profileSpec)) {String[] specifiedProfiles = StringUtils.tokenizeToStringArray(profileSpec, ",; ");if(!this.getReaderContext().getEnvironment().acceptsProfiles(specifiedProfiles)) {if (this.logger.isInfoEnabled()) {this.logger.info("Skipped XML bean definition file due to specified profiles [" + profileSpec + "] not matching: " + this.getReaderContext().getResource());}return;}}}// 解析配置文件之前的操作this.preProcessXml(root);// 解析配置文件this.parseBeanDefinitions(root, this.delegate);// 解析配置文件之后的操作this.postProcessXml(root);this.delegate = parent;
}protected void parseBeanDefinitions(Element root, BeanDefinitionParserDelegate delegate) {if (delegate.isDefaultNamespace(root)) {// 获取根节点下的所有的直接子标签NodeList nl = root.getChildNodes();// 循环获取每一个子标签for(int i = 0; i < nl.getLength(); ++i) {Node node = nl.item(i);if (node instanceof Element) {Element ele = (Element)node;if (delegate.isDefaultNamespace(ele)) {// 解析默认的标签this.parseDefaultElement(ele, delegate);} else {// 解析自定义的标签delegate.parseCustomElement(ele);}}}} else {delegate.parseCustomElement(root);}
} 默认标签

protected void processBeanDefinition(Element ele, BeanDefinitionParserDelegate delegate) {// 配置文件的解析BeanDefinitionHolder bdHolder = delegate.parseBeanDefinitionElement(ele);if (bdHolder != null) {bdHolder = delegate.decorateBeanDefinitionIfRequired(ele, bdHolder);try {// 注册我们获取的 BeanDefinitionHolder 对象BeanDefinitionReaderUtils.registerBeanDefinition(bdHolder,this.getReaderContext().getRegistry());} catch (BeanDefinitionStoreException var5) {this.getReaderContext().error("Failed to register bean definitionwith name '" + bdHolder.getBeanName() + "'", ele, var5);}this.getReaderContext().fireComponentRegistered(newBeanComponentDefinition(bdHolder));}
}
具体的解析操作
public BeanDefinitionHolder parseBeanDefinitionElement(Element ele,BeanDefinition containingBean) {// 获取bean标签的id属性String id = ele.getAttribute("id");// 获取bean标签的name属性String nameAttr = ele.getAttribute("name");List<String> aliases = new ArrayList();if (StringUtils.hasLength(nameAttr)) {String[] nameArr = StringUtils.tokenizeToStringArray(nameAttr, ",;");aliases.addAll(Arrays.asList(nameArr));}String beanName = id;if (!StringUtils.hasText(id) && !aliases.isEmpty()) {beanName = (String)aliases.remove(0);if (this.logger.isDebugEnabled()) {this.logger.debug("No XML 'id' specified - using '" + beanName + "' as bean name and " + aliases + " as aliases");}}if (containingBean == null) {// 检查name是否唯一this.checkNameUniqueness(beanName, aliases, ele);}AbstractBeanDefinition beanDefinition = this.parseBeanDefinitionElement(ele, beanName, containingBean);if (beanDefinition != null) {if (!StringUtils.hasText(beanName)) {try {if (containingBean != null) {beanName = BeanDefinitionReaderUtils.generateBeanName(beanDefinition,this.readerContext.getRegistry(), true);} else {beanName = this.readerContext.generateBeanName(beanDefinition);String beanClassName = beanDefinition.getBeanClassName();if (beanClassName != null && beanName.startsWith(beanClassName) && beanName.length() > beanClassName.length() && !this.readerContext.getRegistry().isBeanNameInUse(beanClassName)) {aliases.add(beanClassName);}}if (this.logger.isDebugEnabled()) {this.logger.debug("Neither XML 'id' nor 'name' specified - using generated bean name [" + beanName + "]");}} catch (Exception var9) {this.error(var9.getMessage(), ele);return null;}}String[] aliasesArray = StringUtils.toStringArray(aliases);return new BeanDefinitionHolder(beanDefinition, beanName,aliasesArray);} else {return null;}
}
方法registerBeanDefinition:
public static void registerBeanDefinition(BeanDefinitionHolder definitionHolder, BeanDefinitionRegistry registry) throws BeanDefinitionStoreException {String beanName = definitionHolder.getBeanName();// 关键代码registry.registerBeanDefinition(beanName,definitionHolder.getBeanDefinition());String[] aliases = definitionHolder.getAliases();if (aliases != null) {String[] var4 = aliases;int var5 = aliases.length;for(int var6 = 0; var6 < var5; ++var6) {String alias = var4[var6];registry.registerAlias(beanName, alias);}}
}
我们需要解析的信息要保存到我们前面实例化的BeanFactory的工厂对象中,DefaultListableBeanFactory对象。

public void registerBeanDefinition(String beanName, BeanDefinition beanDefinition) throws BeanDefinitionStoreException {Assert.hasText(beanName, "Bean name must not be empty");Assert.notNull(beanDefinition, "BeanDefinition must not be null");if (beanDefinition instanceof AbstractBeanDefinition) {try {((AbstractBeanDefinition)beanDefinition).validate();} catch (BeanDefinitionValidationException var9) {throw new BeanDefinitionStoreException(beanDefinition.getResourceDescription(), beanName, "Validation of bean definition failed", var9);}}BeanDefinition oldBeanDefinition = (BeanDefinition)this.beanDefinitionMap.get(beanName);if (oldBeanDefinition != null) {if (!this.isAllowBeanDefinitionOverriding()) {throw new BeanDefinitionStoreException(beanDefinition.getResourceDescription(), beanName, "Cannot register bean definition [" + beanDefinition + "] for bean '" + beanName + "': There is already [" + oldBeanDefinition + "] bound.");}if (oldBeanDefinition.getRole() < beanDefinition.getRole()) {if (this.logger.isWarnEnabled()) {this.logger.warn("Overriding user-defined bean definition for bean '" + beanName + "' with a framework-generated bean definition: replacing [" + oldBeanDefinition + "] with [" + beanDefinition + "]");}} else if (!beanDefinition.equals(oldBeanDefinition)) {if (this.logger.isInfoEnabled()) {this.logger.info("Overriding bean definition for bean '" + beanName + "' with a different definition: replacing [" + oldBeanDefinition + "] with [" + beanDefinition + "]");}} else if (this.logger.isDebugEnabled()) {this.logger.debug("Overriding bean definition for bean '" + beanName + "' with an equivalent definition: replacing [" + oldBeanDefinition + "] with [" + beanDefinition + "]");}this.beanDefinitionMap.put(beanName, beanDefinition);} else {if (this.hasBeanCreationStarted()) {synchronized(this.beanDefinitionMap) {this.beanDefinitionMap.put(beanName, beanDefinition);List<String> updatedDefinitions = new ArrayList(this.beanDefinitionNames.size() + 1);updatedDefinitions.addAll(this.beanDefinitionNames);updatedDefinitions.add(beanName);this.beanDefinitionNames = updatedDefinitions;if (this.manualSingletonNames.contains(beanName)) {Set<String> updatedSingletons = new LinkedHashSet(this.manualSingletonNames);updatedSingletons.remove(beanName);this.manualSingletonNames = updatedSingletons;}}} else {this.beanDefinitionMap.put(beanName, beanDefinition);this.beanDefinitionNames.add(beanName);this.manualSingletonNames.remove(beanName);}this.frozenBeanDefinitionNames = null;}if (oldBeanDefinition != null || this.containsSingleton(beanName)) {this.resetBeanDefinition(beanName);}}
}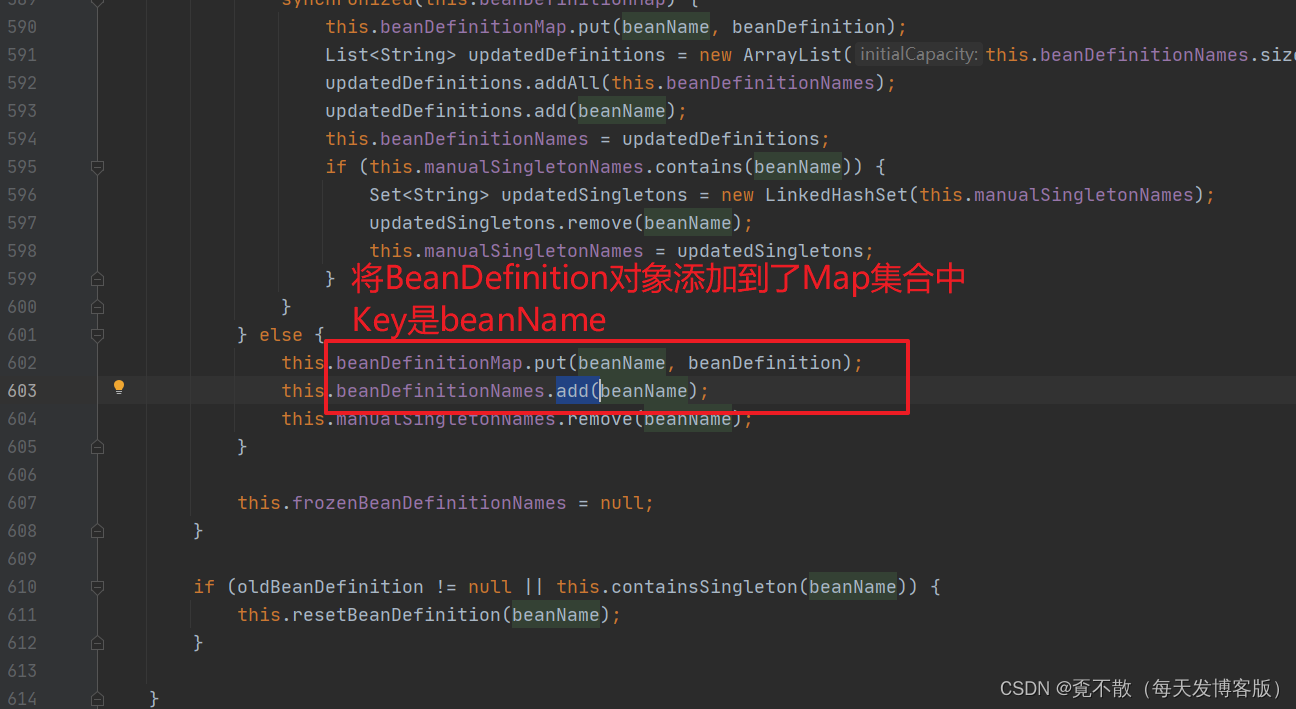

关键结论:SpringIoC容器启动的时候创建的BeanFactory对象的具体实例是(DefultListableBeanFactory),然后我们加载解析的配置文件中的相关标签会保存在BeanDefinition对象中,而多个BeanDefinition对象最终都会保存在DefaultListableBeanFactory对象的beanDefinitionMap属性中。
@Override
public void refresh() throws BeansException, IllegalStateException {//startupShutdownMonitor对象在spring环境刷新和销毁的时候都会用到,确保刷新和销毁不会同时执行synchronized (this.startupShutdownMonitor) {// 准备工作,例如记录事件,设置标志,检查环境变量等,并有留给子类扩展的位置,用来将属性加入到applicationContext中prepareRefresh();// 创建beanFactory,这个对象作为applicationContext的成员变量,可以被applicationContext拿来用,// 并且解析资源(例如xml文件),取得bean的定义,放在beanFactory中ConfigurableListableBeanFactory beanFactory = obtainFreshBeanFactory();// 对beanFactory做一些设置,例如类加载器、SPEL解析器、指定bean的某些类型的成员变量对应某些对象.prepareBeanFactory(beanFactory);try {// 子类扩展用,可以设置bean的后置处理器(bean在实例化之后这些后置处理器会执行)postProcessBeanFactory(beanFactory);// 执行beanFactory后置处理器(有别于bean后置处理器处理bean实例,beanFactory 后置处理器处理bean定义)invokeBeanFactoryPostProcessors(beanFactory);// 将所有的bean的后置处理器排好序,但不会马上用,bean实例化之后会用到registerBeanPostProcessors(beanFactory);// 初始化国际化服务initMessageSource();// 创建事件广播器initApplicationEventMulticaster();// 空方法,留给子类自己实现的,在实例化bean之前做一些ApplicationContext相关的操作onRefresh();// 注册一部分特殊的事件监听器,剩下的只是准备好名字,留待bean实例化完成后再注册registerListeners();// 单例模式的bean的实例化、成员变量注入、初始化等工作都在此完成finishBeanFactoryInitialization(beanFactory);// applicationContext刷新完成后的处理,例如生命周期监听器的回调,广播通知等finishRefresh();}catch (BeansException ex) {logger.warn("Exception encountered during context initialization -cancelling refresh attempt", ex);// 刷新失败后的处理,主要是将一些保存环境信息的集合做清理destroyBeans();// applicationContext是否已经激活的标志,设置为falsecancelRefresh(ex);// Propagate exception to caller.throw ex;}}
}
3. Spring MVC 源码浅析
Spring MVC 源码分析的入口是 DispatcherServlet。因为他就是一个Servlet所以我们前提是要清楚Servlet的生命周期。

DispatcherServlet的类图结构
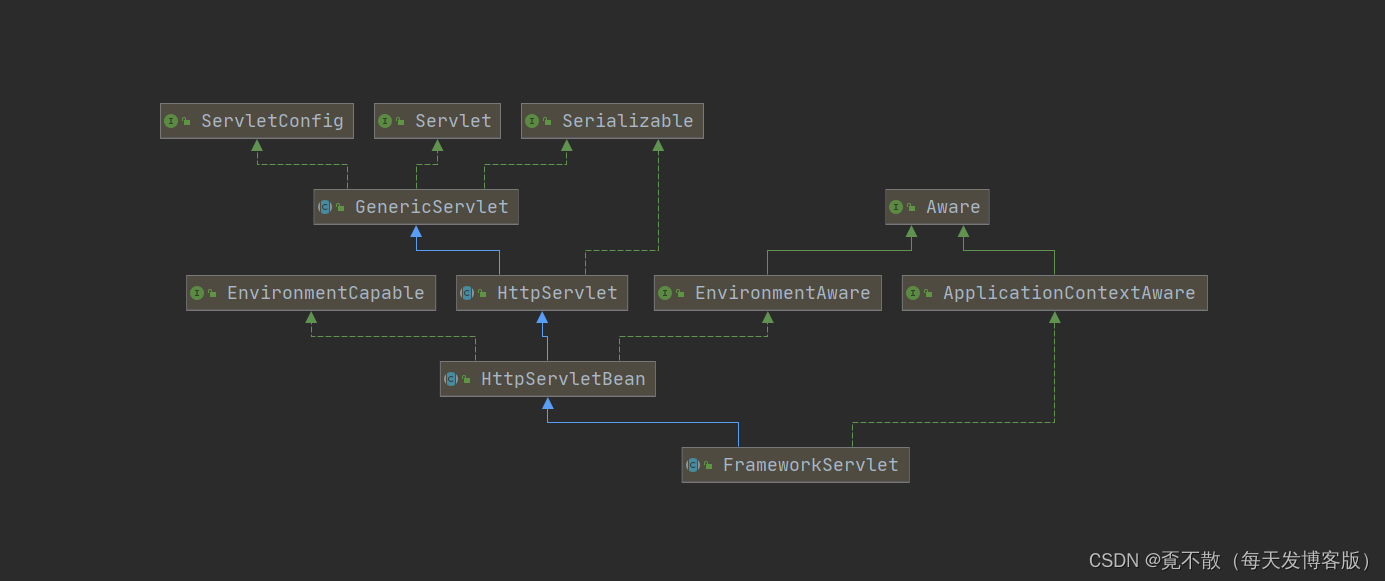
3.1 分析init方法
在父类的HttpServletBean中找到了对应的init方法。
public final void init() throws ServletException {if (this.logger.isDebugEnabled()) {this.logger.debug("Initializing servlet '" + this.getServletName() +"'");}try {PropertyValues pvs = new HttpServletBean.ServletConfigPropertyValues(this.getServletConfig(),this.requiredProperties);BeanWrapper bw = PropertyAccessorFactory.forBeanPropertyAccess(this);ResourceLoader resourceLoader = new ServletContextResourceLoader(this.getServletContext());bw.registerCustomEditor(Resource.class, new ResourceEditor(resourceLoader,this.getEnvironment()));this.initBeanWrapper(bw);bw.setPropertyValues(pvs, true);} catch (BeansException var4) {this.logger.error("Failed to set bean properties on servlet '" +this.getServletName() + "'", var4);throw var4;}// 关键代码this.initServletBean();if (this.logger.isDebugEnabled()) {this.logger.debug("Servlet '" + this.getServletName() + "' configured successfully");}
}
进入initServletBean方法。
protected final void initServletBean() throws ServletException {this.getServletContext().log("Initializing Spring FrameworkServlet '" + this.getServletName() + "'");if (this.logger.isInfoEnabled()) {this.logger.info("FrameworkServlet '" + this.getServletName() + "': initialization started");}long startTime = System.currentTimeMillis();try {// 初始化 Web容器this.webApplicationContext = this.initWebApplicationContext();// 预留给我们扩展的方法this.initFrameworkServlet();} catch (ServletException var5) {this.logger.error("Context initialization failed", var5);throw var5;} catch (RuntimeException var6) {this.logger.error("Context initialization failed", var6);throw var6;}if (this.logger.isInfoEnabled()) {long elapsedTime = System.currentTimeMillis() - startTime;this.logger.info("FrameworkServlet '" + this.getServletName() + "': initialization completed in " + elapsedTime + " ms");}
}
protected WebApplicationContext initWebApplicationContext() {WebApplicationContext rootContext = WebApplicationContextUtils.getWebApplicationContext(this.getServletContext());WebApplicationContext wac = null;// 如果找到了 rootContextif (this.webApplicationContext != null) {wac = this.webApplicationContext;if (wac instanceof ConfigurableWebApplicationContext) {ConfigurableWebApplicationContext cwac =(ConfigurableWebApplicationContext)wac;if (!cwac.isActive()) {if (cwac.getParent() == null) {cwac.setParent(rootContext);}this.configureAndRefreshWebApplicationContext(cwac);}}}if (wac == null) {// 查找容器wac = this.findWebApplicationContext();}if (wac == null) {// 创建容器wac = this.createWebApplicationContext(rootContext);}if (!this.refreshEventReceived) {// 刷新容器this.onRefresh(wac);}if (this.publishContext) {String attrName = this.getServletContextAttributeName();this.getServletContext().setAttribute(attrName, wac);if (this.logger.isDebugEnabled()) {this.logger.debug("Published WebApplicationContext of servlet '"+ this.getServletName() + "' as ServletContext attribute with name [" + attrName+ "]");}}
return wac;
} createWebApplicationContext方法
protected WebApplicationContext createWebApplicationContext(ApplicationContext parent) {Class<?> contextClass = this.getContextClass();if (this.logger.isDebugEnabled()) {this.logger.debug("Servlet with name '" + this.getServletName() + "'will try to create custom WebApplicationContext context of class '" + contextClass.getName() + "', using parent context [" + parent + "]");}if(!ConfigurableWebApplicationContext.class.isAssignableFrom(contextClass)) {throw new ApplicationContextException("Fatal initialization error in servlet with name '" + this.getServletName() + "': custom WebApplicationContext class [" + contextClass.getName() + "] is not of type ConfigurableWebApplicationContext");} else {ConfigurableWebApplicationContext wac = (ConfigurableWebApplicationContext)BeanUtils.instantiateClass(contextClass);wac.setEnvironment(this.getEnvironment());wac.setParent(parent);wac.setConfigLocation(this.getContextConfigLocation());// 核心代码this.configureAndRefreshWebApplicationContext(wac);return wac;}
}
configureAndRefreshWebApplicationContext方法
protected void configureAndRefreshWebApplicationContext(ConfigurableWebApplicationContext wac){if (ObjectUtils.identityToString(wac).equals(wac.getId())) {if (this.contextId != null) {wac.setId(this.contextId);} else {wac.setId(ConfigurableWebApplicationContext.APPLICATION_CONTEXT_ID_PREFIX + ObjectUtils.getDisplayString(this.getServletContext().getContextPath()) + '/' + this.getServletName());}}wac.setServletContext(this.getServletContext());wac.setServletConfig(this.getServletConfig());wac.setNamespace(this.getNamespace());wac.addApplicationListener(new SourceFilteringListener(wac, newFrameworkServlet.ContextRefreshListener()));ConfigurableEnvironment env = wac.getEnvironment();if (env instanceof ConfigurableWebEnvironment) {((ConfigurableWebEnvironment)env).initPropertySources(this.getServletContext(), this.getServletConfig());}this.postProcessWebApplicationContext(wac);this.applyInitializers(wac);// 关键代码 完成SpringMVC配置文件的加载解析操作 Spring容器初始化操作wac.refresh();
}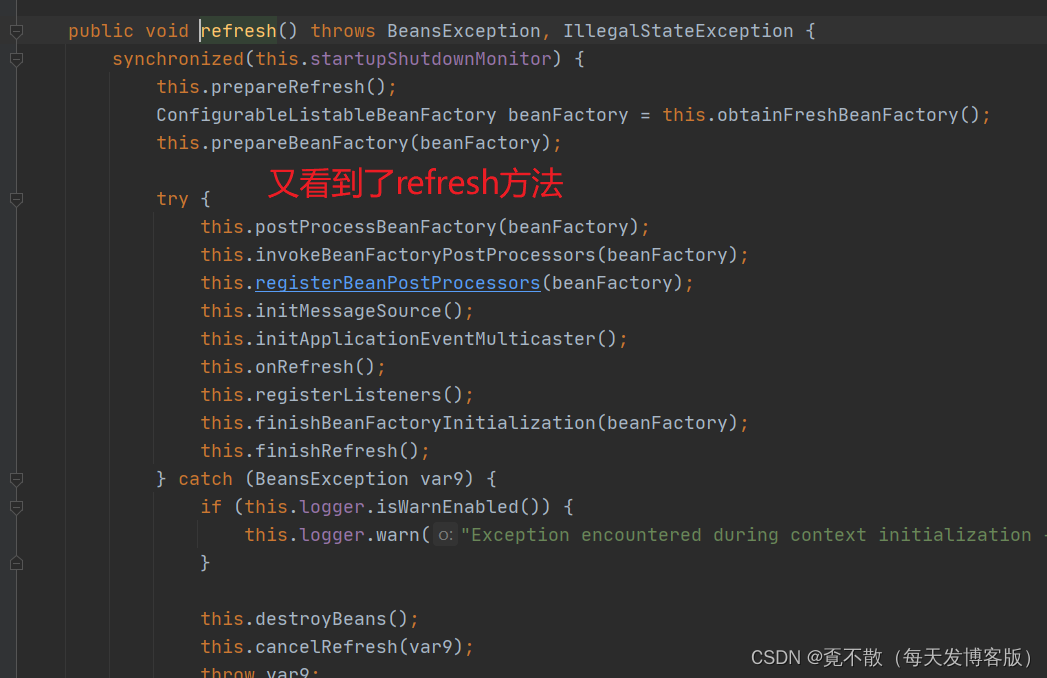
DispatcherServlet的初始化操作其实就是IoC容器的初始化操作过程,完成了Spring MVC配置文件的加载解析操作。
3.2 分析service方法
protected void service(HttpServletRequest request, HttpServletResponse response) throws ServletException, IOException {HttpMethod httpMethod = HttpMethod.resolve(request.getMethod());if (HttpMethod.PATCH != httpMethod && httpMethod != null) {super.service(request, response);} else {// 具体处理请求的方法this.processRequest(request, response);}
}
protected final void processRequest(HttpServletRequest request,HttpServletResponse response) throws ServletException, IOException {long startTime = System.currentTimeMillis();Throwable failureCause = null;LocaleContext previousLocaleContext = LocaleContextHolder.getLocaleContext();LocaleContext localeContext = this.buildLocaleContext(request);RequestAttributes previousAttributes = RequestContextHolder.getRequestAttributes();ServletRequestAttributes requestAttributes = this.buildRequestAttributes(request, response, previousAttributes);WebAsyncManager asyncManager = WebAsyncUtils.getAsyncManager(request);asyncManager.registerCallableInterceptor(FrameworkServlet.class.getName(), new FrameworkServlet.RequestBindingInterceptor());this.initContextHolders(request, localeContext, requestAttributes);try {this.doService(request, response);} catch (ServletException var17) {failureCause = var17;throw var17;} catch (IOException var18) {failureCause = var18;throw var18;} catch (Throwable var19) {failureCause = var19;throw new NestedServletException("Request processing failed",var19);} finally {this.resetContextHolders(request, previousLocaleContext,previousAttributes);if (requestAttributes != null) {requestAttributes.requestCompleted();}if (this.logger.isDebugEnabled()) {if (failureCause != null) {this.logger.debug("Could not complete request",(Throwable)failureCause);} else if (asyncManager.isConcurrentHandlingStarted()) {this.logger.debug("Leaving response open for concurrent processing");} else {this.logger.debug("Successfully completed request");}}this.publishRequestHandledEvent(request, response, startTime,(Throwable)failureCause);}
} 具体处理请求 this.doService(request, response);
protected void doService(HttpServletRequest request, HttpServletResponse response) throws Exception {if (this.logger.isDebugEnabled()) {String resumed = WebAsyncUtils.getAsyncManager(request).hasConcurrentResult() ? " resumed" : "";this.logger.debug("DispatcherServlet with name '" + this.getServletName() + "'" + resumed + " processing " + request.getMethod() + " request for [" + getRequestUri(request) + "]");}Map<String, Object> attributesSnapshot = null;if (WebUtils.isIncludeRequest(request)) {attributesSnapshot = new HashMap();Enumeration attrNames = request.getAttributeNames();label108:while(true) {String attrName;do {if (!attrNames.hasMoreElements()) {break label108;}attrName = (String)attrNames.nextElement();} while(!this.cleanupAfterInclude &&!attrName.startsWith("org.springframework.web.servlet"));attributesSnapshot.put(attrName,request.getAttribute(attrName));}}// 将Web容器保存到了 Request请求中request.setAttribute(WEB_APPLICATION_CONTEXT_ATTRIBUTE,this.getWebApplicationContext());request.setAttribute(LOCALE_RESOLVER_ATTRIBUTE, this.localeResolver);request.setAttribute(THEME_RESOLVER_ATTRIBUTE, this.themeResolver);request.setAttribute(THEME_SOURCE_ATTRIBUTE, this.getThemeSource());FlashMap inputFlashMap = this.flashMapManager.retrieveAndUpdate(request, response);if (inputFlashMap != null) {request.setAttribute(INPUT_FLASH_MAP_ATTRIBUTE,Collections.unmodifiableMap(inputFlashMap));}request.setAttribute(OUTPUT_FLASH_MAP_ATTRIBUTE, new FlashMap());request.setAttribute(FLASH_MAP_MANAGER_ATTRIBUTE, this.flashMapManager);try {// 处理请求分发this.doDispatch(request, response);} finally {if(!WebAsyncUtils.getAsyncManager(request).isConcurrentHandlingStarted() &&
attributesSnapshot != null) {this.restoreAttributesAfterInclude(request, attributesSnapshot);}}
}
protected void doDispatch(HttpServletRequest request, HttpServletResponse response) throws Exception {HttpServletRequest processedRequest = request;HandlerExecutionChain mappedHandler = null;boolean multipartRequestParsed = false;WebAsyncManager asyncManager = WebAsyncUtils.getAsyncManager(request);try {try {ModelAndView mv = null;Object dispatchException = null;try {// 检查是否有文件上传processedRequest = this.checkMultipart(request);multipartRequestParsed = processedRequest != request;mappedHandler = this.getHandler(processedRequest);if (mappedHandler == null || mappedHandler.getHandler() == null) {this.noHandlerFound(processedRequest, response);return;}HandlerAdapter ha = this.getHandlerAdapter(mappedHandler.getHandler());String method = request.getMethod();boolean isGet = "GET".equals(method);if (isGet || "HEAD".equals(method)) {long lastModified = ha.getLastModified(request,mappedHandler.getHandler());if (this.logger.isDebugEnabled()) {this.logger.debug("Last-Modified value for [" +getRequestUri(request) + "] is: " + lastModified);}if ((new ServletWebRequest(request,response)).checkNotModified(lastModified) && isGet) {return;}}if (!mappedHandler.applyPreHandle(processedRequest,response)) {return;}mv = ha.handle(processedRequest, response,mappedHandler.getHandler());if (asyncManager.isConcurrentHandlingStarted()) {return;}this.applyDefaultViewName(processedRequest, mv);mappedHandler.applyPostHandle(processedRequest, response,mv);} catch (Exception var20) {dispatchException = var20;} catch (Throwable var21) {dispatchException = new NestedServletException("Handler dispatch failed", var21);}this.processDispatchResult(processedRequest, response,mappedHandler, mv, (Exception)dispatchException);} catch (Exception var22) {this.triggerAfterCompletion(processedRequest, response,mappedHandler, var22);} catch (Throwable var23) {this.triggerAfterCompletion(processedRequest, response,mappedHandler, new NestedServletException("Handler processing failed", var23));}} finally {if (asyncManager.isConcurrentHandlingStarted()) {if (mappedHandler != null) {mappedHandler.applyAfterConcurrentHandlingStarted(processedRequest, response);}} else if (multipartRequestParsed) {this.cleanupMultipart(processedRequest);}}
} 文件上传操作
protected HttpServletRequest checkMultipart(HttpServletRequest request) throws MultipartException {if (this.multipartResolver != null && this.multipartResolver.isMultipart(request)) {if (WebUtils.getNativeRequest(request, MultipartHttpServletRequest.class) != null) {this.logger.debug("Request is already a MultipartHttpServletRequest - if not in a forward, this typically results from an additional MultipartFilter in web.xml");} else {if (!(request.getAttribute("javax.servlet.error.exception")instanceof MultipartException)) {// 文件上传操作的具体执行return this.multipartResolver.resolveMultipart(request);}this.logger.debug("Multipart resolution failed for current request before - skipping re-resolution for undisturbed error rendering");}}return request;
}
public MultipartHttpServletRequest resolveMultipart(final HttpServletRequest request) throws MultipartException {Assert.notNull(request, "Request must not be null");// 是否需要延迟 处理if (this.resolveLazily) {return new DefaultMultipartHttpServletRequest(request) {protected void initializeMultipart() {MultipartParsingResult parsingResult = CommonsMultipartResolver.this.parseRequest(request);this.setMultipartFiles(parsingResult.getMultipartFiles());this.setMultipartParameters(parsingResult.getMultipartParameters());this.setMultipartParameterContentTypes(parsingResult.getMultipartParameterContentTypes());}};} else {// 解析请求MultipartParsingResult parsingResult = this.parseRequest(request);return new DefaultMultipartHttpServletRequest(request,parsingResult.getMultipartFiles(), parsingResult.getMultipartParameters(),parsingResult.getMultipartParameterContentTypes());}
}
protected MultipartParsingResult parseRequest(HttpServletRequest request)throws MultipartException {String encoding = this.determineEncoding(request);FileUpload fileUpload = this.prepareFileUpload(encoding);try {// 获取提交的表单中的所有的表单域List<FileItem> fileItems = ((ServletFileUpload)fileUpload).parseRequest(request);// 解析每一个表单域return this.parseFileItems(fileItems, encoding);} catch (SizeLimitExceededException var5) {throw new MaxUploadSizeExceededException(fileUpload.getSizeMax(),var5);} catch (FileSizeLimitExceededException var6) {throw new MaxUploadSizeExceededException(fileUpload.getFileSizeMax(), var6);} catch (FileUploadException var7) {throw new MultipartException("Failed to parse multipart servlet request", var7);}
} 具体处理表单中提交的各个部分
protected CommonsFileUploadSupport.MultipartParsingResult parseFileItems(List<FileItem> fileItems, String encoding) {MultiValueMap<String, MultipartFile> multipartFiles = new LinkedMultiValueMap();Map<String, String[]> multipartParameters = new HashMap();Map<String, String> multipartParameterContentTypes = new HashMap();Iterator var6 = fileItems.iterator();while(true) {while(var6.hasNext()) {FileItem fileItem = (FileItem)var6.next();// 普通表单域处理if (fileItem.isFormField()) {String partEncoding = this.determineEncoding(fileItem.getContentType(), encoding);String value;if (partEncoding != null) {try {// 获取对应的编码方式value = fileItem.getString(partEncoding);} catch (UnsupportedEncodingException var12) {if (this.logger.isWarnEnabled()) {this.logger.warn("Could not decode multipartitem '" + fileItem.getFieldName() + "' with encoding '" + partEncoding + "': using platform default");}value = fileItem.getString();}} else {// 得到提交的值value = fileItem.getString();}String[] curParam = (String[])multipartParameters.get(fileItem.getFieldName());if (curParam == null) {// 将提交的数据保存起来multipartParameters.put(fileItem.getFieldName(), new String[]{value});} else {String[] newParam = StringUtils.addStringToArray(curParam, value);multipartParameters.put(fileItem.getFieldName(),newParam);}multipartParameterContentTypes.put(fileItem.getFieldName(), fileItem.getContentType());} else {// 表单提交的文件信息CommonsMultipartFile file = new CommonsMultipartFile(fileItem);// 将表单提交的文件信息 封装到了 CommonsMultipartFile 对象中multipartFiles.add(file.getName(), file);if (this.logger.isDebugEnabled()) {this.logger.debug("Found multipart file [" + file.getName() + "] of size " + file.getSize() + " bytes with original filename [" + file.getOriginalFilename() + "], stored " + file.getStorageDescription());}}}return new CommonsFileUploadSupport.MultipartParsingResult(multipartFiles, multipartParameters, multipartParameterContentTypes);}
}
文件上传处理完成
继续回到doDispatch方法中
protected void doDispatch(HttpServletRequest request, HttpServletResponse response) throws Exception {HttpServletRequest processedRequest = request;HandlerExecutionChain mappedHandler = null;boolean multipartRequestParsed = false;WebAsyncManager asyncManager = WebAsyncUtils.getAsyncManager(request);try {try {ModelAndView mv = null;Object dispatchException = null;try {// 检查是否有文件上传processedRequest = this.checkMultipart(request);multipartRequestParsed = processedRequest != request;// 处理器映射器mappedHandler = this.getHandler(processedRequest);if (mappedHandler == null || mappedHandler.getHandler() == null) {this.noHandlerFound(processedRequest, response);return;}// 获取处理器适配器HandlerAdapter ha = this.getHandlerAdapter(mappedHandler.getHandler());String method = request.getMethod();boolean isGet = "GET".equals(method);if (isGet || "HEAD".equals(method)) {long lastModified = ha.getLastModified(request,mappedHandler.getHandler());if (this.logger.isDebugEnabled()) {this.logger.debug("Last-Modified value for [" + getRequestUri(request) + "] is: " + lastModified);}if ((new ServletWebRequest(request, response)).checkNotModified(lastModified) && isGet) {return;}}if (!mappedHandler.applyPreHandle(processedRequest,response)) {return;}// 处理适配器处理请求mv = ha.handle(processedRequest, response,mappedHandler.getHandler());if (asyncManager.isConcurrentHandlingStarted()) {return;}this.applyDefaultViewName(processedRequest, mv);mappedHandler.applyPostHandle(processedRequest, response,mv);} catch (Exception var20) {dispatchException = var20;} catch (Throwable var21) {dispatchException = new NestedServletException("Handlerdispatch failed", var21);}this.processDispatchResult(processedRequest, response,mappedHandler, mv, (Exception)dispatchException);} catch (Exception var22) {this.triggerAfterCompletion(processedRequest, response, mappedHandler, var22);} catch (Throwable var23) {this.triggerAfterCompletion(processedRequest, response, mappedHandler, new NestedServletException("Handler processing failed", var23));}} finally {if (asyncManager.isConcurrentHandlingStarted()) {if (mappedHandler != null) {mappedHandler.applyAfterConcurrentHandlingStarted(processedRequest, response);}} else if (multipartRequestParsed) {this.cleanupMultipart(processedRequest);}}
}
基于普通的使用方式
public ModelAndView handle(HttpServletRequest request, HttpServletResponse response, Object handler) throws Exception {return ((Controller)handler).handleRequest(request, response);
}
通过源码的简单分析论证了我们前面给大家介绍的Spring MVC的工作原理。
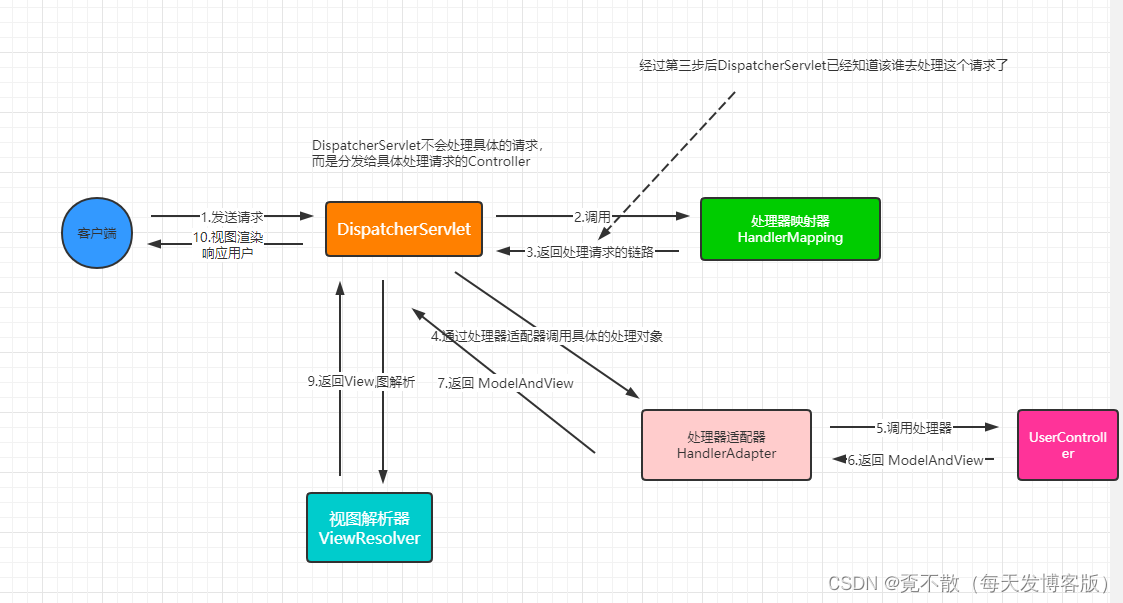
4. Spring MVC和Spring IoC的关联关系
Spring容器是一个父容器,SpringMVC容器是一个子容器,它继承自Spring容器。因此,在SpringMVC容器中,可以访问到Spring容器中定义的Bean,而在Spring容器中,无法访问SpringMVC容器中定义的Bean。在Web开发中,Controller全部在SpringMVC中扫描,除了Controller之外的Bean,全部在Spring容器中扫描(Service、Dao),按这种方式扫描,扫描完完成后,Controller可以访问到Service。
1. 为什么不全部都在Spring中扫描
因为处理器映射器只会去SpringMVC中查找到Controller,如果没有,就找不到,不会去 Spring中找,这就决定了,Controller必须在SpringMVC中扫描。
2. 为什么不全部在SpringMVC中扫描
在SSM整合或者Spring+SpringMVC+JdbcTemplate中,可以全部在SpringMVC中扫描,但是,在SSH整合中,这种方式不允许。
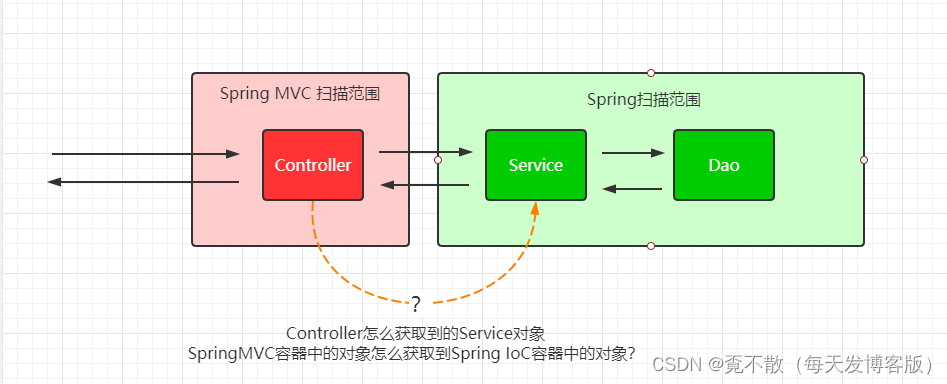
分析Spring的初始化,应该从web.xml中入手。
<!-- 配置Spring -->
<context-param><param-name>contextConfigLocation</param-name><param-value>classpath:applicationContext.xml</param-value>
</context-param>
<listener><listenerclass>org.springframework.web.context.ContextLoaderListener</listener-class>
</listener>
ContextLoaderListener这个监听器是系统启动的时候会触发。
public void contextInitialized(ServletContextEvent event) {// 初始化web容器this.initWebApplicationContext(event.getServletContext());
}
public WebApplicationContext initWebApplicationContext(ServletContext servletContext) {if(servletContext.getAttribute(WebApplicationContext.ROOT_WEB_APPLICATION_CONTEXT_ATTRIBUTE) != null) {throw new IllegalStateException("Cannot initialize context because there is already a root application context present - check whether you have multiple ContextLoader* definitions in your web.xml!");} else {Log logger = LogFactory.getLog(ContextLoader.class);servletContext.log("Initializing Spring root WebApplicationContext");if (logger.isInfoEnabled()) {logger.info("Root WebApplicationContext: initialization started");}long startTime = System.currentTimeMillis();try {if (this.context == null) {// 创建容器对象this.context = this.createWebApplicationContext(servletContext);}if (this.context instanceof ConfigurableWebApplicationContext) {ConfigurableWebApplicationContext cwac = (ConfigurableWebApplicationContext)this.context;if (!cwac.isActive()) {if (cwac.getParent() == null) {ApplicationContext parent = this.loadParentContext(servletContext);cwac.setParent(parent);}// 完全Spring IoC容器的初始化操作this.configureAndRefreshWebApplicationContext(cwac, servletContext);}}// 将Spring的IoC容器对象保存在了Servlet容器中 key是ROOT_WEB_APPLICATION_CONTEXT_ATTRIBUTE servletContext.setAttribute(WebApplicationContext.ROOT_WEB_APPLICATION_CONTEXT_ATTRIBUTE, this.context);ClassLoader ccl = Thread.currentThread().getContextClassLoader();if (ccl == ContextLoader.class.getClassLoader()) {currentContext = this.context;} else if (ccl != null) {currentContextPerThread.put(ccl, this.context);}if (logger.isDebugEnabled()) {logger.debug("Published root WebApplicationContext as ServletContext attribute with name [" +WebApplicationContext.ROOT_WEB_APPLICATION_CONTEXT_ATTRIBUTE + "]");}if (logger.isInfoEnabled()) {long elapsedTime = System.currentTimeMillis() - startTime;logger.info("Root WebApplicationContext: initialization completed in " + elapsedTime + " ms");}return this.context;} catch (RuntimeException var8) {logger.error("Context initialization failed", var8);servletContext.setAttribute(WebApplicationContext.ROOT_WEB_APPLICATION_CONTEXT_ATTRIBUTE, var8);throw var8;} catch (Error var9) {logger.error("Context initialization failed", var9);servletContext.setAttribute(WebApplicationContext.ROOT_WEB_APPLICATION_CONTEXT_ATTRIBUTE, var9);throw var9;}
}
在SpringMVC整合Spring中,在ContextLoaderListener完成的是SpringIoC的初始化操作,同时将IoC容器保存在了Servlet上下文中。
再看SpringMVC中的处理
protected WebApplicationContext initWebApplicationContext() {// 获取Spring IoC容器对象WebApplicationContext rootContext = WebApplicationContextUtils.getWebApplicationContext(this.getServletContext());WebApplicationContext wac = null;if (this.webApplicationContext != null) {wac = this.webApplicationContext;if (wac instanceof ConfigurableWebApplicationContext) {ConfigurableWebApplicationContext cwac = (ConfigurableWebApplicationContext)wac;if (!cwac.isActive()) {if (cwac.getParent() == null) {cwac.setParent(rootContext);}this.configureAndRefreshWebApplicationContext(cwac);}}}if (wac == null) {wac = this.findWebApplicationContext();}if (wac == null) {wac = this.createWebApplicationContext(rootContext);}if (!this.refreshEventReceived) {this.onRefresh(wac);}if (this.publishContext) {String attrName = this.getServletContextAttributeName();this.getServletContext().setAttribute(attrName, wac);if (this.logger.isDebugEnabled()) {this.logger.debug("Published WebApplicationContext of servlet '" + this.getServletName() + "' as ServletContext attribute with name [" + attrName + "]");}}return wac;
}
如何获取Spring IoC容器对象的。
public static WebApplicationContext getWebApplicationContext(ServletContext sc){return getWebApplicationContext(sc,WebApplicationContext.ROOT_WEB_APPLICATION_CONTEXT_ATTRIBUTE);
}
然后进入createWebApplicationContext方法。
protected WebApplicationContext createWebApplicationContext(ApplicationContext parent) {Class<?> contextClass = this.getContextClass();if (this.logger.isDebugEnabled()) {this.logger.debug("Servlet with name '" + this.getServletName() + "'will try to create custom WebApplicationContext context of class '" +contextClass.getName() + "', using parent context [" + parent + "]");}if(!ConfigurableWebApplicationContext.class.isAssignableFrom(contextClass)) {throw new ApplicationContextException("Fatal initialization error in servlet with name '" + this.getServletName() + "': custom WebApplicationContext class [" + contextClass.getName() + "] is not of type ConfigurableWebApplicationContext");} else {ConfigurableWebApplicationContext wac = (ConfigurableWebApplicationContext)BeanUtils.instantiateClass(contextClass);wac.setEnvironment(this.getEnvironment());// Spring MVC的IoC容器对象设置Spring 的IoC容器对象为父容器wac.setParent(parent);wac.setConfigLocation(this.getContextConfigLocation());this.configureAndRefreshWebApplicationContext(wac);return wac;}
}
得出的重点结论:Spring的IoC容器对象是SpringMVC容器的父容器,所以SpringMVC中的对象可以将SpringIOC容器中的对象注入,但是反过来就不行了!!!
五、Spring和SpringMVC总结
相关专题常见面试题:
1. 介绍下Spring的IoC
2. 介绍下Spring的AOP
3. 事务的传播属性
4. 事务的隔离级别
5. 介绍下Spring中用到的设计模式有哪些?
6. 介绍下Spring MVC的工作原理
7. Spring和SpringMVC的关系
)


)
之 慢 SQL 优化思路)

![蓝桥杯-Excel地址[Java]](http://pic.xiahunao.cn/蓝桥杯-Excel地址[Java])


