本节目标
本篇文章主要是介绍以下springboot整合开源项目,实现反爬虫接口防刷的demo,额外的介绍一下axios的基本用法;所以本篇文章阅读起来相对轻松。OK,下面开始整合.
引入项目依赖
cn.keking.project kk-anti-reptile 1.0.0-RELEASEorg.redisson redisson 3.13.5依赖这里遇到了坑,按照它里面的文档说明,如果项目不用redisson,是不需要引入redison的依赖的,只需要配置下redisson的连接就可以的,但是启动会报redis的连接错误,但是貌似也能访问。不过,有错误就得解决,所以我又引入了redisson 的依赖,并且配置了本地的redisson地址,这才没报错。
配置文件
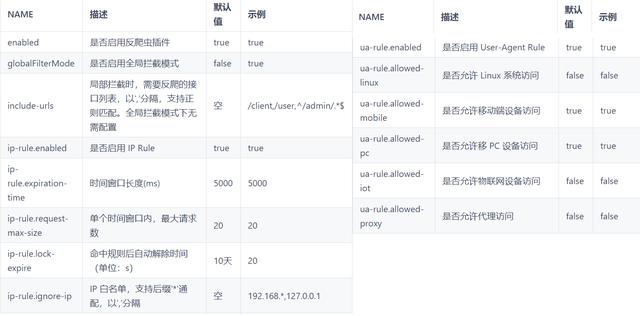
spring: thymeleaf: mode: HTML prefix: classpath:/templates/ encoding: UTF-8 redisson: address: redis://127.0.0.1:6379anti: reptile: manager: enabled: true# 启用反爬插件 ip-rule: expiration-time: 60000 #时间窗口,单位ms request-max-size: 3 #时间窗口内最大请求数enabled: true # 启用IP rule规则所有配置都以anti.reptile.manager为前缀,具体配置如下:

数据来源此项目作者:kekingcn
这里需要说明的是,里面有些配置项不能自由配置,例如 ip-rule.lock-expire ,在配置文件中是找不到这个配置项的,刚开始我还以为看漏了,确实配置不了,而且它的默认值是10天,不过我大概看了下,代码中给的是1天,不知道是不是写错了。
反爬虫组件使用
使用还是比较简单的,只需要在需要反爬的接口上加一个注解就行了,如下
@Controllerpublic class TestController { @AntiReptile @GetMapping("/test/anti") @ResponseBody public String test() { return "hello world!!!"; }}测试
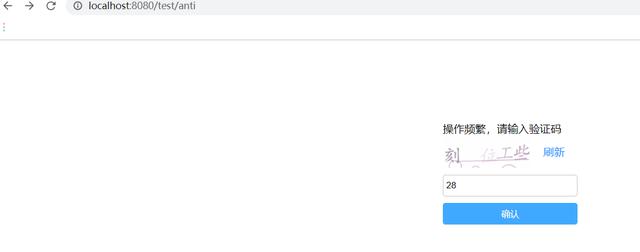
在配置的时间窗口内连续访问,达到访问的最大值,命中规则,就会出现下面的验证规则。这个验证页面我也发现了个问题,就是输入验证信息后,直接按enter,会跳到报错页面,可能它这个enter的监听事件没有做。

验证页面
axios使用
项目中我们是不可能直接这么访问接口的,一般都是从页面点击某个元素然后发起请求,那么就需要对这种命中规则后统一进行拦截,让其输验证码。我这里就cdn 引入了,这里的测试我就不贴出来了,需要的可以私信。配置如下:
//你的baseurlaxios.defaults.baseUrl = 'http://localhost:8080';// 添加响应拦截器axios.interceptors.response.use(function (response) { // to do something console.log('拦截:' + response) return response;}, function (error) { console.log("进来了。。。。。。。"); // to do something if (error.response.status === 509) {// 命中规则会返回509状态码 var html = error.response.data; //console.log('509错误' + html) var verifyWindow = window.open("","_blank","height=400,width=560"); verifyWindow.document.write(html); verifyWindow.document.getElementById("baseUrl").value = baseUrl; }});如果你是前端大神,请跳过此处。作为一名后端猿人,对这个axios的基本用法也应了解一些。下面是常用的方法,帮你罗列出来了。
// 发送 POST 请求axios({ method: 'post', url: '/user/12345', data: { firstName: 'Fred', lastName: 'Flintstone' }}); //无后续//发送POST, 后续处理axios.post('user',{firstName: 'Fred'}).then(function (response) { console.log(response); }) .catch(function (error) { console.log(error); });// 为给定 ID 的 user 创建请求axios.get('/user?ID=12345') .then(function (response) { console.log(response); }) .catch(function (error) { console.log(error); });// 上面的请求也可以这样做axios.get('/user', { params: { ID: 12345 } }) .then(function (response) { console.log(response); }) .catch(function (error) { console.log(error); });//并发请求function getUserAccount() { return axios.get('/user/12345');}function getUserPermissions() { return axios.get('/user/12345/permissions');}axios.all([getUserAccount(), getUserPermissions()]) .then(axios.spread(function (acct, perms) { // 两个请求现在都执行完成 }));更多用法详见:http://www.axios-js.com/zh-cn/docs/#axios-API
总结
目前感觉这个开源项目还需要再沉淀一下,需要更多的人测试优化,今天只是简单的使用了其中一两个配置,其他的配置还没有测试,大家感兴趣的,可以自己去试下。喜欢小编的朋友可以关注下小编,评论里留下你的见解。最后,点赞+转发,私信小编【anti】,获取源码地址。


)


_Linux配置JDK环境)

)
Python机器学习笔记GridSearchCV(网格搜索))


 函数把预定义的 HTML 实体转换为字符)

