前言
我们都知道,Spring的功能非常强大,但也有些弊端。比如:我们需要手动去配置大量的参数,没有默认值,需要我们管理大量的jar包和它们的依赖。
为了提升Spring项目的开发效率,简化一些配置,Spring官方引入了SpringBoot。
当然,引入SpringBoot还有其他原因,在这里就不过多描述了。
本文重点跟大家一起聊聊SpringBoot的starter机制,因为它太重要了。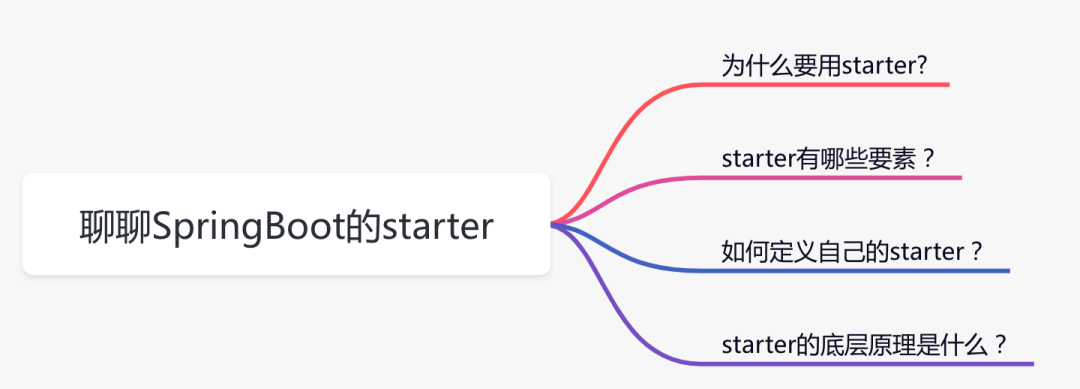
1 为什么要用starter?
在SpringBoot还没有出来之前,我们使用Spring开发项目。如果程序需要连接数据库,我们一般会使用Hibernate或Mybatis等ORM框架,这里我以Mybatis为例,具体的操作步骤如下:
到maven仓库去找需要引入的mybatis jar包,选取合适的版本。
到maven仓库去找mybatis-spring整合的jar包,选取合适的版本。
在spring的applicationContext.xml文件中配置dataSource和mybatis相关信息。
当然有些朋友可能会指正,不是还需要引入数据库驱动包吗?
确实需要引入,但数据库驱动有很多,比如:mysql、oracle、sqlserver,这不属于mybatis的范畴,使用者可以根据项目的实际情况单独引入。
如果程序只是需要连接数据库这一个功能还好,按上面的步骤做基本可以满足需求。但是,连接数据库可能只是庞大的项目体系中一个环节,实际项目中往往更复杂,需要引入更多的功能,比如:连接redis、连接mongodb、使用rocketmq、使用excel功能等等。
引入这些功能的话,需要再把上面的步骤再重复一次,工作量无形当中增加了不少,而且有很多重复的工作。
另外,还是有个问题,每次到要到maven中找合适的版本,如果哪次找的mybatis.jar包 和 mybatis-spring.jar包版本不兼容,程序不是会出现问题?
SpringBoot为了解决以上两个问题引入了starter机制。
2 starter有哪些要素?
我们首先一起看看mybatis-spring-boot-starter.jar是如何定义的。
 可以看到它的META-INF目录下只包含了:
pom.protperties 配置maven所需的项目version、groupId和artifactId。
pom.xml 配置所依赖的jar包。
MANIFEST.MF 这个文件描述了该Jar文件的很多信息。
spring.provides 配置所依赖的artifactId,给IDE使用的,没有其他的作用。
注意一下,没有一行代码。
我们重点看一下pom.xml,因为这个jar包里面除了这个没有啥重要的信息
<?xml version="1.0" encoding="UTF-8"?>
<project xmlns="http://maven.apache.org/POM/4.0.0" xmlns:xsi="http://www.w3.org/2001/XMLSchema-instance" xsi:schemaLocation="http://maven.apache.org/POM/4.0.0 http://maven.apache.org/xsd/maven-4.0.0.xsd"><modelVersion>4.0.0</modelVersion><parent><groupId>org.mybatis.spring.boot</groupId><artifactId>mybatis-spring-boot</artifactId><version>1.3.1</version></parent><artifactId>mybatis-spring-boot-starter</artifactId><name>mybatis-spring-boot-starter</name><dependencies><dependency><groupId>org.springframework.boot</groupId><artifactId>spring-boot-starter</artifactId></dependency><dependency><groupId>org.springframework.boot</groupId><artifactId>spring-boot-starter-jdbc</artifactId></dependency><dependency><groupId>org.mybatis.spring.boot</groupId><artifactId>mybatis-spring-boot-autoconfigure</artifactId></dependency><dependency><groupId>org.mybatis</groupId><artifactId>mybatis</artifactId></dependency><dependency><groupId>org.mybatis</groupId><artifactId>mybatis-spring</artifactId></dependency></dependencies>
</project>从上面可以看出,pom.xml文件中会引入一些jar包,其中除了引入spring-boot-starter,之外重点看一下:mybatis-spring-boot-autoconfigure。
我们找到mybatis-spring-boot-autoconfigure.jar文件,打开这个文件。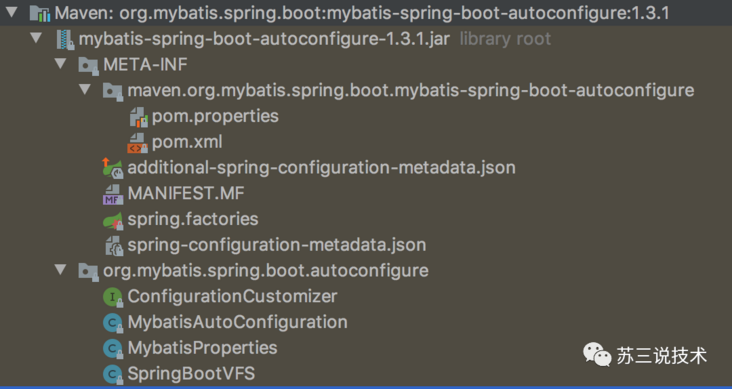
里面包含如下文件:
pom.properties 配置maven所需的项目version、groupId和artifactId
pom.xml 配置所依赖的jar包
additional-spring-configuration-metadata.json 手动添加IDE提示功能
MANIFEST.MF 这个文件描述了该Jar文件的很多信息
spring.factories SPI会读取的文件
spring-configuration-metadata.json 系统自动生成的IDE提示功能
ConfigurationCustomizer 自定义Configuration回调接口
MybatisAutoConfiguration mybatis配置类
MybatisProperties mybatis属性类
SpringBootVFS 扫描嵌套的jar包中的类
spring-configuration-metadata.json和additional-spring-configuration-metadata.json的功能差不多,我们在applicationContext.properties文件中输入spring时,会自动出现下面的配置信息可供选择,就是这个功能了。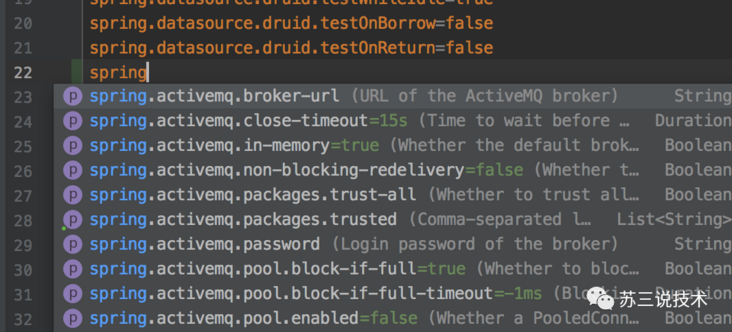
来自灵魂的一问:这两个文件有什么区别?
答:如果pom.xml中引入了spring-boot-configuration-processor包,则会自动生成spring-configuration-metadata.json。
如果需要手动修改里面的元数据,则可以在additional-spring-configuration-metadata.json中编辑,最终两个文件中的元数据会合并到一起。
MybatisProperties类是属性实体类:
@ConfigurationProperties(prefix = MybatisProperties.MYBATIS_PREFIX)
public class MybatisProperties {public static final String MYBATIS_PREFIX = "mybatis";private String configLocation;private String[] mapperLocations;private String typeAliasesPackage;private String typeHandlersPackage;private boolean checkConfigLocation = false;private ExecutorType executorType;private Properties configurationProperties;@NestedConfigurationPropertyprivate Configuration configuration;public String getConfigLocation() {return this.configLocation;}public void setConfigLocation(String configLocation) {this.configLocation = configLocation;}@Deprecatedpublic String getConfig() {return this.configLocation;}@Deprecatedpublic void setConfig(String config) {this.configLocation = config;}public String[] getMapperLocations() {return this.mapperLocations;}public void setMapperLocations(String[] mapperLocations) {this.mapperLocations = mapperLocations;}public String getTypeHandlersPackage() {return this.typeHandlersPackage;}public void setTypeHandlersPackage(String typeHandlersPackage) {this.typeHandlersPackage = typeHandlersPackage;}public String getTypeAliasesPackage() {return this.typeAliasesPackage;}public void setTypeAliasesPackage(String typeAliasesPackage) {this.typeAliasesPackage = typeAliasesPackage;}public boolean isCheckConfigLocation() {return this.checkConfigLocation;}public void setCheckConfigLocation(boolean checkConfigLocation) {this.checkConfigLocation = checkConfigLocation;}public ExecutorType getExecutorType() {return this.executorType;}public void setExecutorType(ExecutorType executorType) {this.executorType = executorType;}public Properties getConfigurationProperties() {return configurationProperties;}public void setConfigurationProperties(Properties configurationProperties) {this.configurationProperties = configurationProperties;}public Configuration getConfiguration() {return configuration;}public void setConfiguration(Configuration configuration) {this.configuration = configuration;}public Resource[] resolveMapperLocations() {ResourcePatternResolver resourceResolver = new PathMatchingResourcePatternResolver();List<Resource> resources = new ArrayList<Resource>();if (this.mapperLocations != null) {for (String mapperLocation : this.mapperLocations) {try {Resource[] mappers = resourceResolver.getResources(mapperLocation);resources.addAll(Arrays.asList(mappers));} catch (IOException e) {// ignore}}}return resources.toArray(new Resource[resources.size()]);}
}可以看到Mybatis初始化所需要的很多属性都在这里,相当于一个JavaBean。
下面重点看一下MybatisAutoConfiguration的代码:
@org.springframework.context.annotation.Configuration
@ConditionalOnClass({ SqlSessionFactory.class, SqlSessionFactoryBean.class })
@ConditionalOnBean(DataSource.class)
@EnableConfigurationProperties(MybatisProperties.class)
@AutoConfigureAfter(DataSourceAutoConfiguration.class)
public class MybatisAutoConfiguration {private static final Logger logger = LoggerFactory.getLogger(MybatisAutoConfiguration.class);private final MybatisProperties properties;private final Interceptor[] interceptors;private final ResourceLoader resourceLoader;private final DatabaseIdProvider databaseIdProvider;private final List<ConfigurationCustomizer> configurationCustomizers;public MybatisAutoConfiguration(MybatisProperties properties,ObjectProvider<Interceptor[]> interceptorsProvider,ResourceLoader resourceLoader,ObjectProvider<DatabaseIdProvider> databaseIdProvider,ObjectProvider<List<ConfigurationCustomizer>> configurationCustomizersProvider) {this.properties = properties;this.interceptors = interceptorsProvider.getIfAvailable();this.resourceLoader = resourceLoader;this.databaseIdProvider = databaseIdProvider.getIfAvailable();this.configurationCustomizers = configurationCustomizersProvider.getIfAvailable();}@PostConstructpublic void checkConfigFileExists() {if (this.properties.isCheckConfigLocation() && StringUtils.hasText(this.properties.getConfigLocation())) {Resource resource = this.resourceLoader.getResource(this.properties.getConfigLocation());Assert.state(resource.exists(), "Cannot find config location: " + resource+ " (please add config file or check your Mybatis configuration)");}}@Bean@ConditionalOnMissingBeanpublic SqlSessionFactory sqlSessionFactory(DataSource dataSource) throws Exception {SqlSessionFactoryBean factory = new SqlSessionFactoryBean();factory.setDataSource(dataSource);factory.setVfs(SpringBootVFS.class);if (StringUtils.hasText(this.properties.getConfigLocation())) {factory.setConfigLocation(this.resourceLoader.getResource(this.properties.getConfigLocation()));}Configuration configuration = this.properties.getConfiguration();if (configuration == null && !StringUtils.hasText(this.properties.getConfigLocation())) {configuration = new Configuration();}if (configuration != null && !CollectionUtils.isEmpty(this.configurationCustomizers)) {for (ConfigurationCustomizer customizer : this.configurationCustomizers) {customizer.customize(configuration);}}factory.setConfiguration(configuration);if (this.properties.getConfigurationProperties() != null) {factory.setConfigurationProperties(this.properties.getConfigurationProperties());}if (!ObjectUtils.isEmpty(this.interceptors)) {factory.setPlugins(this.interceptors);}if (this.databaseIdProvider != null) {factory.setDatabaseIdProvider(this.databaseIdProvider);}if (StringUtils.hasLength(this.properties.getTypeAliasesPackage())) {factory.setTypeAliasesPackage(this.properties.getTypeAliasesPackage());}if (StringUtils.hasLength(this.properties.getTypeHandlersPackage())) {factory.setTypeHandlersPackage(this.properties.getTypeHandlersPackage());}if (!ObjectUtils.isEmpty(this.properties.resolveMapperLocations())) {factory.setMapperLocations(this.properties.resolveMapperLocations());}return factory.getObject();}@Bean@ConditionalOnMissingBeanpublic SqlSessionTemplate sqlSessionTemplate(SqlSessionFactory sqlSessionFactory) {ExecutorType executorType = this.properties.getExecutorType();if (executorType != null) {return new SqlSessionTemplate(sqlSessionFactory, executorType);} else {return new SqlSessionTemplate(sqlSessionFactory);}}public static class AutoConfiguredMapperScannerRegistrarimplements BeanFactoryAware, ImportBeanDefinitionRegistrar, ResourceLoaderAware {private BeanFactory beanFactory;private ResourceLoader resourceLoader;@Overridepublic void registerBeanDefinitions(AnnotationMetadata importingClassMetadata, BeanDefinitionRegistry registry) {ClassPathMapperScanner scanner = new ClassPathMapperScanner(registry);try {if (this.resourceLoader != null) {scanner.setResourceLoader(this.resourceLoader);}List<String> packages = AutoConfigurationPackages.get(this.beanFactory);if (logger.isDebugEnabled()) {for (String pkg : packages) {logger.debug("Using auto-configuration base package '{}'", pkg);}}scanner.setAnnotationClass(Mapper.class);scanner.registerFilters();scanner.doScan(StringUtils.toStringArray(packages));} catch (IllegalStateException ex) {logger.debug("Could not determine auto-configuration package, automatic mapper scanning disabled.", ex);}}@Overridepublic void setBeanFactory(BeanFactory beanFactory) throws BeansException {this.beanFactory = beanFactory;}@Overridepublic void setResourceLoader(ResourceLoader resourceLoader) {this.resourceLoader = resourceLoader;}}@org.springframework.context.annotation.Configuration@Import({ AutoConfiguredMapperScannerRegistrar.class })@ConditionalOnMissingBean(MapperFactoryBean.class)public static class MapperScannerRegistrarNotFoundConfiguration {@PostConstructpublic void afterPropertiesSet() {logger.debug("No {} found.", MapperFactoryBean.class.getName());}}
}这个类就是一个Configuration(配置类),它里面定义很多bean,其中最重要的就是SqlSessionFactory的bean实例,该实例是Mybatis的核心功能,用它创建SqlSession,对数据库进行CRUD操作。
除此之外,MybatisAutoConfiguration类还包含了:
@ConditionalOnClass 配置了只有包含SqlSessionFactory.class和SqlSessionFactoryBean.class,该配置类才生效。
@ConditionalOnBean 配置了只有包含dataSource实例时,该配置类才生效。
@EnableConfigurationProperties 该注解会自动填充MybatisProperties实例中的属性。
AutoConfigureAfter 配置了该配置类在DataSourceAutoConfiguration类之后自动配置。
这些注解都是一些辅助功能,决定Configuration是否生效,当然这些注解不是必须的。
接下来,重点看看spring.factories文件有啥内容:
org.springframework.boot.autoconfigure.EnableAutoConfiguration=\
org.mybatis.spring.boot.autoconfigure.MybatisAutoConfiguration里面只有一行配置,即key为EnableAutoConfiguration,value为MybatisAutoConfiguration。
好了,介绍了这么多东西,现在我们来总结一下,
starter几个要素如下图所示: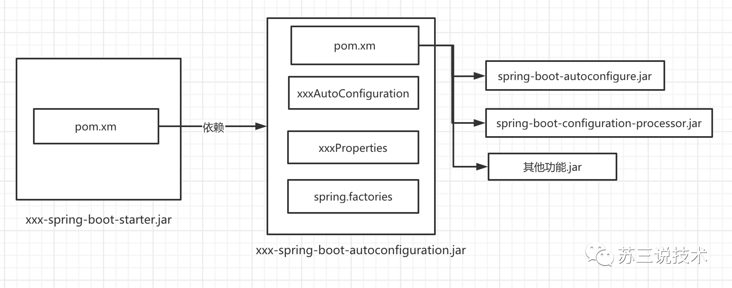 那么,编写starter需要哪些步骤?
1.需要定义一个名称为xxx-spring-boot-starter的空项目,里面不包含任何代码,可以有pom.xml和pom.properties文件。
2.pom.xml文件中包含了名称为xxx-spring-boot-autoconfigure的项目。
3.xxx-spring-boot-autoconfigure项目中包含了名称为xxxAutoConfiguration的类,该类可以定义一些bean实例。当然,Configuration类上可以打一些如:ConditionalOnClass、ConditionalOnBean、EnableConfigurationProperties等注解。
4.需要在spring.factories文件中增加key为EnableAutoConfiguration,value为xxxAutoConfiguration。
我们试着按照这四步,自己编写一个starter看看能否成功,验证一下总结的内容是否正确。
3 如何定义自己的starter?
3.1 先创建一个空项目
该项目名称为id-generate-starter,注意为了方便我把项目重命名了,原本应该是叫id-generate-spring-boot-starter的,如下图所示: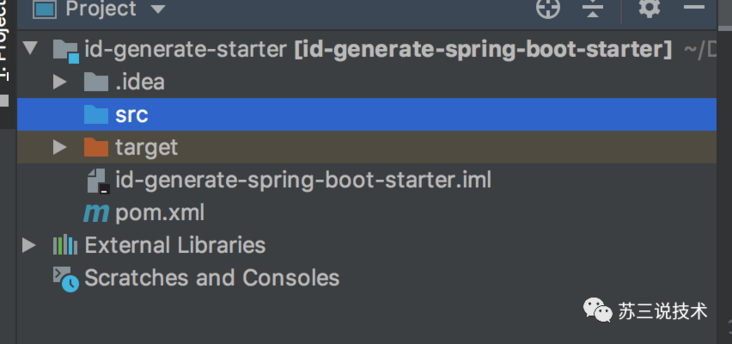
pom.xml文件定义如下:
<?xml version="1.0" encoding="UTF-8"?>
<project xmlns="http://maven.apache.org/POM/4.0.0" xmlns:xsi="http://www.w3.org/2001/XMLSchema-instance" xsi:schemaLocation="http://maven.apache.org/POM/4.0.0 http://maven.apache.org/xsd/maven-4.0.0.xsd"><modelVersion>4.0.0</modelVersion><version>1.3.1</version><groupId>com.sue</groupId><artifactId>id-generate-spring-boot-starter</artifactId><name>id-generate-spring-boot-starter</name><dependencies><dependency><groupId>com.sue</groupId><artifactId>id-generate-spring-boot-autoconfigure</artifactId><version>1.3.1</version></dependency></dependencies>
</project>
我们看到,它只引入了id-generate-spring-boot-autoconfigure。当然如果有需要这里还可以引入多个autoconfigure或者多个其他jar包或者。
3.2 创建id-generate-autoconfigure
同样为了方便我把项目重命名了,原本是叫id-generate-spring-boot-autoconfigure,如下图所示: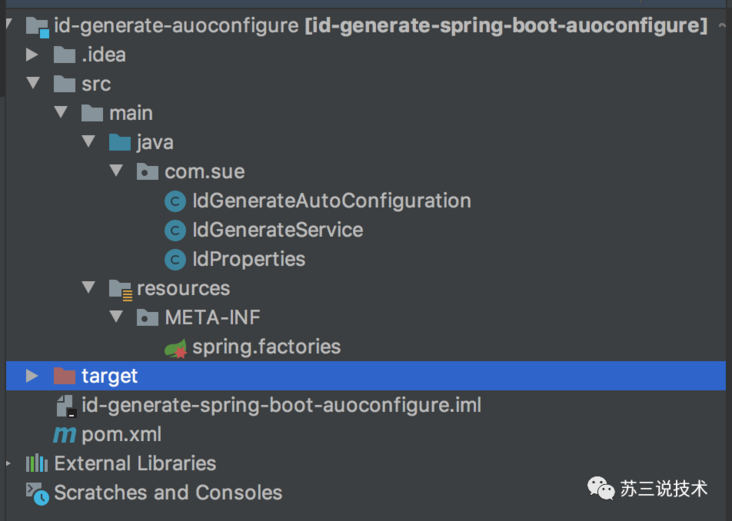
该项目当中包含:pom.xml、spring.factories、IdGenerateAutoConfiguration、IdGenerateService 和 IdProperties 这5个关键文件,下面我们逐一看看。
先从pom.xml
<?xml version="1.0" encoding="UTF-8"?>
<project xmlns="http://maven.apache.org/POM/4.0.0" xmlns:xsi="http://www.w3.org/2001/XMLSchema-instance" xsi:schemaLocation="http://maven.apache.org/POM/4.0.0 http://maven.apache.org/xsd/maven-4.0.0.xsd"><parent><groupId>org.springframework.boot</groupId><artifactId>spring-boot-starter-parent</artifactId><version>2.0.4.RELEASE</version></parent><modelVersion>4.0.0</modelVersion><version>1.3.1</version><groupId>com.sue</groupId><artifactId>id-generate-spring-boot-autoconfigure</artifactId><name>id-generate-spring-boot-autoconfigure</name><dependencies><dependency><groupId>org.springframework.boot</groupId><artifactId>spring-boot-starter</artifactId></dependency><dependency><groupId>org.springframework.boot</groupId><artifactId>spring-boot-autoconfigure</artifactId></dependency><dependency><groupId>org.springframework.boot</groupId><artifactId>spring-boot-configuration-processor</artifactId><optional>true</optional></dependency></dependencies><build><plugins><plugin><groupId>org.apache.maven.plugins</groupId><artifactId>maven-compiler-plugin</artifactId><configuration><source>1.8</source><target>1.8</target></configuration></plugin></plugins></build>
</project>
我们可以看到,这个文件比较简单就引入了:
spring-boot-starter:springboot的相关jar包。
spring-boot-autoconfigure:springboot自动配置相关jar包。
spring-boot-configuration-processor:springboot生成IDE提示功能相关jar包。
重点看看spring.factories文件:
org.springframework.boot.autoconfigure.EnableAutoConfiguration=com.sue.IdGenerateAutoConfiguration它里面只包含一行配置,其中key是EnableAutoConfiguration,value是IdGenerateAutoConfiguration。
再重点看一下IdGenerateAutoConfiguration
@ConditionalOnClass(IdProperties.class)
@EnableConfigurationProperties(IdProperties.class)
@Configuration
public class IdGenerateAutoConfiguration {@Autowiredprivate IdProperties properties;@Beanpublic IdGenerateService idGenerateService() {return new IdGenerateService(properties.getWorkId());}
}该类是一个使用了@Configuration注解标记为了配置类,生效的条件是@ConditionalOnClass注解中检测到包含IdProperties.class。并且使用@EnableConfigurationProperties注解会自动注入IdProperties的实例。
此外,最关键的点是该类里面创建了idGenerateService的bean实例,这是自动配置的精髓。
再看看IdGenerateService
public class IdGenerateService {private Long workId;public IdGenerateService(Long workId) {this.workId = workId;}public Long generate() {return new Random().nextInt(100) + this.workId;}
}我们可以看到它是一个普通的类,甚至都没有使用@Service注解,里面有个generate方法,根据workId的值和随机数动态生成id。
最后看看IdProperties
@ConfigurationProperties(prefix = IdProperties.PREFIX)
public class IdProperties {public static final String PREFIX = "sue";private Long workId;public Long getWorkId() {return workId;}public void setWorkId(Long workId) {this.workId = workId;}
}它是一个配置实体类,里面包含了相关的配置文件。使用@ConfigurationProperties注解,会自动把application.properties文件中以sue开通的,参数名称跟IdProperties中一样的参数值,自动注入到IdProperties对象中。
3.3 创建id-generate-test
这个项目主要用于测试。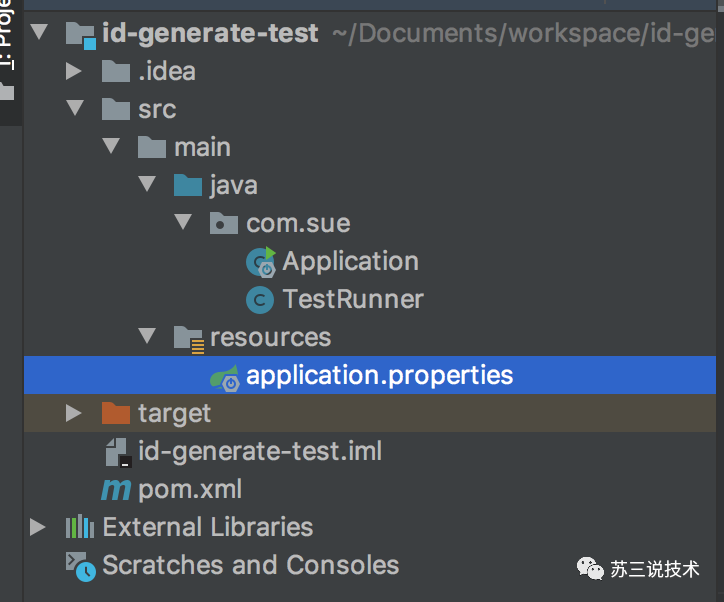
该项目里面包含:pom.xml、application.properties、Application 和 TestRunner 文件。
先看看pom.xml文件
<?xml version="1.0" encoding="UTF-8"?>
<project xmlns="http://maven.apache.org/POM/4.0.0" xmlns:xsi="http://www.w3.org/2001/XMLSchema-instance" xsi:schemaLocation="http://maven.apache.org/POM/4.0.0 http://maven.apache.org/xsd/maven-4.0.0.xsd"><modelVersion>4.0.0</modelVersion><version>1.3.1</version><groupId>com.sue</groupId><artifactId>spring-boot-id-generate-test</artifactId><name>spring-boot-id-generate-test</name><dependencies><dependency><groupId>com.sue</groupId><artifactId>id-generate-spring-boot-starter</artifactId><version>1.3.1</version></dependency></dependencies>
</project>
由于只测试刚刚定义的id生成功能,所以只引入的id-generate-spring-boot-starter jar包。
application.properties配置资源文件
sue.workId=123只有一行配置,因为我们的IdProperties中目前只需要这一个参数。
Application是测试程序启动类
@SpringBootApplication
public class Application {public static void main(String[] args) {SpringApplication.run(Application.class, args);}
}
很简单,就是一个普通的springboot启动类
TestRunner是我们的测试类
@Component
public class TestRunner implements ApplicationRunner {@Autowiredprivate IdGenerateService idGenerateService;public void run(ApplicationArguments args) throws Exception {Long sysNo = idGenerateService.generate();System.out.println(sysNo);}
}它实现了ApplicationRunner接口,所以在springboot启动的时候会调用该类的run方法。
好了,所有自定义starter的代码和测试代码都已经就绪。接下,运行一下Application类的main方法。
运行结果:
176完美,验证成功了。
接下来,我们分析一下starter的底层实现原理。
4 starter的底层原理是什么?
通过上面编写自己的starter的例子,相信大家对starter的认识更进一步了,现在跟大家一起看看starter的底层是如何实现的。
id-generate-starter.jar其实是一个空项目,依赖于id-generate-autoconfiguration.jar。
id-generate-starter.jar是一个入口,我们给他取一个更优雅的名字:门面模式,其他业务系统想引入相应的功能,必须要通过这个门面。
我们重点分析一下 id-generate-autoconfiguration.jar
该jar包核心内容是:IdGenerateConfiguration,这个配置类中创建了IdGenerateService对象,IdGenerateService是我们所需要自动配置的具体功能。
接下来一个最重要的问题:IdGenerateConfiguration为什么会自动加载的呢?
还记得我们定义的spring.factories文件不?
org.springframework.boot.autoconfigure.EnableAutoConfiguration=com.sue.IdGenerateAutoConfiguration它里面只包含一行配置,其中key是EnableAutoConfiguration,value是IdGenerateAutoConfiguration。
要搞明白这个过程,要从Application类的@SpringBootApplication注解开始:
@Target(ElementType.TYPE)
@Retention(RetentionPolicy.RUNTIME)
@Documented
@Inherited
@SpringBootConfiguration
@EnableAutoConfiguration
@ComponentScan(excludeFilters = {@Filter(type = FilterType.CUSTOM, classes = TypeExcludeFilter.class),@Filter(type = FilterType.CUSTOM, classes = AutoConfigurationExcludeFilter.class) })
public @interface SpringBootApplication {@AliasFor(annotation = EnableAutoConfiguration.class)Class<?>[] exclude() default {};@AliasFor(annotation = EnableAutoConfiguration.class)String[] excludeName() default {};@AliasFor(annotation = ComponentScan.class, attribute = "basePackages")String[] scanBasePackages() default {};@AliasFor(annotation = ComponentScan.class, attribute = "basePackageClasses")Class<?>[] scanBasePackageClasses() default {};
}从上面可以看出该注解里面包含了@EnableAutoConfiguration注解。
@Target(ElementType.TYPE)
@Retention(RetentionPolicy.RUNTIME)
@Documented
@Inherited
@AutoConfigurationPackage
@Import(AutoConfigurationImportSelector.class)
public @interface EnableAutoConfiguration {String ENABLED_OVERRIDE_PROPERTY = "spring.boot.enableautoconfiguration";Class<?>[] exclude() default {};String[] excludeName() default {};
}@EnableAutoConfiguration注解会引入AutoConfigurationImportSelector类。
该类的selectImports方法一个关键方法:
@Overridepublic String[] selectImports(AnnotationMetadata annotationMetadata) {//配置有没有配置spring.boot.enableautoconfiguration开关,默认为true//如果为false,则不执行自动配置的功能,直接返回if (!isEnabled(annotationMetadata)) {return NO_IMPORTS;}//找spring-autoconfigure-metadata.properties中的元素AutoConfigurationMetadata autoConfigurationMetadata = AutoConfigurationMetadataLoader.loadMetadata(this.beanClassLoader);//获取EnableAutoConfiguration注解中的属性 AnnotationAttributes attributes = getAttributes(annotationMetadata);//获取工程下所有配置key为EnableAutoConfiguration的值,即IdGenerateConfiguration等类。List<String> configurations = getCandidateConfigurations(annotationMetadata,attributes);//删除重复的值 configurations = removeDuplicates(configurations);//获取需要排除的规则列表Set<String> exclusions = getExclusions(annotationMetadata, attributes);//检查checkExcludedClasses(configurations, exclusions);//删除需要排除的值configurations.removeAll(exclusions);//根据配置文件中配置的开关,过滤一部分不满足条件的值configurations = filter(configurations, autoConfigurationMetadata);fireAutoConfigurationImportEvents(configurations, exclusions);return StringUtils.toStringArray(configurations);}这里就是starter能够自动配置的秘密。
此外,有些朋友看其他人定义的springboot starter可能会有疑惑。
先看看druid-spring-boot-starter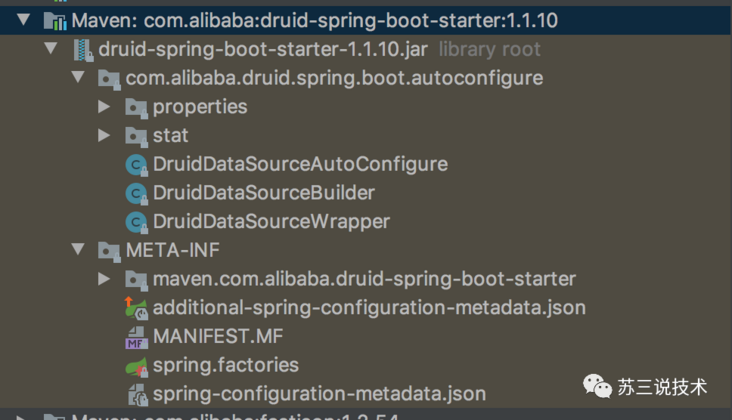
alibaba定义的druid-spring-boot-starter只有xxx-spring-boot-starter.jar文件,而没有xxx-spring-boot-autoconfigure.jar文件。
再看看spring-boot-starter-jdbc:
更神奇的是这个文件中连pom.xml都没有,一脸懵逼。。。。。。。
是不是我讲错了?
答:其实没有。
SpringBoot的原则是约定优于配置。
从spring-boot-starter-jdbc内部空实现来看,它的约定是要把xxx-spring-boot-starter.jar和xxx-spring-boot-autoconfigure.jar区分开的。个人认为,alibaba定义得并不好,没有遵照springboot的约定,虽然功能不受影响。(这个地方欢迎一起探讨一下)
而springboot自己定义的spring-boot-starter-jdbc为什么连pom.xml文件也没有呢?
它不需要依赖xxx-spring-boot-autoconfigure.jar文件吗?
因为springboot把所有的自动配置的类都统一放到spring-boot-autoconfigure.jar下面了: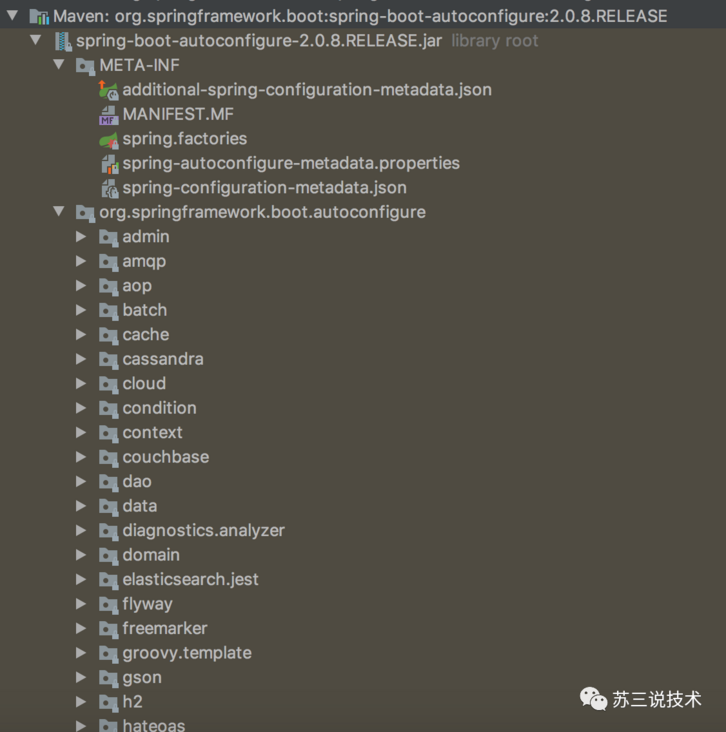
spring.factories文件内容如下: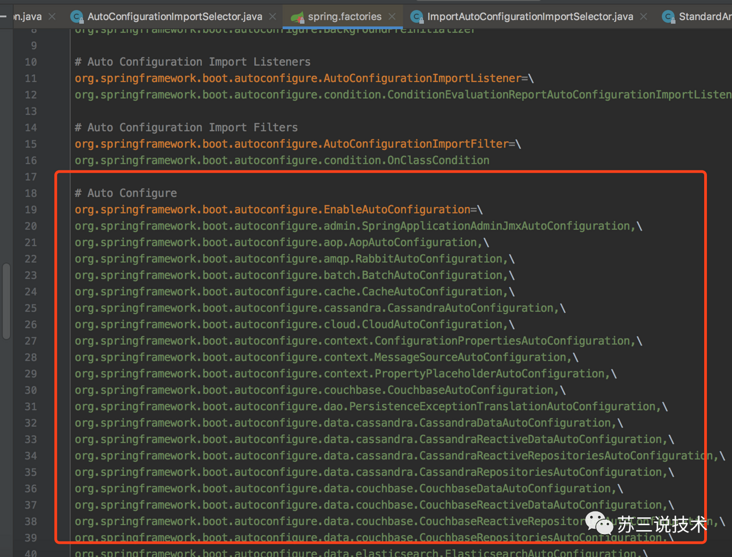 SpringBoot这样集中管理自动配置,而不需要从各个子包中遍历,我个人认为是为了查找效率。
我们最后再看看spring-cloud-starter-openfegin 明显看到,它是遵循了我们说的原则的。
除此之外,还有一个原则一顺便提一下。
SpringBoot和SpringCloud系列定义jar包的名称是:
spring-boot-starter-xxx.jar
spring-cloud-starter-xxx.jar
而我们自己的项目定义的jar应该是:
xxx-spring-boot-starter.jar
最后说一句(求关注,别白嫖我)
如果这篇文章对您有所帮助,或者有所启发的话,帮忙扫描下发二维码关注一下,您的支持是我坚持写作最大的动力。
求一键三连:点赞、转发、在看。


 判断目录是否存在)

)
函数与示例)


