avr计数
This type of counter may be also used in the EVM machines. A counter can be used to count the number of times a button is pressed. It can have many applications. The most widely used counter application is in EVM and also in customer feedback machines.
这种类型的计数器也可以在EVM机器中使用。 计数器可用于计算按下按钮的次数。 它可以有很多应用。 最广泛使用的计数器应用程序是在EVM中以及在客户反馈机中。
CODE
码
#include <avr/io.h>
#define F_CPU 1000000
#include <util/delay.h>
#define RS 0
#define EN 1
void lcd_comm	(char);
void lcd_data	(char);
void lcd_init	(void);
void lcd_string	(char*);
void lcd_num	(int n);
int main(void)
{
int c = 0;
DDRA = 0x00;
lcd_init();
lcd_comm(0x84);
lcd_string("COUNTER");
lcd_comm(0xC5);
lcd_data(c+48);
while(1)
{
if( (PINA & 0x01) == 1 )
{
c++;
lcd_comm(0xC5);
lcd_num(c);
while( (PINA & 0x01) == 1 );
}
}
}
void lcd_comm(char x){
PORTD = x;
PORTC &= ~(1<<RS);
PORTC |= 1<<EN;
_delay_ms(5);
PORTC &= ~(1<<EN);
}
void lcd_data(char x){
PORTD = x;
PORTC |= 1<<RS;
PORTC |= 1<<EN;
_delay_ms(5);
PORTC &= ~(1<<EN);
}
void lcd_init(void){
DDRD = 0xFF;
DDRC = 0x03;
lcd_comm(0x38);
lcd_comm(0x06);
lcd_comm(0x0E);
lcd_comm(0x01);
lcd_comm(0x80);
}
void lcd_string(char* p){
while(*p!='\0'){
lcd_data(*p);
p++;
}
}
void lcd_num(int n){
lcd_data((n/1000)+48);
n %= 1000;
lcd_data((n/100)+48);
n %= 100;
lcd_data((n/10)+48);
n %= 10;
lcd_data(n+48);
}
Explanation:
说明:
Firstly we have included all the header file that is required basically
首先,我们包含了所有基本需要的头文件
At the initial condition, we have defined EN=1 and RS=0.
在初始条件下,我们定义了EN = 1和RS = 0 。
Next we have defined certain functions lcd_comm(char), lcd_data(char) and lcd_init(void) etc.
接下来,我们定义了某些函数lcd_comm(char) , lcd_data(char)和lcd_init(void)等。
Inside the int main(void) we have created a variable c which is an integer and initially it is equal to zero. It will remember the number of times we will press our push button.
在int main(void)内部,我们创建了一个变量c ,它是一个整数,最初它等于零。 它会记住我们按下按钮的次数。
DDRA=0x00 says that we have connected a push button to PA0.
DDRA = 0x00表示我们已将按钮连接到PA0 。
The
的
lcd_init(); will run the lcd_init function that we have defined below.
lcd_init(); 将运行下面定义的lcd_init函数。
The command
命令
0x84 is made our string(COUNTER) in between of the LCD display
0x84是我们在液晶显示器之间的字符串(COUNTER)
Lcd_string("COUNTER") will print COUNTER.
Lcd_string(“ COUNTER”)将打印COUNTER。
Lcd_data(c+48) is used to write our string in ASCII code.
Lcd_data(c + 48)用于以ASCII代码写入我们的字符串。
Inside the while loop, we have written our condition if the button is pressed we add 1 to our variable c.
在while循环内部,如果按下按钮,我们就写了条件,我们在变量c中加了1。
The command 0xCS will overwrite the initial zero condition of our counter.
命令0xCS将覆盖计数器的初始零条件。
Inside the void lcd_comm(char x), we have taken the variable as char x, which we have assigned to PORTD. In the next step we have masked the initial value of RS which was initially 0, and here we have made it 1. Next, we have made our Enable Pin high and then low by giving the time delay of 5ms in between.
在void lcd_comm(char x)内 ,我们将变量指定为char x ,并将其分配给PORTD 。 在下一步中,我们屏蔽了RS的初始值,该值最初为0,在这里我们将其设置为1。接下来,通过在5ms之间设置时间延迟,将使能引脚设为高电平,然后设为低电平。
Again for the next function, we would be giving the data to LCD through this. We have taken a variable x, and assigned to PORTD, again made RS pin 0 and also have done similarly the Enable pin high and then low by providing the time delay of 5ms. In this function lcd_init(void), we have written all the commands that are required for the LCD at the beginning. The DDRD=0xFF indicates all the data pins connected to the PORTD, and DDRC=0x03 is for the connection of the ENABLE Pin and R/S pin we connected to PORTC.
再次为下一个功能,我们将通过此将数据提供给LCD。 我们已将变量x分配给PORTD ,再次将其设为RS引脚0,并且通过提供5ms的时间延迟,同样将Enable引脚设为高电平,然后设为低电平。 在此函数lcd_init(void)中 ,我们在一开始就编写了LCD所需的所有命令。 DDRD = 0xFF表示连接到PORTD的所有数据引脚,而DDRC = 0x03用于连接我们连接到PORTC的ENABLE引脚和R / S引脚。
0x38 - as the LCD is in 8 bit mode.
0x38 -LCD处于8位模式。
0x06 - cursor shifts to the right.
0x06-光标向右移动。
0x0E - display ON and cursor ON.
0x0E-显示打开,光标打开。
0x01 - clears the screen.
0x01-清除屏幕。
Ox80 – 0th row and 0th column.
Ox80 – 第 0行和第 0列。
The function lcd_string(char *p) is used to print the words and are simple strings, here we have used them to print the word COUNTER.
函数lcd_string(char * p)用于打印单词,它们是简单的字符串,这里我们使用它们来打印单词COUNTER。
The void lcd_num(int n) function is used to display n which is equal to the number of times the button is pressed. Inside the function, we have defined three conditions for n to be a three digit number, a two digit number, and a single digit number. We have also used mod here so that we can get the accurate value of n.
void lcd_num(int n)函数用于显示n ,该n等于按钮被按下的次数。 在函数内部,我们为n定义了三个条件,即三个数字,两个数字和一个数字。 我们在这里还使用了mod,以便获得n的准确值。
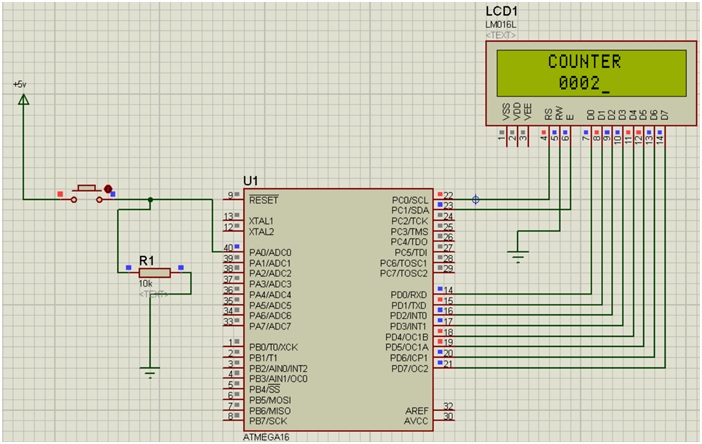
Simulation:
模拟:

Explanation:
说明:
Components required:
所需组件:
- 1 resistor
- 2 ground terminal
- LM016L i.e. our LCD
- Atmega16
- Push button
- Power terminal
Make the connections as shown above.
如上所示进行连接。
Double click on power terminal and edit its property to +5V.
双击电源端子,然后将其属性编辑为+ 5V。
Connected the resistor after the push button such that the high unwanted current goes directly ti it.
在按钮之后连接电阻,以使多余的高电流直接流过该电阻。
Double click the Atmega16 and debug the HEX file.
双击Atmega16并调试HEX文件。
Click on the Run Button and your counter will run and the no. if times you will press the button will appear on the screen.
单击运行按钮,您的计数器将运行,并且没有。 如果您要按几次,该按钮将出现在屏幕上。
翻译自: https://www.includehelp.com/embedded-system/create-counter-using-an-8-bits-lcd-avr.aspx
avr计数


![php 查看扩展 代码,[扩展推荐] 使用 PHP Insights 在终端查看 PHP 项目代码质量](http://pic.xiahunao.cn/php 查看扩展 代码,[扩展推荐] 使用 PHP Insights 在终端查看 PHP 项目代码质量)


| 使用Python的线性代数)
