CSharpGL(49)试水OpenGL软实现
CSharpGL迎来了第49篇。本篇内容是用C#编写一个OpenGL的软实现。暂且将其命名为SoftGL。
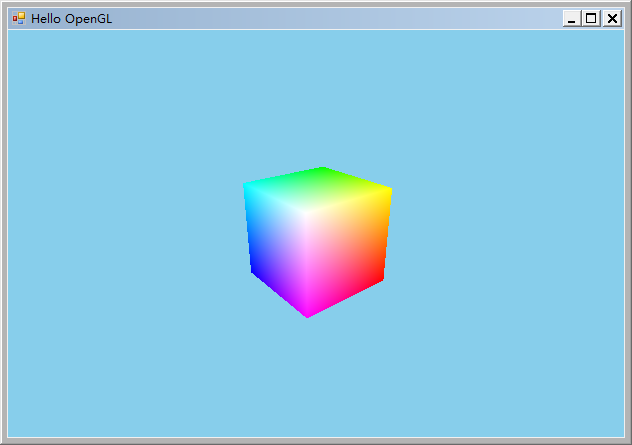
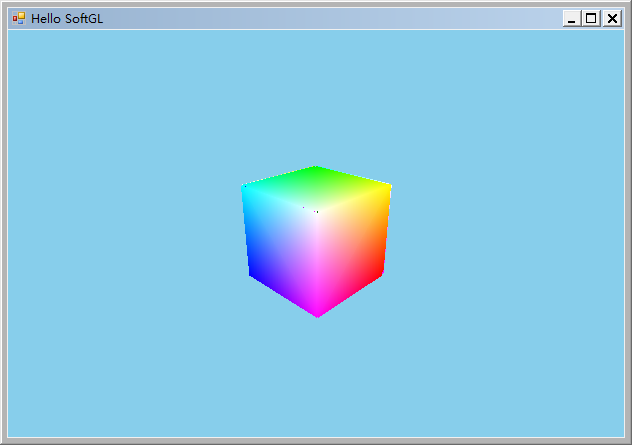
目前已经实现了由Vertex Shader和Fragment Shader组成的Pipeline,其效果与显卡支持的OpenGL实现几乎相同。下图左是常规OpenGL渲染的结果,右是SoftGL渲染的结果。


下载
CSharpGL已在GitHub开源,欢迎对OpenGL有兴趣的同学加入(https://github.com/bitzhuwei/CSharpGL)
SoftGL也已在GitHub开源,欢迎对OpenGL有兴趣的同学加入(https://github.com/bitzhuwei/SoftGL)
从使用者的角度开始
OpenGL的使用者就是OpenGL应用程序开发者(Dev)。
下面按其被执行的先后顺序陈列OpenGL相关的命令(只陈列最基本的命令):
创建Device Context
用一个System.Windows.Forms.Control类型的对象即可。
最后会发现,这个Device Context的作用之一是为创建Render Context提供参数。目前在SoftGL中不需要这个参数。
创建Render Context
Render Context包含OpenGL的所有状态字段。例如,当Dev调用glLineWidth(float width);时,Render Context会记下这一width值,从而使之长期有效(直到下次调用glLineWidth(float width);来修改它)。
可能同时存在多个Render Context,每个都保存自己的lineWidth等字段。当使用静态的OpenGL函数static void glLineWidth(float width);时,它会首先找到当前的Render Context对象(详见后面的MakeCurrent(..)),然后让此对象执行真正的glLineWidth(float width);函数。
可见Render Context就是一个典型的class,其伪代码如下:
 1 partial class SoftGLRenderContext:
 2 {
 3     private float lineWidth;
 4     // .. other fields.
 5
 6     public static void glLineWidth(float width)
 7     {
 8         SoftGLRenderContext obj = SoftGLRenderContext .GetCurrentContext();
 9         if (obj != null) { obj.LineWidth(width); }
10     }
11
12     private void LineWidth(float width)
13     {
14         this.lineWidth = width;
15     }
16
17     // .. other OpenGL functions.
18 }
MakeCurrent(IntPtr dc, IntPtr rc);
函数static void MakeCurrent(IntPtr dc, IntPtr rc);不是OpenGL函数。它的作用是指定当前线程(Thread)与哪个Render Context对应,即在Dictionary<Thread, RenderContext>这一字典类型中记录下Thread与Render Context的对应关系。
当然,如果rc为IntPtr.Zero,就是要解除当前Thread与其Render Context的对应关系。
伪代码如下:
 1 partial class SoftGLRenderContext
 2 {
 3     // Thread -> Binding Render Context Object.
 4     static Dictionary<Thread, SoftGLRenderContext> threadContextDict = new Dictionary<Thread, SoftGLRenderContext>();
 5
 6     // Make specified renderContext the current one of current thread.
 7     public static void MakeCurrent(IntPtr deviceContext, IntPtr renderContext)
 8     {
 9         var threadContextDict = SoftGLRenderContext.threadContextDict;
10         if (renderContext == IntPtr.Zero) // cancel current render context to current thread.
11         {
12             SoftGLRenderContext context = null;
13
14             Thread thread = System.Threading.Thread.CurrentThread;
15             if (threadContextDict.TryGetValue(thread, out context))
16             {
17                 threadContextDict.Remove(thread);
18             }
19         }
20         else // change current render context to current thread.
21         {
22             SoftGLRenderContext context = GetContextObj(renderContext);
23             if (context != null)
24             {
25                 SoftGLRenderContext oldContext = GetCurrentContextObj();
26                 if (oldContext != context)
27                 {
28                     Thread thread = Thread.CurrentThread;
29                     if (oldContext != null) { threadContextDict.Remove(thread); }
30                     threadContextDict.Add(thread, context);
31                     context.DeviceContextHandle = deviceContext;
32                 }
33             }
34         }
35     }
36 }
获取OpenGL函数指针
在CSharpGL.Windows项目中,我们可以通过Win32 API找到在opengl32.dll中的OpenGL函数指针,并将其转换为C#中的函数委托(Delegate),从而可以像使用普通函数一样使用OpenGL函数。其伪代码如下:
 1 public partial class WinGL : CSharpGL.GL
 2 {
 3     public override Delegate GetDelegateFor(string functionName, Type functionDeclaration)
 4     {
 5         Delegate del = null;
 6         if (!extensionFunctions.TryGetValue(functionName, out del))
 7         {
 8             IntPtr proc = Win32.wglGetProcAddress(name);
 9             if (proc != IntPtr.Zero)
10             {
11                 // Get the delegate for the function pointer.
12                 del = Marshal.GetDelegateForFunctionPointer(proc, functionDeclaration);
13
14                 // Add to the dictionary.
15                 extensionFunctions.Add(functionName, del);
16             }
17         }
18
19         return del;
20 }
21
22     // Gets a proc address.
23     [DllImport("opengl32.dll", SetLastError = true)]
24 internal static extern IntPtr wglGetProcAddress(string name);
25
26     // The set of extension functions.
27     static Dictionary<string, Delegate> extensionFunctions = new Dictionary<string, Delegate>();
28 }
此时我们想使用SoftGL,那么要相应地为其编写一个SoftGL.Windows项目。这个项目通过在类似opengl32.dll的SoftOpengl32项目(或者SoftOpengl32.dll)中查找函数的方式来找到我们自己实现的OpenGL函数。其伪代码如下:
 1 partial class WinSoftGL : CSharpGL.GL
 2 {
 3     private static readonly Type thisType = typeof(SoftOpengl32.StaticCalls);
 4     public override Delegate GetDelegateFor(string functionName, Type functionDeclaration)
 5     {
 6         Delegate result = null;
 7         if (!extensionFunctions.TryGetValue(functionName, out result))
 8         {
 9             MethodInfo methodInfo = thisType.GetMethod(functionName, BindingFlags.Static | BindingFlags.Public);
10             if (methodInfo != null)
11             {
12                 result = System.Delegate.CreateDelegate(functionDeclaration, methodInfo);
13             }
14
15             if (result != null)
16             {
17                 //  Add to the dictionary.
18                 extensionFunctions.Add(functionName, result);
19             }
20         }
21
22         return result;
23     }
24
25     // The set of extension functions.
26     static Dictionary<string, Delegate> extensionFunctions = new Dictionary<string, Delegate>();
27 }
可见只需通过C#和.NET提供的反射机制即可实现。在找到System.Delegate.CreateDelegate(..)这个方法时,我感觉到一种“完美”。
此时,我们应当注意到另一个涉及大局的问题,就是整个SoftGL的框架结构。
SoftGL项目本身的作用与显卡驱动中的OpenGL实现相同。操作系统(例如Windows)提供了一个opengl32.dll之类的方式来让Dev找到OpenGL函数指针,从而使用OpenGL。CSharpGL项目是对OpenGL的封装,具体地讲,是对OpenGL的函数声明的封装,它不包含对OpenGL的实现、初始化等功能。这些功能是在CSharpGL.Windows中实现的。Dev通过引用CSharpGL项目和CSharpGL.Windows项目就可以直接使用OpenGL了。
如果不使用显卡中的OpenGL实现,而是换做SoftGL,那么这一切就要相应地变化。SoftOpengl32项目代替操作系统的opengl32.dll。CSharpGL保持不变。SoftGL.Windows代替CSharpGL.Windows。Dev通过引用CSharpGL项目和SoftGL.Windows项目就可以直接使用软实现的OpenGL了。
最重要的是,这样保证了应用程序的代码不需任何改变,应用程序只需将对CSharpGL.Windows的引用修改为对SoftGL.Windows的引用即可。真的。
创建ShaderProgram和Shader
根据OpenGL命令,可以推测一种可能的创建和删除ShaderProgram对象的方式,伪代码如下:
 1 partial class SoftGLRenderContext
 2 {
 3     private uint nextShaderProgramName = 1;
 4
 5     // name -> ShaderProgram object
 6     Dictionary<uint, ShaderProgram> nameShaderProgramDict = new Dictionary<uint, ShaderProgram>();
 7
 8     private ShaderProgram currentShaderProgram = null;
 9
10     public static uint glCreateProgram() // OpenGL functions.
11     {
12         uint id = 0;
13         SoftGLRenderContext context = ContextManager.GetCurrentContextObj();
14         if (context != null)
15         {
16             id = context.CreateProgram();
17         }
18
19         return id;
20     }
21
22     private uint CreateProgram()
23     {
24         uint name = nextShaderProgramName;
25         var program = new ShaderProgram(name); //create object.
26         this.nameShaderProgramDict.Add(name, program); // bind name and object.
27         nextShaderProgramName++; // prepare for next name.
28
29         return name;
30 }
31
32     public static void glDeleteProgram(uint program)
33     {
34         SoftGLRenderContext context = ContextManager.GetCurrentContextObj();
35         if (context != null)
36         {
37             context.DeleteProgram(program);
38         }
39     }
40
41     private void DeleteProgram(uint program)
42     {
43         Dictionary<uint, ShaderProgram> dict = this.nameShaderProgramDict;
44         if (!dict.ContainsKey(program)) { SetLastError(ErrorCode.InvalidValue); return; }
45
46         dict.Remove(program);
47     }
48 }
创建ShaderProgram对象的逻辑很简单,首先找到当前的Render Context对象,然后让它创建一个ShaderProgram对象,并使之与一个name绑定(记录到一个Dictionary<uint, ShaderProgram>字典类型的字段中)。删除ShaderProgram对象的逻辑也很简单,首先判断参数是否合法,然后将字典中的ShaderProgram对象删除即可。
OpenGL中的很多对象都遵循这样的创建模式,例如Shader、Buffer、VertexArrayObject、Framebuffer、Renderbuffer、Texture等。
ShaderProgram是一个大块头的类型,它要处理很多和GLSL Shader相关的东西。到时候再具体说。
创建VertexBuffer、IndexBuffer和VertexArrayObject
参见创建ShaderProgram对象的方式。要注意的是,这些类型的创建分2步。第一步是调用glGen*(int count, uint[] names);,此时只为其分配了name,没有创建对象。第二步是首次调用glBind*(uint target, uint name);,此时才会真正创建对象。我猜这是早期的函数接口,所以用了这么啰嗦的方式。
对顶点属性进行设置
一个顶点缓存对象(GLBuffer)实际上是一个字节数组(byte[])。它里面保存的,可能是顶点的位置属性(vec3[]),可能是顶点的纹理坐标属性(vec2[]),可能是顶点的密度属性(float[]),可能是顶点的法线属性(vec3[]),还可能是这些属性的某种组合(如一个位置属性+一个纹理坐标属性这样的轮流出现)。OpenGL函数glVertexAttribPointer(uint index, int size, uint type, bool normalized, int stride, IntPtr pointer)的作用就是描述顶点缓存对象保存的是什么,是如何保存的。
glClear(uint mask)
每次渲染场景前,都应清空画布,即用glClear(uint mask);清空指定的缓存。
OpenGL函数glClearColor(float r, float g, float b, float a);用于指定将画布清空为什么颜色。这是十分简单的,只需设置Render Context中的一个字段即可。
需要清空颜色缓存(GL_COLOR_BUFFER_BIT)时,实际上是将当前Framebuffer对象上的颜色缓存设置为指定的颜色。需要清空深度缓存(GL_DEPTH_BUFFER_BIT)或模板缓存(GL_STENCIL_BUFFER_BIT)时,实际上也是将当前Framebuffer对象上的深度缓存或模板缓存设置为指定的值。
所以,为了实现glClear(uint mask)函数,必须将Framebuffer和各类缓存都准备好。
Framebuffer中的各种缓存都可以简单的用一个Renderbuffer对象充当。一个Renderbuffer对象实际上也是一个字节数组(byte[]),只不过它还用额外的字段记录了自己的数据格式(GL_RGBA等)等信息。纹理(Texture)对象里的各个Image也可以充当Framebuffer中的各种缓存。所以Image是和Renderbuffer类似的东西,或者说,它们支持同一个接口IAttachable。
1 interface IAttachable
2 {
3     uint Format { get; }  // buffer’s format
4     int Width { get; } // buffer’s width.
5     int Height { get; } // buffer’s height.
6     byte[] DataStore { get; } // buffer data.
7 }
这里就涉及到对与byte[]这样的数组与各种其他类型的数组(例如描述位置的vec3[])相互赋值的问题。一般,可以用下面的方式解决:
1 byte[] bytes = ...
2 this.pin = GCHandle.Alloc(bytes, GCHandleType.Pinned);
3 IntPtr pointer = this.pin.AddrOfPinnedObject();
4 var array = (vec3*)pointer.ToPointer();
5 for (in i = 0; i< ...; i++) {
6     array[i] = ...
7 }
只要能将数组转换为 void* 类型,就没有什么做不到的了。
glGetIntegerv(uint target, int[] values)
这个十分简单。一个大大的switch语句。
设置Viewport
设置viewport本身是十分简单的,与设置lineWidth类似。但是,在一个Render Context对象被首次MakeCurrent()到一个线程时,要将Device Context的Width和Height赋值给viewport。这个有点麻烦。
更新uniform变量的值
glDrawElements(..)
总结


合同怎么写?)


 python_python的apply应用:一般性的“拆分-应用-合并”,附加详细讲解)
Slave DNS及高级特性)


