一、目录管理
1、cd (切换目录)
cd 路径 :切换路径命令,路径可以是绝对路径,也可以是相对路径
./ : 当前目录
返回上级目录: cd …
返回用户目录: cd ~

2、ls(列出目录)
-a 参数:all,查看全部的文件,包含隐藏文件
-l 参数:列出所有的文件(不包含隐藏文件),包含文件的属性和权限,

3、pwd(显示当前用户所在的目录)

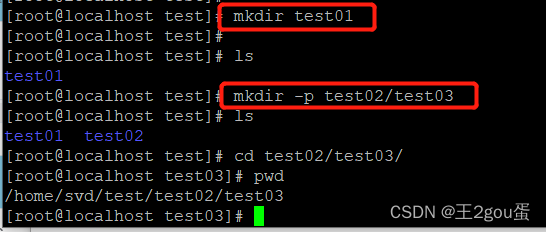
4、mkdir(创建一个目录)
-p 参数:递归创建文件夹

5、rmdir(删除目录)
rmdir 仅能删除空的目录,如果下面存在文件,需要先删除文件,递归删除多个目录加 -p 参数即可
[root@localhost test02]# pwd
/home/svd/test/test02
[root@localhost test02]# cd ..
[root@localhost test]# ls
test01  test02
[root@localhost test]# rmdir test02
rmdir: failed to remove ‘test02’: Directory not empty
[root@localhost test]# rmdir -p  test02
rmdir: failed to remove ‘test02’: Directory not empty
[root@localhost test]# rmdir -p  test02/test03/
[root@localhost test]# ls
test01
6、cp(复制文件或者目录)
-p:连同文件的属性一起复制过去,而非使用默认属性(备份常用);
-d:若来源档为连结档的属性(link file),则复制连结档属性而非文件本身;
-r:递归持续复制,用於目录的复制行为;(常用)
-f:为强制(force)的意思,若目标文件已经存在且无法开启,则移除后再尝试一次;
-i:若目标档(destination)已经存在时,在覆盖时会先询问动作的进行(常用)
cp 原来的地方 新的地方
[root@localhost test]# touch 1.txt
[root@localhost test]# ls
1.txt  test01
[root@localhost test]# cp 1.txt test01
[root@localhost test]# ls
1.txt  test01
[root@localhost test]# cd test01/
[root@localhost test01]# ls
1.txt
可对文件进行重命名,如果文件名重复会有提示:
[root@localhost test]# cp 1.txt test01/2.txt  # 重命名文件
[root@localhost test]# cd test01/
[root@localhost test01]# ls
1.txt  2.txt
[root@localhost test01]# cd ..
[root@localhost test]# cp 1.txt test01/2.txt # 文件名重复,y覆盖,n不覆盖
cp: overwrite ‘test01/2.txt’? y
[root@localhost test]#
7、rm(移除文件或者目录)
-f 忽略不存在的文件,不会出现警告,强制删除!
-r 递归删除目录
-i 互动,删除时询问是否删除
rm -rf / # 删除系统中所有的文件,删库跑路操作!!!
[root@localhost test]# ls
1.txt  test01
[root@localhost test]# cd ..
[root@localhost svd]# ls
mysql57-community-release-el7-8.noarch.rpm  study_mysql_backup  test
[root@localhost svd]# rm -rf test
[root@localhost svd]# ls
mysql57-community-release-el7-8.noarch.rpm  study_mysql_backup
[root@localhost svd]#
8、mv(移动文件或者目录,重命名文件或目录)
-f :force 强制的意思,如果目标文件已经存在,不会询问而直接覆盖;
-i :若目标文件 (destination) 已经存在时,就会询问是否覆盖!
-u :若目标文件已经存在,且 source 比较新,才会升级 (update)
[root@localhost test]# ls
1.txt  test01
[root@localhost test]#
[root@localhost test]# mv 1.txt test01  # 移动文件
[root@localhost test]# ls
test01
[root@localhost test]# cd test01/
[root@localhost test01]# ls
1.txt
[root@localhost test01]# mv 1.txt 2.txt  # 重命名文件
[root@localhost test01]# ls
2.txt
[root@localhost test01]# cd ..
[root@localhost test]# ls
test01
[root@localhost test]# mv test01 test02  # 重命名文件夹
[root@localhost test]# ls
test02
二、基本属性
1、文件属性
Linux系统是一种典型的多用户系统,不同的用户处于不同的地位,拥有不同的权限。为了保护系统的安全性,Linux系统对不同的用户访问同一文件(包括目录文件)的权限做了不同的规定。
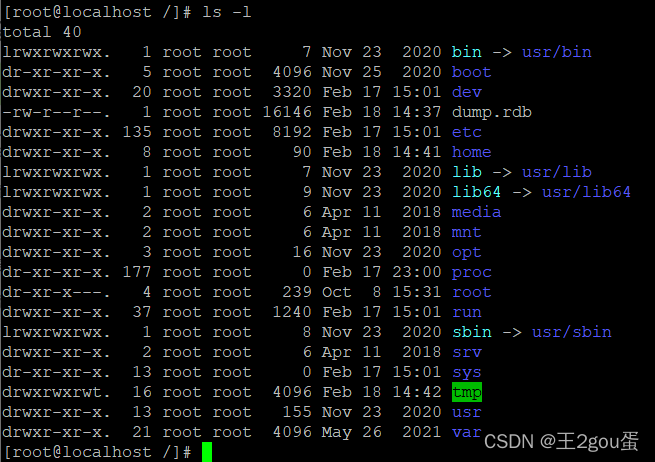
在Linux中我们可以使用ls -l 命令来显示一个文件的属性以及文件所属的用户和组,如:

上图中,boot文件的第一个属性用"d"表示,"d"在Linux中代表该文件是文件夹。
在Linux中第一个字符代表这个文件是目录、文件或链接文件等等:
- 当为 [d] 则是目录
- 当为 [-] 则是文件
- 当为 [l] 则表示为链接文档(link file)
- 当为 [b] 则表示为装置文件里面的可供储存的接口设备(可随机存取装置)
- 当为 [c] 则表示为装置文件里面的串行端口设备,例如键盘、鼠标(一次性读取装置)
接下来的字符中,以三个为一组,且均为 rwx 的三个参数的组合。其中, r 代表可读(read)、 w 代表可写(write)、 x 代表可执行(execute)。 要注意的是,这三个权限的位置不会改变,如果没有权限,就会出现减号 - 而已。

第 0 位确定文件类型,第 1-3 位确定属主(该文件的所有者)拥有该文件的权限。
第4-6位确定属组(所有者的同组用户)拥有该文件的权限,第7-9位确定其他用户拥有该文件的权限。
其中:
第 1、4、7 位表示读权限,如果用 r 字符表示,则有读权限,如果用 - 字符表示,则没有读权限;
第 2、5、8 位表示写权限,如果用 w 字符表示,则有写权限,如果用 - 字符表示没有写权限
第 3、6、9 位表示可执行权限,如果用 x 字符表示,则有执行权限,如果用 - 字符表示,则没有执行权限
对于文件来说,它都有一个特定的所有者,也就是对该文件具有所有权的用户。
同时,在Linux系统中,用户是按组分类的,一个用户属于一个或多个组。
文件所有者以外的用户又可以分为文件所有者的同组用户和其他用户。
因此,Linux系统按文件所有者、文件所有者同组用户和其他用户来规定了不同的文件访问权限。
属主:这个文件属于谁
属组:这个文件的用户组

2、修改文件属性
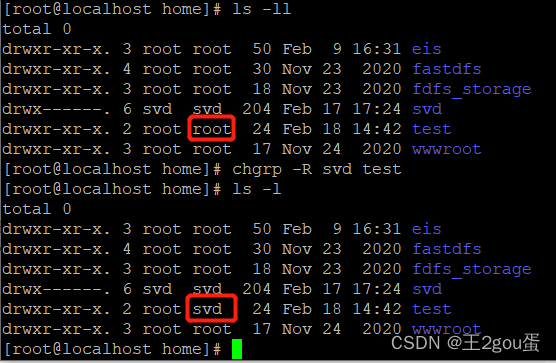
2.1 chgrp: 更改文件属组
chgrp [-R] 属组名 文件名
-R:递归更改文件属组,就是在更改某个目录文件的属组时,如果加上-R的参数,那么该目录下的所有文件的属组都会更改。

2.2 chown: 更改文件属主,也可以同时更改文件属组
chown [–R] 属主名 文件名
chown [-R] 属主名:属组名 文件名


2.3 chmod: 更改文件9个属性
Linux文件属性有两种设置方法,一种是数字,一种是符号。
Linux 文件的基本权限就有九个,分别是 owner/group/others(拥有者/组/其他) 三种身份各有自己的 read/write/execute 权限。
九个权限是三个三个一组的!其中,我们可以使用数字来代表各个权限,各权限的分数对照表如下:
r:4   w:2   x:1
可读;可写;可执行  rwx = 4+2+1=7
可读;可写;不可执行  rw- = 4+2+0=6
可读;不可写;可执行  r-x = 4+0+1=5
可读;不可写;不可执行  r-- = 4+0+1=4
不可读;可写;可执行  -wx = 0+2+1=3
不可读;可写;不可执行  -w- = 0+2+0=2
不可读;不可写;可执行  --x = 0+0+1=1
不可读;不可写;不可执行  --- = 0+0+0=0
每种身份(owner/group/others)各自的三个权限(r/w/x)分数是需要累加的,例如当权限为: -rwxrwx— 分数则是:
owner = rwx = 4+2+1 = 7
group = rwx = 4+2+1 = 7
others= — = 0+0+0 = 0
所以等一下我们设定权限的变更时,该文件的权限数字就是 770。变更权限的指令 chmod 的语法是这样的:
chmod [-R] xyz 文件或目录
选项与参数:
xyz : 就是刚刚提到的数字类型的权限属性,为 rwx 属性数值的相加。
-R : 进行递归(recursive)的持续变更,亦即连同次目录下的所有文件都会变更
[root@localhost home]# ls -l
total 0
drwxr-xr-x. 2 root root  24 Feb 18 14:42 test
[root@localhost home]# chmod 777 test
[root@localhost home]# ls -l
total 0
drwxrwxrwx. 2 root root  24 Feb 18 14:42 test
[root@localhost home]# chmod 761 test
[root@localhost home]# ls -l
total 0
drwxrw---x. 2 root root  24 Feb 18 14:42 test
符号类型改变文件权限(了解)
还有一个改变权限的方法,从之前的介绍中我们可以发现,基本上就九个权限分别是:
user:用户、group:组、others:其他
那么我们就可以使用 u, g, o 来代表三种身份的权限。
此外, a 则代表 all,即全部的身份。读写的权限可以写成 r, w, x,也就是可以使用下表的方式来看:

[root@localhost home]# ls -l
total 0
drwxr-xr-x. 2 root root  24 Feb 18 14:42 test
[root@localhost home]# chmod u=rwx,g=r,o=r test
[root@localhost home]# ls -l
total 0
drwxr--r--. 2 root root  24 Feb 18 14:42 test
[root@localhost home]#
如果是要将权限去掉而不改变其他已存在的权限,例如要拿掉全部人的可执行权限,则:
[root@localhost home]# ls -l
total 0
drwxr--r--. 2 root root  24 Feb 18 14:42 test
[root@localhost home]# chmod a-x test
[root@localhost home]# ls -l
total 0
drw-r--r--. 2 root root  24 Feb 18 14:42 test
[root@localhost home]#
https://www.bilibili.com/video/BV187411y7hF?p=6
https://www.bilibili.com/video/BV187411y7hF?p=7
https://blog.csdn.net/qq479850581/article/details/113333045
https://www.runoob.com/linux/linux-file-attr-permission.html


