好的,作为一个合格的bug生产者,我们直接进入主题,多数据源和读写分离实现方案。
首先多数据源和读写分离什么时候我们才需要呢?
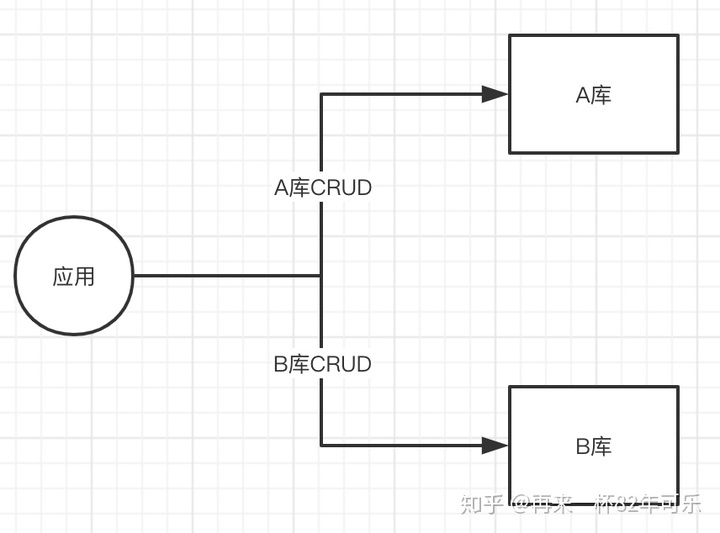
多数据源:一个单体项目过于复杂,需要操作多个业务库的时候,就需要多数据源操作不同的数据
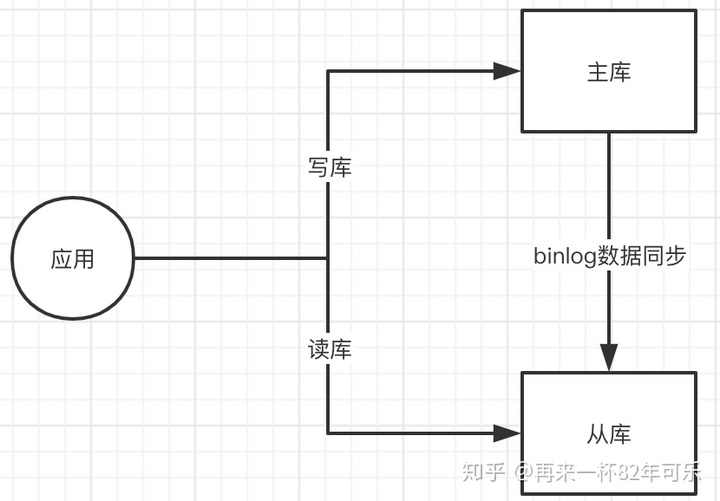
读写分离:数据库压力较大时,我们考虑读写分离,主库写,从库读,减少数据库的压力。多个库数据是一样的。
理解完使用场景后,再入主题,怎么实现呢?这里说三种实现方式
1、扩展Spring的AbstractRoutingDataSource
2、通过Mybatis 配置不同的 Mapper 使用不同的 SqlSessionTemplate
3、分库分表中间件,比如Sharding-JDBC 、Mycat等。
好的,再让我们直入主题
扩展Spring的AbstractRoutingDataSource
多数据源
基于Spring AbstractRoutingDataSource做扩展,通过继承AbstractRoutingDataSource抽象类,实现一个管理多个 DataSource的数据源管理类。Spring 在获取数据源时,可以通过 数据源管理类 返回实际的 DataSource 。
然后我们可以定义一个注解,添加到service、dao上,表示一个实际的对应的datasource。
不过这个方式,对于spring事物的支持不好,多个数据源无法保障事物。这个问题是多数据源的通用问题了。
废话不多说,下面我们说下具体实现把,首先pom要引入的依赖的话很简单,就是一个springboot项目。
pom.xml
<dependency><groupId>org.springframework.boot</groupId><artifactId>spring-boot-starter-web</artifactId>
</dependency>
<dependency><groupId>org.mybatis.spring.boot</groupId><artifactId>mybatis-spring-boot-starter</artifactId><version>2.1.2</version>
</dependency>
<dependency><groupId>org.springframework.boot</groupId><artifactId>spring-boot-starter-aop</artifactId>
</dependency>
<dependency><groupId>mysql</groupId><artifactId>mysql-connector-java</artifactId><scope>runtime</scope>
</dependency>
<dependency><groupId>org.projectlombok</groupId><artifactId>lombok</artifactId><optional>true</optional>
</dependency>
<dependency><groupId>org.springframework.boot</groupId><artifactId>spring-boot-starter-test</artifactId><scope>test</scope><exclusions><exclusion><groupId>org.junit.vintage</groupId><artifactId>junit-vintage-engine</artifactId></exclusion></exclusions>
</dependency>
<!--实现对 Druid 连接池的自动化配置-->
<dependency><groupId>com.alibaba</groupId><artifactId>druid-spring-boot-starter</artifactId><version>1.1.21</version>
</dependency>
application配置多数据源
server:port: 8080spring:application:name: dynamicdatasource:mall:url: jdbc:mysql://rm-xxxxx.mysql.rds.aliyuncs.com/luu_mall?useSSL=false&useUnicode=true&characterEncoding=UTF-8driver-class-name: com.mysql.jdbc.Driverusername: root # 数据库账号password: root0319@ # 数据库密码type: com.alibaba.druid.pool.DruidDataSource # 设置类型为 DruidDataSourcemin-idle: 0 # 池中维护的最小空闲连接数,默认为 0 个。max-active: 20 # 池中最大连接数,包括闲置和使用中的连接,默认为 8 个。# 用户数据源配置users:url: jdbc:mysql://rm-xxxxxx.mysql.rds.aliyuncs.com/luu_user_center?useSSL=false&useUnicode=true&characterEncoding=UTF-8driver-class-name: com.mysql.jdbc.Driverusername: root # 数据库账号password: root0319@ # 数据库密码type: com.alibaba.druid.pool.DruidDataSource # 设置类型为 DruidDataSource# Druid 自定义配置,对应 DruidDataSource 中的 setting 方法的属性min-idle: 0 # 池中维护的最小空闲连接数,默认为 0 个。max-active: 20 # 池中最大连接数,包括闲置和使用中的连接,默认为 8 个。# Druid 自定义配置,对应 DruidDataSource 中的 setting 方法的属性druid: # 设置 Druid 连接池的自定义配置。然后 DruidDataSourceAutoConfigure 会自动化配置 Druid 连接池。filter:stat: # 配置 StatFilter ,对应文档 https://github.com/alibaba/druid/wiki/%E9%85%8D%E7%BD%AE_StatFilterlog-slow-sql: true # 开启慢查询记录slow-sql-millis: 5000 # 慢 SQL 的标准,单位:毫秒merge-sql: true # SQL合并配置stat-view-servlet: # 配置 StatViewServlet ,对应文档 https://github.com/alibaba/druid/wiki/%E9%85%8D%E7%BD%AE_StatViewServlet%E9%85%8D%E7%BD%AEenabled: true # 是否开启 StatViewServletlogin-username: root # 账号login-password: root # 密码mybatis:mapper-locations: classpath:mapper/*.xmltype-aliases-package: com.luu.druid.druid_demo.entity.*配置多数据源DynamicDataSourceConfig
@Configuration
public class DynamicDataSourceConfig {/*** 创建 orders 数据源*/@Bean(name = "mallDataSource")@ConfigurationProperties(prefix = "spring.datasource.mall") // 读取 spring.datasource.orders 配置到 HikariDataSource 对象public DataSource ordersDataSource() {return DruidDataSourceBuilder.create().build();}/*** 创建 users 数据源*/@Bean(name = "usersDataSource")@ConfigurationProperties(prefix = "spring.datasource.users")public DataSource usersDataSource() {return DruidDataSourceBuilder.create().build();}@Bean@Primarypublic DynamiDataSource dataSource(DataSource mallDataSource, DataSource usersDataSource) {Map<Object, Object> targetDataSources = new HashMap<>(2);targetDataSources.put(DataSourceFlag.DATA_SOURCE_FLAG_MALL, mallDataSource);targetDataSources.put(DataSourceFlag.DATA_SOURCE_FLAG_USER, usersDataSource);// 还有数据源,在targetDataSources中继续添加System.out.println("DataSources:" + targetDataSources);//默认的数据源是oneDataSourcereturn new DynamiDataSource(mallDataSource, targetDataSources);}}
常量DataSourceFlag装载这我们区分数据源的key
public interface DataSourceFlag {

    public static String DATA_SOURCE_FLAG_MALL = "mall";
    public static String DATA_SOURCE_FLAG_USER = "user";

}
DynamiDataSource用来继承Spring AbstractRoutingDataSource来实现数据源切换,并且设置默认数据源。
public class DynamiDataSource extends AbstractRoutingDataSource {/*** 配置DataSource, defaultTargetDataSource为主数据库*/public DynamiDataSource(DataSource defaultTargetDataSource, Map<Object, Object> targetDataSources) {//设置默认数据源super.setDefaultTargetDataSource(defaultTargetDataSource);//设置数据源列表super.setTargetDataSources(targetDataSources);super.afterPropertiesSet();}@Overrideprotected Object determineCurrentLookupKey() {return DynamicDataSourceHolder.getRouteKey();}
}
通过DynamicDataSourceHolder操作ThreadLocal来保存当前线程操作的哪个数据源
/*** 数据源管路由*/
public class DynamicDataSourceHolder {private static ThreadLocal<String> routeKey = new ThreadLocal<String>();/*** 获取当前线程的数据源路由的key*/public static String getRouteKey() {String key = routeKey.get();return key;}/*** 绑定当前线程数据源路由的key* 使用完成后必须调用removeRouteKey()方法删除*/public static void setRouteKey(String key) {routeKey.set(key);}/*** 删除与当前线程绑定的数据源路由的key*/public static void removeRouteKey() {routeKey.remove();}
}
到这里配置基本完成来,那要怎么用呢,如何切换数据源呢,这里我们上面有说到,通过注解,来切换数据源。所以定义一个注解ChangeDataSource,不同的key切换不同的数据源
@Documented
@Target({ElementType.METHOD})
@Retention(RetentionPolicy.RUNTIME)
public @interface ChangeDataSource {String value() default DataSourceFlag.DATA_SOURCE_FLAG_MALL;
}
我们把注解用在mapper方法上
@Mapper
public interface TestMapper {int test();String mallNoAnno();@ChangeDataSource(DataSourceFlag.DATA_SOURCE_FLAG_MALL)String mallExitAnno();@ChangeDataSource(DataSourceFlag.DATA_SOURCE_FLAG_USER)String userNoAnno();@ChangeDataSource(DataSourceFlag.DATA_SOURCE_FLAG_USER)String userExitAnno();}
然后通过切面DataSourceAspect更换ThreadLocal中key实现数据源切换
@Aspect
@Component
public class DataSourceAspect implements Ordered {protected Logger logger = LoggerFactory.getLogger(getClass());/*** 切点: 所有配置 ChangeDataSource 注解的方法*/@Pointcut("@annotation(com.luu.druid.druid_demo.common.ChangeDataSource)")public void dataSourcePointCut() {}@Around("dataSourcePointCut()")public Object around(ProceedingJoinPoint point) throws Throwable {MethodSignature signature = (MethodSignature) point.getSignature();Method method = signature.getMethod();ChangeDataSource ds = method.getAnnotation(ChangeDataSource.class);// 通过判断 @ChangeDataSource注解 中的值来判断当前方法应用哪个数据源DynamicDataSourceHolder.setRouteKey(ds.value());System.out.println("当前数据源: " + ds.value());logger.debug("set datasource is " + ds.value());try {return point.proceed();} finally {DynamicDataSourceHolder.removeRouteKey();logger.debug("clean datasource");}}@Overridepublic int getOrder() {return 1;}
}
单元测试
@SpringBootTest
class DruidDemoApplicationTests {@AutowiredTestMapper testMapper;@Testvoid contextLoads() {int i = testMapper.test();String id = testMapper.mallNoAnno();String id2 = testMapper.mallExitAnno();String name = testMapper.userNoAnno();String name2 = testMapper.userExitAnno();}
}
到这里呢,代码基本写完来。这里就是多数据源的配置,然后还有读写分离怎么实现呢。
而上面我们说到事物上不起效果的,因为事物上要拿到数据源的连接对象,而这里我们在mapper层有更换数据源,所以是不行的,所以数据源无法切换成果,然后执行的时候会报错的。但是如果我们整个是在Service上使用这个注解,整个方法上同一个数据源就可以的。
实现读写分离
其实读写分离的实现通过上面的方式稍微修改下就可以来,就是在切面中,不在通过注解,根据方法名的前缀来判断是走主库,还是走从库。比如find、select这样读数据的就走从库,而insert这样的就走主库。具体的代码的话,摸一摸我发量不多的头,算了,偷一偷就不贴来,反正思路就是这样的。
通过Mybatis 配置不同的 Mapper 使用不同的 SqlSessionTemplate
根据不同操作类(就是mapper),然后创建不同的SqlSessionTemplate ,这样每个SqlSessionTemplate 就可以设置不同的数据源和扫描不同的mapper咯。听起来是不是很简单呢。不用管什么切面不切面的,不像上面那么麻烦咯。但是多数据源的通病还是在滴,那就是多数据源事物用起来不方便啦。
多数据源
还是用刚才的springboot项目吧,改动一下咯。pom文件啥的就不说咯,跟上面一样的。然后我们看下配置文件,数据源还是一样,两个数据源一样的配置,只不过这里没有mybatis的配置咯。
application
server:port: 8080spring:application:name: dynamicdatasource:mall:url: jdbc:mysql://rm-wz9yy0528x91z1iqdco.mysql.rds.aliyuncs.com/luu_mall?useSSL=false&useUnicode=true&characterEncoding=UTF-8driver-class-name: com.mysql.cj.jdbc.Driverusername: root # 数据库账号password: root0319@ # 数据库密码type: com.alibaba.druid.pool.DruidDataSource # 设置类型为 DruidDataSourcemin-idle: 0 # 池中维护的最小空闲连接数,默认为 0 个。max-active: 20 # 池中最大连接数,包括闲置和使用中的连接,默认为 8 个。# 用户数据源配置users:url: jdbc:mysql://rm-wz9yy0528x91z1iqdco.mysql.rds.aliyuncs.com/luu_user_center?useSSL=false&useUnicode=true&characterEncoding=UTF-8driver-class-name: com.mysql.cj.jdbc.Driverusername: root # 数据库账号password: root0319@ # 数据库密码type: com.alibaba.druid.pool.DruidDataSource # 设置类型为 DruidDataSource# Druid 自定义配置,对应 DruidDataSource 中的 setting 方法的属性min-idle: 0 # 池中维护的最小空闲连接数,默认为 0 个。max-active: 20 # 池中最大连接数,包括闲置和使用中的连接,默认为 8 个。# Druid 自定义配置,对应 DruidDataSource 中的 setting 方法的属性druid: # 设置 Druid 连接池的自定义配置。然后 DruidDataSourceAutoConfigure 会自动化配置 Druid 连接池。filter:stat: # 配置 StatFilter ,对应文档 https://github.com/alibaba/druid/wiki/%E9%85%8D%E7%BD%AE_StatFilterlog-slow-sql: true # 开启慢查询记录slow-sql-millis: 5000 # 慢 SQL 的标准,单位:毫秒merge-sql: true # SQL合并配置stat-view-servlet: # 配置 StatViewServlet ,对应文档 https://github.com/alibaba/druid/wiki/%E9%85%8D%E7%BD%AE_StatViewServlet%E9%85%8D%E7%BD%AEenabled: true # 是否开启 StatViewServletlogin-username: root # 账号login-password: root # 密码DBConstants常量类
public class DBConstants {public static final String TX_MANAGER_MALL = "malltransactionManager";public static final String TX_MANAGER_SER = "usertransactionManager";
}
然后就是创建不同的SqlSessionTemplate和数据源了。
DataSourceMallConfig配置mall的数据源,并且mallSqlSessionTemplate设置了扫面mapper包位置
@Configuration
@MapperScan(basePackages = "com.luu.druid.druid_demo.mapper.mall", sqlSessionTemplateRef = "mallSqlSessionTemplate")
public class DataSourceMallConfig {/*** 创建 mall 数据源*/@Bean(name = "mallDataSource")@ConfigurationProperties(prefix = "spring.datasource.mall")public DataSource mallDataSource() {return DruidDataSourceBuilder.create().build();}/*** 创建 MyBatis SqlSessionFactory*/@Bean(name = "mallSqlSessionFactory")public SqlSessionFactory sqlSessionFactory(DataSource mallDataSource) throws Exception {SqlSessionFactoryBean bean = new SqlSessionFactoryBean();// <2.1> 设置 orders 数据源bean.setDataSource(mallDataSource);// <2.2> 设置 entity 所在包bean.setTypeAliasesPackage("com.luu.druid.druid_demo.entity.*");// <2.3> 设置 config 路径
// bean.setConfigLocation(new PathMatchingResourcePatternResolver().getResource("classpath:mybatis-config.xml"));// <2.4> 设置 mapper 路径bean.setMapperLocations(new PathMatchingResourcePatternResolver().getResources("classpath:mapper/mall/*.xml"));return bean.getObject();}/*** 创建 MyBatis SqlSessionTemplate*/@Bean(name = "mallSqlSessionTemplate")public SqlSessionTemplate sqlSessionTemplate(DataSource mallDataSource) throws Exception {return new SqlSessionTemplate(this.sqlSessionFactory(mallDataSource));}/*** 创建 mall 数据源的 TransactionManager 事务管理器*/@Bean(name = DBConstants.TX_MANAGER_MALL)public PlatformTransactionManager transactionManager(DataSource mallDataSource) {return new DataSourceTransactionManager(mallDataSource);}}
DataSourceUserConfig配置user的数据源,并且userSqlSessionTemplate设置了扫面mapper包位置
@Configuration
@MapperScan(basePackages = "com.luu.druid.druid_demo.mapper.user", sqlSessionTemplateRef = "userSqlSessionTemplate")
public class DataSourceUserConfig {/*** 创建 user 数据源*/@Bean(name = "userDataSource")@ConfigurationProperties(prefix = "spring.datasource.users")public DataSource userDataSource() {return DruidDataSourceBuilder.create().build();}/*** 创建 MyBatis SqlSessionFactory*/@Bean(name = "userSqlSessionFactory")public SqlSessionFactory sqlSessionFactory(DataSource userDataSource) throws Exception {SqlSessionFactoryBean bean = new SqlSessionFactoryBean();// <2.1> 设置 orders 数据源bean.setDataSource(userDataSource);// <2.2> 设置 entity 所在包bean.setTypeAliasesPackage("com.luu.druid.druid_demo.entity.*");// <2.3> 设置 config 路径
// bean.setConfigLocation(new PathMatchingResourcePatternResolver().getResource("classpath:mybatis-config.xml"));// <2.4> 设置 mapper 路径bean.setMapperLocations(new PathMatchingResourcePatternResolver().getResources("classpath:mapper/user/*.xml"));return bean.getObject();}/*** 创建 MyBatis SqlSessionTemplate*/@Bean(name = "userSqlSessionTemplate")public SqlSessionTemplate sqlSessionTemplate(DataSource userDataSource) throws Exception {return new SqlSessionTemplate(this.sqlSessionFactory(userDataSource));}/*** 创建 user 数据源的 TransactionManager 事务管理器*/@Bean(name = DBConstants.TX_MANAGER_SER)public PlatformTransactionManager transactionManager(DataSource userDataSource) {return new DataSourceTransactionManager(userDataSource);}}
到这多数据源配置就差不多了,不同的mapper对应不同的数据源。这里mapper,entity啥的就不贴出来了,秉承着能偷懒就偷懒的一贯风格。直接把单元测试贴一下看下。
@SpringBootTest
class DruidDemoApplicationTests {@AutowiredUserMapper userMapper;@AutowiredTestMapper testMapper;@Testvoid contextLoads() {String id = testMapper.mallNoAnno();String id2 = testMapper.mallExitAnno();String name = userMapper.userNoAnno();String name2 = userMapper.userExitAnno();}
}
当然,上面说到说,依然是多数据源,所以呢对于事物的支持依然是有问题的。
读写分离
这种方式实现读写分离,就不用多说咯吧,我这个专业bug制造者都想的明白,各位大佬也能想明白的。
分库分表中间件,比如Sharding-JDBC 、Mycat等
对于分库分表的中间件,会解析我们编写的 SQL ,路由操作到对应的数据源。那么,它们天然就支持多数据源。如此,我们仅需配置好每个表对应的数据源,中间件就可以透明的实现多数据源或者读写分离。Sharding-JDBC 、Mycat是比较常用的中间件,这里使用的话就不写了,后面会专门写如何去使用它们的,Sharding-JDBC并且支持分布式事物的。
如果需要可以下载代码试试的dynamic-datasource-spring、dynamic-datasource-mybatis,到此完美收工:
https://github.com/servef-toto/luu_yinchuishiting.gitgithub.com


![矩阵求逆c语言实现_[V-SLAM] Bundle Adjustment 实现](http://pic.xiahunao.cn/矩阵求逆c语言实现_[V-SLAM] Bundle Adjustment 实现)


