上一篇博客介绍了无人驾驶中深度学习在交通标志识别中的应用(动手学无人驾驶(1):交通标志识别)。
本文介绍如何使用深度学习进行车辆检测,使用到的模型是YOLO模型,关于YOLO模型的具体检测原理,可以参考吴恩达老师的深度学习课程视频。课程链接是:https://www.deeplearning.ai/deep-learning-specialization/。
之前的一篇博客中也对YOLO的原理进行了详细介绍:13.深度学习练习:Autonomous driving - Car detection(YOLO实战)
目录
1.导入库和数据
2.分类过滤
3.非最大抑制
4.评估模型
5.测试
1)模型输出转换为可用边界框张量
2)选取最佳框
3)车辆检测
6.参考资料
1.导入库和数据
在本文中我们将使用到一个预训练模型,用它来检测数据集上的车辆。
文件“ coco_classes.txt”和“ yolo_anchors.txt”中收集了有关80个类和5个定位框的信息。
首先是加载这些信息,同时为了方便处理,对图片进行了预处理(图片尺寸大小为720x1280)。
import argparse
import os
import matplotlib.pyplot as plt
from matplotlib.pyplot import imshow
import scipy.io
import scipy.misc
import numpy as np
import pandas as pd
import PIL
import tensorflow as tf
from keras import backend as K
from keras.layers import Input, Lambda, Conv2D
from keras.models import load_model, Model
from yolo_utils import read_classes, read_anchors, generate_colors, preprocess_image, draw_boxes, scale_boxes
from yad2k.models.keras_yolo import yolo_head, yolo_boxes_to_corners, preprocess_true_boxes, yolo_loss, yolo_body%matplotlib inlineclass_names = read_classes("model_data/coco_classes.txt")
anchors = read_anchors("model_data/yolo_anchors.txt")
image_shape = (720., 1280.)
2.分类过滤
因为最终输出为80个分类的预测,这里需要对其进行过滤,即选取预测概率值前五的类别。
在yolo_filter_boxes函数中定义了以下参数:阈值这里为0.6
- box_confidence:形状为含有pc的张量(19x19,5,1),pc表示所预测的5个boxes中含有目标;
- boxes: 形状为含有(bx,by,bh,bw)的张量(19x19,5,4);
- box_class_probs: 形状为含有(c1,c2,...,c80)的张量(19×19,5,80), c1,c2,...c80表示为预测类别的概率。
def yolo_filter_boxes(box_confidence, boxes, box_class_probs, threshold = .6):"""返回值:scores -- 得分boxes -- 最终选出的锚盒classes -- 预测类别"""# Step 1: 计算得分box_scores = box_confidence * box_class_probs# Step 2: 根据得分选取类别box_classes = K.argmax(box_scores, axis = -1)box_class_scores = K.max(box_scores, axis = -1)# Step 3:根据阈值设置maskfiltering_mask = (box_class_scores > threshold )# Step 4: 最终预测结果scores = tf.boolean_mask(box_class_scores, filtering_mask)boxes = tf.boolean_mask(boxes, filtering_mask)classes = tf.boolean_mask(box_classes, filtering_mask)return scores, boxes, classes3.非最大抑制
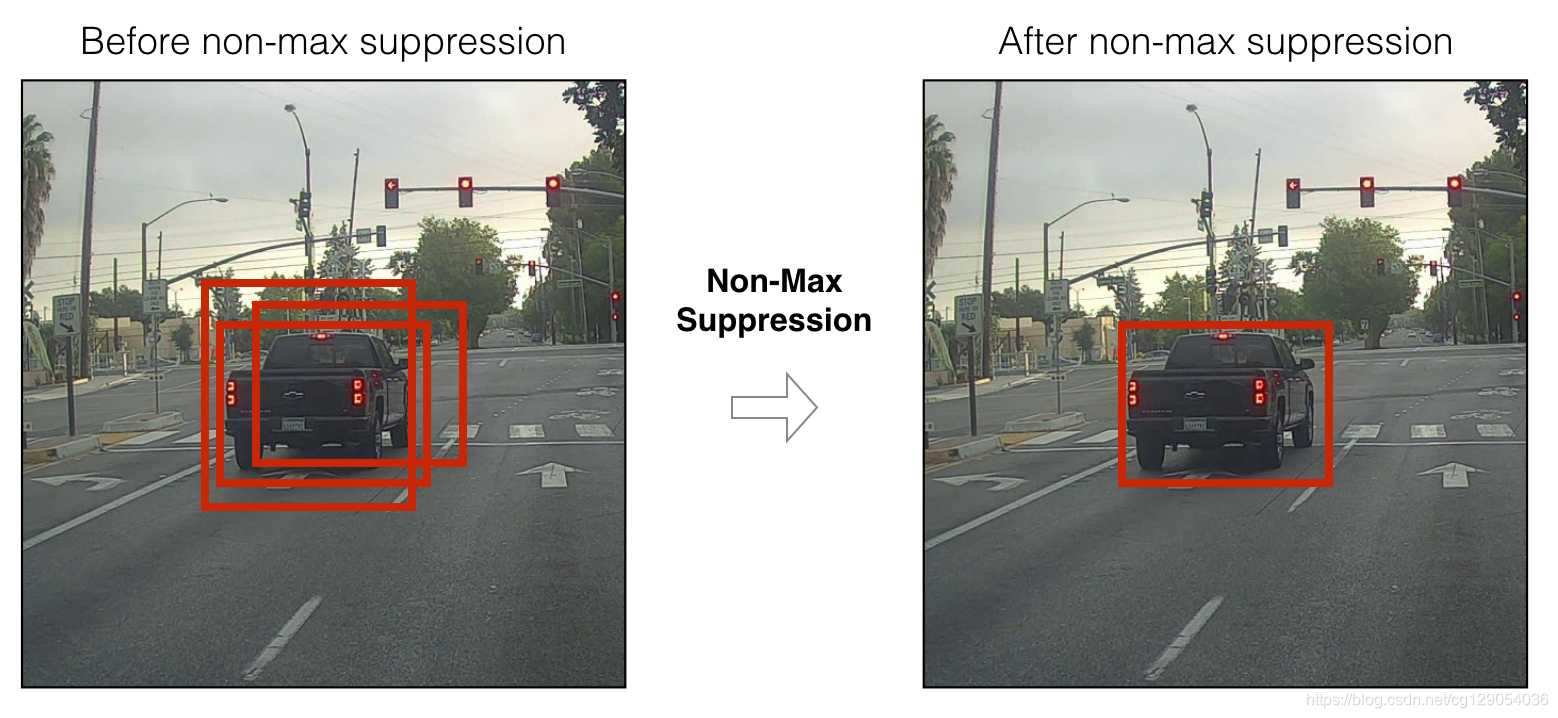
在上一节的阈值过滤后,会存在许多相互重叠的框,如下图所示。 为了选择最正确的目标框这里需要用到第二个过滤器:即非最大抑制(NMS)。

非最大抑制使用名为IOU的函数:

在此代码中,我们使用以下约定:(0,0)是图像的左上角,(1,0)是右上角,(1,1)是右下角。
def iou(box1, box2):"""参数s:box1 -- first box, list object with coordinates (x1, y1, x2, y2)box2 -- second box, list object with coordinates (x1, y1, x2, y2)"""# 重叠区域面积xi1 = np.maximum(box1[0], box2[0])yi1 = np.maximum(box1[1], box2[1])xi2 = np.minimum(box1[2], box2[2])yi2 = np.minimum(box1[3], box2[3])inter_area = (xi2 - xi1)*(yi2 - yi1)# 整个区域面积box1_area = (box1[2] - box1[0]) * (box1[3] - box1[1])box2_area = (box2[2] - box2[0]) * (box2[3] - box2[1])union_area = box2_area + box1_area - inter_area# 输出IOUiou = inter_area / union_areareturn iou现在对上一节输出的结果进行非最大值抑制:
def yolo_non_max_suppression(scores, boxes, classes, max_boxes = 10, iou_threshold = 0.5):"""参数:scores -- tensor of shape (None,), output of yolo_filter_boxes()boxes -- tensor of shape (None, 4), output of yolo_filter_boxes() that have been scaled to the image size (see later)classes -- tensor of shape (None,), output of yolo_filter_boxes()max_boxes -- integer, maximum number of predicted boxes you'd likeiou_threshold -- real value, "intersection over union" threshold used for NMS filtering返回值:scores -- tensor of shape (, None), predicted score for each boxboxes -- tensor of shape (4, None), predicted box coordinatesclasses -- tensor of shape (, None), predicted class for each box"""max_boxes_tensor = K.variable(max_boxes, dtype='int32') # tensor to be used in tf.image.non_max_suppression()K.get_session().run(tf.variables_initializer([max_boxes_tensor])) # initialize variable max_boxes_tensor# Use tf.image.non_max_suppression() to get the list of indices corresponding to boxes you keepnms_indices = tf.image.non_max_suppression(boxes, scores, max_boxes, iou_threshold)# Use K.gather() to select only nms_indices from scores, boxes and classesscores = K.gather(scores, nms_indices)boxes = K.gather(boxes, nms_indices)classes = K.gather(classes, nms_indices)return scores, boxes, classes4.评估模型
运用之前编写的函数进行模型评估。
def yolo_eval(yolo_outputs, image_shape = (720., 1280.), max_boxes=10, score_threshold=.6, iou_threshold=.5):""" 参数s:yolo_outputs -- output of the encoding model (for image_shape of (608, 608, 3)), contains 4 tensors:box_confidence: tensor of shape (None, 19, 19, 5, 1)box_xy: tensor of shape (None, 19, 19, 5, 2)box_wh: tensor of shape (None, 19, 19, 5, 2)box_class_probs: tensor of shape (None, 19, 19, 5, 80)image_shape -- tensor of shape (2,) containing the input shape, in this notebook we use (608., 608.) (has to be float32 dtype)max_boxes -- integer, maximum number of predicted boxes you'd likescore_threshold -- real value, if [ highest class probability score < threshold], then get rid of the corresponding boxiou_threshold -- real value, "intersection over union" threshold used for NMS filtering返回值:scores -- tensor of shape (None, ), predicted score for each boxboxes -- tensor of shape (None, 4), predicted box coordinatesclasses -- tensor of shape (None,), predicted class for each box"""# YOLO模型的输出box_confidence, box_xy, box_wh, box_class_probs = yolo_outputs# 输出boxesboxes = yolo_boxes_to_corners(box_xy, box_wh)# 阈值过滤scores, boxes, classes = yolo_filter_boxes(box_confidence, boxes, box_class_probs, score_threshold)# Scale boxes back to original image shape.boxes = scale_boxes(boxes, image_shape)# 非最大值抑制scores, boxes, classes = yolo_non_max_suppression(scores, boxes, classes, max_boxes, iou_threshold)return scores, boxes, classes5.测试
训练YOLO模型需要花费很长时间,并且需要带有目标类别的标记边界框的数据集。
这里选择加载存储在“ yolo.h5”中的现有预训练的Keras YOLO模型。 (这些权重来自YOLO官方网站,并使用Allan Zelener编写的函数进行了转换。)
yolo_model = load_model("model_data/yolov2.h5")yolo_model.summary()1)模型输出转换为可用张量
yolo_model的输出是(m,19,19,5,85)张量。
yolo_outputs = yolo_head(yolo_model.output, anchors, len(class_names))2)选取最佳框
yolo_outputs以正确格式提供了yolo_model的所有预测框。 现在,可以执行过滤并仅选择最佳框。
scores, boxes, classes = yolo_eval(yolo_outputs, image_shape)3)车辆检测
下面是整个的处理过程:
- yolo_model.input被赋予yolo_model。 该模型用于计算输出yolo_model.output
- yolo_model.output由yolo_head处理。 给出yolo_outputs
- yolo_outputs通过过滤功能yolo_eval。 它输出预测:分数,方框,类
下面给出预测代码,以及检测结果。
def predict(sess, image_file):""" 参数:sess -- your tensorflow/Keras session containing the YOLO graphimage_file -- name of an image stored in the "images" folder.返回:out_scores -- tensor of shape (None, ), scores of the predicted boxesout_boxes -- tensor of shape (None, 4), coordinates of the predicted boxesout_classes -- tensor of shape (None, ), class index of the predicted boxes"""# 图片预处理image, image_data = preprocess_image("images/" + image_file, model_image_size = (608, 608))out_scores, out_boxes, out_classes = sess.run([scores, boxes, classes], feed_dict = {yolo_model.input:image_data, K.learning_phase(): 0})# 打印预测信息print('Found {} boxes for {}'.format(len(out_boxes), image_file))# Generate colors for drawing bounding boxes.colors = generate_colors(class_names)# Draw bounding boxes on the image filedraw_boxes(image, out_scores, out_boxes, out_classes, class_names, colors)# Save the predicted bounding box on the imageimage.save(os.path.join("out", image_file), quality=90)# Display the results in the notebookoutput_image = scipy.misc.imread(os.path.join("out", image_file))imshow(output_image)return out_scores, out_boxes, out_classes
6.参考资料
- Joseph Redmon, Santosh Divvala, Ross Girshick, Ali Farhadi - You Only Look Once: Unified, Real-Time Object Detection (2015)
- Joseph Redmon, Ali Farhadi - YOLO9000: Better, Faster, Stronger (2016)
- Allan Zelener - YAD2K: Yet Another Darknet 2 Keras
- The official YOLO website (YOLO: Real-Time Object Detection)
)
)


)


)


)

)


)
)
:图片分类笔记与KNN编程作业)
)