前言: 今晚写一篇关于学员/讲师/销售员CRM系统。这个小项目是27号开始做的,大概搞了一星期不到。我把一些知识点总结下,还写下当时克服的BUG。
Django练习小项目:学员管理系统设计开发
带着项目需求学习是最有趣和效率最高的,今天就来基于下面的需求来继续学习Django
项目需求:
- 分讲师\学员\课程顾问角色
- 学员可以属于多个班级,学员成绩按课程分别统计
- 每个班级至少包含一个或多个讲师
- 一个学员要有状态转化的过程 ,比如未报名前,报名后,毕业老学员
- 客户要有咨询纪录, 后续的定期跟踪纪录也要保存
- 每个学员的所有上课出勤情况\学习成绩都要保存
- 学校可以有分校区,默认每个校区的员工只能查看和管理自己校区的学员
- 客户咨询要区分来源
拿到需求后,先要分析,再设计表结构: 超级重要!!


  1 from django.db import models
  2
  3 from django.contrib.auth.models import User  #django自带的用户认证表
  4 # Create your models here.
  5 course_type_choice = (("online", u"网络班"),
  6                       ("offline_weekend", u"面授班(周末)"),
  7                       ("offline_fulltime", u"面授班(脱产)"),
  8                       )  # 课程类型
  9
 10 class School(models.Model):  #学校表
 11     name = models.CharField(max_length=128, unique=True)
 12     city = models.CharField(max_length=64)
 13     addr = models.CharField(max_length=128)
 14
 15     def __str__(self):  #给前端界面显示学校名
 16         return self.name
 17
 18
 19 class UserProfile(models.Model):  #内部员工表
 20     # User是一张表,在UserProfile关联User表,类似继承User表,也可以拓展别的字段
 21     # 这里不能用ForeignKey(一对多),比如User表里有一个zcl,
 22     # 用FK,则可以在UserProfile创建多个zcl用户,实际上UserProfile应当只有一个用户
 23     # 用OneToOne关联,只能有一个UserProfile用户与User关联,其它用户不能关联,
 24     # 在数据库层面OneToOne与ForeignKey实现是相同的,都是用FK, OneToOne是django admin层面做限制的
 25     user = models.OneToOneField(User,verbose_name=u"登陆用户名")
 26     name = models.CharField(max_length=64, verbose_name=u"全名")
 27     school = models.ForeignKey("School")  #比如领导可以管理多个学校,但有些老师就只能对应一个学校
 28     user_type_choice = (("salespeople", u"销售员"),
 29                         ("teachers", u"讲师"),
 30                         ("others", u"其它"),
 31                         )
 32     user_type = models.CharField(verbose_name=u"用户类型",max_length=64, choices=user_type_choice, default="others")
 33
 34     def __str__(self):
 35         return self.name
 36
 37     class Meta:
 38         # 加上权限。can_del_customer是存在数据库中的,"可以删除用户"是显示在界面的
 39         # permissions = (("can_del_customer",u"可以删除用户"),)
 40         # 加入三条权限
 41         permissions = (("view_customer_list",u"可以查看客户列表"),  # 对销售员的权限
 42                        ("view_customer_info", u"可以查看客户详情"),
 43                        ("edit_own_customer_info", u"可以修改自己的客户信息"),
 44
 45                        ("view_class_list", u"可以查看班级列表"),  # 对讲师的权限
 46                        ("view_class_info", u"可以查看班级详情"),
 47                        ("edit_own_class_info", u"可以修改自己的班级信息"),
 48
 49                        )
 50
 51
 52 class CustomerTrackRecord(models.Model):  #客户跟踪记录表
 53     customer = models.ForeignKey("Customer")  #一个客户可有多个跟踪记录
 54     track_record = models.TextField(u"跟踪记录")
 55     track_date = models.DateField(auto_now_add=True)  #跟踪日期
 56     tracker = models.ForeignKey(UserProfile)  #一条跟踪记录只能有一个追踪人
 57     status_choices = ((1, u"近期无报名计划"),
 58                       (2, u"2个月内报名"),
 59                       (3, u"1个月内报名"),
 60                       (4, u"2周内报名"),
 61                       (5, u"1周内报名"),
 62                       (6, u"2天内报名"),
 63                       (7, u"已报名"),
 64                       )
 65     status = models.IntegerField(u"状态",choices=status_choices,help_text=u"选择客户此时的状态")
 66
 67     def __str__(self):
 68         return self.customer.qq
 69
 70
 71 class Course(models.Model):  #课程表
 72     name = models.CharField(max_length=64, unique=True)  #课程名
 73     online_price = models.IntegerField()  #网络班课程价格
 74     offline_price = models.IntegerField()  #面授班课程价格
 75     introduction = models.TextField()  #课程介绍
 76
 77     def __str__(self):
 78         return self.name
 79
 80
 81 class ClassList(models.Model):  # 班级表
 82     course = models.ForeignKey(Course, verbose_name=u"课程")  # 关联课程表
 83     semester = models.IntegerField(verbose_name=u"学期")
 84     teachers = models.ManyToManyField(UserProfile, verbose_name=u"讲师")  # 多对多关联
 85     start_date = models.DateField(verbose_name=u"开班日期")  # 开班日期
 86     graduate_date = models.DateField(blank=True,null=True)  # 结业日期
 87     # 课程类型
 88     course_type = models.CharField(max_length=64, choices=course_type_choice,default="offline_weekend")
 89
 90     def __str__(self):
 91         return "%s[%s期][%s]" % (self.course, self.semester, self.get_course_type_display())
 92
 93     class Meta:
 94         # 联合唯一,python网络班15期只能有一个
 95         unique_together = ("course", "semester", "course_type")
 96
 97
 98 class Customer(models.Model):  # 学员表
 99     qq = models.CharField(max_length=64, unique=True)
100     # 名字可为空,刚来咨询时不会告诉name
101     name = models.CharField(max_length=64, blank=True, null=True)
102     phone = models.BigIntegerField(blank=True, null=True)  # 不用IntegerField,不够长
103     course = models.ForeignKey("Course")  # 学员咨询的课程,只记录咨询的一个课程,若有多个可备注说明
104     course_type = models.CharField(verbose_name=u"课程类型", max_length=64, choices=course_type_choice, default="offline_weekend")
105     consult_memo = models.TextField(verbose_name=u"咨询备注")  # 咨询内容
106     source_type_choice = (("qq", u"qq群"),
107                           ("referral", u"内部转介绍"),
108                           ("51CTO", u"51CTO"),
109                           ("agent", u"招生代理"),
110                           ("others", u"其它"),
111                           )  #客户来源
112     source_type = models.CharField(max_length=64, choices=source_type_choice, default="others")
113     # 表示自关联(Customer表关联Customer表),也可用referral_from = models.ForeignKey("Customer")
114     # 1.加上self  2.自关联要加上related_name,通过internal_referral反查数据
115     # 反向关联得加上related_name: eg:A介绍B来上课,对A通过referral_from可找到B;反之需通过referral
116     # 该字段表示该学生被谁介绍来上课的
117     referral_from = models.ForeignKey("self", blank=True, null=True, related_name="referral")
118
119     status_choices = (("singed", u"已报名"),
120                       ("unregistered", u"未报名"),
121                       ("graduated", u"已毕业"),
122                       ("drop_off", u"退学"),
123                       )  # 客户来源
124     status = models.CharField(max_length=64, choices=status_choices, default="unregistered")
125     consultant = models.ForeignKey("UserProfile", verbose_name="课程顾问")
126     date = models.DateField(u"咨询日期", auto_now_add=True)  # auto_now_add创建时自动添加当前日期
127     class_list = models.ManyToManyField("ClassList", blank=True)  # 对于多对多字段,不需要null=true
128
129     def __str__(self):
130         return "%s[%s]" % (self.qq, self.name)
131
132
133 class CourseRecord(models.Model):  # 上课记录表
134     class_obj = models.ForeignKey(ClassList)  # 关联班级
135     day_num = models.IntegerField(u"第几节课")
136     course_date = models.DateField(auto_now_add=True, verbose_name=u"上课时间")
137     teacher = models.ForeignKey(UserProfile)  # 讲师
138
139     # students = models.ManyToManyField(Customer) 不能在这里多对多,if do this,can't 查看出勤情况
140     def __str__(self):
141         return "%s[day%s]" % (self.class_obj, self.day_num)
142
143     class Meta:  # 联合唯一  python自动化12期网络班 12;只能有一个12天
144         unique_together = ("class_obj", "day_num")
145
146
147 class StudyRecord(models.Model):
148     # 关联上课记录表,上课记录表有第几节课字段,同时也与ClassList关联,可知道是哪个班第几期
149     course_record = models.ForeignKey(CourseRecord)
150     student = models.ForeignKey(Customer)  # 关联学员表
151     record_choices = (('checked', u"已签到"),
152                       ('late',u"迟到"),
153                       ('no_show',u"缺勤"),
154                       ('leave_early',u"早退"),
155                       )
156     record = models.CharField(u"状态", choices=record_choices,default="no_show",max_length=64)
157     score_choices = ((100, 'A+'),
158                      (90,'A'),
159                      (85,'B+'),
160                      (80,'B'),
161                      (70,'B-'),
162                      (60,'C+'),
163                      (50,'C'),
164                      (40,'C-'),
165                      (0,'D'),
166                      (-1,'N/A'),  # 暂无成绩
167                      (-100,'COPY'),
168                      (-1000,'FAIL'),
169                      )
170     score = models.IntegerField(u"本节成绩",choices=score_choices,default=-1)
171     date = models.DateTimeField(auto_now_add=True)
172     note = models.CharField(u"备注",max_length=255,blank=True,null=True)
173
174     def __str__(self):
175         return "%s,%s,%s" % (self.course_record,self.student,self.get_record_display())
先来张图看看效果: 下图是销售员Alex登陆后看到的界面

点击右上方Alex已招学员,出现下图界面:
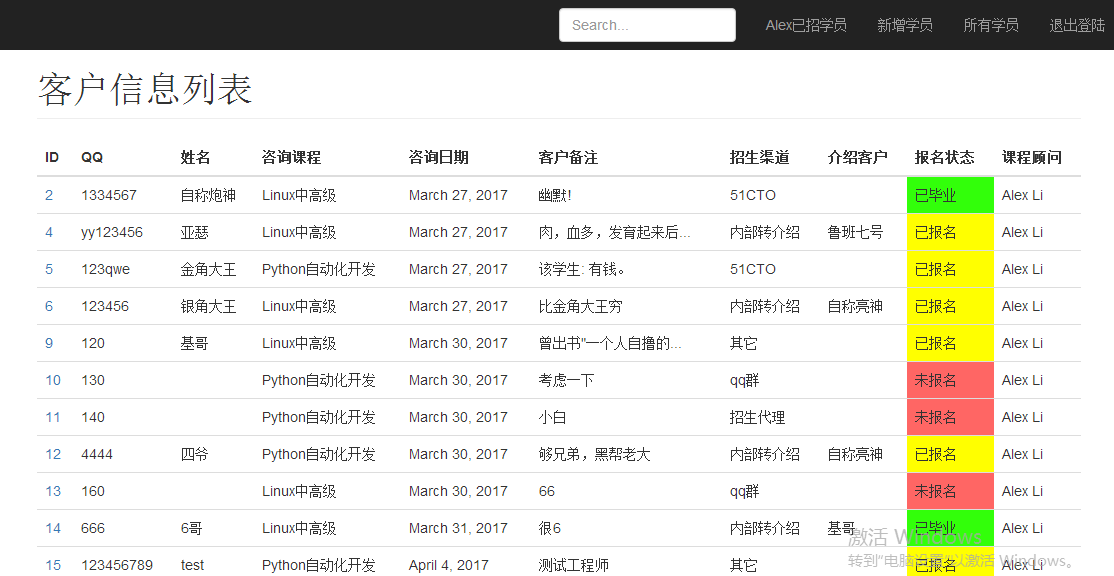
一、前端界面实现
界面看着我感觉是蛮漂亮的,登陆界面和信息界面都是搞bootstrap模版的。只要将bootstrap模版修改下,就变成所需要的界面啦。不会修改的可以看看如何使用bootstrap。
二、字数显示限制
如果备注过多,会使界面不好看,要想使备注只显示一定的字数,可用下列方法: 只显示13个字节
<td>{{ customer.consult_memo|truncatechars:13}}</td>

三、报名状态加色
第一种方法,比较麻烦,有兴趣可看django进阶-modelform&admin action
第二种方法更简单
1. 在bootstrap添加自定义的css样式文件,custom.css
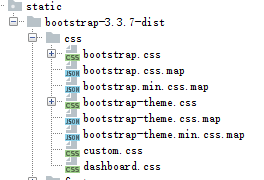
2. 在基础模版(我定义的是base.html,其它html模块是继承它的)导入custom.css文件:
<link href="/static/bootstrap-3.3.7-dist/css/custom.css" rel="stylesheet">
3. 你随意在custom.css定义样式


.singed{background-color:yellow;
}.unregistered{background-color:#ff6664;
}.graduated{background-color:#32ff0a;
}.drop_off{background-color:bisque;
} 4. 在对应的customer.html的标签加入样式; customer.status是后台传给前端的,是学生的报名状态。
<td class="{{ customer.status }}">{{ customer.get_status_display }}</td>
四、分页功能
其实Alex销售员登陆后看到的界面只有两条客户的信息,这是我在后台写的。注意看左下角有个分页,类似与百度搜索的分页。其实分页实现起来还是有点难度的。
先看django官方文档。官方文档写得很详细!!


>>> from django.core.paginator import Paginator
>>> objects = ['john', 'paul', 'george', 'ringo']
>>> p = Paginator(objects, 2)
>>> p.count
4
>>> p.num_pages
2
>>> type(p.page_range)  # `<type 'rangeiterator'>` in Python 2.
<class 'range_iterator'>
>>> p.page_range
range(1, 3)
>>> page1 = p.page(1)
>>> page1
<Page 1 of 2>
>>> page1.object_list
['john', 'paul']
>>> page2 = p.page(2)
>>> page2.object_list
['george', 'ringo']
>>> page2.has_next()
False
>>> page2.has_previous()
True
>>> page2.has_other_pages()
True
>>> page2.next_page_number()
Traceback (most recent call last):
...
EmptyPage: That page contains no results
>>> page2.previous_page_number()
1
>>> page2.start_index() # The 1-based index of the first item on this page
3
>>> page2.end_index() # The 1-based index of the last item on this page
4
>>> p.page(0)
Traceback (most recent call last):
...
EmptyPage: That page number is less than 1
>>> p.page(3)
Traceback (most recent call last):
...
EmptyPage: That page contains no results
后台实现:
 1 def customers(request):
 2     print(">>>>request:",request)
 3     # 查找所有客户,获取所有信息的结果集,但并不是所有信息都已经取出来了(如果有上万条数据,不能一次性取出来,先取一部分),
 4     customer_list = models.Customer.objects.all()
 5     print(">>>>customers:", customer_list)
 6     paginator = Paginator(customer_list, 2)  # 生成分页实例: 每一页有两条数据
 7     page = request.GET.get("page")  # 获取前端点击的页数,参数page可自定义
 8     try:
 9         customer_objs = paginator.page(page)  # 生成第page页的对象
10     except PageNotAnInteger:
11         # If page is not an integer, deliver first page
12         # 如果输入的页码不是下标,则返回第一页
13         customer_objs = paginator.page(1)
14     except EmptyPage:
15         # If page is out of range (e.g. 9999), deliver last page of results.
16         # 如果输入的页码超出,则跳转到最后的页码
17         customer_objs = paginator.page(paginator.num_pages)
18
19     return render(request, "crm/customer.html", {"customer_list": customer_objs})
前端实现:
1 <div class="pagination">
2
3 <nav>
4 <ul class="pagination">
5 {% if customer_list.has_previous %}
6 <li class=""><a href="?page={{ customer_list.previous_page_number }}" aria-label="Previous"><span aria-hidden="true">«</span></a></li>
7 {% endif %}
8
9 {% for page_num in customer_list.paginator.page_range %}
10 <!-- abs_page为函数名,后两个为参数 -->
11 {% abs_page customer_list.number page_num %}
12
13 {% endfor %}
14
15 {% if customer_list.has_next %}
16 <li class=""><a href="?page={{ customer_list.next_page_number }}" aria-label="Next"><span aria-hidden="true">»</span></a></li>
17 {% endif %}
18 </ul>
19 </nav>
20
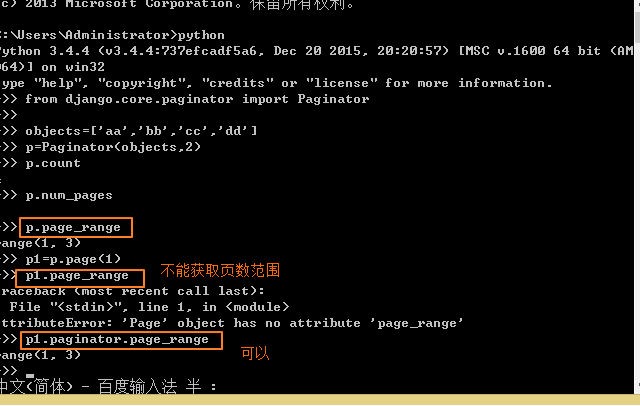
21 </div> 第一次进入http://127.0.0.1:8000/crm/customer/页面时,请求为get方式,后台接收到的page参数为空,故会出PagenotAnInterger异常,故会返回到第一页!!
注意前端的第九行代码: customer_list.paginator.page_range是页数的范围。customer_list只是一个第几页的实例而已,是无法获取到页数的范围的。
但是问题来了,如果,你有100条数据,每页只放两条数据,意味着界面得有50个button,基本上页面是放不下的。
如果页面过多,看下百度怎么处理:

可用abs绝对值,若当前页面为第6页,想让3、4、5和7、8、9也显示出来,可在循环判断页面时,利用abs, 当|循环的页面值-当前的页面值|<=3 ,则显示。
但问题又来了,前端的templates可没有abs取绝对值这种后台才有的方法,怎么办??
自定义template tags
https://docs.djangoproject.com/es/1.9/howto/custom-template-tags/
效果图:


后台是如何自定义模版??
首先自定义templates模版,我随便建了个文件custom_tags.py,必须放在新建包templatetags下:
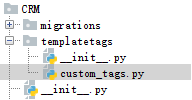
custom_tags.py: 当页码绝对值之差小于3时,则返回页码按钮的html给前端,反之不返回。
 1 from django import template
 2 from django.utils.html import format_html
 3
 4 register = template.Library()  #django的语法库
 5
 6
 7 @register.simple_tag
 8 def abs_page(current_page, loop_page):
 9     offset = abs(current_page - loop_page)
10     if offset < 3:
11         if current_page == loop_page:
12             page_ele = "<li class='active'><a href='?page=%s'>%s</a></li>" % (current_page, current_page)
13         else:
14             page_ele = "<li class=''><a href='?page=%s'>%s</a></li>" % (loop_page, loop_page)
15         return format_html(page_ele)  #将字符串转化为html,返回给前端
16     else:
17         return ""
五、modelform进阶
modelform之前有写过,django进阶-modelform&admin action, 但主要是写django自带的admin。
现在我有个需求,销售员Alex想查看客户的详细信息。只需只击客户的ID号,便可查看,当然也可以修改。
前端:
<td><a href="/crm/customers/{{customer.id}}/">{{customer.id}}</a></td>
urls:
# 当学员id当作参数,传给customer_detail方法
url(r'^customers/(\d+)/$', views.customer_detail),
后台:
def customer_detail(request,customer_id):customer_obj = models.Customer.objects.get(id=customer_id)form = forms.CustomerModelForm()return render(request,"crm/customer_detail.html",{"customer_form":form})
看前端界面显示: 虽然能显示出表单,但无法显示出学员的信息,而且太丑了!!
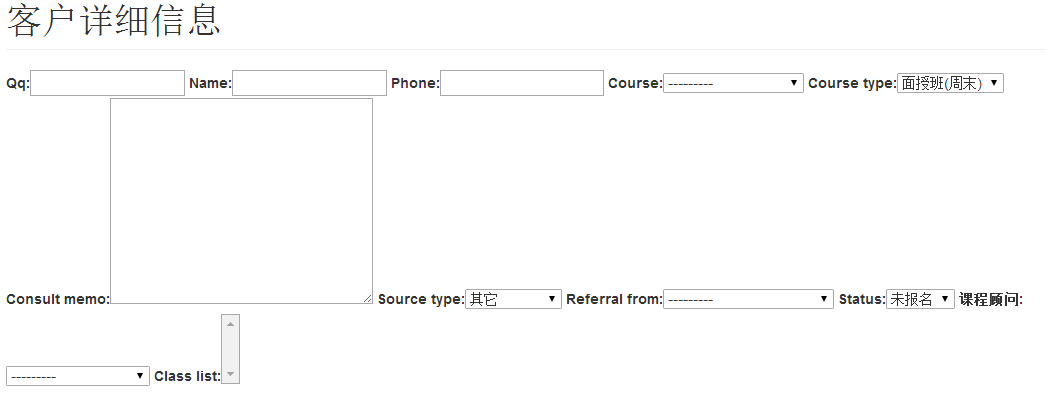
如何显示出学员的信息:
customer_obj = models.Customer.objects.get(id=customer_id)form = forms.CustomerModelForm(instance=customer_obj) # 将数据对象当作参数传入
如何使前端界面更漂亮:
forms.py表单文件:


 1 from django.forms import Form,ModelForm
 2 from CRM import models
 3
 4
 5 # 客户的form表单,可用于修改客户的信息,增加客户的前端界面
 6 class CustomerModelForm(ModelForm):
 7
 8     class Meta:
 9         model = models.Customer  # 绑定Customer表
10         exclude = ()
11
12     # 重构modelform的初始化类的方式;前面已经继承modelform,下面进行重构
13     def __init__(self, *args, **kwargs):
14         super(CustomerModelForm, self).__init__(*args, **kwargs)
15
16         for field_name in self.base_fields:
17             field = self.base_fields[field_name]  # 循环取出所有字段
18             field.widget.attrs.update({"class": "form-control"})  # 给字段加上样式
前端: 样式是从bootstrap参考来的


 1 {% block page_content %}
 2 <!-- action为空表示数据提交到当前url -->
 3 <form class="form-horizontal" method="post" action="">{% csrf_token %}
 4     {% for field in customer_form %}
 5         <div class="form-group">
 6             {% if field.field.required %} <!--若是必填字段 -->
 7                 <label class="col-sm-2 control-label">
 8                     <span style="color: red;font-size: larger">*</span>{{ field.label }}
 9                 </label>
10             {% else %} <!-- label在django默认为加粗 -->
11                 <label style="font-weight: normal" class="col-sm-2 control-label">{{ field.label }}</label>
12             {% endif %}
13             <div class="col-sm-8">
14                 {{ field }}
15                 {% if field.errors %}  <!--错误提示modelform已经帮我们封装好了-->
16                     <ul>
17                         {% for error in field.errors %}
18                             <li style="color: red">{{ error }}</li>
19                         {% endfor %}
20                     </ul>
21                 {% endif %}
22             </div>
23         </div>
24     {% endfor %}
25     <div class="col-md-10">
26         <button type="submit" class="btn btn-success pull-right">Save</button>
27     </div>
28 </form>
29
30 {% endblock %}
效果图:

修改后保存信息


 1 def customer_detail(request,customer_id):
 2     #通过modelform显示某用户的详细信息,修改后可保存
 3     customer_obj=models.Customer.objects.get(id=customer_id)
 4     if request.method=="POST":
 5         #必须加instance=customer_obj告诉修改哪条数据,否则就是创建数据了
 6         form=forms.CustomerModelForm(request.POST,instance=customer_obj)
 7         if form.is_valid():
 8             form.save()#修改后保存
 9     else:
10         form=forms.CustomerModelForm(instance=customer_obj)
11 return render(request,"crm/customer_detail.html",{"customer_form":form})
六、必填与非必填字段
效果图: 必填字段有加粗,且左上角有红色*号

只需修改下前端代码即可:
1 {% if field.field.required %} <!--若是必填字段 -->
2     <label class="col-sm-2 control-label">
3         <span style="color: red;font-size: larger">*</span>{{ field.label }}
4     </label>
5 {% else %} <!-- label在django默认为加粗 -->
6     <label style="font-weight: normal" class="col-sm-2 control-label">{{ field.label }}</label>
7 {% endif %}
权限分配, 这个改天再写博客整理下: 三个角色的权限是不同的。对销售员来讲,无法修改非本人招收客户的信息。

七、url别名
啥是url别名??
1 #当学员id当作参数,传给customer_detail方法,
2 #给该url起别名,一调用别名customer_detail,就关联上url
3 url(r'^customers/(\d+)/$',views.customer_detail,name="customer_detail"),
现在销售员想查看客户的详细信息,只需一点击客户的ID号便可查看。so, ID号必须是个a标签,下面来看看前端实现:
1 <!-- 这里查看学员的详细信息不应该写列,否则当url一改变,得来这里改代码 -->
2 <!-- <td><a href = " /crm/customers/ {{customer.id}} / "> {{ customer.id }} </a></td> -->
3
4 <td><a href = "{% url  'customer_detail'  customer.id %}"> {{ customer.id }} </a></td>
注意了,如果不用url别名的话,就用第2行代码。但是,这样项目的可维护性大大降低了。当你需改动url时,必须到前端修改对应的a标签。如果用了url别名,就不用再来前端修改了。

看到没,我用浏览器审查元素,浏览器已经自动将ID号的a标签,转化为一条url. 神奇!!


states深入理解)


——搭建开发框架Express,实现Web网站登录验证)
)

Linux下CACTI完全搭建技术文档二)


)
)

