我们在《ASP.NET Core项目实战的课程》第一章里面给identity server4做了一个全面的介绍和示例的练习 。
如果想完全理解本文所涉及到的话题,你需要了解的背景知识有:
什么是OpenId Connect (OIDC)
OIDC 对oAuth进行了哪些扩展?
Identity Server4提供的OIDC认证服务(服务端)
ASP.NET Core的权限体系中的OIDC认证框架(客户端)
什么是 OIDC
在了解OIDC之前,我们先看一个很常见的场景。假使我们现在有一个网站要集成微信或者新浪微博的登录,两者现在依然采用的是oAuth 2.0的协议来实现 。 关于微信和新浪微博的登录大家可以去看看它们的开发文档。
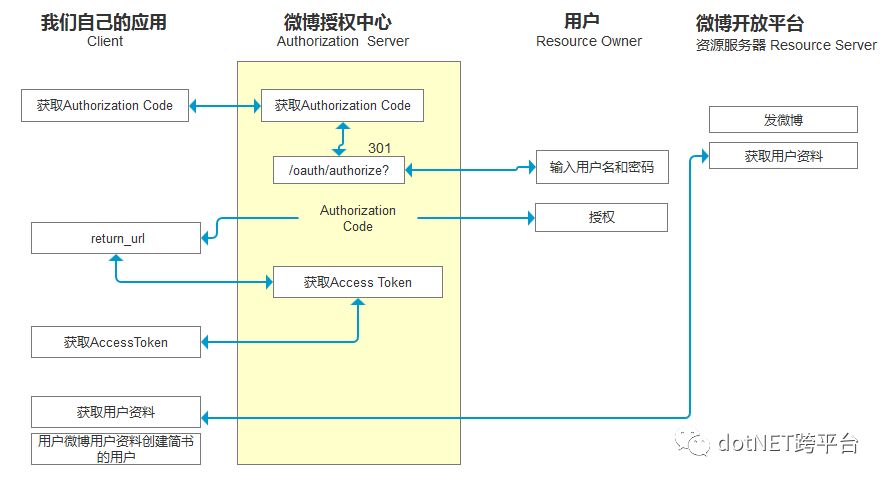
在我们的网站集成微博或者新浪微博的过程大致是分为五步:
准备工作:在微信/新浪微博开发平台注册一个应用,得到AppId和AppSecret
发起 oAauth2.0 中的 Authorization Code流程请求Code
根据Code再请求AccessToken(通常在我们应用的后端完成,用户不可见)
根据 AccessToken 访问微信/新浪微博的某一个API,来获取用户的信息
后置工作:根据用户信息来判断是否之前登录过?如果没有则创建一个用户并将这个用户作为当前用户登录(我们自己应用的登录逻辑,比如生成jwt),如果有了则用之前的用户登录。
中间第2到3的步骤为标准的oAuth2 授权码模式的流程,如果不理解的可以参考阮一峰所写的《理解oAuth2.0 》一文。我们主要来看第4和5步,对于第三方应用要集成微博登录这个场景来说最重要的是我希望能快速拿到用户的一些基本信息(免去用户再次输入的麻烦)然后根据这些信息来生成一个我自己的用户跟微博的用户Id绑定(为的是下次你使用微博登录的时候我还能把你再找出来)。
oAuth在这里麻烦的地方是我还需要再请求一次API去获取用户数据,注意这个API和登录流程是不相干的,其实是属于微博开放平台丛多API中的一个,包括微信开放平台也是这样来实现。这里有个问题是前面的 2和3是oAuth2的标准化流程,而第4步却不是,但是大家都这么干(它是一个大家都默许的标准)
于是大家干脆就建立了一套标准协议并进行了一些优化,它叫OIDC
OIDC 建立在oAuth2.0协议之上,允许客户端(Clients)通过一个授权服务(Authorization Server)来完成对用户认证的过程,并且可以得到用户的一些基本信息包含在JWT中。
OIDC对oAuth进行了哪些扩展?
在oAuth2.0授权码模式的帮助下,我们拿到了用户信息。

上没有认证的过程,只是给我们的应用授权访问一个API的权限,我们通过这个API去获取当前用户的信息,这些都是通过oAuth2的授权码模式完成的。 我们来看看oAuth2 授权码模式的流程:
第一步,我们向authorize endpoint请求code的时候所传递的response_type表示授权类型,原来只有固定值code
GET /connect/authorize?response_type=code&client_id=postman&state=xyz&scope=api1 &redirect_uri=http://localhost:5001/oauth2/callback第二步,上面的请求执行完成之后会返回301跳转至我们传过去的redirect_uri并带上code
https://localhost:5001/oauth2/callback?code=835d584d4bc96d46ce49e27ebdbf272e40234d5f31097f63163f17da61fcd01c&scope=api1&state=111271607第三步,用code换取access token
POST /connect/token?grant_type=authorization_code&code=835d584d4bc96d46ce49e27ebdbf272e40234d5f31097f63163f17da61fcd01c&redirect_uri=http://localhost:5001/oauth2/callback&client_id=postman&client_secret=secret通过这个POST我们就可以得到access_token
{ "access_token": "eyJhbGciOiJSUzI1NiIsImtpZCI6IjV", "expires_in": 3600, "token_type": "Bearer"}我们拿到access_token之后,再把access_token放到authorization头请求 api来获取用户的信息。在这里,这个api不是属于授权服务器提供的,而是属于资源服务器。
OIDC给oAuth2进行扩展之后就填补了这个空白,让我们可以授权它添加了以下两个内容:
response_type 添加IdToken
添加userinfo endpoint,用idToken可以获取用户信息
OIDC对它进行了扩展,现在你有三个选择:code, id_token和 token,现在我们可以这样组合来使用。
| "response_type" value | Flow |
|---|---|
| code | Authorization Code Flow |
| id_token | Implicit Flow |
| id_token token | Implicit Flow |
| code id_token | Hybrid Flow |
| code token | Hybrid Flow |
| code id_token token | Hybrid Flow |
我们简单的来理解一下这三种模式:
Authorization Code Flow授权码模式:保留oAuth2下的授权模式不变response_type=code
Implicit Flow 隐式模式:在oAuth2下也有这个模式,主要用于客户端直接可以向授权服务器获取token,跳过中间获取code用code换accesstoken的这一步。在OIDC下,responsetype=token idtoken,也就是可以同时返回access_token和id_token。
Hybrid Flow 混合模式: 比较有典型的地方是从authorize endpoint 获取 code idtoken,这个时候id_token可以当成认证。而可以继续用code获取access_token去做授权,比隐式模式更安全。
再来详细看一下这三种模式的差异:
| Property | Authorization Code Flow | Implicit Flow | Hybrid Flow |
|---|---|---|---|
| access token和id token都通过Authorization endpoint返回 | no | yes | no |
| 两个token都通过token end point 返回 | yes | no | no |
| 用户使用的端(浏览器或者手机)无法查看token | yes | no | no |
| Client can be authenticated | yes | no | yes |
| 支持刷新token | yes | no | yes |
| 不需要后端参与 | no | yes | no |
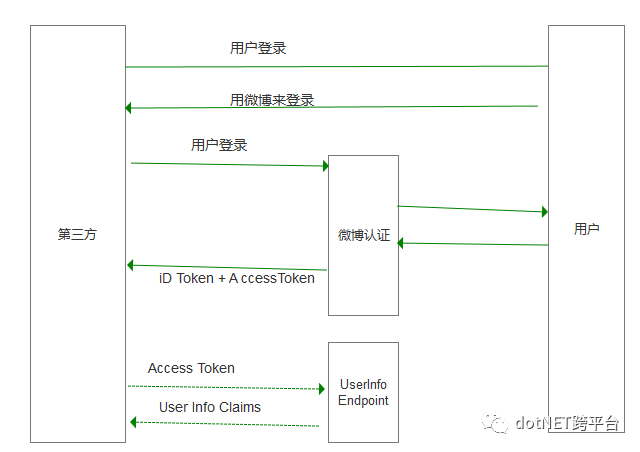
我们来看一下通过Hybird如何获取 code、id_token、_以及access_token,然后再用id_token向userinfo endpoint请求用户信息。
第一步:获取code,
response_type=code id_token
scope=api1 openid profile 其中openid即为用户的唯一识别号
GET /connect/authorize?response_type=code id_token&client_
id=postman&state=xyz&scope=api1 openid profile&nonc
e=7362CAEA-9CA5-4B43-9BA3-34D7C303EBA7        &r
edirect_uri=http://localhost:5001/oauth2/callback
当我们使用OIDC的时候,我们请求里面多了一个nonce的参数,与state有异曲同工之妙。我们给它一个guid值即可。
第二步:我们的redirect_uri在接收的时候即可以拿到code 和 id_token
https://localhost:5001/oauth2/callback#code=c5eaaaca8d4538f69f670a900d7a4fa1d1300b26ec67fba2f84129f0ab4ffa35&id_token=eyJhbGciOiJSUzI1NiIsImtpZCI6IjVjMzA5ZGIwYTE2OGEwOTgGtpbj0GVXNnkKhGdrzA&scope=openid%20profile%20api1&state=111271607第三步:用code换access_token(这一步与oAuth2中的授权码模式一致)
第四步:用access_token向userinfo endpoint获取用户资料
Get http://localhost:5000/connect/userinfo
Authorization Bearer access_token
返回的用户信息
{ "name": "scott", "family_name": "liu", "sub": "5BE86359-073C-434B-AD2D-A3932222DABE"}以下是我们的流程示意图。

可能会注意到,在这里我们拿到的idtoken没有派上用场,我们的用户资料还是通过access_token从userinfo endpoint里拿的。这里有两个区别:
userinfo endpoint是属于认证服务器实现的,并非资源服务器,有归属的区别
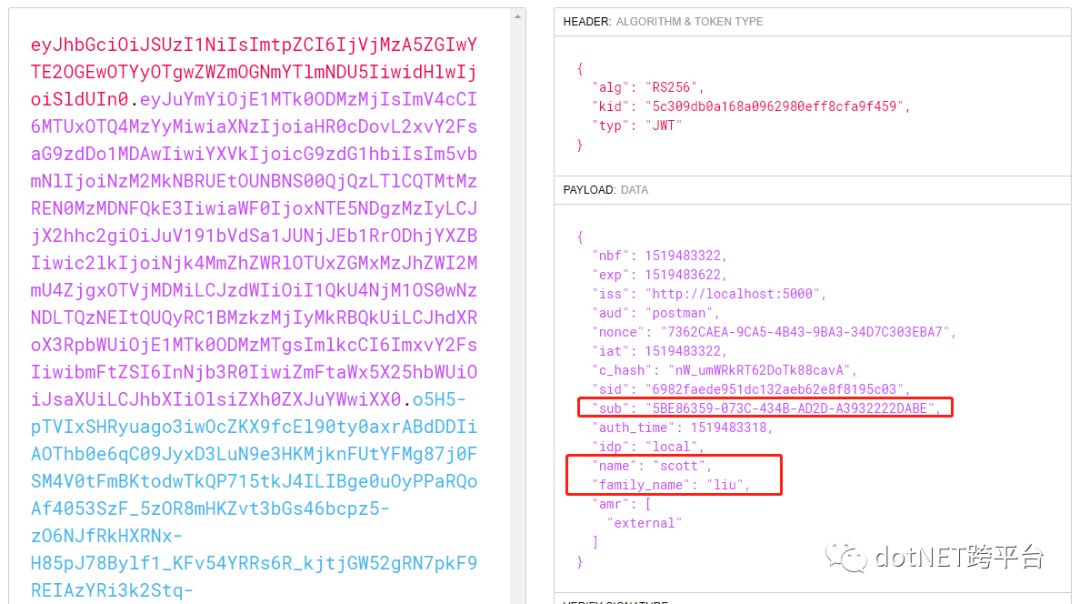
id_token 是一个jwt,里面带有用户的唯一标识,我们在判断该用户已经存在的时候不需要再请求userinfo endpoint
下图是对id_token进行解析得到的信息:sub即subject_id(用户唯一标识 )

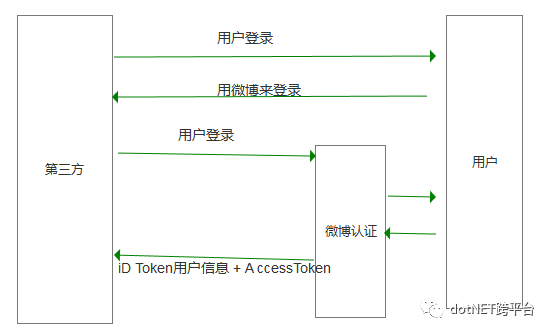
jwt了解的同学知道它里面本身就可以存储用户的信息,那么id_token可以吗?答案当然是可以的,我们将在介绍完identity server4的集成之后最后来实现。
Identity Server4提供的OIDC认证服务
Identity Server4是asp.net core2.0实现的一套oAuth2 和OIDC框架,用它我们可以很快速的搭建一套自己的认证和授权服务。我们来看一下用它如何快速实现OIDC认证服务。
由于用户登录代码过多,完整代码可以加入ASP.NET Core QQ群 92436737获取。 此处仅展示配置核心代码。
过程
新建asp.net core web应用程序
添加identityserver4 nuget引用
依赖注入初始化
services.AddIdentityServer()
  .AddDeveloperSigningCredential()
  .AddInMemoryIdentityResources(Config.GetIdentityResources())
  .AddInMemoryApiResources(Config.GetApiResources())
  .AddInMemoryClients(Config.GetClients())
  .AddTestUsers(Config.GetTestUsers());
中间件添加
app.UseIdentityServer();配置
在测试的时候我们新建一个Config.cs来放一些配置信息
api resources
public static IEnumerable<ApiResource> GetApiResources(){
 return new List<ApiResource>{
   new ApiResource("api1", "API Application"){UserClaims = { "role", JwtClaimTypes.Role }}};}
identity resources
public static IEnumerable<IdentityResource> GetIdentityResources(){
 return new List<IdentityResource> {
  new IdentityResources.OpenId(),
         new IdentityResources.Profile(),
             new IdentityResources.Email(),};}
clients
我们要讲的关键信息在这里,client有一个AllowGrantTypes它是一个string的集合。我们要写进去的值就是我们在上一节讲三种模式: Code,Implict和Hybird。因为这三种模式决定了我们的response_type可以请求哪几个值,所以这个地方一定不能写错。
IdentityServer4.Models.GrantTypes这个枚举给我们提供了一些选项,实际上是把oAuth的4种和OIDC的3种进行了组保。
public static IEnumerable<Client> GetClients(){ return new List<Client>{ new Client{ClientId = "postman",AllowedGrantTypes = GrantTypes.Hybird,RedirectUris = { "https://localhost:5001/oauth2/callback" },ClientSecrets ={ new Secret("secret".Sha256())},AllowedScopes = new List<string>{IdentityServerConstants.StandardScopes.OpenId,IdentityServerConstants.StandardScopes.Profile, "api1"},AllowOfflineAccess=true,},};}users
public static List<TestUser> GetTestUsers()
{
   return new List<TestUser> {
     new TestUser {SubjectId = "5BE86359-073C-434B-AD2D-A3932222DABE",Username = "scott",Password = "password",Claims = new List<Claim> {
          new Claim(JwtClaimTypes.Name, "scott"),
         new Claim(JwtClaimTypes.FamilyName, "liu"),
          new Claim(JwtClaimTypes.Email, "scott@scottbrady91.com"),
           new Claim(JwtClaimTypes.Role, "user"),
             }}};}
ASP.NET Core的权限体系中的OIDC认证框架
在Microsoft.AspNetCore.All nuget引用中包含了Microsoft.AspNetCore.Authentication.OpenIdConnect即asp.net core OIDC的客户端。我们需要在依赖注入中添加以下配置:
services.AddAuthentication(options =>{options.DefaultScheme = "Cookies";options.DefaultChallengeScheme = "oidc";}).AddCookie("Cookies").AddOpenIdConnect("oidc", options =>{options.SignInScheme = "Cookies";options.Authority = "http://localhost:5000";options.RequireHttpsMetadata = false;options.ClientId = "postman";options.ClientSecret = "secret";options.ResponseType = "code id_token";options.GetClaimsFromUserInfoEndpoint = true;options.Scope.Add("api1");options.Scope.Add("offline_access");});Authority即我们的用identity server4搭建的认证授权服务器,而其中的GetClaimsFromUserInfoEndpoint则会在拿到id_token之后自动向userinfo endpoint请求用户信息并放到asp.net core的User Identity下。
我们上面讲过,可以不需要请求userinfo endpoint, 直接将用户信息放到id_token中。
样我们就不需要再向userinfo endpoint发起请求,从id_token中即可以获取到用户的信息。而有了identity server4的帮助,完成这一步只需要一句简单的配置即可:
new Client
{    ClientId = "postman",AlwaysIncludeUserClaimsInIdToken = true,AllowOfflineAccess=true,
}
这样我们在拿到id_token之后,里即包含了我们的用户信息。

相关文章:
学习Identity Server 4的预备知识
使用Identity Server 4建立Authorization Server (1)
使用Identity Server 4建立Authorization Server (2)
使用Identity Server 4建立Authorization Server (3)
使用Identity Server 4建立Authorization Server (4)
Identity Service - 解析微软微服务架构eShopOnContainers(二)
IdentityServer4 第三方快速入门和示例
IdentityServer4 SigningCredential(RSA 证书加密)
原文地址:https://github.com/jessetalk/aspnet-core-in-practise/blob/master/chapter1.md
.NET社区新闻,深度好文,欢迎访问公众号文章汇总 http://www.csharpkit.com


之DataSet与RDD转换)
![P3389-[模板]高斯消元法](http://pic.xiahunao.cn/P3389-[模板]高斯消元法)

之数据加载与存储)

![bzoj3143,P3232-[Hnoi2013]游走【数学期望,高斯消元,贪心】](http://pic.xiahunao.cn/bzoj3143,P3232-[Hnoi2013]游走【数学期望,高斯消元,贪心】)
之加载数据的参数配置)
![bzoj1013,luogu4035-[JSOI2008]球形空间产生器【高斯消元】](http://pic.xiahunao.cn/bzoj1013,luogu4035-[JSOI2008]球形空间产生器【高斯消元】)

之简介)


之基于用户的相似度公式)