2019独角兽企业重金招聘Python工程师标准>>> 
一 Nginx安装
1、切换目录
# cd /usr/local/src
2、下载
# wget http://nginx.org/download/nginx-1.12.1.tar.gz
3、解压
# tar xzvf nginx-1.12.1.tar.gz
4、切换到nginx目录下
# cd nginx-1.12.1/

5、编译
# ./configure --prefix=/usr/local/nginx
以上编译参数是一般情况下使用,在实际编译时,需要根据需求添加参数,比如网站添加了ssl证书时,就需要将ssl相关的模块给nginx配置上,因此我们需要注意后续将下载的源码包保留,可能后续会用到里面包含的某个模块
6、make && make install
# make && make install
安装完成后,我们来看下/usr/local/nginx目录下的文件
![]()
其中conf下是nginx的配置文件

html下是样例文件
![]()
logs目录存放日志文件,sbin下面是进程,也就是核心文件

支持 -t检查配置文件语法

7、编辑启动脚本
启动脚本需要放在/etc/init.d/目录下
# vim /etc/init.d/nginx //创建并编辑启动脚本
在启动脚本中加入以下内容(参考https://coding.net/u/aminglinux/p/aminglinux-book/git/blob/master/D15Z/etc_init.d_nginx):
#!/bin/bash
# chkconfig: - 30 21
# description: http service.
# Source Function Library
. /etc/init.d/functions
# Nginx Settings
NGINX_SBIN="/usr/local/nginx/sbin/nginx"
NGINX_CONF="/usr/local/nginx/conf/nginx.conf"
NGINX_PID="/usr/local/nginx/logs/nginx.pid"
RETVAL=0
prog="Nginx"
start()
{
echo -n $"Starting $prog: "
mkdir -p /dev/shm/nginx_temp
daemon $NGINX_SBIN -c $NGINX_CONF
RETVAL=$?
echo
return $RETVAL
}
stop()
{
echo -n $"Stopping $prog: "
killproc -p $NGINX_PID $NGINX_SBIN -TERM
rm -rf /dev/shm/nginx_temp
RETVAL=$?
echo
return $RETVAL
}
reload()
{
echo -n $"Reloading $prog: "
killproc -p $NGINX_PID $NGINX_SBIN -HUP
RETVAL=$?
echo
return $RETVAL
}
restart()
{
stop
start
}
configtest()
{
$NGINX_SBIN -c $NGINX_CONF -t
return 0
}
case "$1" in
start)
start
;;
stop)
stop
;;
reload)
reload
;;
restart)
restart
;;
configtest)
configtest
;;
*)
echo $"Usage: $0 {start|stop|reload|restart|configtest}"
RETVAL=1
esac
exit $RETVAL
8、修改启动脚本权限
# chmod 755 /etc/init.d/nginx
9、将nginx加入启动服务列表
# chkconfig --add nginx
10、编辑配置文件
此时/usr/local/nginx/conf/目录下已经有一个nginx.conf配置文件,

但是我们不用这个配置文件,我们用自己写的配置文件,所有我们先将原来的nginx.conf备份
# mv nginx.conf nginx.conf.bak

接下来创建并编辑我们自己的nginx.conf配置文件
# vim nginx.conf
在配置文件中加入以下内容(参考https://coding.net/u/aminglinux/p/aminglinux-book/git/blob/master/D15Z/nginx.conf):
user nobody nobody; //user用于定义启动nginx的是哪个用户,也就是如果要让nginx去做读写操作时是使用谁的身份去操作的
worker_processes 2; //定义子进程有几个
error_log /usr/local/nginx/logs/nginx_error.log crit;
pid /usr/local/nginx/logs/nginx.pid;
worker_rlimit_nofile 51200; //定义nginx最多可以打开多少个文件
events
{
use epoll; //使用epoll模式
worker_connections 6000; //进程最大连接数
}
http
{
include mime.types;
default_type application/octet-stream;
server_names_hash_bucket_size 3526;
server_names_hash_max_size 4096;
log_format combined_realip '$remote_addr $http_x_forwarded_for [$time_local]'
' $host "$request_uri" $status'
' "$http_referer" "$http_user_agent"';
sendfile on;
tcp_nopush on;
keepalive_timeout 30;
client_header_timeout 3m;
client_body_timeout 3m;
send_timeout 3m;
connection_pool_size 256;
client_header_buffer_size 1k;
large_client_header_buffers 8 4k;
request_pool_size 4k;
output_buffers 4 32k;
postpone_output 1460;
client_max_body_size 10m;
client_body_buffer_size 256k;
client_body_temp_path /usr/local/nginx/client_body_temp;
proxy_temp_path /usr/local/nginx/proxy_temp;
fastcgi_temp_path /usr/local/nginx/fastcgi_temp;
fastcgi_intercept_errors on;
tcp_nodelay on;
gzip on;
gzip_min_length 1k;
gzip_buffers 4 8k;
gzip_comp_level 5;
gzip_http_version 1.1;
gzip_types text/plain application/x-javascript text/css text/htm
application/xml;
server //每个server对应一个虚拟主机
{
listen 80; //nginx监听的端口
server_name localhost; //网站域名
index index.html index.htm index.php;
root /usr/local/nginx/html; //网站的根目录
location ~ \.php$ //用于配置解析php的
{
include fastcgi_params;
fastcgi_pass unix:/tmp/php-fcgi.sock; //指定php-fpm监听的端口或socket,可替代为fastcgi_pass 127.0.0.1:9000;
fastcgi_index index.php;
fastcgi_param SCRIPT_FILENAME /usr/local/nginx/html$fastcgi_script_name;
}
}
}
11、检查配置文件语法错误
# /usr/local/nginx/sbin/nginx -t

12、启动
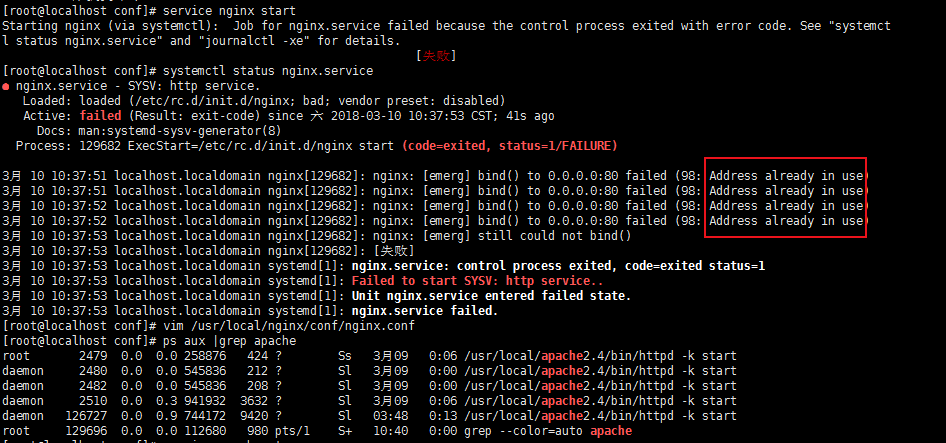
# /etc/init.d/nginx start //启动前应确认apache服务已经关闭,如果没有关闭,出现如下现象
13、查看nginx是否成功启动
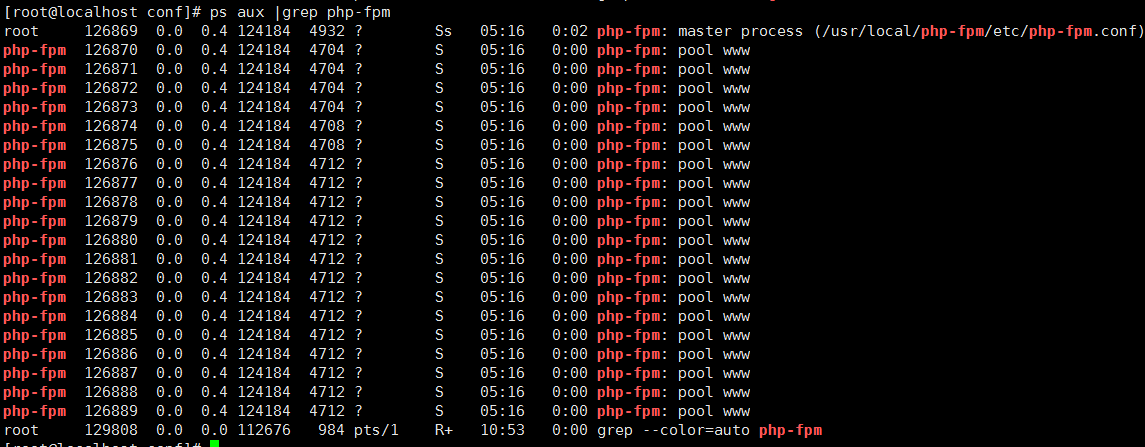
# ps aux |grep nginx //下图中Ss表示此进程为父进程,下面为2个worker process子进程,一般父进程属主都是root,子进程属主为上面我们配置的nobody

# ps aux |grep php-fpm //同样,php-fpm父进程属主都是root,子进程属主为上面我们配置的php-fpm
14、测试访问默认页面
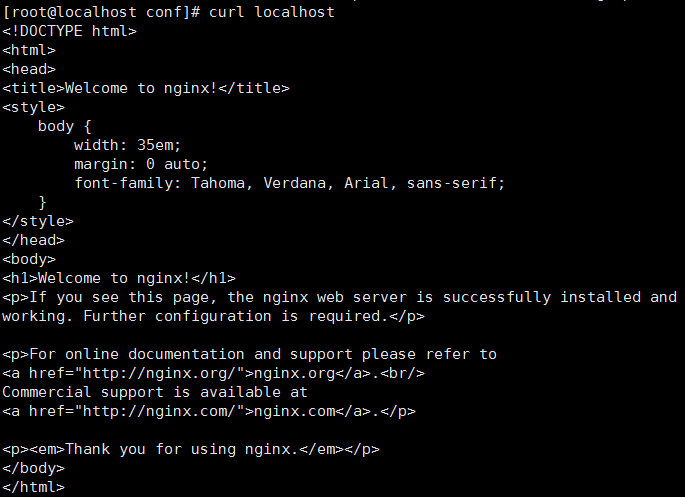
使用下面这两组命令访问的结果是一样的
# curl localhost
# curl 127.0.0.1:80
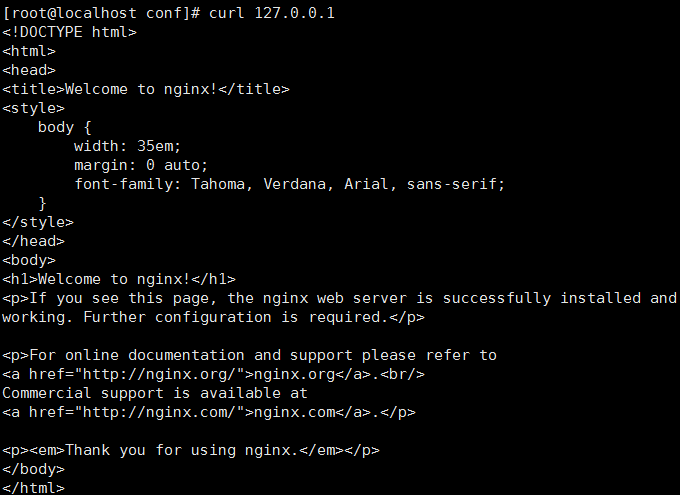
上图中访问到的页面实际上就是我们在配置文件中配置的第一个虚拟主机(也是默认虚拟主机)设置的默认访问页面/usr/local/nginx/html/index.html
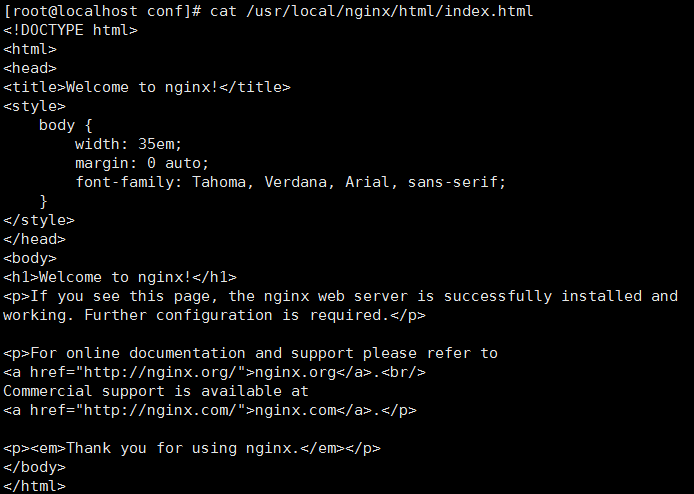
进一步测试,我们在/usr/local/nginx/html/目录下写一个1.php的文件,看是否能成功解析,1.php中写入以下内容:
<?php
echo "This is nginx test page!";
?>
保存后,我们来访问这个页面
# curl localhost/1.php //下面是访问成功截图
![]()
二 默认虚拟主机
1、修改配置文件
去掉下图框中内容:
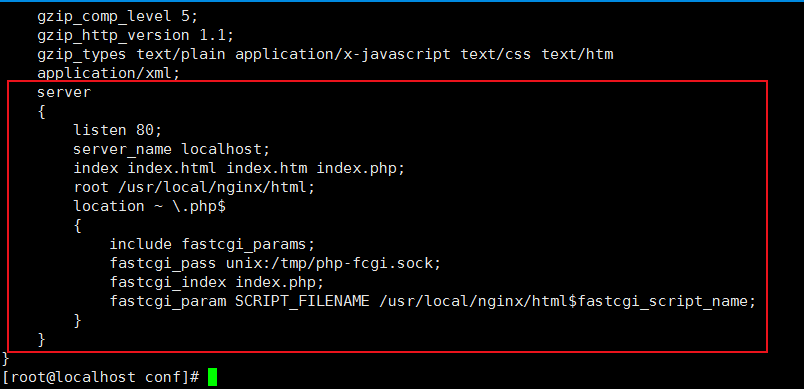
在倒数第二行增加如下内容:
include vhost/*.conf; //表示虚拟主机配置文件放在当前目录下的子目录vhost中;

2、创建虚拟主机配置文件存放目录
# mkdir vhost //当前目录为/usr/local/nginx/conf/
3、创建并编辑虚拟主机配置文件
# vim vhost/aaa.com.conf
在文件中写入以下内容:
server
{
listen 80 default_server; // 有default_server这个标记的就是默认虚拟主机
server_name aaa.com;
index index.html index.htm index.php; //指定索引页
root /data/wwwroot/default; //网站所在目录
}
4、创建网站根目录
如果网站指定的目录还不存在的话,需要创建这个目录
# mkdir /data/wwwroot/default
5、在网站目录下写一个页面
# cd /data/wwwroot/default
# vim index.html
文件中写入以下内容:
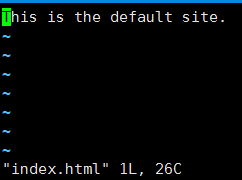
6、测试nginx配置文件是否有语法错误
# /usr/local/nginx/sbin/nginx -t
7、重新加载配置文件
# /etc/init.d/nginx restart //此命令直接通过重启nginx来重新加载配置文件
# /usr/local/nginx/sbin/nginx -s reload //此命令不用重启nginx服务就可以重新加载配置文件
8、测试访问我们写的页面
# curl localhost


# curl -x127.0.0.1:80 bbb.com //目前是没有这个网站的,因此我们访问到的是默认的虚拟主机

8、如何区分默认虚拟主机和非默认虚拟主机
nginx找server的时候肯定会从第一个开始,因此在没有设定默认虚拟主机时,nginx会自动将排在第一个的server作为默认虚拟主机
另外就是找带有default_server标记的server即为默认虚拟主机
三 Nginx用户认证
1、创建一个测试用的虚拟主机
首先切换到vhost虚拟主机配置文件目录下,新增一个虚拟主机配置文件
# test.com.conf

在这个文件里写入以下内容:
server
{
listen 80;
server_name test.com;
index index.html index.htm index.php;
root /data/wwwroot/test.com;
location /
{
auth_basic "Auth"; //用于定义用户认证的名字
auth_basic_user_file /usr/local/nginx/conf/htpasswd; //用户名密码文件
}
}
2、生成密码文件
使用apache2.4自带的htpsswd命令或文件来生成密码文件,如果没有安装apache,可以使用yum命令安装一个
# /usr/local/apache2.4/bin/htpasswd -c /usr/local/nginx/conf/htpasswd lijie
其中-c指创建,/usr/local/nginx/conf/htpasswd是存放路径 ,lijie是用户名

按照上图提示输入两次密码后,我们再来查看密码文件内容

接下来再来创建一个用户就不用加-c选项了

3、测试语法并重新加载
# /usr/local/nginx/sbin/nginx -t
# /usr/local/nginx/sbin/nginx -s reload
4、访问这个测试虚拟主机
# curl -x127.0.0.1:80 test.com -I //提示401错误,需要用户认证
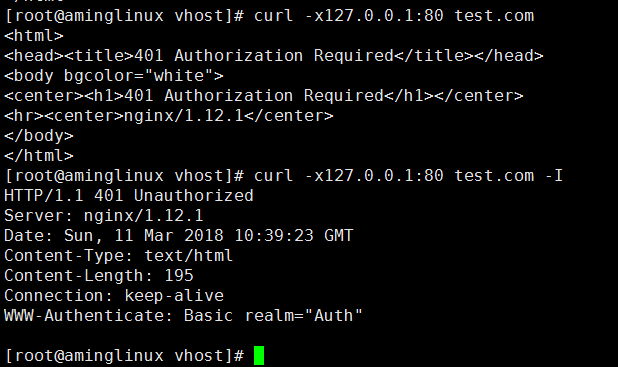
接下来我们输入用户名和密码来访问
# curl -ulj:112233 -x127.0.0.1:80 test.com //其中lj是用户名,112233是密码

我们看到上图提示404错误,这是因为我们之前没有创建访问的目录及索引页,现在我们来创建一个
![]()
这时我们再来访问就可以看到index.html中的内容了
![]()
5、针对目录的用户认证
我们只需要在虚拟主机配置文件/usr/local/nginx/conf/vhost/test.com.conf中作出修改即可
修改前的配置文件内容
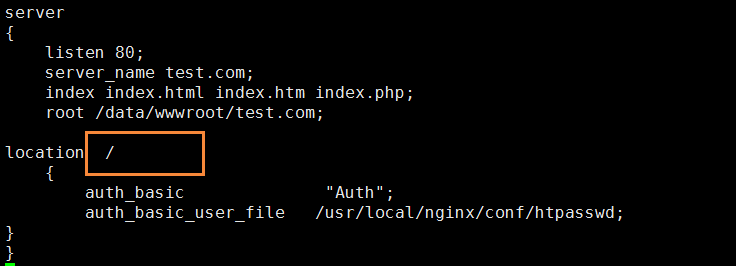
修改后的配置文件内容如下,表示是针对admin这个目录进行用户认证
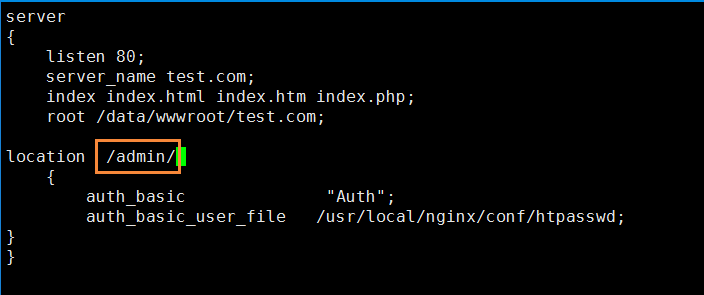
修改后,访问test.com就不需要做用户认证,只有访问test.com/admin时才需要做用户认证
6、针对某个页面的用户认证
访问某个页面才需要用户认证的话,需要将配置文件/usr/local/nginx/conf/vhost/test.com.conf修改为如下内容:
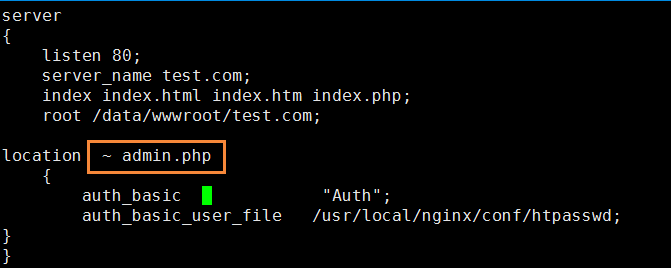
上图中~表示匹配,~ admin.php表示匹配到admin.php这个页面就需要做用户认证
四 Nginx域名重定向
1、修改配置文件
当前我们已经有test.com这个域名来访问test.com这个网站,为了使另外两个域名test2.com和test3.com也跳转到test.com这个网站,我们需要修改配置文件
# vim /usr/local/nginx/conf/vhost/test.com.conf
以下内容为域名重定向使用的代码
if ($host != 'test.com' ) {
rewrite ^/(.*)$ http://test.com/$1 permanent;
}
修改前
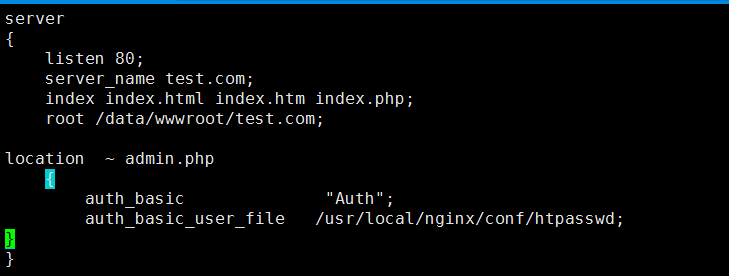
修改后,下图框中部分为新增内容:
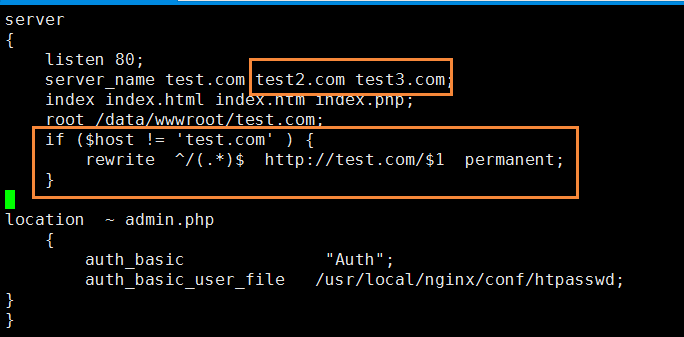
上面^/(.*)$是http://$host/(.*)$的简写,^表示的就是域名,(.*)$代表的是域名后面跟着的一长串,$1代表的就是(.*)
permanent为永久重定向,状态码为301,如果写redirect则为302
2、检查语法并重新加载
# /usr/local/nginx/sbin/nginx -t
# /usr/local/nginx/sbin/nginx -s reload
3、测试验证域名重定向
验证访问test2.com,可以看到状态码301重定向到test.com

验证访问test2.com/wrwer/err,可以看到状态码301重定向到test.com/wrwer/err

验证访问test3.com/wrwer/err,可以看到状态码301重定向到test.com/wrwer/err

验证访问test4.com/wrwer/err,提示页面未找到,实际上是跳转到了默认虚拟主机aaa.com去了。


)


:实战(三)股票数据定向爬虫)


)


![[转帖]外壳命名空间扩展](http://pic.xiahunao.cn/[转帖]外壳命名空间扩展)
