一、概述
Spring是一个开源框架,2003 年兴起的一个轻量级的Java 开发框架,作者Rod Johnson 。Spring是为了解决企业级应用开发的复杂性而创建的,简化开发。
1.1对比
对比一下 Spring 程序和 SpringBoot 程序。如下图

坐标
- Spring 程序中的坐标需要自己编写,而且坐标非常多
- SpringBoot 程序中的坐标是我们在创建工程时进行勾选自动生成的
web3.0 配置类
- Spring 程序需要自己编写这个配置类。这个配置类大家之前编写过,肯定感觉很复杂
- SpringBoot 程序不需要我们自己书写
配置类
- Spring/SpringMVC 程序的配置类需要自己书写。而 SpringBoot 程序则不需要书写。
1.2文件解析
parent
1.开发SpringBoot程序要继承spring-boot-starter-parent
2.spring-boot-starter-parent中定义了若干个依赖管理
3.继承parent模块可以避免多个依赖使用相同技术时出现依赖版本冲突
4.继承parent的形式也可以采用引入依赖的形式实现效果
<parent><groupId>org.springframework.boot</groupId><artifactId>spring-boot-dependencies</artifactId><version>3.2.0</version></parent>点进去:(Ctrl+B)
<parent><groupId>org.springframework.boot</groupId><artifactId>spring-boot-dependencies</artifactId><version>3.2.0</version></parent>点进去:(Ctrl+B)
<modelVersion>4.0.0</modelVersion><parent><groupId>org.springframework.boot</groupId><artifactId>spring-boot-dependencies</artifactId><version>3.2.0</version></parent>再点进去:(Ctrl+B)
会发现定义了很多版本控制以及依赖

starter
SpringBoot中常见项目名称,定义了当前项目使用的所有依赖坐标,以达到减少依赖配置的目的
1.开发springboot程序需要导入坐标时通常导入对应的starter
2.每个不同的starter根据功能不同,通常包含多个依赖坐标
3.使用starter可以实现快速配置的效果,达到简化配置的目的
<dependency><groupId>org.springframework.boot</groupId><artifactId>spring-boot-starter-web</artifactId>
</dependency>
这个我们都知道,一般称为 SpringBoot框架web项目的起步依赖,那么为什么我们添加这个依赖之后,之前在SpringMVC中的一些依赖就不需要再添加了呢?点进入这个依赖看看。
可以看到这个依赖中,还管理着其他依赖,其中就有tomcat、spring-webmvc这些,这不都是之前学SpringMVC需要配置tomcat以及其他依赖项吗?而spring-boot-starter-web这个起步依赖已经帮我们做好了,你就不需要再添加很多其他依赖了,是不是很方便呢?
向其中的pom文件添加依赖的时候,我们会发现,添加的很多依赖都是以 spring-boot-start-XXX 这样的形式,我当时就按照字面意思去理解:springboot-开始-XXX的依赖。
那么,我们现在说的规范一点:
spring-boot-start-XXX就是spring-boot的场景启动器。
- spring-boot-starter-web:帮我们导入了web模块正常运行所依赖的组件;
- spring-boot-starter-thymeleaf:帮我们导入了thymeleaf模板引擎正常运行所依赖的组件;
引导类
1.SpringBoot工程提供引导类用来启动程序
2.SpringBoot工程启动后创建并初始化Spring容器
package com.yanyu;import org.springframework.boot.SpringApplication;
import org.springframework.boot.autoconfigure.SpringBootApplication;@SpringBootApplication
public class SpringTest1Application {public static void main(String[] args) {SpringApplication.run(SpringTest1Application.class, args);}}
SpringBoot的引导类是Boot工程的执行入口,运行main方法就可以启动项目
SpringBoot工程运行后初始化Spring容器,扫描引导类所在包加载bean
内嵌tomcat
内嵌tomcat(spring-boot-starter-web)
工作原理是将tomcat服务器作为对象运行,并将该对象交给Spring容器管理
<dependency><groupId>org.springframework.boot</groupId><artifactId>spring-boot-starter-tomcat</artifactId><version>3.2.0</version><scope>compile</scope></dependency>springboot内置服务器:
tomcat(默认):apache出品,粉丝多,应用面广,负载了若干较重的组件
jetty:更轻量级,负载性能远不及tomcat
undertow:负载性能勉强能跑赢tomcat
1.3快速启动
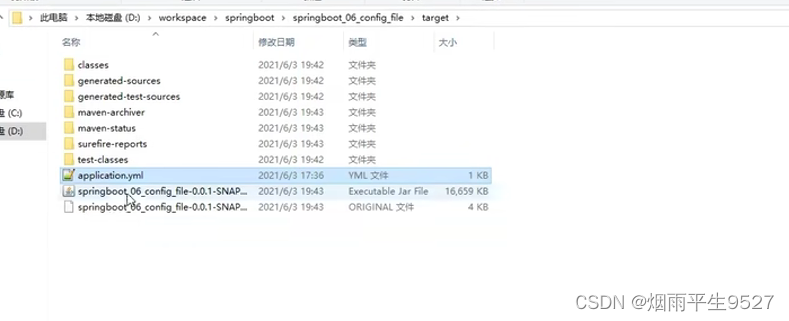
打包
<plugins><plugin><groupId>org.springframework.boot</groupId><artifactId>spring-boot-maven-plugin</artifactId><configuration><excludes><exclude><groupId>org.projectlombok</groupId><artifactId>lombok</artifactId></exclude></excludes></configuration></plugin></plugins>所以我们只需要使用 Maven 的 package 指令打包就会在 target 目录下生成对应的 Jar 包
启动
jar -jar springboot_01_quickstart-0.0.1-SNAPSHOT.jar 1
1.4概述
SpringBoot程序优点:
- 起步依赖(简化依赖配置)
- 自动配置(简化常用工程相关配置)
- 辅助功能(内置服务器,……)
SpringBoot的四大核心了:
- 自动装配:简单配置甚至零配置即可运行项目
- 起步依赖:场景启动器
- Actuator:指标监控
- 命令行界面 :命令行
辅助功能
排除依赖
<dependency>
<groupId>org.springframework.boot</groupId>
<artifactId>spring-boot-starter-web</artifactId>
<exclusions>
<exclusion>
<artifactId>spring-boot-starter-tomcat</artifactId>
<groupId>org.springframework.boot</groupId>
</exclusion>
</exclusions>
</dependency>
<dependency>
<groupId>org.springframework.boot</groupId>
<artifactId>spring-boot-starter-jetty</artifactId>
</dependency>
二、基础配置
2.1配置文件格式
SpringBoot使用一个全局的配置文件 , 配置文件名称是固定的
application.properties
语法结构 :key=value
application.yml
语法结构 :key:空格 value
application.yaml
注意: SpringBoot 程序的配置文件名必须是 application ,只是后缀名不同而已。优先级为:properties>yml>yaml
配置文件的作用 :修改SpringBoot自动配置的默认值,因为SpringBoot在底层都给我们自动配置好了;
比如我们可以在配置文件中修改Tomcat 默认启动的端口号!测试一下!
server.port=80812.2配置文件历史
xml
<enterprise>
<name>itcast</name>
<age>16</age>
<tel>4006184000</tel>
</enterprise>
properties
enterprise.name=itcast
enterprise.age=16
enterprise.tel=4006184000
yaml 类型
enterprise:name: itcastage: 16tel: 40061840002.3yaml格式
YAML ( YAML Ain't Markup Language ),一种数据序列化格式。这种格式的配置文件在近些年已经占有主导地位,。
优点:
容易阅读
容易与脚本语言交互
以数据为核心,重数据轻格式
yml语法规则
①大小写敏感
②属性层级关系使用多行描述,每行结尾时用冒号结束
③属性值前面添加空格(属性名与属性值之间使用冒号+空格作为分隔)
④#表示注释
⑤使用缩进标识层级关系,同层级左侧对齐,只允许使用空格(不允许使用Tab键)


读取yaml数据
读取yaml单一属性数据
使用@Value配合SpEL读取单个数据
如果数据存在多层级,依次书写层级名称即可
lesson: SpringBoot
server:
port: 80
enterprise:name: itcastage: 16tel: 4006184000subject:- Java- 前端- 大数据
@RestController
@RequestMapping("/books")
public class BookController {@Value("${lesson}")private String lesson;@Value("${server.port}")private Integer port;@Value("${enterprise.subject[0]}")private String subject_00;@GetMapping("/{id}")public String getById(@PathVariable Integer id){System.out.println(lesson);System.out.println(port);System.out.println(subject_00);return "hello , spring boot!";}
}
Environment对象
上面方式读取到的数据特别零散, SpringBoot 还可以使用 @Autowired 注解注入 Environment 对象的方式读取数据。这 种方式 SpringBoot 会将配置文件中所有的数据封装到 Environment 对象中,如果需要使用哪个数据只需要通过调用Environment 对象的 getProperty(String name) 方法获取。具体代码如下:
 读取yaml引用类型属性数据
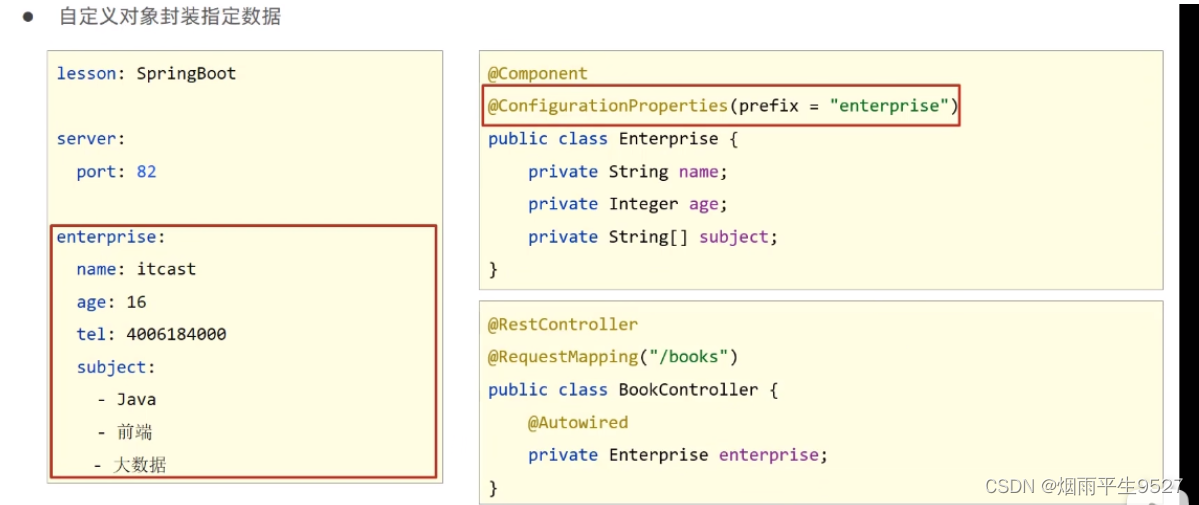
1.使用@ConfigurationProperties注解绑定配置信息到封装类中
2.封装类需要定义为Spring管理的bean,否则无法进行属性注入


注意:这种方式,框架内容大量数据,而在开发中我们很少使用。
举例
配置
#创建类,用于封装下面的数据
#由spring帮我们去加载数据到对象中,一定要告诉spring加载这组信息
#使用的时候从spring中直接获取信息使用datasource:driver: com.myswl.cj.jdbc.Driverurl: jdbc:mysql://localhost/db_springbootusername: rootpassword: root
自定义环境类
package com.yanyu.pojo;import lombok.AllArgsConstructor;
import lombok.Builder;
import lombok.Data;
import lombok.NoArgsConstructor;
import org.springframework.boot.context.properties.ConfigurationProperties;
import org.springframework.stereotype.Component;//1.定义数据模型封装yaml文件中对应的数据
//2.定义为spring管控的bean
@Component
//3.指定加载的数据
@ConfigurationProperties(prefix="datasource")
@Data
@Builder
@AllArgsConstructor
@NoArgsConstructor
public class MyDataSource {private String driver;private String url;private String username;private String password;}
测试
package com.yanyu.controller;import com.yanyu.pojo.MyDataSource;
import org.springframework.beans.factory.annotation.Autowired;
import org.springframework.beans.factory.annotation.Value;
import org.springframework.web.bind.annotation.GetMapping;
import org.springframework.web.bind.annotation.PathVariable;
import org.springframework.web.bind.annotation.RequestMapping;
import org.springframework.web.bind.annotation.RestController;@RestController
@RequestMapping("/books")
public class BookController {@Autowiredprivate MyDataSource myDataSource;@GetMapping("/datasource")public String getMyDatasource(){System.out.println(myDataSource);return "source";}
}
GET http://localhost:8080/books/datasource自定义对象封装数据警告解决方案
这个警告提示解决是在 pom.xml 中添加如下依赖即可
<dependency>
<groupId>org.springframework.boot</groupId>
<artifactId>spring-boot-configuration-processor</artifactId>
<optional>true</optional>
</dependency>
读取Property数据
加载指定的配置文件
@PropertySource :加载指定的配置文件;
@configurationProperties:默认从全局配置文件中获取值;
配置文件占位符
配置文件还可以编写占位符生成随机数
person:name: qinjiang${random.uuid} # 随机uuidage: ${random.int} # 随机inthappy: falsebirth: 2000/01/01maps: {k1: v1,k2: v2}lists:- code- girl- musicdog:name: ${person.hello:other}_旺财age: 1
1、新建一个实体类User
@Component //注册bean
public class User {private String name;private int age;private String sex;
}
2、编辑配置文件 user.properties
user1.name=kuangshen
user1.age=18
user1.sex=男
3、我们在User类上使用@Value来进行注入!
@Component //注册bean
@PropertySource(value = "classpath:user.properties")
public class User {//直接使用@value@Value("${user.name}") //从配置文件中取值private String name;@Value("#{9*2}")  // #{SPEL} Spring表达式private int age;@Value("男")  // 字面量private String sex;
}
4、Springboot测试
@SpringBootTest
class DemoApplicationTests {@AutowiredUser user;@Testpublic void contextLoads() {System.out.println(user);}}三、多环境配置

yaml 类型
#设置启用的环境
spring:
profiles:
active: dev
---
#开发
spring:
profiles: dev
server:
port: 80
---
#生产
spring:
profiles: pro
server:
port: 81
---
#测试
spring:
profiles: test
server:
port: 82
#开发
spring:
config:
activate:
on-profile: devproperties文件
 命令行启动参数设置
使用 SpringBoot 开发的程序以后都是打成 jar 包,通过 java - jar xxx.jar 的方式启动服务的。那么就存在一个问 题,如何切换环境呢?因为配置文件打到的jar 包中了。我们知道 jar 包其实就是一个压缩包,可以解压缩,然后修改配置,最后再打成 jar 包就可以了。这种方式显然有点麻烦, 而 SpringBoot 提供了在运行 jar 时设置开启指定的环境的方式,如下
java –jar xxx.jar –-spring.profiles.active=testjava –jar xxx.jar –-server.port=88 java –jar springboot.jar –-server.port=88 –-spring.profiles.active=test配置文件分类
SpringBoot 中 4 级配置文件放置位置:
- 1级:classpath:application.yml
- 2级:classpath:config/application.yml
- 3级:file :application.yml
- 4级:file :config/application.yml
说明: 级别越高优先级越高


)

:sku管理:商品上下架,商品详情,删除sku)


)
_RNN循环神经网络)

〗- 面向对象之认识上下文与上下文规则)


+数据集+模型(三))


)