微服务的拆分与远程调用
创建父工程
任何分布式架构都离不开服务的拆分, 微服务也是一样 , 微服务的拆分遵守三个原则
- 微服务需要根据业务模块拆分,
不同微服务不要重复开发相同业务 - 每个微服务都有自己独立的数据库,
不要直接访问其他微服务的数据库 - 微服务可以
将自己的业务暴露为接口供其他微服务调用
创建父工程cloud-demo用来管理项目所需要的依赖的版本
order-service订单微服务模块(工程): 负责订单相关业务,如根据订单Id查询订单user-service用户微服务模块(工程): 负责用户相关业务,如根据用户Id查询用户

<groupId>cn.itcast.demo</groupId>
<artifactId>cloud-demo</artifactId>
<version>1.0</version>
<!--管理子模块-->
<modules><module>user-service</module><module>order-service</module>
</modules>
<packaging>pom</packaging><!--当前SpringBoot项目继承的父工程-->
<parent><groupId>org.springframework.boot</groupId><artifactId>spring-boot-starter-parent</artifactId><version>2.3.9.RELEASE</version><relativePath/>
</parent><!--依赖版本号属性-->
<properties><project.build.sourceEncoding>UTF-8</project.build.sourceEncoding><project.reporting.outputEncoding>UTF-8</project.reporting.outputEncoding><java.version>1.8</java.version><spring-cloud.version>Hoxton.SR10</spring-cloud.version><mysql.version>5.1.47</mysql.version><mybatis.version>2.1.1</mybatis.version>
</properties><!--引用定义的依赖版本属性值,对依赖的版本进行管理,并不会在项目中引入依赖-->
<dependencyManagement><dependencies><!-- springCloud --><dependency><groupId>org.springframework.cloud</groupId><artifactId>spring-cloud-dependencies</artifactId><version>${spring-cloud.version}</version><type>pom</type><scope>import</scope></dependency><!-- mysql驱动 --><dependency><groupId>mysql</groupId><artifactId>mysql-connector-java</artifactId><version>${mysql.version}</version></dependency><!--mybatis--><dependency><groupId>org.mybatis.spring.boot</groupId><artifactId>mybatis-spring-boot-starter</artifactId><version>${mybatis.version}</version></dependency></dependencies>
</dependencyManagement>
<dependencies><dependency><groupId>org.projectlombok</groupId><artifactId>lombok</artifactId></dependency>
</dependencies>
创建订单微服务模块(工程)
第一步: 执行cloud-order.sql文件创建订单数据库,cloud-order的tb_order表中含有用户数据库的tb_user表的Id字段

@Data
public class Order {private Long id;private Long price;private String name;private Integer num;private Long userId;private User user;
}
第二步: 配置order-service工程的pom.xml文件
<parent><artifactId>cloud-demo</artifactId><groupId>cn.itcast.demo</groupId><version>1.0</version>
</parent>
<modelVersion>4.0.0</modelVersion>
<artifactId>order-service</artifactId><dependencies><dependency><groupId>org.springframework.boot</groupId><artifactId>spring-boot-starter-web</artifactId></dependency><dependency><groupId>mysql</groupId><artifactId>mysql-connector-java</artifactId></dependency><!--mybatis--><dependency><groupId>org.mybatis.spring.boot</groupId><artifactId>mybatis-spring-boot-starter</artifactId></dependency>
</dependencies>
<build><finalName>app</finalName><plugins><plugin><groupId>org.springframework.boot</groupId><artifactId>spring-boot-maven-plugin</artifactId></plugin></plugins>
</build>
第三步: 配置order-service工程的application.yml文件
server:port: 8080
spring:datasource:url: jdbc:mysql://localhost:3306/cloud_order?useSSL=falseusername: rootpassword: 123driver-class-name: com.mysql.jdbc.Driver
mybatis:type-aliases-package: cn.itcast.user.pojoconfiguration:map-underscore-to-camel-case: true
logging:level:cn.itcast: debugpattern:dateformat: MM-dd HH:mm:ss:SSS
第四步: 创建Mapper接口和自定义Service类,这里就不再创建业务类的实现类了
@Mapper
public interface OrderMapper {@Select("select * from tb_order where id = #{id}")Order findById(Long id);
}
@Service
public class OrderService {@Autowiredprivate OrderMapper orderMapper;@Autowiredprivate UserClient userClient;public Order queryOrderById(Long orderId) {// 查询订单Order order = orderMapper.findById(orderId);// 返回查询到的订单对象,user属性为nullreturn order;}
}
第五步: 在order-service工程中创建controller/OrderController,编写接口根据订单Id从订单数据库中查询订单信息
@RestController
@RequestMapping("order")
public class OrderController {@Autowiredprivate OrderService orderService;@GetMapping("{orderId}")public Order queryOrderByUserId(@PathVariable("orderId") Long orderId) {// 根据id查询订单并返回return orderService.queryOrderById(orderId);}
}
第五步: 打开浏览器访问http://localhost:8080/order/101可以查询到订单数据的但此时user属性的值是null
{"id": 101,"price": 699900,"name": "Apple 苹果 iPhone 12 ","num": 1,"userId": 1,"user": null
}
创建用户微服务模块(工程)
第一步: 执行cloud-user.sql文件创建用户数据库,创建tb_user表及其对应的实体类

@Data
public class User {private Long id;private String username;private String address;
}
第二步: 配置user-service工程的pom.xml文件
<parent><artifactId>cloud-demo</artifactId><groupId>cn.itcast.demo</groupId><version>1.0</version>
</parent>
<modelVersion>4.0.0</modelVersion><artifactId>user-service</artifactId><dependencies><dependency><groupId>org.springframework.boot</groupId><artifactId>spring-boot-starter-web</artifactId></dependency><dependency><groupId>mysql</groupId><artifactId>mysql-connector-java</artifactId></dependency><!--mybatis--><dependency><groupId>org.mybatis.spring.boot</groupId><artifactId>mybatis-spring-boot-starter</artifactId></dependency>
</dependencies>
<build><finalName>app</finalName><plugins><plugin><groupId>org.springframework.boot</groupId><artifactId>spring-boot-maven-plugin</artifactId></plugin></plugins>
</build>
第三步: 配置user-service工程的application.yml文件
server:port: 8081
spring:datasource:url: jdbc:mysql://localhost:3306/cloud_user?useSSL=falseusername: rootpassword: 123driver-class-name: com.mysql.jdbc.Driver
mybatis:type-aliases-package: cn.itcast.user.pojoconfiguration:map-underscore-to-camel-case: true
logging:level:cn.itcast: debugpattern:dateformat: MM-dd HH:mm:ss:SSS
第四步: 配置Mapper接口和Service类,这里就不再创建业务类的实现类了
@Mapper
public interface UserMapper {    @Select("select * from tb_user where id = #{id}")User findById(@Param("id") Long id);
}
@Service
public class UserService {@Autowiredprivate UserMapper userMapper;public User queryById(Long id) {return userMapper.findById(id);}
}
第五步: 在user-service工程中创建controller/UserController,编写接口根据用户Id从用户数据库中查询用户信息
@Slf4j
@RestController
@RequestMapping("/user")
public class UserController {@Autowiredprivate UserService userService;/*** 路径: /user/110* @param id 用户id* @return 用户*/@GetMapping("/{id}")public User queryById(@PathVariable("id") Long id) {return userService.queryById(id);}
}
第六步: 打开浏览器访问http://localhost:8081/user/1查询到的数据如下
{"id": 1,"username": "柳岩","address": "湖南省衡阳市"
}
远程调用(RestTemplate)
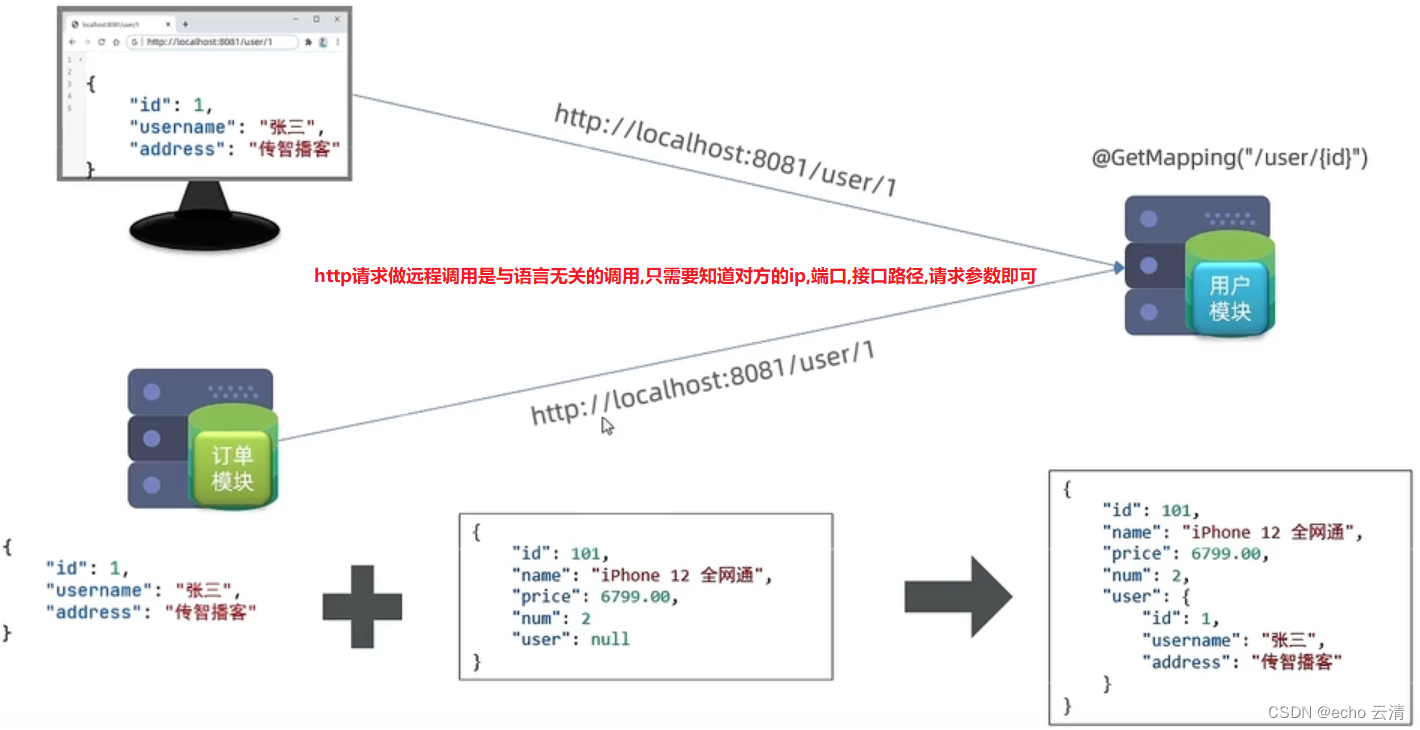
需求: 访问订单模块根据订单Id查询订单,根据查询的订单对象中包含的userId访问用户模块查询出用户信息,然后封装到订单对象的user属性中返回

RestTemplate是Spring提供的发起http请求的工具类
| 方法名 | 功能 |
|---|---|
| Object getForObject(url, Xxx.class) | 发起一个get请求并指定返回的类型(服务器默认返回Json类型的数据) |
| Object postForObject(url, Xxx.class) | 发起一个post请求并指定返回的类型(服务器默认返回Json类型的数据) |
第一步: 在order-service服务的代码逻辑中向user-service服务发起一个http请求,访问http://localhost:8081/user/{userId}查询用户信息

第二步: 在order-service服务中的OrderApplication启动类中(本质是个配置类)中注册RestTemplate实例到Spring容器当中
@MapperScan("cn.itcast.order.mapper")
@SpringBootApplication
public class OrderApplication {public static void main(String[] args) {SpringApplication.run(OrderApplication.class, args);}@Beanpublic RestTemplate restTemplate() {return new RestTemplate();}
}
第三步: 修改订单服务的OrderService类中的queryOrderById方法,根据Order对象中包含的userId发http请求访问用户服务查询用户信息,然后一并返回
@Service
public class OrderService {@Autowiredprivate OrderMapper orderMapper;@Autowiredprivate RestTemplate restTemplate;public Order queryOrderById(Long orderId) {// 1.查询订单Order order = orderMapper.findById(orderId);// 2.使用RestTemplate指定url地址发起http请求查询User,指定接收的类型(服务器默认返回Json类型的数据)String url = "http://localhost:8081/user/" + order.getUserId();User user = restTemplate.getForObject(url, User.class);// 3.存入orderorder.setUser(user);// 4.返回return order;}
}
第四步: 访问订单服务查询订单的接口http://localhost:8080/order/101,此时订单对象中包含对应用户的信息
{"id": 101,"price": 699900,"name": "Apple 苹果 iPhone 12 ","num": 1,"userId": 1,"user": {"id": 1,"username": "柳岩","address": "湖南省衡阳市"}
}


——读取文件的详细流程)


