Spring Security是一个基于Spring框架的安全框架,它提供了全面的安全解决方案,包括用户认证和用户授权等Web应用安全性问题。Spring Security可以轻松扩展以满足自定义需求,它的真正强大之处在于它可以轻松扩展以满足自定义要求。
对于分布式系统来说,Spring Security可以结合Spring Cloud进行微服务安全性的全面管理。在Spring Cloud的生态系统中,可以使用Spring Security进行安全控制,包括认证、授权、审计等方面。
具体来说,在分布式系统中,Spring Security可以做到以下几点:
认证:通过JWT(JSON Web Token)等认证方式,对用户进行身份验证,确保只有合法的用户才能访问系统。
授权:通过RBAC(Role-Based Access Control)等方式,对用户进行权限管理,确保用户只能访问自己有权限的资源。
审计:通过AOP(Aspect-Oriented Programming)等技术,对系统的操作进行全面记录,以便于后期审计和异常处理。
保护:通过过滤器链等技术,对系统的敏感资源进行保护,防止未经授权的访问。
基于session的认证方式
基于 Session 的认证方式是一种在 Web 应用程序中常见的认证方法。Session 是一种在服务器端保存用户状态和信息的方式,通常用于保存用户登录状态、用户偏好等信息。基于 Session 的认证方式的工作流程如下:
- 用户登录:用户输入用户名和密码进行登录。
- 服务器验证:服务器收到用户的登录信息后,进行验证。如果验证成功,服务器会生成一个唯一的 Session ID,并将该 Session ID 保存在服务器的 Session 数据存储中。
- 生成 Cookie:服务器将 Session ID 以 Cookie 的形式发送给客户端浏览器。浏览器会将 Cookie 保存在本地,用于后续的认证。
- 客户端请求:当用户访问应用程序的任意页面时,浏览器会将保存在本地的 Session ID 发送给服务器。
- 服务器验证:服务器收到 Session ID 后,根据该 Session ID 在 Session 数据存储中查找对应的用户信息。如果找到且有效,则说明用户登录状态合法;否则,用户需要重新登录。
- 访问资源:如果用户登录状态合法,服务器会根据用户的权限允许访问特定的资源。
基于 Session 的认证方式的优点是相对简单且易于实现。缺点是 Session 具有生命周期,超过规定时间需要重新登录,而且具有各种丢失的可能,如服务器重启、内存回收等,可能会影响用户体验。
基于 Token 的认证方式
基于 Token 的认证方式是一种在 Web 应用程序中常见的认证方法。Token 是一种用于证明用户身份的加密字符串,通常在客户端和服务器之间传递。基于 Token 的认证方式的工作流程如下:
- 用户登录:用户输入用户名和密码进行登录。
- 服务器验证:服务器收到用户的登录信息后,进行验证。如果验证成功,服务器会生成一个唯一的 Token 并将其发送给客户端。
- 客户端存储 Token:客户端收到 Token 后,将其保存在本地(如浏览器缓存或内存中)。
- 客户端请求:当用户访问应用程序的任意页面时,客户端会将保存在本地的 Token 发送给服务器。
- 服务器验证 Token:服务器收到 Token 后,根据该 Token 进行验证。如果验证成功,服务器会允许用户访问特定的资源;否则,拒绝访问。
- 访问资源:如果服务器验证 Token 成功,用户可以访问受保护的资源。
基于 Token 的认证方式的优点是相对简单且易于实现,同时比基于 Cookie 的认证方式更安全。缺点是 Token 的丢失或泄露可能会导致安全隐患,而且不同浏览器的兼容性问题可能影响用户体验。
在实际应用中,基于 Token 的认证方式常与 OAuth 2.0 等授权框架结合使用,以实现第三方应用的安全认证。
1.spring_security_01
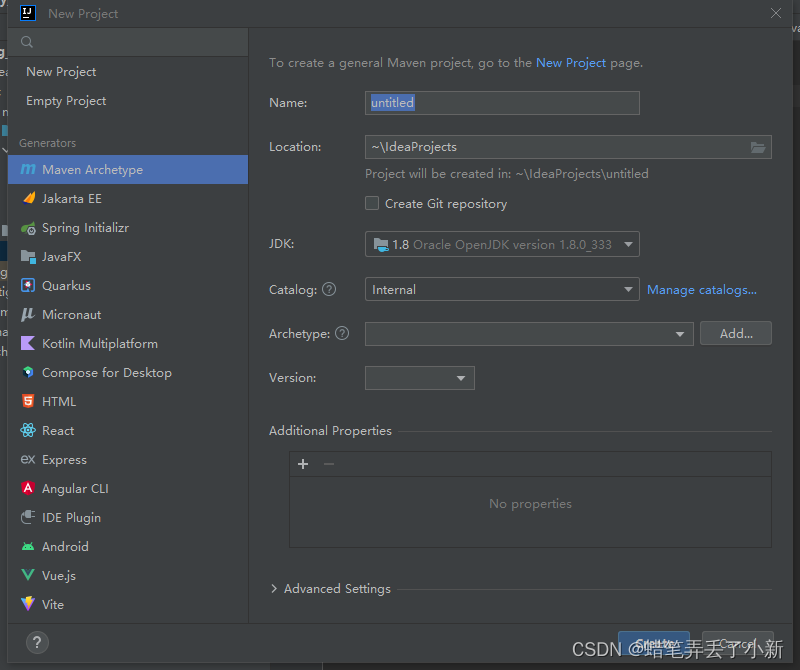
1.1创建一个Maven项目:
1.2创建主启动类FirstApplication:
package com.neu;
import org.springframework.boot.SpringApplication;
import org.springframework.boot.autoconfigure.SpringBootApplication;
import org.springframework.boot.autoconfigure.security.servlet.SecurityAutoConfiguration;@SpringBootApplication
public class FirstApplication {public static void main(String[] args) {SpringApplication.run(FirstApplication.class,args);}
}
1.3创建控制类HelloSecurityController:
package com.neu.ctrl;import org.springframework.web.bind.annotation.RequestMapping;
import org.springframework.web.bind.annotation.RestController;@RestController
@RequestMapping("/spring")
public class HelloSecurityController {@RequestMapping("/security01")public String sayHello(){return "Hello Spring Secuirty 安全管理框架";}
}
1.4 添加依赖pom.xml:
<?xml version="1.0" encoding="UTF-8"?>
<project xmlns="http://maven.apache.org/POM/4.0.0"xmlns:xsi="http://www.w3.org/2001/XMLSchema-instance"xsi:schemaLocation="http://maven.apache.org/POM/4.0.0 http://maven.apache.org/xsd/maven-4.0.0.xsd"><modelVersion>4.0.0</modelVersion><groupId>com.neu</groupId><artifactId>spring_security_01</artifactId><version>1.0</version><properties><maven.compiler.source>8</maven.compiler.source><maven.compiler.target>8</maven.compiler.target><project.build.sourceEncoding>UTF-8</project.build.sourceEncoding></properties><!--加入spring boot --><parent><groupId>org.springframework.boot</groupId><artifactId>spring-boot-parent</artifactId><version>2.0.6.RELEASE</version></parent><!--指定依赖--><dependencies><!--web开发相关依赖--><dependency><groupId>org.springframework.boot</groupId><artifactId>spring-boot-starter-web</artifactId></dependency><!--spring security--><dependency><groupId>org.springframework.boot</groupId><artifactId>spring-boot-starter-security</artifactId></dependency></dependencies><!-- 配置spring boot maven 插件 --><build><plugins><plugin><groupId>org.springframework.boot</groupId><artifactId>spring-boot-maven-plugin</artifactId></plugin></plugins></build></project>
1.5 创建application.properties
server.port=8081
spring.security.user.name=jeflee
spring.security.user.password=123456
1.6 运行结果
输入网址:http://localhost:8081/spring/security01
会跳转到登录页。
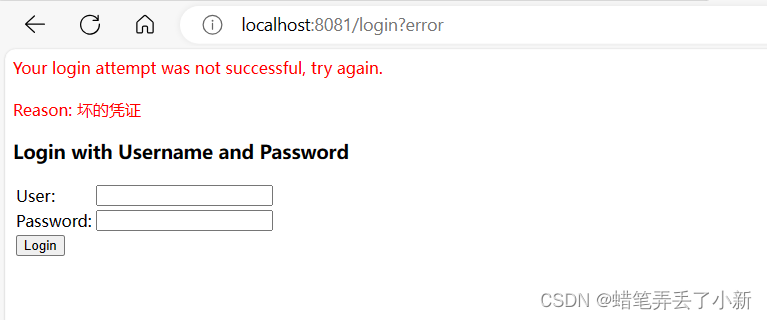
输入错误的用户名和密码:
输入正确的用户名:

1.7 如果没有在配置文件中配置用户名和密码:
用户名默认是:user,不区分大小写

2.spring_security_02
2.1 修改spring boot启动文件:FirstApplication
将application.properties文件中的内容注释掉,在配置文件中指定用户名与密码,不是spring security指定的最佳配置方式 ,另外,通过继承类的方式来指定security列表。
package com.neu;import org.springframework.boot.SpringApplication;
import org.springframework.boot.autoconfigure.SpringBootApplication;
import org.springframework.boot.autoconfigure.security.servlet.SecurityAutoConfiguration;@SpringBootApplication
//排除Secuirty的配置,让他不启用
//@SpringBootApplication(exclude = {SecurityAutoConfiguration.class})
public class FirstApplication {public static void main(String[] args) {SpringApplication.run(FirstApplication.class, args);}
}
2.2 修改HelloSecurityController
package com.neu.ctrl;import org.springframework.web.bind.annotation.RequestMapping;
import org.springframework.web.bind.annotation.RestController;@RestController
@RequestMapping("/spring")
public class HelloSecurityController {@RequestMapping("/security02")public String sayHello() {return "使用 Spring Secuirty 安全管理框架 配置列表 继承类的方式实现";}
}
2.3 在项目中建立包com.neu.config,建立继承配置类文件MyWebSecurityConfig
package com.neu.config;import org.springframework.context.annotation.Bean;
import org.springframework.context.annotation.Configuration;
import org.springframework.security.config.annotation.authentication.builders.AuthenticationManagerBuilder;
import org.springframework.security.config.annotation.web.configuration.EnableWebSecurity;
import org.springframework.security.config.annotation.web.configuration.WebSecurityConfigurerAdapter;
import org.springframework.security.crypto.bcrypt.BCryptPasswordEncoder;
import org.springframework.security.crypto.password.PasswordEncoder;@Configuration
@EnableWebSecurity
public class MyWebSecurityConfig extends WebSecurityConfigurerAdapter {//在方法中配置 用户和密码的信息, 作为登录的数据@Overrideprotected void configure(AuthenticationManagerBuilder auth) throws Exception {PasswordEncoder pe = passwordEncoder();auth.inMemoryAuthentication().withUser("jeflee").password(pe.encode("123456")).roles();auth.inMemoryAuthentication().withUser("neu").password(pe.encode("123456")).roles();auth.inMemoryAuthentication().withUser("neuedu").password(pe.encode("neuedu")).roles();} //创建密码的加密类@Beanpublic PasswordEncoder passwordEncoder() {//创建PasawordEncoder的实现类, 实现类必须要求加密算法return new BCryptPasswordEncoder();}
}
2.4 运行结果

3.spring_security_03
列表中的多个密码进行多次测试,均通过AOP拦截案例验证,表示程序结果正常。
角色权限与身份认证;
同一个用户可以有不同的角色,如果在用户层上,再加入角色层。权限系统会更加复杂。
同时,认证的精确度与粒度管理,可以细至方法级别。
3.1 修改HelloSecurityController
package com.neu.ctrl;
import org.springframework.security.access.prepost.PreAuthorize;
import org.springframework.web.bind.annotation.RequestMapping;
import org.springframework.web.bind.annotation.RestController;
@RestController
public class HelloSecurityController {@RequestMapping("/spring")public String sayHello(){return "使用配置文件的用户信息";}//指定 normal 和admin 角色都可以访问的方法@RequestMapping("/sec_user")@PreAuthorize(value = "hasAnyRole('admin','normal')")public String helloCommonUser(){return "配置有normal, admin角色的用户都可以访问这个方法";}//指定admin角色的访问方法@RequestMapping("/sec_admin")@PreAuthorize("hasAnyRole('admin')")public String helloAdmin(){return "配置 admin角色的用户可以访问";}
}
3.2 配置MyWebSecurityConfig.java文件
package com.neu.config;import org.springframework.context.annotation.Bean;
import org.springframework.context.annotation.Configuration;
import org.springframework.security.config.annotation.authentication.builders.AuthenticationManagerBuilder;
import org.springframework.security.config.annotation.method.configuration.EnableGlobalMethodSecurity;
import org.springframework.security.config.annotation.web.configuration.EnableWebSecurity;
import org.springframework.security.config.annotation.web.configuration.WebSecurityConfigurerAdapter;
import org.springframework.security.crypto.bcrypt.BCryptPasswordEncoder;
import org.springframework.security.crypto.password.PasswordEncoder;/*** @EnableGlobalMethodSecurity:启用方法级别的认证 prePostEnabled:boolean 默认是false* true:表示可以使用@PreAuthorize注解 和 @PostAuthorize*/
@Configuration
@EnableWebSecurity
@EnableGlobalMethodSecurity(prePostEnabled = true)
public class MyWebSecurityConfig extends WebSecurityConfigurerAdapter {//在方法中配置 用户和密码的信息, 作为登录的数据@Overrideprotected void configure(AuthenticationManagerBuilder auth) throws Exception {PasswordEncoder pe = passwordEncoder();auth.inMemoryAuthentication().withUser("jeflee").password(pe.encode("123456")).roles("normal");auth.inMemoryAuthentication().withUser("neu").password(pe.encode("123456")).roles("normal");auth.inMemoryAuthentication().withUser("neuedu").password(pe.encode("neuedu")).roles("admin", "normal");} //创建密码的加密类@Beanpublic PasswordEncoder passwordEncoder() {
//创建PasawordEncoder的实现类, 实现类必须要求加密算法return new BCryptPasswordEncoder();}
}
3.3 测试结果
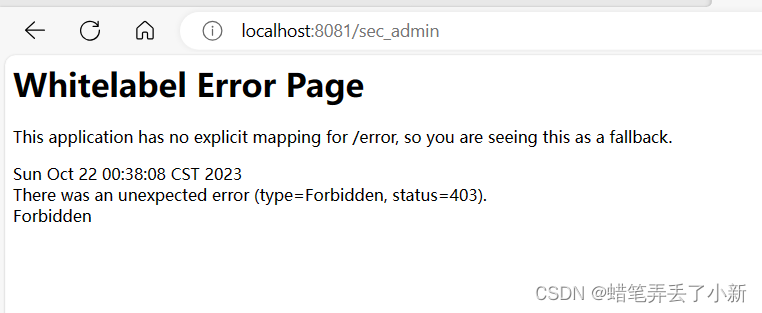
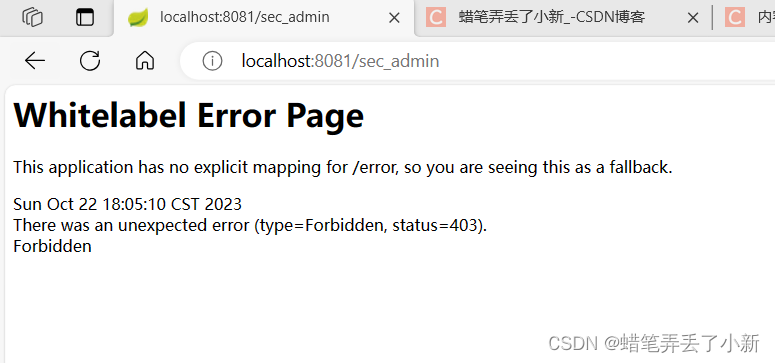
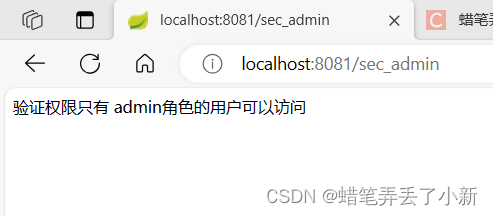
不同的用户有不同的权限,没有权限的用户访问不到指定的路径,403权限被拦截:

4.spring_security_04
数据库中用户的安全验证:
实际项目中,用户信息存储在关系型数据库中,用户与角色的案例验证做法如下:
通过JDBC从mysql数据库中,获取用户信息,进行安全验证。
设计思路:
从数据库 mysql 中获取用户的身份信息(用户名称,密码,角色) 1)在 spring security 框架对象用
户信息的表示类是 UserDetails. UserDetails 是一个接口,高度抽象的用户信息类(相当于项目中的
User 类) User 类:是 UserDetails 接口的实现类, 构造方法有三个参数: username,password,
authorities 需要向 spring security 提供 User 对象, 这个对象的数据来自数据库的查询。 2)实现
UserDetailsService 接口, 重写方法 UserDetails loadUserByUsername(String var1) 在方法中获取数
据库中的用户信息, 也就是执行数据库的查询,条件是用户名称。
4.1 修改配置文件pom.xml
<?xml version="1.0" encoding="UTF-8"?>
<project xmlns="http://maven.apache.org/POM/4.0.0"xmlns:xsi="http://www.w3.org/2001/XMLSchema-instance"xsi:schemaLocation="http://maven.apache.org/POM/4.0.0 http://maven.apache.org/xsd/maven-4.0.0.xsd"><modelVersion>4.0.0</modelVersion><groupId>org.example</groupId><artifactId>spring_security_04</artifactId><version>1.0-SNAPSHOT</version><properties><maven.compiler.source>8</maven.compiler.source><maven.compiler.target>8</maven.compiler.target><project.build.sourceEncoding>UTF-8</project.build.sourceEncoding></properties><!--加入spring boot --><parent><groupId>org.springframework.boot</groupId><artifactId>spring-boot-parent</artifactId><version>2.0.6.RELEASE</version></parent><!--指定依赖--><dependencies><!--web开发相关依赖--><dependency><groupId>org.springframework.boot</groupId><artifactId>spring-boot-starter-web</artifactId></dependency><!--spring security--><dependency><groupId>org.springframework.boot</groupId><artifactId>spring-boot-starter-security</artifactId></dependency><!--mysql驱动--><dependency><groupId>mysql</groupId><artifactId>mysql-connector-java</artifactId><version>8.0.29</version></dependency><!--数据库访问框架jpa--><dependency><groupId>org.springframework.boot</groupId><artifactId>spring-boot-starter-data-jpa</artifactId></dependency></dependencies><build><plugins><plugin><groupId>org.springframework.boot</groupId><artifactId>spring-boot-maven-plugin</artifactId></plugin></plugins></build>
</project>
4.2 配置application.properties
server.port=8081
#spring.security.user.name=jeflee
#spring.security.user.password=123456
spring.datasource.url=jdbc:mysql://localhost:3306/springdb
spring.datasource.username=root
spring.datasource.password=root
spring.datasource.driver-class-name=com.mysql.cj.jdbc.Driver
spring.jpa.generate-ddl=true
spring.jpa.show-sql=true
spring.jpa.database=mysql
4.3 创建主启动类springbootApplication
package com.neu;
import org.springframework.boot.SpringApplication;
import org.springframework.boot.autoconfigure.SpringBootApplication;
@SpringBootApplication
public class springbootApplication {public static void main(String[] args) {SpringApplication.run(springbootApplication.class,args);}
}
4.4 创建entity层,dao层和service层
entity层
package com.neu.entity;import javax.persistence.Entity;
import javax.persistence.GeneratedValue;
import javax.persistence.GenerationType;
import javax.persistence.Id;//表示当前类是一个实体类, 表示数据库中的一个表
//表名默认和类名一样的
@Entity
public class UserInfo {@Id@GeneratedValue(strategy = GenerationType.IDENTITY)private Long id;//用户名称private String username;//密码private String password;//角色private String role;public Long getId() {return id;}public void setId(Long id) {this.id = id;}public String getUsername() {return username;}public void setUsername(String username) {this.username = username;}public String getPassword() {return password;}public void setPassword(String password) {this.password = password;}public String getRole() {return role;}public void setRole(String role) {this.role = role;}
}
dao层
package com.neu.dao;
import com.neu.entity.UserInfo;
import org.springframework.data.jpa.repository.JpaRepository;
public interface UserInfoDao extends JpaRepository<UserInfo,Long> {//按照username查询数据库信息UserInfo findByUsername(String username);
}
service层
package com.neu.service;
import com.neu.entity.UserInfo;
public interface UserInfoService {UserInfo findUserInfo(String username);
}
service层实现类
package com.neu.service.impl;
import com.neu.dao.UserInfoDao;
import com.neu.entity.UserInfo;
import com.neu.service.UserInfoService;
import org.springframework.beans.factory.annotation.Autowired;
import org.springframework.stereotype.Service;
@Service
public class UserInfoServiceImpl implements UserInfoService {@Autowiredprivate UserInfoDao dao;@Overridepublic UserInfo findUserInfo(String username) {UserInfo userinfo = dao.findByUsername(username);return userinfo;}
}
4.5 创建初始化数据库的工具类JdbcInit
package com.neu.init;import com.neu.dao.UserInfoDao;
import com.neu.entity.UserInfo;
import org.springframework.beans.factory.annotation.Autowired;
import org.springframework.security.crypto.bcrypt.BCryptPasswordEncoder;
import org.springframework.security.crypto.password.PasswordEncoder;
import org.springframework.stereotype.Component;import javax.annotation.PostConstruct;
import javax.annotation.Resource;//@Component
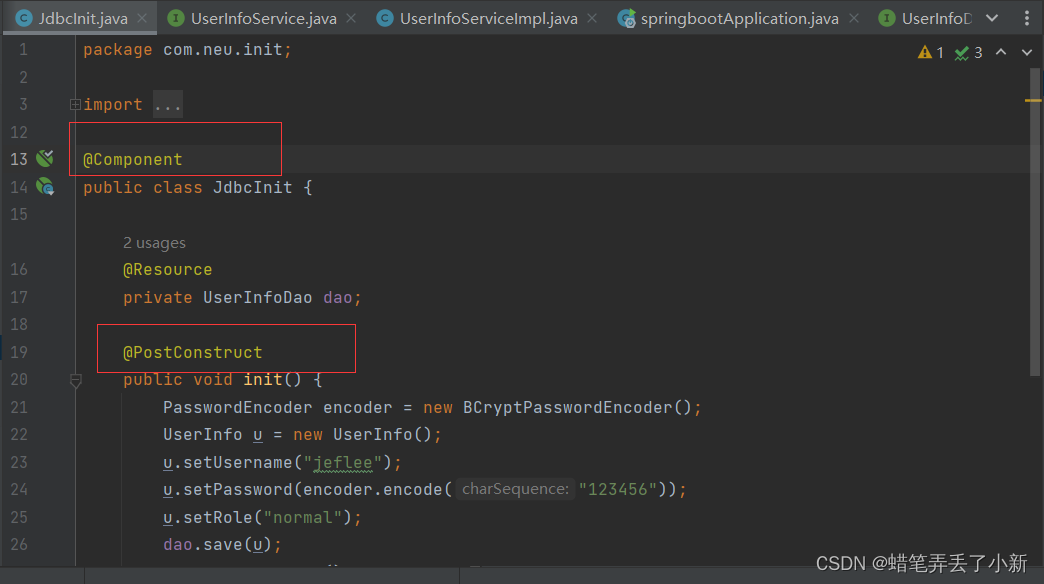
public class JdbcInit {@Resourceprivate UserInfoDao dao;//@PostConstructpublic void init() {PasswordEncoder encoder = new BCryptPasswordEncoder();UserInfo u = new UserInfo();u.setUsername("jeflee");u.setPassword(encoder.encode("123456"));u.setRole("normal");dao.save(u);u = new UserInfo();u.setUsername("neuedu");u.setPassword(encoder.encode("neuedu"));u.setRole("admin");dao.save(u);}
}
4.6 实现userdetail接口,实现服务层。(UserDetailsService接口是Security框架中的接口)
MyUserDetailService
package com.neu.provider;import com.neu.dao.UserInfoDao;
import com.neu.entity.UserInfo;
import org.springframework.beans.factory.annotation.Autowired;
import org.springframework.security.core.GrantedAuthority;
import org.springframework.security.core.authority.SimpleGrantedAuthority;
import org.springframework.security.core.userdetails.User;
import org.springframework.security.core.userdetails.UserDetails;
import org.springframework.security.core.userdetails.UserDetailsService;
import org.springframework.security.core.userdetails.UsernameNotFoundException;
import org.springframework.stereotype.Component;import java.util.ArrayList;
import java.util.List;@Component("MyUserDetailService")
public class MyUserDetailService implements UserDetailsService {@Autowiredprivate UserInfoDao dao;@Overridepublic UserDetails loadUserByUsername(String username) throwsUsernameNotFoundException {User user = null;UserInfo userinfo = null;if (username != null) {userinfo = dao.findByUsername(username);if (userinfo != null) {List<GrantedAuthority> list = new ArrayList<>();
//角色必须以ROLE_开头GrantedAuthority authority = new SimpleGrantedAuthority("ROLE_"+ userinfo.getRole());list.add(authority);
//创建User对象user = newUser(userinfo.getUsername(), userinfo.getPassword(), list);}}return user;}
}
4.7 创建控制器层HelloController
package com.neu.ctrl;import org.springframework.security.access.prepost.PreAuthorize;
import org.springframework.web.bind.annotation.RequestMapping;
import org.springframework.web.bind.annotation.RestController;@RestController
public class HelloController {@RequestMapping("/spring")public String sayHello() {return "使用配置中的用户信息";}//指定 normal 和admin 角色都可以访问的方法@RequestMapping("/sec_user")@PreAuthorize(value = "hasAnyRole('admin','normal')")public String helloCommonUser() {return "验证权限有normal, admin角色的用户";} //指定admin角色的访问方法@RequestMapping("/sec_admin")@PreAuthorize("hasAnyRole('admin')")public String helloAdmin() {return "验证权限只有 admin角色的用户可以访问";}
}
4.8 创建配置信息验证包与相关类MyWebSecurityConfig
package com.neu.config;
import org.springframework.beans.factory.annotation.Autowired;
import org.springframework.beans.factory.annotation.Qualifier;
import org.springframework.context.annotation.Bean;
import org.springframework.context.annotation.Configuration;
import org.springframework.security.config.annotation.authentication.builders.AuthenticationManagerBuilder;
import org.springframework.security.config.annotation.method.configuration.EnableGlobalMethodSecurity;
import org.springframework.security.config.annotation.web.configuration.EnableWebSecurity;
import org.springframework.security.config.annotation.web.configuration.WebSecurityConfigurerAdapter;
import org.springframework.security.core.userdetails.UserDetailsService;
import org.springframework.security.crypto.bcrypt.BCryptPasswordEncoder;
import org.springframework.security.crypto.password.PasswordEncoder;
@Configuration
@EnableWebSecurity
@EnableGlobalMethodSecurity(prePostEnabled = true)
public class MyWebSecurityConfig extends WebSecurityConfigurerAdapter {@Autowired@Qualifier("MyUserDetailService")private UserDetailsService userDetailsService;@Overrideprotected void configure(AuthenticationManagerBuilder auth) throws Exception{auth.userDetailsService(userDetailsService).passwordEncoder( newBCryptPasswordEncoder());}
}
4.9 运行主启动类
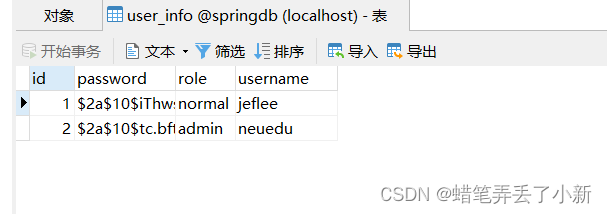
4.9.1 数据库表中有数据插入:

4.9.2 将JdbcInit类中的文件注释掉:
4.9.3 多路径测试:

5. spring_security_05
RBAC模型(基于角色的访问控制)是一种安全模型,它通过定义角色的权限,并对用户授予某个角色从而来控制用户的权限。这种模型在20世纪90年代被研究出来,但其实在20世纪70年代的多用户计算时期,这种思想就已经被提出来。
在RBAC模型中,用户、角色和权限是三个基础组成部分。通过将权限赋予角色,然后将角色赋予用户,可以实现用户和权限的逻辑分离,极大地简化了权限的管理。
RBAC的核心思想是将访问权限与角色相联系,而不是直接授予用户。这种方式下,用户首先被分配到一个或多个角色,然后每个角色又被分配到一组特定的权限。当用户通过身份验证后,他们就可以以所分配的角色访问相应的权限。
这种模型有很多优点。首先,它极大地简化了权限管理。管理员只需要管理角色和权限,而不是单独管理每个用户的权限。其次,通过将访问权限与角色相联系,可以更容易地实现权限的动态分配和撤销。最后,通过将访问权限与角色相联系,可以更有效地控制系统的安全性。只有具有特定角色的用户才能访问相应的数据和资源。
总的来说,RBAC模型是一种非常有效的安全验证方法,它能够有效地保护数据库中的数据和资源,同时简化了权限的管理过程。
RBAC的工作原理:
RBAC的工作原理可以通过一个简单的例子来解释。假设我们有一个公司内部的在线报销系统,员工和财务人员都可以访问这个系统。员工需要提交报销申请,而财务人员需要审批申请。在这个系统中,我们可以使用RBAC模型来实现访问控制。
定义用户和角色:首先,我们需要定义系统的用户和角色。在这个例子中,我们可以定义两种角色,分别是员工和财务人员。每个角色都有相应的权限。
定义权限:接下来,我们需要定义每个角色的权限。例如,员工可以提交报销申请,但无法审批申请;而财务人员可以查看报销申请和审批申请。
分配角色:然后,我们需要将角色分配给用户。例如,一个用户可以是员工,也可以是财务人员。
身份验证:当用户登录系统时,需要进行身份验证,验证通过后,系统会根据用户的角色赋予相应的权限。
访问控制:最后,系统会根据用户的角色和权限,控制用户可以访问的数据和执行的操作。例如,如果一个用户是员工,那么他可以提交报销申请,但无法查看审批申请。如果一个用户是财务人员,那么他可以查看报销申请和审批申请。
通过这种方式,我们可以实现基于角色的访问控制,确保每个用户只能访问其所需的数据和执行所需的操作。这种模型极大地简化了权限管理,并提高了系统的安全性。
RBAC表设计:
在RBAC(基于角色的访问控制)模型中,通常需要设计以下几种表:
用户表(User):用于存储系统的用户信息,包括用户ID、用户名、密码等。
角色表(Role):用于定义系统中的角色信息,包括角色ID、角色名称等。
权限表(Permission):用于定义系统中的权限信息,包括权限ID、权限名称等。
用户角色关系表(User_Role):用于建立用户和角色之间的多对多关系,包括用户ID和角色ID。
角色权限关系表(Role_Permission):用于建立角色和权限之间的多对多关系,包括角色ID和权限ID。
通过这些表的设计,可以实现用户和角色的关联,以及角色和权限的关联。这样,当一个用户登录系统时,可以通过查询用户角色关系表来确定其拥有的角色,然后再查询角色权限关系表来确定其拥有的权限。这样就可以实现对用户访问权限的控制和管理。
5.1 建立mysql数据库中的相关表
定义用户(t_user),角色(t_role),角色关系表(t_user_role)
create database rbac;
create table t_user(id int primary key auto_increment,
username varchar(200),password varchar(200),realname
varchar(200),isexpired int,isenable int,islock int,iscredentials int, createtime
date,logintime date);
create table t_role(id int primary key auto_increment,rolename
varchar(200),rolememo varchar(200));
create table t_user_role(userid int,roleid int);
5.2 配置maven pom.xml文件
<?xml version="1.0" encoding="UTF-8"?>
<project xmlns="http://maven.apache.org/POM/4.0.0"xmlns:xsi="http://www.w3.org/2001/XMLSchema-instance"xsi:schemaLocation="http://maven.apache.org/POM/4.0.0 http://maven.apache.org/xsd/maven-4.0.0.xsd"><modelVersion>4.0.0</modelVersion><groupId>com.neu</groupId><artifactId>spring_security_05</artifactId><version>1.0-SNAPSHOT</version><properties><maven.compiler.source>8</maven.compiler.source><maven.compiler.target>8</maven.compiler.target><project.build.sourceEncoding>UTF-8</project.build.sourceEncoding></properties><!--加入spring boot --><parent><groupId>org.springframework.boot</groupId><artifactId>spring-boot-parent</artifactId><version>2.0.6.RELEASE</version></parent><!--指定依赖--><dependencies><!--web开发相关依赖--><dependency><groupId>org.springframework.boot</groupId><artifactId>spring-boot-starter-web</artifactId></dependency><!--spring security--><dependency><groupId>org.springframework.boot</groupId><artifactId>spring-boot-starter-security</artifactId></dependency><!--mysql驱动--><dependency><groupId>mysql</groupId><artifactId>mysql-connector-java</artifactId><version>8.0.29</version></dependency><!--mybatis--><dependency><groupId>org.mybatis.spring.boot</groupId><artifactId>mybatis-spring-boot-starter</artifactId><version>2.0.1</version></dependency></dependencies><build><plugins><plugin><groupId>org.springframework.boot</groupId><artifactId>spring-boot-maven-plugin</artifactId></plugin></plugins></build>
</project>
5.3 创建资源文件application.properties
spring.datasource.driver-class-name=com.mysql.cj.jdbc.Driver
spring.datasource.url=jdbc:mysql://localhost:3306/rbac
spring.datasource.username=root
spring.datasource.password=root
mybatis.mapper-locations=classpath:/mapper/*Mapper.xml
mybatis.type-aliases-package=com.neu.entity
5.4 在resources目录中,创建静态页面文件夹static,并创建静态页面
index.html
<!DOCTYPE html>
<html lang="en">
<head><meta charset="UTF-8"><title>Title</title>
</head>
<body>
<p>验证RBAC</p>
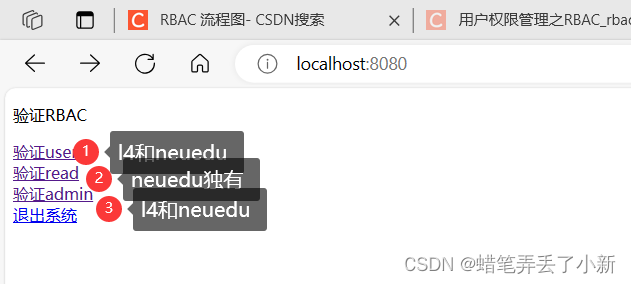
<a href="/access/user">验证user</a> <br/>
<a href="/access/read">验证read</a><br/>
<a href="/access/admin">验证admin</a><br/>
<a href="/logout" >退出系统</a>
</body>
</html>
mylogin.html
<!DOCTYPE html>
<html lang="en">
<head><meta charset="UTF-8"><title>Title</title>
</head>
<body>
<p>自定义登录页面</p>
<form action="/login" method="post">用户名:<input type="text" name="username" value=""> <br/>密 码:<input type="text" name="password" value=""> <br/><input type="submit" value="登录">
</form>
</body>
</html>
5.5 在resources目录中,创建mapper目录,并创建配置文件
SysRoleMapper.xml
<?xml version="1.0" encoding="UTF-8"?>
<!DOCTYPE mapperPUBLIC "-//mybatis.org//DTD Mapper 3.0//EN""http://mybatis.org/dtd/mybatis-3-mapper.dtd">
<mapper namespace="com.neu.mapper.SysRoleMapper"><!--定义 列和 属性的对应关系--><resultMap id="roleMapper" type="com.neu.entity.SysRole"><id column="id" property="id"/><result column="rolename" property="name"/><result column="rolememo" property="memo" /></resultMap><select id="selectRoleByUser" resultMap="roleMapper">select r.id, r.rolename,r.rolememo from t_user_role ur , t_role rwhere ur.roleid = r.id and ur.userid=#{userid}</select></mapper>
SysUserMapper.xml
<?xml version="1.0" encoding="UTF-8"?>
<!DOCTYPE mapperPUBLIC "-//mybatis.org//DTD Mapper 3.0//EN""http://mybatis.org/dtd/mybatis-3-mapper.dtd">
<mapper namespace="com.neu.mapper.SysUserMapper"><!--定义 列和 属性的对应关系--><resultMap id="userMapper" type="com.neu.entity.SysUser"><id column="id" property="id"/><result column="username" property="username"/><result column="password" property="password" /><result column="realname" property="realname" /><result column="isexpired" property="isExpired" /><result column="isenable" property="isEnabled" /><result column="islock" property="isLocked" /><result column="iscredentials" property="isCredentials" /><result column="createtime" property="createTime" /><result column="logintime" property="loginTime" /></resultMap><insert id="insertSysUser">insert into t_user(username,password,realname,isexpired,isenable,islock,iscredentials,createtime,logintime)values(#{username},#{password},#{realname},#{isExpired},#{isEnabled},#{isLocked},#{isCredentials},#{createTime},#{loginTime})</insert><select id="selectSysUser" resultMap="userMapper">select id, username,password,realname,isexpired,isenable,islock,iscredentials,createtime,logintimefrom t_user where username=#{username}</select>
</mapper>
5.6 创建实体类
SysRole
package com.neu.entity;public class SysRole {private Integer id;private String name;private String memo;public Integer getId() {return id;}public void setId(Integer id) {this.id = id;}public String getName() {return name;}public void setName(String name) {this.name = name;}public String getMemo() {return memo;}public void setMemo(String memo) {this.memo = memo;}@Overridepublic String toString() {return "SysRole{" +"id=" + id +", name='" + name + '\'' +", memo='" + memo + '\'' +'}';}
}
SysUser
package com.neu.entity;import org.springframework.security.core.GrantedAuthority;
import org.springframework.security.core.userdetails.UserDetails;import java.util.Collection;
import java.util.Date;
import java.util.List;public class SysUser implements UserDetails {private Integer id;private String username;private String password;private String realname;private boolean isExpired;private boolean isLocked;private boolean isCredentials;private boolean isEnabled;private Date createTime;private Date loginTime;private List<GrantedAuthority> authorities;public SysUser() {}public SysUser(String username, String password, String realname,boolean isExpired, boolean isLocked,boolean isCredentials, boolean isEnabled,Date createTime, Date loginTime, List<GrantedAuthority>authorities) {this.username = username;this.password = password;this.realname = realname;this.isExpired = isExpired;this.isLocked = isLocked;this.isCredentials = isCredentials;this.isEnabled = isEnabled;this.createTime = createTime;this.loginTime = loginTime;this.authorities = authorities;}@Overridepublic Collection<? extends GrantedAuthority> getAuthorities() {return authorities;}@Overridepublic String getPassword() {return password;}@Overridepublic String getUsername() {return username;}@Overridepublic boolean isAccountNonExpired() {return isExpired;}@Overridepublic boolean isAccountNonLocked() {return isLocked;}@Overridepublic boolean isCredentialsNonExpired() {return isCredentials;}@Overridepublic boolean isEnabled() {return isEnabled;}public Integer getId() {return id;}public Date getCreateTime() {return createTime;}public Date getLoginTime() {return loginTime;}public String getRealname() {return realname;}public void setId(Integer id) {this.id = id;}public void setUsername(String username) {this.username = username;}public void setPassword(String password) {this.password = password;}public void setRealname(String realname) {this.realname = realname;}public void setExpired(boolean expired) {isExpired = expired;}public void setLocked(boolean locked) {isLocked = locked;}public void setCredentials(boolean credentials) {isCredentials = credentials;}public void setEnabled(boolean enabled) {isEnabled = enabled;}public void setCreateTime(Date createTime) {this.createTime = createTime;}public void setLoginTime(Date loginTime) {this.loginTime = loginTime;}public void setAuthorities(List<GrantedAuthority> authorities) {this.authorities = authorities;}@Overridepublic String toString() {return "SysUser{" +"id=" + id +", username='" + username + '\'' +", password='" + password + '\'' +", realname='" + realname + '\'' +", isExpired=" + isExpired +", isLocked=" + isLocked +", isCredentials=" + isCredentials +", isEnabled=" + isEnabled +", createTime=" + createTime +", loginTime=" + loginTime +", authorities=" + authorities +'}';}
}
5.7 创建mapper
SysRoleMapper
package com.neu.mapper;
import com.neu.entity.SysRole;
import java.util.List;
public interface SysRoleMapper {List<SysRole> selectRoleByUser(Integer userId);
}
SysUserMapper
package com.neu.mapper;
import com.neu.entity.SysUser;
import org.springframework.stereotype.Repository;
//@Repository :创建dao对象
@Repository
public interface SysUserMapper {int insertSysUser(SysUser user);//根据账号名称,获取用户信息SysUser selectSysUser(String username);
}
5.8 创建程序启动类
springApplication
package com.neu;
import com.neu.entity.SysUser;
import com.neu.mapper.SysUserMapper;
import org.mybatis.spring.annotation.MapperScan;
import org.springframework.beans.factory.annotation.Autowired;
import org.springframework.boot.SpringApplication;
import org.springframework.boot.autoconfigure.SpringBootApplication;
import org.springframework.security.core.GrantedAuthority;
import org.springframework.security.core.authority.SimpleGrantedAuthority;
import org.springframework.security.crypto.bcrypt.BCryptPasswordEncoder;
import org.springframework.security.crypto.password.PasswordEncoder;
import javax.annotation.PostConstruct;
import java.util.ArrayList;
import java.util.Date;
import java.util.List;
@MapperScan(value = "com.neu.mapper")
@SpringBootApplication
public class springApplication {@AutowiredSysUserMapper userMapper;public static void main(String[] args) {SpringApplication.run(springApplication.class,args);}//@PostConstructpublic void jdbcInit(){Date curDate = new Date();PasswordEncoder encoder = new BCryptPasswordEncoder();List<GrantedAuthority> list = new ArrayList<>();
//参数角色名称,需要以"ROLE_"开头, 后面加上自定义的角色名称GrantedAuthority authority = newSimpleGrantedAuthority("ROLE_"+"READ");list.add(authority);SysUser user = new SysUser("l4",encoder.encode("123456"),"l4",true,true,true,true,curDate, curDate, list);userMapper.insertSysUser(user);List<GrantedAuthority> list2 = new ArrayList<>();GrantedAuthority authority2 = newSimpleGrantedAuthority("ROLE_"+"AMDIN");GrantedAuthority authority3 = newSimpleGrantedAuthority("ROLE_"+"USER");list.add(authority2);list.add(authority3);SysUser user2 = new SysUser("neuedu",encoder.encode("neuedu"),"admin",true,true,true,true,curDate, curDate,list2);userMapper.insertSysUser(user2);}
}
5.9 创建spring security 配置文件类
CustomSecurityConfig
package com.neu.config;
import org.springframework.beans.factory.annotation.Autowired;
import org.springframework.boot.autoconfigure.AutoConfigureOrder;
import org.springframework.context.annotation.Configuration;
import org.springframework.security.config.annotation.authentication.builders.AuthenticationManagerBuilder;
import org.springframework.security.config.annotation.web.builders.HttpSecurity;
import org.springframework.security.config.annotation.web.configuration.EnableWebSecurity;
import org.springframework.security.config.annotation.web.configuration.WebSecurityConfigurerAdapter;
import org.springframework.security.core.userdetails.UserDetailsService;
import org.springframework.security.crypto.bcrypt.BCryptPasswordEncoder;
@Configuration
@EnableWebSecurity
public class CustomSecurityConfig extends WebSecurityConfigurerAdapter {@Autowiredprivate UserDetailsService userDetailsService;@Overrideprotected void configure(AuthenticationManagerBuilder auth) throws Exception{
//super.configure(auth);auth.userDetailsService(userDetailsService).passwordEncoder(newBCryptPasswordEncoder());}@Overrideprotected void configure(HttpSecurity http) throws Exception {System.out.println("******configure HttpSecurity******");http.authorizeRequests().antMatchers("/index").permitAll().antMatchers("/access/user/**").hasRole("USER").antMatchers("/access/read/**").hasRole("READ").antMatchers("/access/admin/**").hasRole("ADMIN").anyRequest().authenticated().and().formLogin();}
}
5.10 创建service层相关类
JdbcUserDetatilsService
package com.neu.service;import com.neu.entity.SysRole;
import com.neu.entity.SysUser;
import com.neu.mapper.SysRoleMapper;
import com.neu.mapper.SysUserMapper;
import org.springframework.beans.factory.annotation.Autowired;
import org.springframework.boot.autoconfigure.AutoConfigureOrder;
import org.springframework.security.core.GrantedAuthority;
import org.springframework.security.core.authority.SimpleGrantedAuthority;
import org.springframework.security.core.userdetails.UserDetails;
import org.springframework.security.core.userdetails.UserDetailsService;
import org.springframework.security.core.userdetails.UsernameNotFoundException;
import org.springframework.stereotype.Service;import javax.annotation.Resource;
import java.util.ArrayList;
import java.util.List;@Service
public class JdbcUserDetatilsService implements UserDetailsService {@Resourceprivate SysUserMapper userMapper;@Resourceprivate SysRoleMapper roleMapper;@Overridepublic UserDetails loadUserByUsername(String username) throwsUsernameNotFoundException {
//1. 根据username 获取SysUserSysUser user = userMapper.selectSysUser(username);System.out.println("loadUserByUsername user:" + user);if (user != null) {
//2. 根据userid的,获取roleList<SysRole> roleList = roleMapper.selectRoleByUser(user.getId());System.out.println("roleList:" + roleList);List<GrantedAuthority> authorities = new ArrayList<>();String roleName = "";for (SysRole role : roleList) {roleName = role.getName();GrantedAuthority authority = newSimpleGrantedAuthority("ROLE_" + roleName);authorities.add(authority);}user.setAuthorities(authorities);return user;}return user;}
}
5.11 创建控制器层与相关的类
IndexController
package com.neu.ctrl;
import org.springframework.stereotype.Controller;
import org.springframework.web.bind.annotation.GetMapping;
@Controller
public class IndexController {@GetMapping("/index")public String toIndexHtml(){return "forward:/index.html";}
}
MyController
package com.neu.ctrl;
import org.springframework.web.bind.annotation.GetMapping;
import org.springframework.web.bind.annotation.RestController;
@RestController
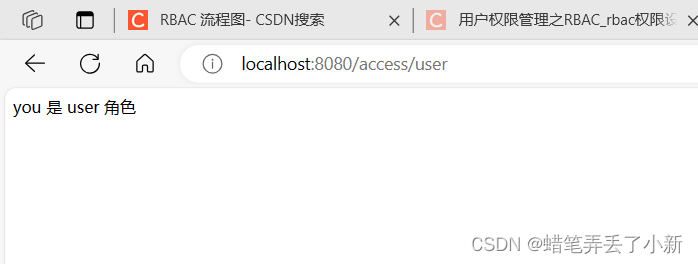
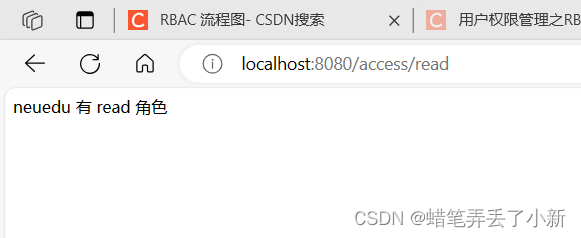
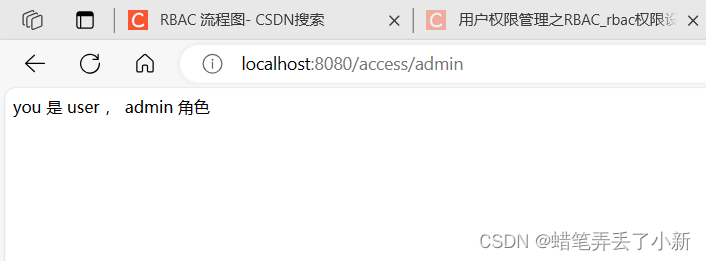
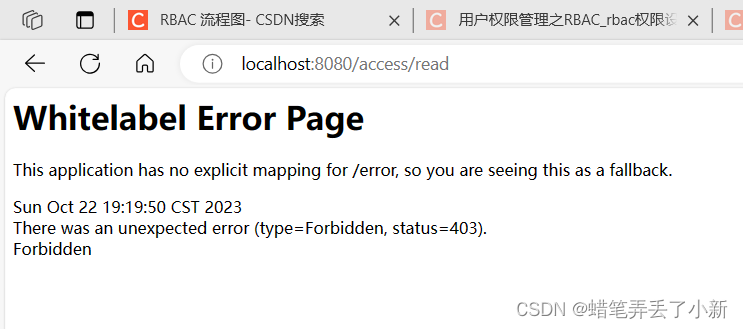
public class MyController {@GetMapping(value = "/access/user",produces = "text/html;charset=utf-8")public String sayUser(){return "you 是 user 角色";} @GetMapping(value = "/access/read",produces = "text/html;charset=utf-8")public String sayRead(){return "neuedu 有 read 角色";} @GetMapping(value = "/access/admin",produces = "text/html;charset=utf-8")public String sayAdmin(){return "you 是 user , admin 角色";}
}
5.12 运行测试
启动项目后,查看数据库中此时,已经初始化了两个用户,将初始化启动类的注释关闭。

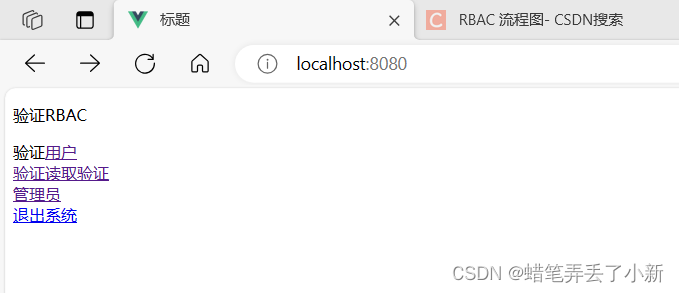
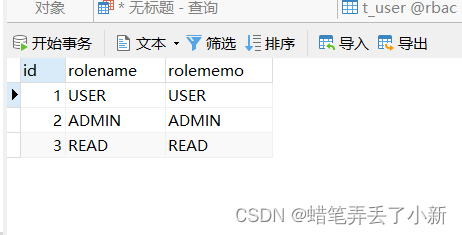
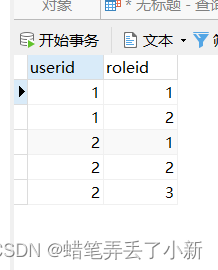
向数据库表中插入数据,l4 有1,2两个权限,neuedu有1,2,3三个权限:
INSERT INTO t_role ( rolename, rolememo )
VALUES( 'USER', 'USER' );
INSERT INTO t_role ( rolename, rolememo )
VALUES( 'ADMIN', 'ADMIN' );
INSERT INTO t_role ( rolename, rolememo )
VALUES( 'READ', 'READ' );
INSERT INTO t_user_role
VALUES( 1, 1 );
INSERT INTO t_user_role
VALUES( 1, 2 );
INSERT INTO t_user_role
VALUES( 2, 1 );
INSERT INTO t_user_role
VALUES( 2, 2 );
INSERT INTO t_user_role
VALUES( 2, 3 );
运行结果:
6.总结
Spring Security是一个强大且灵活的框架,它基于Spring Boot,为Java企业应用程序提供全面的安全性解决方案。它允许开发者以声明式的方式实现安全特性,包括用户认证、角色授权、安全配置等。
Spring Security主要从两个维度来解决安全性问题:
Web安全:Spring Security提供了很多用于保护Web请求的机制,如安全过滤器(Security Filter)。这些过滤器可以配置来限制URL级别的访问,例如,通过配置安全约束(Security Constraints)来限制哪些URL需要什么样的认证或授权。
方法安全:Spring Security也提供了保护方法调用的机制,这是通过Spring AOP(面向切面编程)实现的。开发者可以使用Spring AOP来定义安全策略,例如,只有具有特定角色或权限的用户才能调用某个方法。这种保护是透明的,对开发者来说,他们只需要关注业务逻辑,而不需要显式地在每个方法中检查用户的角色或权限。
Spring Security还提供了丰富的安全性特性,如用户认证、角色授权、跨站请求伪造(CSRF)保护、跨站请求包含(XSS)保护等。所有这些特性都可以很容易地通过配置来实现,而不需要编写大量的代码。
最后,Spring Security还支持多种身份验证机制,包括JDBC、LDAP、内存中的用户详细信息、OAuth2等。这使得开发者可以根据具体的应用场景选择最适合的身份验证方式。


)


: Go操作Redis实战)


(持续更新))


