文章目录
- ImagesPipeline
- 使用步骤:
- 1. 数据解析: 获取图片的地址 & 2. 将存储图片地址的item提交到指定的管道类(`hotgirls.py`)
- 3. 在管道文件中自制一个基于ImagesPipeLine的一个管道类
- !!天大的坑 !!
- 4. 在配置文件settings.py中:
- item()类
- 完整代码
- hotgilrs.py 爬虫文件
- items.py
- pipelines.py
使用scrapy爬取图片,采用管道方法进行下载。
- 这里采用继承ImagesPipeline类的方法来重写get_media_requests,file_path, item_completed。
ImagesPipeline
只需要img的src属性值进行解析,提交给该管道,该管道就会对图片的src进行请求发送获取图片的二进制数据,且保存到本地。
使用步骤:
- 数据解析: 获取图片的地址
- 将存储图片地址的item提交到指定的管道类
- 在管道文件中自制一个基于ImagesPipeLine的一个管道类
- get_media_requests
- file_path
- item_completed
- 在配置文件settings.py中:
- 指定图片的存储路径: IMAGES_STORE
- 指定开启的管道:自定制的管道类。
本次解析的网站地址:https://www.tuiimg.com/meinv/
谁不爱呢哈哈哈
原本思路:
- 每个图片对应一个图集的url。将这些图集详情页url保存下来,对这些详情页url进行解析。
- 将这些详情页url中的图片爬取下来
后来发现这个思路不太可行。因为在详情页中还需要点击展开全图,这需要用到selenium的操作,加上scrapy我实现了一下失败了,所以后面换别的方法。

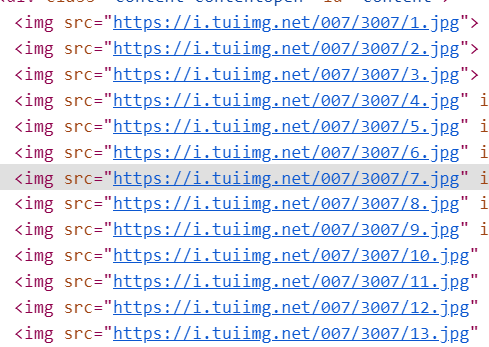
发现在初始界面的图片src为https://i.tuiimg.net/007/3007/c.jpg
然后点进去他的详情页,发现它每张照片的url为:

所以我只需要将预览图的c.jpg换成123456就可以得到所有的图片src
1. 数据解析: 获取图片的地址 & 2. 将存储图片地址的item提交到指定的管道类(hotgirls.py)
parse() 用于获取所有不同图集的图片src模板,即将c.jpg去掉。
parse_length() 用于获取每个图集的图片张数,并解析每一张图片,将其yield给管道并下载。
from time import sleepimport scrapy
from hotgilrsPro.items import HotgilrsproItemclass HotgirlsSpider(scrapy.Spider):name = "hotgirls"# allowed_domains = ["www.xxx.com"]start_urls = ["https://www.tuiimg.com/meinv/"]name_src_list = []idx = 0def parse_length(self, response):item = response.meta['item']#  print("当前在parse_length中解析的页面", response.url)length = response.xpath('.//div[@id="page"]/span[2]/i//text()').extract_first()length = int(length.split('/')[-1][:-1])    # 从str:展开全图(1/75)转到int: 75item['length'] = lengthprint("当前的idx", self.idx)# print("当前长度为:", length)for i in range(1, length+1):#print("保存在字典中的改写的src为",src, "字典模板为", self.dic['img_template'])url = self.name_src_list[self.idx]['img_template'] + f"/{i}.jpg"item['src'] = url# print("在parse_length中生成的url:", url)yield item	# 将带有图片src的item传给管道,对应 2. 将存储图片地址的item提交到指定的管道类self.idx += 1def parse(self, response):# scrapy框架的内容li_list = response.xpath('/html/body/div[3]/ul/li') # /html/body/div[3]/ulitem = HotgilrsproItem()item['page_url'] = []for li in li_list:name = li.xpath('.//a[2]/text()').extract_first()img_template = li.xpath('.//a[1]/img/@src').extract_first()img_template = img_template[:img_template.rfind('/')]   # 得到前面的模板img_template = ''.join(img_template)print("当前的name:", name)print("当前的模板:", img_template)item['img_template'] = img_templatedic = {}dic['name'] = nameitem['name'] = namedic['img_srcs'] = {}dic['img_template'] = img_templateself.name_src_list.append(dic)page_src = li.xpath('./a[1]/@href').extract_first()item['page_url'].append(page_src)yield scrapy.Request(url=page_src, callback=self.parse_length, meta={'item': item})  # 这一步是异步的,在这儿等请求响应并接着往下执行。print(self.name_src_list)
3. 在管道文件中自制一个基于ImagesPipeLine的一个管道类
!!天大的坑 !!
return 'images/' + str(self.imgName) + ".jpg"
这里写图片的路径的时候,前面必须再加上一个目录名,否则不会保存到本地,!!!!
# Define your item pipelines here
#
# Don't forget to add your pipeline to the ITEM_PIPELINES setting
# See: https://docs.scrapy.org/en/latest/topics/item-pipeline.html
import scrapy
# useful for handling different item types with a single interface
from itemadapter import ItemAdapter
from scrapy.pipelines.images import ImagesPipeline
# from hotgilrsPro.spiders.hotgirls import name_src_list# 写这里别忘了修改settings。
# class HotgilrsproPipeline:
#     def process_item(self, item, spider):
#         return itemclass imgsPileLine(ImagesPipeline):imgName = 1# 可以根据图片地址进行图片数据的请求def get_media_requests(self, item, info):#  print("当前在pipelines中请求到图片地址:", item['src'])yield scrapy.Request(item['src'])# 指定图片的存储路径# 这里本来想将图集名称也爬取下来,放到多个文件夹下,但是能力不够没能实现。只能按照张数123一张一张胡乱存。def file_path(self, request, response=None, info=None):print("当前图片", request.url, "的存储路径", self.imgName)self.imgName += 1return 'images/' + str(self.imgName) + ".jpg"	def item_completed(self, results, item, info):return item     # 返回给下一个即将被执行的管理类
4. 在配置文件settings.py中:
#指定图片存储的目录
IMAGES_STORE = './imgs_hotgirls'# 开启指定管道
ITEM_PIPELINES = {# "hotgilrsPro.pipelines.HotgilrsproPipeline": 300,"hotgilrsPro.pipelines.imgsPileLine": 250,}
item()类
class HotgilrsproItem(scrapy.Item):# define the fields for your item here like:# name = scrapy.Field()# 在item中定义相关的属性length = scrapy.Field()name = scrapy.Field()src = scrapy.Field()page_url = scrapy.Field()img_template = scrapy.Field()完整代码
hotgilrs.py 爬虫文件
from time import sleepimport scrapy
from hotgilrsPro.items import HotgilrsproItemclass HotgirlsSpider(scrapy.Spider):name = "hotgirls"# allowed_domains = ["www.xxx.com"]start_urls = ["https://www.tuiimg.com/meinv/"]name_src_list = []idx = 0def parse_length(self, response):item = response.meta['item']#  print("当前在parse_length中解析的页面", response.url)length = response.xpath('.//div[@id="page"]/span[2]/i//text()').extract_first()length = int(length.split('/')[-1][:-1])    # 从str:展开全图(1/75)转到int: 75item['length'] = lengthprint("当前的idx", self.idx)# print("当前长度为:", length)for i in range(1, length+1):#print("保存在字典中的改写的src为",src, "字典模板为", self.dic['img_template'])url = self.name_src_list[self.idx]['img_template'] + f"/{i}.jpg"item['src'] = url# print("在parse_length中生成的url:", url)yield itemself.idx += 1def parse(self, response):# scrapy框架的内容li_list = response.xpath('/html/body/div[3]/ul/li') # /html/body/div[3]/ulitem = HotgilrsproItem()item['page_url'] = []for li in li_list:name = li.xpath('.//a[2]/text()').extract_first()img_template = li.xpath('.//a[1]/img/@src').extract_first()img_template = img_template[:img_template.rfind('/')]   # 得到前面的模板img_template = ''.join(img_template)print("当前的name:", name)print("当前的模板:", img_template)item['img_template'] = img_templatedic = {}dic['name'] = nameitem['name'] = namedic['img_srcs'] = {}dic['img_template'] = img_templateself.name_src_list.append(dic)page_src = li.xpath('./a[1]/@href').extract_first()item['page_url'].append(page_src)yield scrapy.Request(url=page_src, callback=self.parse_length, meta={'item': item})  # 这一步是异步的,在这儿等请求响应并接着往下执行。print(self.name_src_list)
items.py
# Define here the models for your scraped items
#
# See documentation in:
# https://docs.scrapy.org/en/latest/topics/items.htmlimport scrapyclass HotgilrsproItem(scrapy.Item):# define the fields for your item here like:# name = scrapy.Field()length = scrapy.Field()name = scrapy.Field()src = scrapy.Field()page_url = scrapy.Field()img_template = scrapy.Field()
pipelines.py
# Define your item pipelines here
#
# Don't forget to add your pipeline to the ITEM_PIPELINES setting
# See: https://docs.scrapy.org/en/latest/topics/item-pipeline.html
import scrapy
# useful for handling different item types with a single interface
from itemadapter import ItemAdapter
from scrapy.pipelines.images import ImagesPipeline
# from hotgilrsPro.spiders.hotgirls import name_src_list# 写这里别忘了修改settings。
# class HotgilrsproPipeline:
#     def process_item(self, item, spider):
#         return itemclass imgsPileLine(ImagesPipeline):imgName = 1# 可以根据图片地址进行图片数据的请求def get_media_requests(self, item, info):#  print("当前在pipelines中请求到图片地址:", item['src'])yield scrapy.Request(item['src'])# 指定图片的存储路径def file_path(self, request, response=None, info=None):print("当前图片", request.url, "的存储路径", self.imgName)self.imgName += 1return 'images/' + str(self.imgName) + ".jpg"def item_completed(self, results, item, info):return item     # 返回给下一个即将被执行的管理类
)


![[论文笔记]UNILM](http://pic.xiahunao.cn/[论文笔记]UNILM)

)


![二十七、[进阶]MySQL默认存储引擎InnoDB的简单介绍](http://pic.xiahunao.cn/二十七、[进阶]MySQL默认存储引擎InnoDB的简单介绍)
