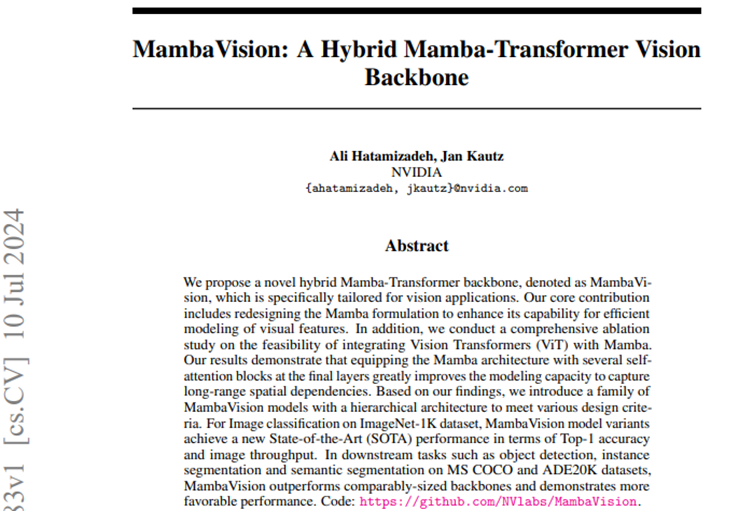
Hatamizadeh, Ali and Jan Kautz. “MambaVision: A Hybrid Mamba-Transformer Vision Backbone.” ArXiv abs/2407.08083 (2024): n. pag.
1.模型原理

-
关键思路:
-
通过重新设计Mamba的架构和在最终层增加自注意力块,提高了Mamba模型对视觉特征的建模能力,
-
将其与Vision Transformers相结合,形成了MambaVision模型
-
-
实验结果:
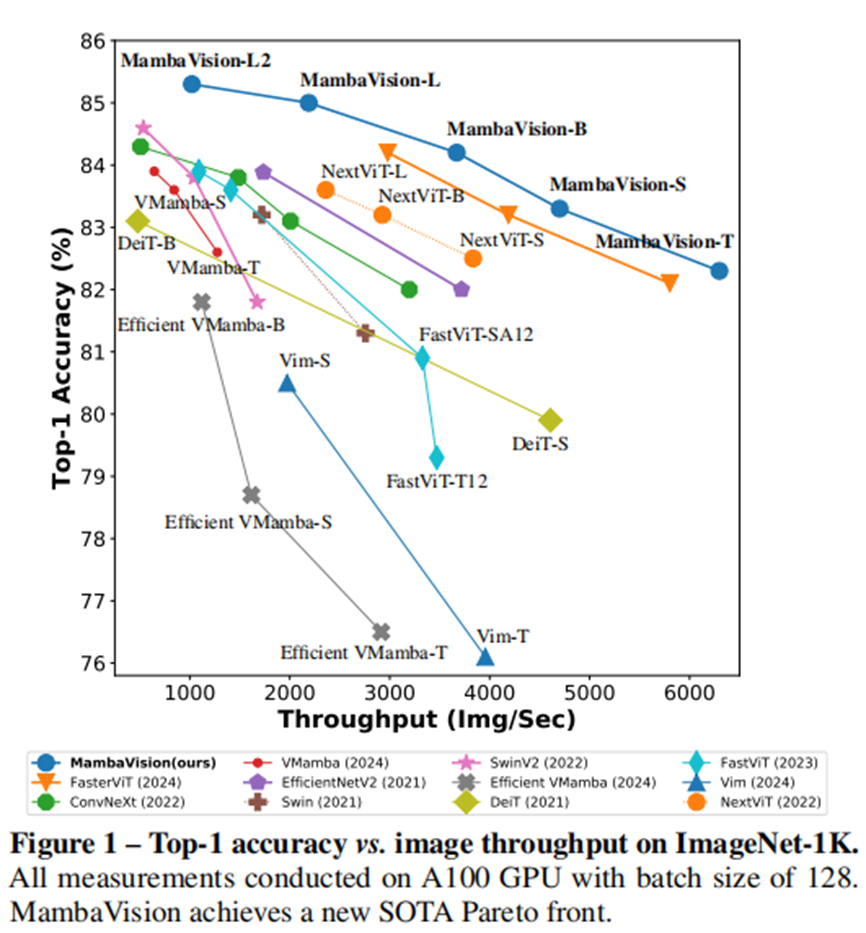
分类任务上


比较不同家族的模型:
•基于conv based,
•基于transformer,
•基于conv-transformer
•和mambab based
在ImageNet Top-1的精度和图像吞吐量上最优
-
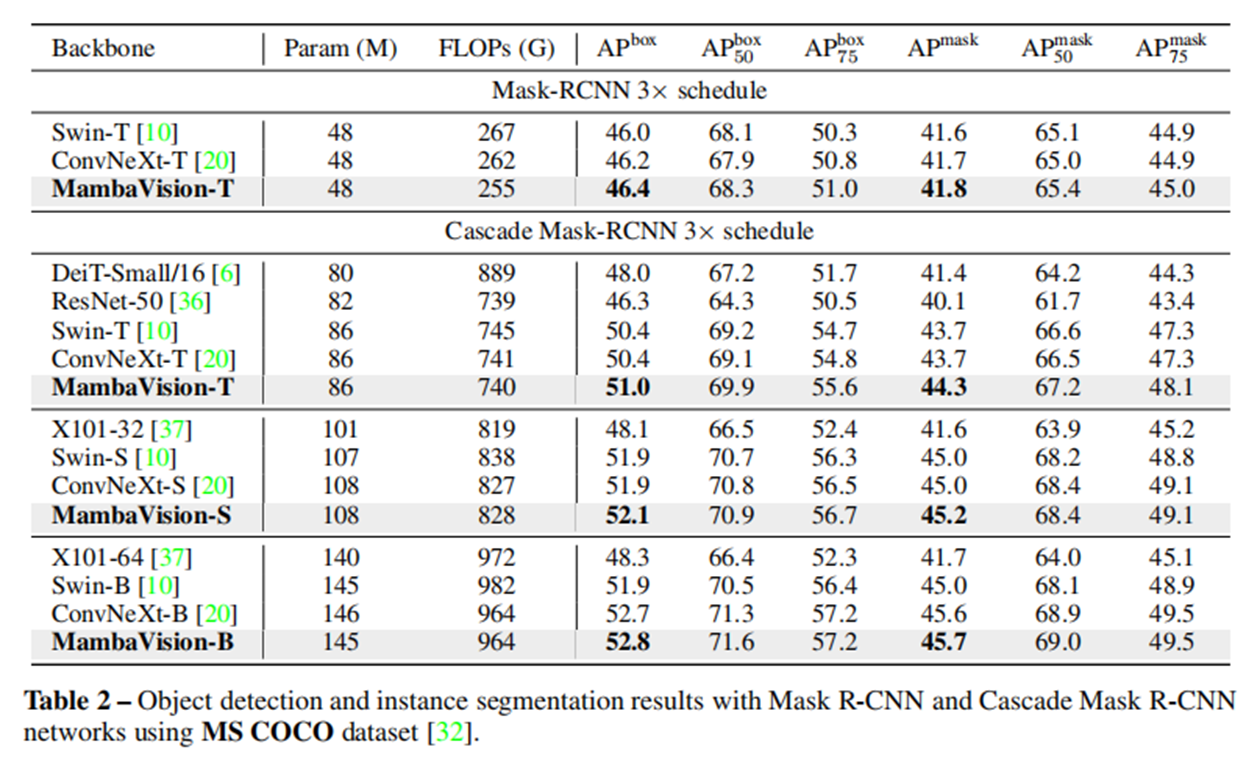
在目标检测和分割任务上

-
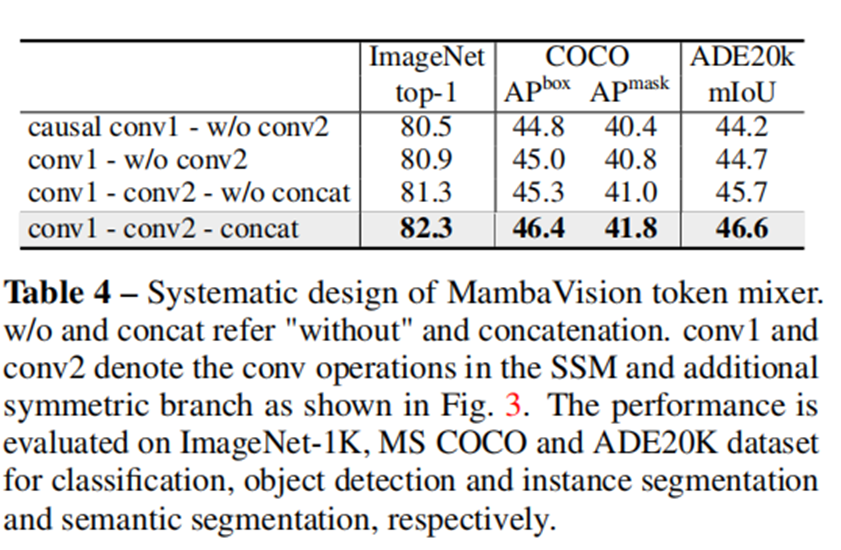
消融分析
这部分得出来的结论是本篇论文的亮点

结论1:连接来自两个分支(即,SSM和非SSM)的输出导致学习更丰富的特征表示并增强全局上下文理解。
结论2:将每个阶段的自注意块数增加到最后N/2层,达到最佳性能。
后面可以看到代码实现也是按照N/2写的。
2.环境配置
最好是新建一个虚环境,之前我配置了mamba、VMamba、vision Mamba的环境用起来都有一大堆报错,懒得去解决,以免解决后导致之前的项目又出问题。
1.conda create -n mambavision python=3.102.conda install pytorch==2.4.0 torchvision==0.19.0 torchaudio==2.4.0  pytorch-cuda=11.8 -c pytorch -c nvidia3.下载causal_conv1d:https://github.com/Dao-AILab/causal-conv1d/releases
causal_conv1d-1.4.0+cu118torch2.4cxx11abiFALSE-cp310-cp310-linux_x86_64.whl
pip install causal_conv1d-1.4.0+cu118torch2.4cxx11abiFALSE-cp310-cp310-linux_x86_64.whl4.下载 Mamba-ssmm https://github.com/state-spaces/mamba/releases/tag/v1.2.2
pip install mamba_ssm-1.2.2+cu118torch2.4cxx11abiFALSE-cp310-cp310-linux_x86_64.whl5.安装timm
pip install timm
测试模型在环境下是否工作正常
import torch
from timm.models import create_model, load_checkpoint
import argparse
import warningswarnings.filterwarnings("ignore")parser = argparse.ArgumentParser()
parser.add_argument('--model', '-m', metavar='NAME', default='mamba_vision_T', help='model architecture (default: mamba_vision_T)')
parser.add_argument('--checkpoint', default='', type=str, metavar='PATH',help='path to latest checkpoint (default: none)')
parser.add_argument('--use_pip', action='store_true', default=False, help='to use pip package')
args = parser.parse_args()# Define mamba_vision_T model with 224 x 224 resolutionif args.use_pip:from mambavision import create_modelmodel = create_model(args.model, pretrained=True, model_path="/tmp/mambavision_tiny_1k.pth.tar")
else:from models.mamba_vision import *model = create_model(args.model) if args.checkpoint:load_checkpoint(model, args.checkpoint, None)print('{} model succesfully created !'.format(args.model))image = torch.rand(1, 3, 754, 234).cuda() # place image on cudamodel = model.cuda() # place model on cudaoutput = model(image) # output logit size is [1, 1000]print(output.shape)
print('Inference succesfully completed on dummy input !')输出:
mamba_vision_T model succesfully created !
torch.Size([1, 1000])
Inference succesfully completed on dummy input !
3.模型代码详细注释
代码取自论文作者源码的modes/mamba_vision.py
从源码上看代码实现相比以往的视觉mamba而言简化很多
- window_partition:实现图像分块,直接reshape变形,没有像以往通过卷积来实现
- Downsample:用卷积实现,分辨率减半,通道数翻倍
- PatchEmbed:通过两次卷积将输入图像分辨率变为原来的 1 4 \frac{1}{4} 41,通道数转变为给定的dim参数(默认96),这种方式与以往的patch embedding方式实现也不一样
- ConvBlock:由两个卷积层组成的纯卷积块,添加了layer_scale和drop_path
- MambaVisionMixer:原始的mamba块
- Attention:实现了Transformer的self-attention部分
- Block:根据参数选择用Attention中的Transformer还是MambaVisionMixer中的Mamba
- MambaVisionLayer:构成每个阶段中每一层的具体块,根据conv参数确定是用ConvBlock还是Block中的Transformer或者Mamba
- MambaVision:最终的模型类。其中第0阶段和第1阶段用的是卷积,后面的阶段由MambaVisionLayer构成(阶段内部后半部分是transformer,见代码
transformer_blocks=list(range(depths[i]//2+1, depths[i])) if depths[i]%2!=0 else list(range(depths[i]//2, depths[i]))
def window_partition(x, window_size):"""Args:x: (B, C, H, W)window_size: window sizeh_w: Height of windoww_w: Width of windowReturns:local window features (num_windows*B, window_size*window_size, C)"""B, C, H, W = x.shapex = x.view(B, C, H // window_size, window_size, W // window_size, window_size)windows = x.permute(0, 2, 4, 3, 5, 1).reshape(-1, window_size*window_size, C)return windowsdef window_reverse(windows, window_size, H, W):"""Args:windows: local window features (num_windows*B, window_size, window_size, C)window_size: Window sizeH: Height of imageW: Width of imageReturns:x: (B, C, H, W)"""B = int(windows.shape[0] / (H * W / window_size / window_size))x = windows.reshape(B, H // window_size, W // window_size, window_size, window_size, -1)x = x.permute(0, 5, 1, 3, 2, 4).reshape(B,windows.shape[2], H, W)return xdef _load_state_dict(module, state_dict, strict=False, logger=None):"""Load state_dict to a module.This method is modified from :meth:`torch.nn.Module.load_state_dict`.Default value for ``strict`` is set to ``False`` and the message forparam mismatch will be shown even if strict is False.Args:module (Module): Module that receives the state_dict.state_dict (OrderedDict): Weights.strict (bool): whether to strictly enforce that the keysin :attr:`state_dict` match the keys returned by this module's:meth:`~torch.nn.Module.state_dict` function. Default: ``False``.logger (:obj:`logging.Logger`, optional): Logger to log the errormessage. If not specified, print function will be used."""# 定义一个函数,用于将状态字典(state_dict)加载到指定的模块(module)中# 这个函数修改自torch.nn.Module.load_state_dict方法# 默认情况下,strict参数设置为False,即使strict为False,也会显示参数不匹配的消息# 参数说明:# module (Module): 接收状态字典的模块# state_dict (OrderedDict): 权重字典# strict (bool): 是否严格确保state_dict中的键与模块state_dict函数返回的键匹配,默认为False# logger (logging.Logger, 可选): 记录错误信息的日志器,如果没有指定,则使用print函数unexpected_keys = [] # 用于存储状态字典中多余的键all_missing_keys = [] # 用于存储状态字典中缺失的键err_msg = [] # 用于存储错误信息# 获取状态字典的元数据metadata = getattr(state_dict, '_metadata', None)state_dict = state_dict.copy() # 复制状态字典以避免修改原始字典if metadata is not None:state_dict._metadata = metadata # 如果有元数据,则复制元数据def load(module, prefix=''):# 定义一个内部函数,用于递归加载模块的状态字典local_metadata = {} if metadata is None else metadata.get(prefix[:-1], {}) # 获取当前模块的元数据module._load_from_state_dict(state_dict, prefix, local_metadata, True,all_missing_keys, unexpected_keys,err_msg) # 加载当前模块的状态字典for name, child in module._modules.items(): # 递归加载子模块的状态字典if child is not None:load(child, prefix + name + '.')load(module) # 调用内部函数开始加载状态字典load = None # 加载完成后,将内部函数设置为None,避免后续调用# 过滤掉num_batches_tracked相关的缺失键,因为这些键通常不是模型的关键部分missing_keys = [key for key in all_missing_keys if 'num_batches_tracked' not in key]# 如果有多余的键,则添加错误信息if unexpected_keys:err_msg.append('unexpected key in source 'f'state_dict: {", ".join(unexpected_keys)}\n')# 如果有缺失的键,则添加错误信息if missing_keys:err_msg.append(f'missing keys in source state_dict: {", ".join(missing_keys)}\n')# 如果有错误信息,则组合错误信息并根据strict参数和logger参数决定如何处理if len(err_msg) > 0:err_msg.insert(0, 'The model and loaded state dict do not match exactly\n')err_msg = '\n'.join(err_msg) # 组合所有错误信息if strict: # 如果strict为True,则抛出异常raise RuntimeError(err_msg)elif logger is not None: # 如果有logger,则使用logger记录错误信息logger.warning(err_msg)else:print(err_msg) # 如果没有logger,则使用print函数打印错误信息def _load_checkpoint(model,filename,map_location='cpu',strict=False,logger=None):"""Load checkpoint from a file or URI.Args:model (Module): Module to load checkpoint.filename (str): Accept local filepath, URL, ``torchvision://xxx``,``open-mmlab://xxx``. Please refer to ``docs/model_zoo.md`` fordetails.map_location (str): Same as :func:`torch.load`.strict (bool): Whether to allow different params for the model andcheckpoint.logger (:mod:`logging.Logger` or None): The logger for error message.Returns:dict or OrderedDict: The loaded checkpoint."""checkpoint = torch.load(filename, map_location=map_location)if not isinstance(checkpoint, dict):raise RuntimeError(f'No state_dict found in checkpoint file {filename}')if 'state_dict' in checkpoint:state_dict = checkpoint['state_dict']elif 'model' in checkpoint:state_dict = checkpoint['model']else:state_dict = checkpointif list(state_dict.keys())[0].startswith('module.'):state_dict = {k[7:]: v for k, v in state_dict.items()}if sorted(list(state_dict.keys()))[0].startswith('encoder'):state_dict = {k.replace('encoder.', ''): v for k, v in state_dict.items() if k.startswith('encoder.')}_load_state_dict(model, state_dict, strict, logger)return checkpointclass Downsample(nn.Module):"""Down-sampling block"下采样模块。"""def __init__(self,dim,keep_dim=False,):"""Args:dim: feature size dimension.norm_layer: normalization layer.keep_dim: bool argument for maintaining the resolution.参数:dim (int): 输入特征的维度。keep_dim (bool): 是否保持维度不变。如果为True,则输出维度与输入维度相同;如果为False,则输出维度是输入维度的两倍。"""super().__init__()if keep_dim:dim_out = dimelse:dim_out = 2 * dimself.reduction = nn.Sequential(nn.Conv2d(dim, dim_out, 3, 2, 1, bias=False),)def forward(self, x):x = self.reduction(x)return xclass PatchEmbed(nn.Module):"""Patch embedding block""""def __init__(self, in_chans=3, in_dim=64, dim=96):"""Args:in_chans: number of input channels.dim: feature size dimension."""# in_dim = 1super().__init__()self.proj = nn.Identity()self.conv_down = nn.Sequential(nn.Conv2d(in_chans, in_dim, 3, 2, 1, bias=False),nn.BatchNorm2d(in_dim, eps=1e-4),nn.ReLU(),nn.Conv2d(in_dim, dim, 3, 2, 1, bias=False),nn.BatchNorm2d(dim, eps=1e-4),nn.ReLU())def forward(self, x):x = self.proj(x)x = self.conv_down(x)return xclass ConvBlock(nn.Module):"""卷积块。这个类定义了一个包含两个卷积层的神经网络模块,通常用于深度学习中的图像处理任务。该模块还包括批量归一化、激活函数和可选的层缩放(layer scaling)。Attributes:conv1 (nn.Conv2d): 第一个卷积层。norm1 (nn.BatchNorm2d): 第一个批量归一化层。act1 (nn.GELU): 第一个激活函数,使用GELU。conv2 (nn.Conv2d): 第二个卷积层。norm2 (nn.BatchNorm2d): 第二个批量归一化层。gamma (nn.Parameter): 层缩放参数,如果layer_scale为True,则使用。drop_path (nn.Module): 随机丢弃路径,用于训练时的正则化。"""def __init__(self, dim,drop_path=0.,layer_scale=None,kernel_size=3):super().__init__()self.conv1 = nn.Conv2d(dim, dim, kernel_size=kernel_size, stride=1, padding=1)self.norm1 = nn.BatchNorm2d(dim, eps=1e-5)self.act1 = nn.GELU(approximate= 'tanh') # 激活函数,使用GELU的近似实现self.conv2 = nn.Conv2d(dim, dim, kernel_size=kernel_size, stride=1, padding=1)self.norm2 = nn.BatchNorm2d(dim, eps=1e-5)self.layer_scale = layer_scale# 如果layer_scale不为None且为数字类型if layer_scale is not None and type(layer_scale) in [int, float]:# 初始化层缩放参数self.gamma = nn.Parameter(layer_scale * torch.ones(dim))# 设置layer_scale为Trueself.layer_scale = Trueelse:self.layer_scale = Falseself.drop_path = DropPath(drop_path) if drop_path > 0. else nn.Identity()def forward(self, x):input = xx = self.conv1(x)x = self.norm1(x)x = self.act1(x)x = self.conv2(x)x = self.norm2(x)if self.layer_scale: # 层缩放x = x * self.gamma.view(1, -1, 1, 1)x = input + self.drop_path(x) # 残差连接和随机丢弃路径return xclass MambaVisionMixer(nn.Module):"""MambaVisionMixer是一个神经网络模块,它结合了Transformer和卷积网络的特点,用于处理序列数据。它通过将输入数据投影到一个高维空间,然后应用一系列的卷积和注意力机制,最后将结果投影回原始空间。"""def __init__(self,d_model,d_state=16,d_conv=4,expand=2,dt_rank="auto",dt_min=0.001,dt_max=0.1,dt_init="random",dt_scale=1.0,dt_init_floor=1e-4,conv_bias=True,bias=False,use_fast_path=True,layer_idx=None,device=None,dtype=None,):# 初始化一些基本参数和设备信息factory_kwargs = {"device": device, "dtype": dtype}super().__init__()# 模型的维度参数self.d_model = d_modelself.d_state = d_stateself.d_conv = d_convself.expand = expand# 扩展后的内部维度self.d_inner = int(self.expand * self.d_model)# 确定时间步(dt)的秩,自动计算或者用户指定self.dt_rank = math.ceil(self.d_model / 16) if dt_rank == "auto" else dt_rankself.use_fast_path = use_fast_pathself.layer_idx = layer_idx# 输入投影,将输入投影到一个高维空间self.in_proj = nn.Linear(self.d_model, self.d_inner, bias=bias, **factory_kwargs)# x_proj用于计算时间步和状态参数self.x_proj = nn.Linear(self.d_inner//2, self.dt_rank + self.d_state * 2, bias=False, **factory_kwargs)# dt_proj用于从时间步投影回高维空间self.dt_proj = nn.Linear(self.dt_rank, self.d_inner//2, bias=True, **factory_kwargs)# 根据初始化类型初始化权重dt_init_std = self.dt_rank**-0.5 * dt_scaleif dt_init == "constant":nn.init.constant_(self.dt_proj.weight, dt_init_std)elif dt_init == "random":nn.init.uniform_(self.dt_proj.weight, -dt_init_std, dt_init_std)else:raise NotImplementedError# 初始化时间步(dt)并进行指数映射dt = torch.exp(torch.rand(self.d_inner//2, **factory_kwargs) * (math.log(dt_max) - math.log(dt_min))+ math.log(dt_min)).clamp(min=dt_init_floor)# 计算反向时间步(inv_dt),并在没有梯度的情况下复制到dt_proj的偏置项中inv_dt = dt + torch.log(-torch.expm1(-dt))with torch.no_grad():self.dt_proj.bias.copy_(inv_dt)self.dt_proj.bias._no_reinit = True# 创建参数AA = repeat(torch.arange(1, self.d_state + 1, dtype=torch.float32, device=device),"n -> d n",d=self.d_inner//2,).contiguous()# 创建参数A,表示状态的顺序A_log = torch.log(A)self.A_log = nn.Parameter(A_log)self.A_log._no_weight_decay = True# 初始化D参数,用于控制输出self.D = nn.Parameter(torch.ones(self.d_inner//2, device=device))self.D._no_weight_decay = Trueself.out_proj = nn.Linear(self.d_inner, self.d_model, bias=bias, **factory_kwargs)# 定义两个卷积层用于处理x和zself.conv1d_x = nn.Conv1d(in_channels=self.d_inner//2,out_channels=self.d_inner//2,bias=conv_bias//2,kernel_size=d_conv,groups=self.d_inner//2,**factory_kwargs,)self.conv1d_z = nn.Conv1d(in_channels=self.d_inner//2,out_channels=self.d_inner//2,bias=conv_bias//2,kernel_size=d_conv,groups=self.d_inner//2,**factory_kwargs,)def forward(self, hidden_states):"""前向传播函数参数:hidden_states: (B, L, D) 表示输入的批次大小、序列长度和特征维度返回:与输入形状相同的输出 (B, L, D)"""# 获取输入张量的形状信息_, seqlen, _ = hidden_states.shape# 将输入投影到高维xz = self.in_proj(hidden_states)# 调整维度以适应卷积操作xz = rearrange(xz, "b l d -> b d l")# 将投影后的结果分成x和z两部分x, z = xz.chunk(2, dim=1)# 计算A参数,负指数映射A = -torch.exp(self.A_log.float())# 对x和z分别应用激活函数和卷积操作x = F.silu(F.conv1d(input=x, weight=self.conv1d_x.weight, bias=self.conv1d_x.bias, padding='same', groups=self.d_inner//2))z = F.silu(F.conv1d(input=z, weight=self.conv1d_z.weight, bias=self.conv1d_z.bias, padding='same', groups=self.d_inner//2))# 对x进行投影,得到时间步(dt)、状态B和Cx_dbl = self.x_proj(rearrange(x, "b d l -> (b l) d"))dt, B, C = torch.split(x_dbl, [self.dt_rank, self.d_state, self.d_state], dim=-1)# 将dt投影回原始维度dt = rearrange(self.dt_proj(dt), "(b l) d -> b d l", l=seqlen)# 调整B和C的形状以进行后续操作B = rearrange(B, "(b l) dstate -> b dstate l", l=seqlen).contiguous()C = rearrange(C, "(b l) dstate -> b dstate l", l=seqlen).contiguous()# 使用选择性的扫描函数对x进行处理y = selective_scan_fn(x,dt,A,B,C,self.D.float(),z=None,delta_bias=self.dt_proj.bias.float(),delta_softplus=True,return_last_state=None)# 将y和z沿着特征维度拼接y = torch.cat([y, z], dim=1)# 调整输出形状y = rearrange(y, "b d l -> b l d")# 将结果投影回原始空间out = self.out_proj(y)return outclass Attention(nn.Module):"""注意力模块。这个类定义了一个自注意力(Self-Attention)机制的实现,它允许模型在序列的不同位置关注不同的信息。自注意力机制是Transformer架构中的关键组件。Attributes:num_heads (int): 注意力头的数量。head_dim (int): 每个注意力头的维度。scale (float): 缩放因子,用于缩放点积注意力的输出。qkv (nn.Linear): 线性层,用于计算查询(Q)、键(K)和值(V)。q_norm (nn.LayerNorm or nn.Identity): 应用于查询的归一化层。k_norm (nn.LayerNorm or nn.Identity): 应用于键的归一化层。attn_drop (nn.Dropout): 注意力权重的dropout层。proj (nn.Linear): 线性层,用于将注意力的输出投影回原始空间。proj_drop (nn.Dropout): 输出的dropout层。"""def __init__(self,dim,num_heads=8,qkv_bias=False,qk_norm=False,attn_drop=0.,proj_drop=0.,norm_layer=nn.LayerNorm,):super().__init__()# 确保维度可以被注意力头数整除assert dim % num_heads == 0self.num_heads = num_headsself.head_dim = dim // num_headsself.scale = self.head_dim ** -0.5self.fused_attn = True# 计算Q、K、V的线性层self.qkv = nn.Linear(dim, dim * 3, bias=qkv_bias)self.q_norm = norm_layer(self.head_dim) if qk_norm else nn.Identity()self.k_norm = norm_layer(self.head_dim) if qk_norm else nn.Identity()self.attn_drop = nn.Dropout(attn_drop)self.proj = nn.Linear(dim, dim)self.proj_drop = nn.Dropout(proj_drop)def forward(self, x):"""前向传播方法。通过注意力模块对输入特征进行处理。参数:x (Tensor): 输入特征,形状为(B, N, C),其中B是批次大小,N是序列长度,C是特征维度。返回:Tensor: 输出特征,形状与输入相同。"""B, N, C = x.shape# 计算Q、K、V并重排qkv = self.qkv(x).reshape(B, N, 3, self.num_heads, self.head_dim).permute(2, 0, 3, 1, 4)# 分割Q、K、Vq, k, v = qkv.unbind(0)# 对Q、K进行归一化q, k = self.q_norm(q), self.k_norm(k)if self.fused_attn: # 如果使用融合的注意力计算# 就是缩放点积注意力,只是这个是Pytorch框架提供的# else分支的是自己实现的x = F.scaled_dot_product_attention(q, k, v,dropout_p=self.attn_drop.p,)else: # 如果不使用融合的注意力计算,就是最原始的self-attentionq = q * self.scale # 计算注意力权重attn = q @ k.transpose(-2, -1) # 归一化注意力权重attn = attn.softmax(dim=-1) # 对注意力权重进行dropoutattn = self.attn_drop(attn) # 计算注意力输出x = attn @ v # 计算注意力输出x = x.transpose(1, 2).reshape(B, N, C) # 重排和重塑输出x = self.proj(x) # 输出投影x = self.proj_drop(x) # 对输出进行dropoutreturn xclass Block(nn.Module):"""模型基本块,根据counter值确定用transformer还是Mamba。这个类定义了一个Transformer块,它结合了自注意力机制和多层感知机(MLP),用于处理序列数据。该块可以用于构建Transformer模型的各种变体。Attributes:norm1 (nn.Module): 第一个归一化层。mixer (nn.Module): 自注意力或MambaVisionMixer模块,用于处理输入数据。drop_path (nn.Module): DropPath正则化层。norm2 (nn.Module): 第二个归一化层。mlp (nn.Module): 多层感知机模块,用于处理输入数据。gamma_1 (nn.Parameter or float): 第一个层缩放参数。gamma_2 (nn.Parameter or float): 第二个层缩放参数。"""def __init__(self, dim, num_heads, counter, transformer_blocks, mlp_ratio=4., qkv_bias=False, qk_scale=False, drop=0., attn_drop=0.,drop_path=0., act_layer=nn.GELU, norm_layer=nn.LayerNorm, Mlp_block=Mlp,layer_scale=None,):super().__init__()self.norm1 = norm_layer(dim)# 根据计数器和Transformer块的列表决定使用自注意力# 还是MambaVisionMixerif counter in transformer_blocks:self.mixer = Attention(dim,num_heads=num_heads,qkv_bias=qkv_bias,qk_norm=qk_scale,attn_drop=attn_drop,proj_drop=drop,norm_layer=norm_layer,)else:self.mixer = MambaVisionMixer(d_model=dim, d_state=8, d_conv=3, expand=1)# DropPath正则化层self.drop_path = DropPath(drop_path) if drop_path > 0. else nn.Identity()self.norm2 = norm_layer(dim)# 计算MLP的隐藏层维度mlp_hidden_dim = int(dim * mlp_ratio)self.mlp = Mlp_block(in_features=dim, hidden_features=mlp_hidden_dim, act_layer=act_layer, drop=drop)# 判断是否使用层缩放use_layer_scale = layer_scale is not None and type(layer_scale) in [int, float]# 第一个层缩放参数self.gamma_1 = nn.Parameter(layer_scale * torch.ones(dim)) if use_layer_scale else 1# 第二个层缩放参数self.gamma_2 = nn.Parameter(layer_scale * torch.ones(dim)) if use_layer_scale else 1def forward(self, x):# 第一个分支:自注意力或MambaVisionMixer + DropPath + 层缩放x = x + self.drop_path(self.gamma_1 * self.mixer(self.norm1(x)))# 第二个分支:MLP + DropPath + 层缩放x = x + self.drop_path(self.gamma_2 * self.mlp(self.norm2(x)))return xclass MambaVisionLayer(nn.Module):"""MambaVision层。这个类定义了一个MambaVision层,它结合了卷积块和Transformer块,用于处理图像或特征图数据。该层可以用于构建MambaVision模型的不同阶段。Attributes:conv (bool): 是否使用卷积块。transformer_block (bool): 是否使用Transformer块。blocks (nn.ModuleList): 包含卷积块或Transformer块的列表。downsample (nn.Module or None): 下采样模块,如果不需要下采样则为None。do_gt (bool): 是否进行全局池化,目前未用。window_size (int): 窗口大小。"""def __init__(self,dim,depth,num_heads,window_size,conv=False,downsample=True,mlp_ratio=4.,qkv_bias=True,qk_scale=None,drop=0.,attn_drop=0.,drop_path=0.,layer_scale=None,layer_scale_conv=None,transformer_blocks = [],):"""初始化MambaVision层。参数:dim (int): 输入数据的维度。depth (int): 每个阶段的层数。num_heads (int): 每个阶段的注意力头数。window_size (int): 每个阶段的窗口大小。conv (bool): 是否使用卷积块,默认为False。downsample (bool): 是否进行下采样,默认为True。mlp_ratio (float): MLP的隐藏层维度与输入维度的比率,默认为4.0。qkv_bias (bool): 是否在QKV线性层中使用偏置项,默认为True。qk_scale (bool): 是否对QKV进行缩放,默认为None。drop (float): dropout概率,默认为0.0。attn_drop (float): 注意力权重的dropout概率,默认为0.0。drop_path (float or list): DropPath正则化的概率,默认为0.0。layer_scale (float or None): 层缩放的缩放因子,默认为None。layer_scale_conv (float or None): 卷积层缩放的缩放因子,默认为None。transformer_blocks (list): 包含Transformer块的列表,默认为空。"""super().__init__()self.conv = convself.transformer_block = Falseif conv: # 如果使用卷积块,则创建一个卷积块列表self.blocks = nn.ModuleList([ConvBlock(dim=dim,drop_path=drop_path[i] if isinstance(drop_path, list) else drop_path,layer_scale=layer_scale_conv)for i in range(depth)])self.transformer_block = Falseelse: # 如果不使用卷积块,则创建一个Transformer和mamba混合块列表self.blocks = nn.ModuleList([Block(dim=dim,counter=i, transformer_blocks=transformer_blocks,num_heads=num_heads,mlp_ratio=mlp_ratio,qkv_bias=qkv_bias,qk_scale=qk_scale,drop=drop,attn_drop=attn_drop,drop_path=drop_path[i] if isinstance(drop_path, list) else drop_path,layer_scale=layer_scale)for i in range(depth)])self.transformer_block = True# 如果需要下采样,则创建一个下采样模块self.downsample = None if not downsample else Downsample(dim=dim)self.do_gt = False # 目前未使用self.window_size = window_size # 窗口大小def forward(self, x):_, _, H, W = x.shape # 获取输入特征的维度if self.transformer_block:# 如果使用Transformer块,则进行窗口划分pad_r = (self.window_size - W % self.window_size) % self.window_sizepad_b = (self.window_size - H % self.window_size) % self.window_sizeif pad_r > 0 or pad_b > 0:# 如果需要,则对输入特征进行填充# (padding_left, padding_right, padding_top, padding_bottom)x = torch.nn.functional.pad(x, (0,pad_r,0,pad_b))_, _, Hp, Wp = x.shapeelse:Hp, Wp = H, W# 进行窗口划分# ->(num_windows*B, window_size*window_size, C)x = window_partition(x, self.window_size)# 遍历每个块,并对输入特征进行处理for _, blk in enumerate(self.blocks):x = blk(x)if self.transformer_block:# 如果使用Transformer块,则进行窗口反向x = window_reverse(x, self.window_size, Hp, Wp)if pad_r > 0 or pad_b > 0:# 如果需要,则去除填充x = x[:, :, :H, :W].contiguous()if self.downsample is None:return x # 如果不需要下采样,则返回输出特征return self.downsample(x) # 如果需要下采样,则进行下采样并返回输出特征class MambaVision(nn.Module):"""MambaVision模型。这是一个深度学习模型,用于处理图像数据,通常用于图像分类任务。模型结合了卷积层和Transformer架构的特点,通过多个阶段的处理来提取图像特征。Attributes:num_classes (int): 类别数。patch_embed (PatchEmbed): 补丁嵌入模块,用于将输入图像划分为补丁并进行嵌入。levels (nn.ModuleList): 包含多个MambaVisionLayer的列表,每个阶段一个。norm (nn.BatchNorm2d): 批量归一化层。avgpool (nn.AdaptiveAvgPool2d): 自适应平均池化层。head (nn.Linear or nn.Identity): 输出层,如果num_classes大于0,则为线性层,否则为恒等映射。"""def __init__(self,dim,in_dim,depths,window_size,mlp_ratio,num_heads,drop_path_rate=0.2,in_chans=3,num_classes=1000,qkv_bias=True,qk_scale=None,drop_rate=0.,attn_drop_rate=0.,layer_scale=None,layer_scale_conv=None,**kwargs):"""初始化MambaVision模型。参数:dim (int): 特征维度。in_dim (int): 输入维度。depths (list): 每个阶段的层数。window_size (list): 每个阶段的窗口大小。mlp_ratio (float): MLP比率。num_heads (list): 每个阶段的注意力头数。drop_path_rate (float): DropPath比率,默认为0.2。in_chans (int): 输入通道数,默认为3。num_classes (int): 类别数,默认为1000。qkv_bias (bool): 是否使用QKV偏置,默认为True。qk_scale (bool): 是否对QK进行缩放,默认为None。drop_rate (float): Dropout比率,默认为0.0。attn_drop_rate (float): 注意力Dropout比率,默认为0.0。layer_scale (float or None): 层缩放系数,默认为None。layer_scale_conv (float or None): 卷积层缩放系数,默认为None。"""super().__init__()num_features = int(dim * 2 ** (len(depths) - 1))self.num_classes = num_classes# 补丁嵌入模块self.patch_embed = PatchEmbed(in_chans=in_chans, in_dim=in_dim, dim=dim)# 计算DropPath比率dpr = [x.item() for x in torch.linspace(0, drop_path_rate, sum(depths))]self.levels = nn.ModuleList() # 创建一个模块列表来存储每个阶段for i in range(len(depths)):# 第一和第二阶段使用卷积conv = True if (i == 0 or i == 1) else Falselevel = MambaVisionLayer(dim=int(dim * 2 ** i),depth=depths[i],num_heads=num_heads[i],window_size=window_size[i],mlp_ratio=mlp_ratio,qkv_bias=qkv_bias,qk_scale=qk_scale,conv=conv,drop=drop_rate,attn_drop=attn_drop_rate,drop_path=dpr[sum(depths[:i]):sum(depths[:i + 1])],downsample=(i < 3),layer_scale=layer_scale,layer_scale_conv=layer_scale_conv,transformer_blocks=list(range(depths[i]//2+1, depths[i])) if depths[i]%2!=0 else list(range(depths[i]//2, depths[i])),) # 每个阶段的后半部分使用transformer blocksself.levels.append(level)self.norm = nn.BatchNorm2d(num_features)self.avgpool = nn.AdaptiveAvgPool2d(1)self.head = nn.Linear(num_features, num_classes) if num_classes > 0 else nn.Identity()self.apply(self._init_weights)def _init_weights(self, m):if isinstance(m, nn.Linear):trunc_normal_(m.weight, std=.02)if isinstance(m, nn.Linear) and m.bias is not None:nn.init.constant_(m.bias, 0)elif isinstance(m, nn.LayerNorm):nn.init.constant_(m.bias, 0)nn.init.constant_(m.weight, 1.0)elif isinstance(m, LayerNorm2d):nn.init.constant_(m.bias, 0)nn.init.constant_(m.weight, 1.0)elif isinstance(m, nn.BatchNorm2d):nn.init.ones_(m.weight)nn.init.zeros_(m.bias)@torch.jit.ignoredef no_weight_decay_keywords(self):return {'rpb'}def forward_features(self, x):x = self.patch_embed(x)for level in self.levels:x = level(x)x = self.norm(x)x = self.avgpool(x)x = torch.flatten(x, 1)return xdef forward(self, x):x = self.forward_features(x)x = self.head(x)return xdef _load_state_dict(self, pretrained, strict: bool = False):_load_checkpoint(self, pretrained, strict=strict)

)


)


)


)
NNLM → Word2Vec)

)

