但凡 Java 程序,想必就是 Spring 程序;但凡 Spring 程序,想必就是 SpringBoot 程序——且慢,当今尚有不是 SpringBoot 即 SpringMVC 的程序不?有——老旧的遗留系统不就是嘛~——不,其实只要稍加“调教”,SpringMVC 即可原地变为非常近似 SpringBoot 的形态,——不信?且待笔者慢慢道来。
早在若干年前笔者已经热衷于无 XML 文件配置 SpringMVC,全部用注解来配置(参见博文)。不过仍然依赖独立 Tomcat 来运行。后来笔者更进一步,成功使用嵌入式的 Tomcat 来运行,使之形态更相似 SpringBoot,参见博文《轻量级仿 Spring Boot=嵌入式 Tomcat+Spring MVC》。当前方案在多个现实中项目中使用,可以说跟 SpringBoot 非常相似了。最近笔者比较有时间,于是重构了这个技术点,独立发布一个工程在 Github 上,并发布 Maven 中央库,同时也想回顾一下个中的原理。
这个技术点取名 lightweight-springboot,开源,可通过 Maven 依赖到你的项目中启动,与 SpringBoot 用法大体一致。
安装与使用
安装 lightweight-springboot
源码:https://github.com/lightweight-component/aj-lightweight-springboot。
Java Documents: https://dev.ajaxjs.com/docs/javadoc/aj-lightweight-springboot/。
需要 Java 1.8+, Maven:
<dependency><groupId>com.ajaxjs</groupId><artifactId>aj-lightweight-springboot</artifactId><version>1.1</version>
</dependency>
使用方式
在资源目录中安排 application.yml 文件,内容如下:
server:port: 8888 # 端口号context-path: /foo # 项目名,如果不设定,默认是 /localFileUpload: true # 是否支持本地文件上传
代码结构按照惯常开发的模式即可。必须要有启动类和相关的配置类。
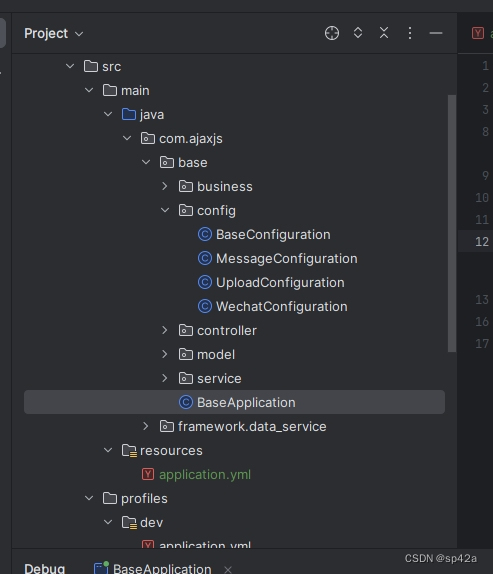
启动的main()函数内的start()必须传入配置类参数;指定@ComponentScan扫描包的范围。
import com.ajaxjs.framework.embeded_tomcat.BaseWebMvcConfigure;
import com.ajaxjs.framework.embeded_tomcat.EmbeddedTomcatStarter;
import org.springframework.context.annotation.ComponentScan;
import org.springframework.context.annotation.Configuration;
import org.springframework.web.servlet.config.annotation.EnableWebMvc;@Configuration
@EnableWebMvc
@ComponentScan({"com.ajaxjs.base", "com.ajaxjs.framework.data_service"})
public class BaseApplication extends BaseWebMvcConfigure {public static void main(String[] args) {EmbeddedTomcatStarter.start(BaseApplication.class); // BaseApplication 为配置类}
}
BaseApplication 配置类,配置数据库、注入依赖组件等等,如下例。
import com.ajaxjs.data.jdbc_helper.JdbcConn;
import com.ajaxjs.data.jdbc_helper.JdbcWriter;
import com.ajaxjs.iam.resource_server.UserInterceptor;
import com.ajaxjs.util.logger.LogHelper;
import org.springframework.beans.factory.annotation.Value;
import org.springframework.beans.factory.config.ConfigurableBeanFactory;
import org.springframework.context.annotation.Bean;
import org.springframework.context.annotation.Configuration;
import org.springframework.context.annotation.Scope;
import org.springframework.util.StringUtils;
import org.springframework.web.servlet.config.annotation.CorsRegistry;
import org.springframework.web.servlet.config.annotation.InterceptorRegistration;
import org.springframework.web.servlet.config.annotation.InterceptorRegistry;
import org.springframework.web.servlet.config.annotation.WebMvcConfigurer;import javax.sql.DataSource;/*** 程序配置*/
@Configuration
public class BaseConfiguration implements WebMvcConfigurer {@Value("${db.url}")private String url;@Value("${db.user}")private String user;@Value("${db.psw}")private String psw;@Bean(value = "dataSource", destroyMethod = "close")DataSource getDs() {return JdbcConn.setupJdbcPool("com.mysql.cj.jdbc.Driver", url, user, psw);}
}
Demo 程序
为方便大家观摩了解,可以第一时间领略该项目,笔者准备了一个现成的演示程序,也可以作为创建程序的样板或者说“脚手架(Scaffolding)”,开发者可以在此基础上进行进一步的开发,而不必从头开始编写所有的代码。
https://github.com/lightweight-component/aj-framework-demo-service
启动流程
加载配置
当执行 Java 程序的main()函数时候,lightweight-springboot 会执行什么呢?首先是加载 yaml 配置文件,参见EmbeddedTomcatStarter类下面的start()方法。
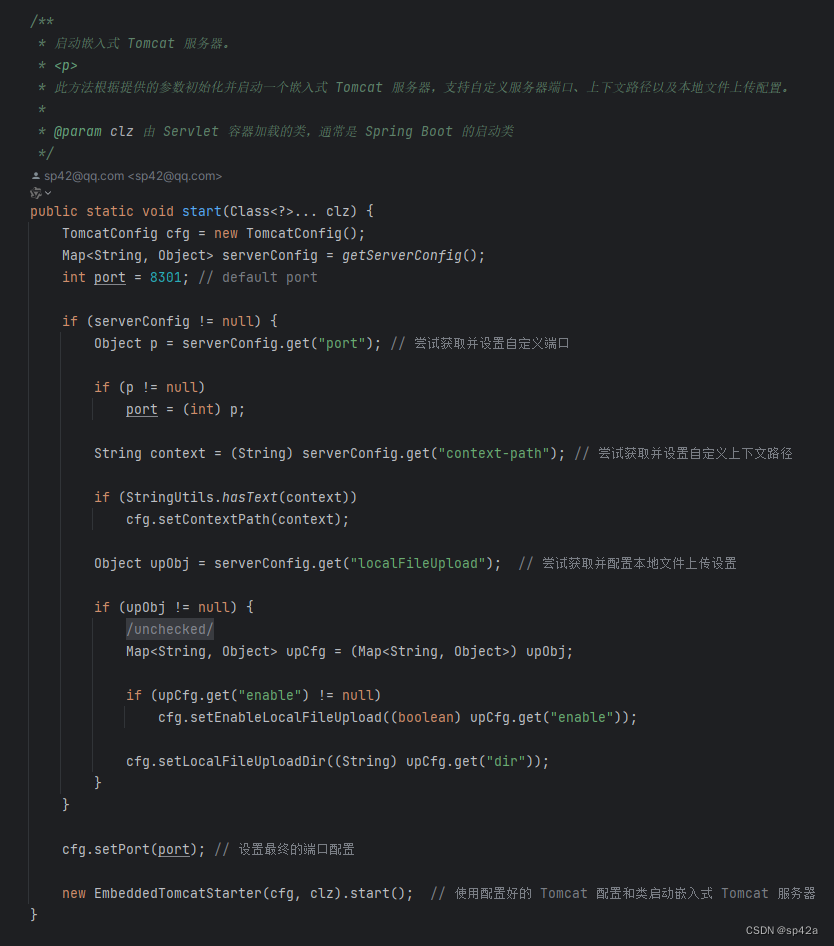
解析 yaml 借助第三方组件 Snakeyaml,它手动加载配置的方法如下:
/*** 从类路径下的 application.yml 文件中获取服务器配置。** @return 服务器配置的 Map 对象,如果文件不存在或读取失败,则返回null*/
@SuppressWarnings("unchecked")
static Map<String, Object> getServerConfig() {ClassPathResource resource = new ClassPathResource("application.yml");if (!resource.exists())return null;try {Map<String, Object> yamlMap = new Yaml().load(resource.getInputStream());return (Map<String, Object>) yamlMap.get("server");} catch (IOException e) {throw new RuntimeException(e);}
}
配置都返回为 Map,这就非常好用了。
初始化 Tomcat 对象
得到配置后就创建EmbeddedTomcatStarter实例并执行start(),包含以下流程:
initTomcat();
initConnector();
initContext();
runTomcat();
主要围绕 Tomcat 进行配置和启动。这里和 SpringBoot 不同:SpringBootmain()函数执行后,是先启动 Spring 自身的各项功能,几乎最后才启动 Web 容器的(如 Tomcat)。lightweight-springboot 则是先启动 Tomcat 再通知 Spring 初始化,与原来的 SpringMVC 启动方式差不多,也就是把原来webx.xml里面的配置,改为 Java 语言命令语句(Programmatically)去调用。当然,你必须了解 Tomcat 的 API 怎么调用才行。
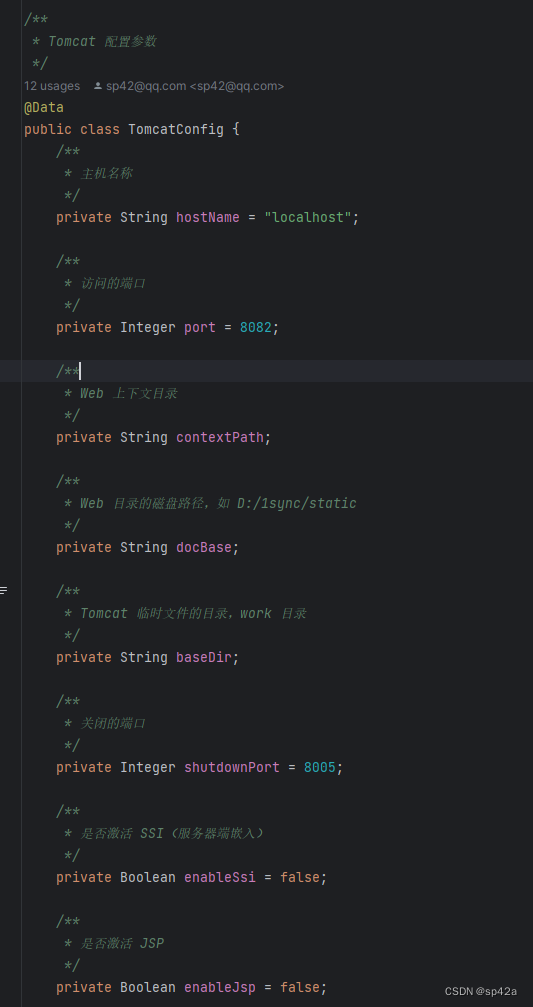
Web 容器的一般配置,无非端口、ContextPath、BaseDir 诸如此类的配置,我们安排了一个 POJO TomcatConfig来管理这些配置。
Tomcat Connector
另外是对 Tomcat Connector 的配置。Tomcat Connector 是 Tomcat 服务器中负责接收请求、处理协议、与 Servlet 容器交互的桥梁,是 Tomcat 架构中的重要组成部分。通过合理配置和优化 Connector,可以改善 Web 程序并发、线程等的问题。另外还有用于监控的 JMX 也是通过 Connector 来配置的。
Tomcat Context
接着对 Tomcat Context 的配置。Tomcat Context 是 Tomcat 服务器中用于定义特定 Web 应用程序的环境和配置的组件,为 Web 应用提供了一个隔离的环境,使得不同的 Web 应用可以在同一台服务器上独立运行,互不干扰。通过合理配置 Context,可以优化 Web 应用的性能和安全性。不过我们的程序一个 jar 包就是一个 context,不存在多个 context。
比较相关的是设置 JSP 页面。一般来讲此类的工程都不是为 Web 页面服务的,都是做 API 接口的,故所以一般不需要 JSP 表示层渲染,而且禁止 JSP 及其他资源的扫描(Servlet 3 的新特性),可以大大加快程序的启动。
启动 Tomcat
最后,执行runTomcat()启动 Tomcat。
启动 Spring
咦~上述过程怎么没有提及如何启动 Spring 的?稍安勿躁,这不就讲讲如何启动 Spring,它是专门规划到一个类EmbeddedTomcatStarter,上述的流程只是针对 Tomcat 的,是为TomcatStarter类,然后EmbeddedTomcatStarter继承于TomcatStarter,——这样规划比较清晰。
我们看看EmbeddedTomcatStarter.onContextReady()源码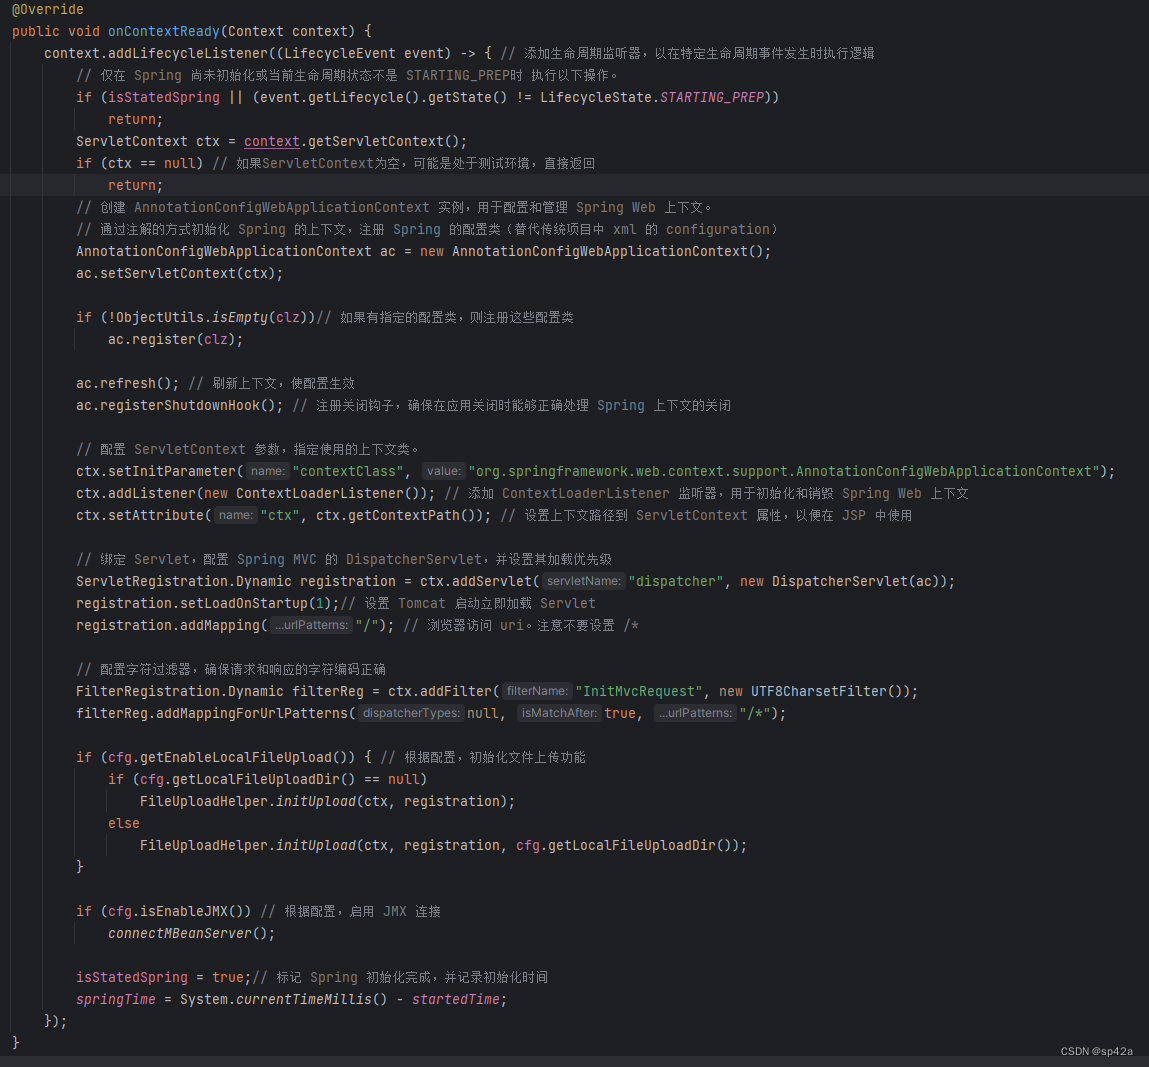
,
可见是在 Context 就绪之后才能初始化 Spring。之前笔者尝试不用异步/事件的方法调用,但结构上不太理想,还是按照 Tomcat API 标准的写法去弄。
注意这里的初始化 Spring 语句,其实与web.xml的非常像,就是换了个写法。这时org.springframework.web.context.support.AnnotationConfigWebApplicationContext会创建一个ApplicationContext,这是 Spring 应用程序的核心,用于管理所有的 Spring 组件。
此时,Spring 就进行其自身的相关初始化工作:首先遍历所有的 Bean 定义,包括 @Component、@Service、@Repository、@Controller 等注解的类,并将它们注册到 Spring 容器中;然后根据 Bean 定义创建 Bean 实例,并进行依赖注入;如果 Bean 实现了InitializingBean接口或通过@PostConstruct注解标记的方法,Spring 将调用这些方法进行初始化。最后注册所有的事件监听器,并在ApplicationContext初始化完成后触发ApplicationEvent。
// 配置 ServletContext 参数,指定使用的上下文类。
ctx.setInitParameter("contextClass", "org.springframework.web.context.support.AnnotationConfigWebApplicationContext");
ctx.addListener(new ContextLoaderListener()); // 添加 ContextLoaderListener 监听器,用于初始化和销毁 Spring Web 上下文
ctx.setAttribute("ctx", ctx.getContextPath()); // 设置上下文路径到 ServletContext 属性,以便在 JSP 中使用// 绑定 Servlet,配置 Spring MVC 的 DispatcherServlet,并设置其加载优先级
ServletRegistration.Dynamic registration = ctx.addServlet("dispatcher", new DispatcherServlet(ac));
registration.setLoadOnStartup(1);// 设置 Tomcat 启动立即加载 Servlet
registration.addMapping("/"); // 浏览器访问 uri。注意不要设置 /*// 配置字符过滤器,确保请求和响应的字符编码正确
FilterRegistration.Dynamic filterReg = ctx.addFilter("InitMvcRequest", new UTF8CharsetFilter());
filterReg.addMappingForUrlPatterns(null, true, "/*");
回到启动这里,值得一提的是下一步的绑定 Servlet:配置 SpringMVC 的 DispatcherServlet,并设置其加载优先级。我们知道,SpringMVC 是通过 DispatcherServlet 来分发处理请求,在 SpringBoot 出现之前,都是需要在web.xml里配置,来实现请求的拦截。
而在 Servlet 3.0 之后,规则中新增了 Dynamic Servlet、Dynamic Filter 这些概念, 可以在运行时动态添加/注册组件到 Context 中。这里就是 Dynamic Servlet、Dynamic Filter 的应用。
ServletContainerInitializer
上述过程是使用 Java 语言“硬编码”调用 Spring 的,其实还有一种方法只要配置不用编码就可以启动 Spring,那就是 SCI(ServletContainerInitializer)的应用。SCI 不是 Spring 的特性,而是 Servlet 3.0 标准的特性,用于接收 Web 应用在启动阶段通知的接口,再根据通知进行一些编程式的处理,比如触发 Spring 启动、动态注册Servlet、Filter 等。
也就是说,当你希望 WebApp 启动时候,也启动某些组件,就可以使用这个 SCI。组件具体可以是你的 jar 包。容器在启动应用的时候,会扫描当前应用每一个 jar 包里面META-INF/services/javax.servlet.ServletContainerInitializer指定的实现类,启动并运行这个实现类的onStartup方法。这种称为可插拔性(Pluggability)。
Jar 文件的 META-INF 中 services 中包含一个 SCI 的声明。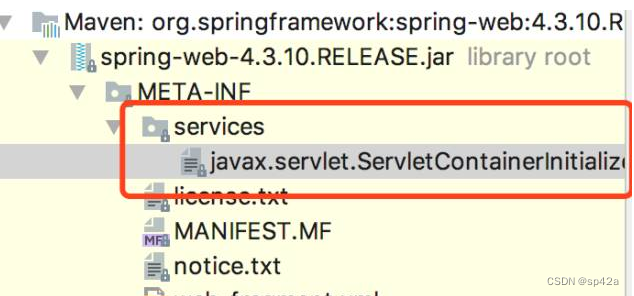
SpringBoot 也是这样被点燃的
public void onStartup(ServletContext servletContext) throws ServletException {this.logger = LogFactory.getLog(this.getClass());WebApplicationContext rootAppContext = this.createRootApplicationContext(servletContext);if(rootAppContext != null) {servletContext.addListener(new ContextLoaderListener(rootAppContext) {public void contextInitialized(ServletContextEvent event) {}});} else {this.logger.debug("No ContextLoaderListener registered, as createRootApplicationContext() did not return an application context");}}
参考文章:《Tomcat 是怎样处理 SpringBoot 应用的?》、《Tomcat 中的可插拔以及 SCI 的实现原理》。
SPI 机制
顺带说说与 SCI 相仿的 SPI。我们知道 SpringBoot 相较于 Spring 的一大特性就是自动装配,那么自动装配是怎么具体实现的呢?其实在实现自动装配上 SpringBoot 采用了多种方案结合的,比如基于 Spring 的扩展点的自动属性注入等,还有提供了一套 SPI 机制让程序自动可插拔的装配。
SPI(Service Provider Interface)是 JDK 内置的一种服务提供发现机制,可以用来启用框架扩展和替换组件,它允许开发者编写一个服务接口,然后通过在项目中使用服务提供者实现该接口的方式,实现对应的服务功能。
SPI 机制通过在 Classpath 中的META-INF/services目录下,创建以服务接口全限定名命名的文件,文件的内容为实现该接口的具体实现类。当应用程序需要使用该服务时,JDK 会自动加载并实例化配置文件中列出的实现类,并提供给应用程序使用。

参见《深入剖析 Spring Boot 的 SPI 机制 》、《SpringBoot(二):SpringBoot自动装配之 SPI 机制》。
扩展
单纯启动 Tomcat/Spring 没几个类,lightweight-springboot 核心就这几个类:
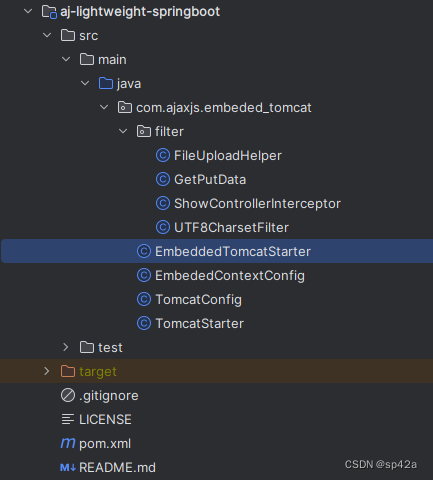
filter 包下面的是扩展的过滤器,或者说拦截器。当前默认加载的有:
UTF8CharsetFilter,避免中文乱码FileUploadHelper,Servlet 3 自带的文件上传功能ShowControllerInterceptor拦截器,获得 Controller 方法名、请求参数和注解信息,打印出来,以方便调试。这个要 Spring 配置来启动。
lightweight-springboot 作为提供底层功能的库,更多的扩展或配置是放在上层去调用的。我们知道,SpringBoot 一般是实现WebMvcConfigurer接口来配置的,——在 lightweight-springboot 同样如是。比如说配置统一返回 JSON 格式、全局异常拦截、相关通用 Bean 注入的等等。这属于上层框架配置的职责,每一个项目可能都不一样,就没有放在 lightweight-springboot 了。
具体可以看看笔者框架的实现:BaseWebMvcConfigure https://github.com/lightweight-component/aj-framework/blob/main/src/main/java/com/ajaxjs/framework/BaseWebMvcConfigure.java。


:cgroup v2 简介)


)


)