Spring提供了在线的Spring Initialzr在线创建Spring Boot项目,为了更好的理解Spring Boot项目,这里我们选择手动创建。
1.新建Web应用
1.1 生成工程
首先要做是创建一个Java项目,这里我们选择使用Maven来支持,使用archetype:generate生成一个项目。
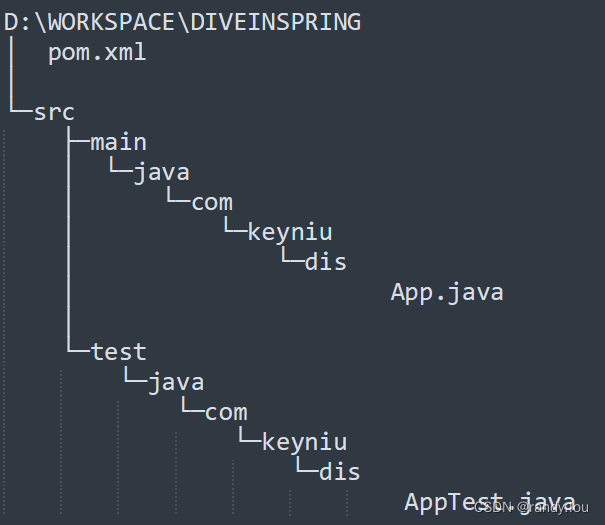
mvn archetype:generate -DarchetypeGroupId=org.apache.maven.archetypes -DarchetypeArtifactId=maven-archetype-quickstart -DarchetypeVersion=1.4 -DgroupId=com.keyniu.dis -DartifactId=DiveInSpring -Dversion=0.1 -Dpackage=com.keyniu.dis -DinteractiveMode=false生成的项目结构很简单,整个目录结果如下图,根目录下存放pom.xml、src目录,src目录下又分为主目录(main)和测试目录(test)

1.2 添加Spring Boot依赖
为了让应用支持SpringBoot,只需要在pom.xml里添加Spring Boot依赖即可。这里我们目标是让项目支持Spring Boot提供Web接口。首先是设置项目的parent
<project>...<parent><groupId>org.springframework.boot</groupId><artifactId>spring-boot-starter-parent</artifactId><version>3.3.0</version></parent>....
</project>
然后是添加spring-boot-starter-web依赖,支持Web接口开发
<project><dependencies><dependency><groupId>org.springframework.boot</groupId><artifactId>spring-boot-starter-web</artifactId></dependency></dependencies>
</project>
为了支持当前项目的启动,需要定义SpringBootApplication注解,使用SpringApplication.run执行当前工程,我们创建一个引导类
package com.keyniu.dis;import org.springframework.boot.SpringApplication;
import org.springframework.boot.autoconfigure.SpringBootApplication;
import org.springframework.web.bind.annotation.GetMapping;
import org.springframework.web.bind.annotation.RequestParam;
import org.springframework.web.bind.annotation.RestController;@SpringBootApplication
@RestController
public class DiveInMain {@GetMapping("/hello")public String hello(@RequestParam("name") String name) {return "hello," + name;}public static void main(String[] args) {SpringApplication.run(DiveInMain.class);}
}
通过DiveInMain.main方法启动后,我们通过curl查看/hello调用已经正常工作了。
randy@Randy:~$ curl -s http://192.168.31.52:8080/hello?name=randy
hello,randy
2. 不依赖<parent>
将pom.xml的parent设置为spring-boot-starter-parent确实很方便,然而有的时候,组织内部会有自己的parent pom定义,pom是单根继承,无法额外再加一个。我们需要拆解一下spring-boot-starter-parent的定义,它主要分为3部分:
- 依赖的版本管理,通过spring-boot-dependencies的dependencyManagement定义各个依赖的推荐版本
- 插件的使用管理,通过pluginManagement定义推荐的插件版本
- 自定义的profile,在spring-boot-starter-parent里定义了各种各样的profile实现特定场景定制的能力
2.1 依赖的版本管理
上面提到spring-boot-starter-parent提供了3个能力,分别是依赖的版本管理、插件的版本管理、自定义的Profile。想要在工程能不依赖spring-boot-starter-parent,通过引入spring-boot-dependencies,我们能做到继续使用Spring官方推荐的依赖版本,看如下的pom.xml定义,相比之前的版本,唯一的差异就是在dependencyManagement中使用了spring-boot-dependencies。
<?xml version="1.0" encoding="UTF-8"?><project xmlns="http://maven.apache.org/POM/4.0.0" xmlns:xsi="http://www.w3.org/2001/XMLSchema-instance"xsi:schemaLocation="http://maven.apache.org/POM/4.0.0 http://maven.apache.org/xsd/maven-4.0.0.xsd"><modelVersion>4.0.0</modelVersion><groupId>com.keyniu.dis</groupId><artifactId>DiveInSpring</artifactId><version>0.1</version><name>DiveInSpring</name><properties><project.build.sourceEncoding>UTF-8</project.build.sourceEncoding><maven.compiler.source>17</maven.compiler.source><maven.compiler.target>17</maven.compiler.target></properties><dependencyManagement><dependencies><dependency><groupId>org.springframework.boot</groupId><artifactId>spring-boot-dependencies</artifactId><version>3.3.0</version></dependency></dependencies></dependencyManagement><dependencies><dependency><groupId>org.springframework.boot</groupId><artifactId>spring-boot-starter-web</artifactId><version>3.3.0</version></dependency><dependency><groupId>junit</groupId><artifactId>junit</artifactId><version>4.11</version><scope>test</scope></dependency></dependencies></project>
2.2 插件的使用管理
使用spring-boot-dependencies能实依赖的版本管理,通过IDEA执行DiveInMain看起来一切正常,直到我们脱离IDEA运行的时候,执行java -jar发现执行报错
PS D:\Workspace\DiveInSpring\target> java -jar .\DiveInSpring-0.1.jar
.\DiveInSpring-0.1.jar中没有主清单属性
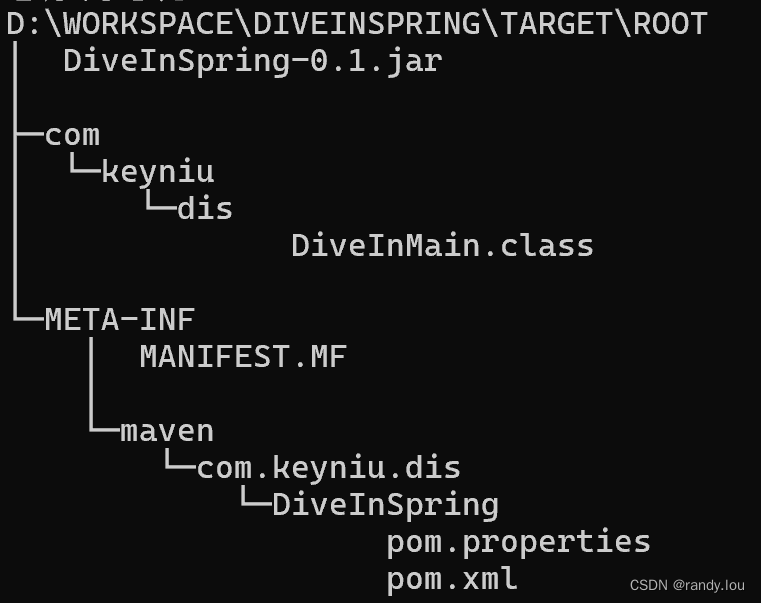
我们知道java -jar执行的时候会查找MANIFEST.MF文件里定义的Main-Class配置,解压jar文件还发现MANIFEST.MF并没有设置Main-Class启动类,jar文件并不是FatJar,没有包含被依赖的组件

这个操作是由spring-boot-maven-plugin这个Maven插件完成的,不适用parent的话,我们要手动这个插件,配置start-class作为mainClass,startClass可能是JarLauncher、WarLauncher,它们定义在spring-boot-loader模块中。添加插件后,重新打包并使用java -jar执行,这个时候工程就能正常运行了。
<properties><spring-boot.run.main-class>${start-class}</spring-boot.run.main-class>
</properties><build><plugins><plugin><groupId>org.springframework.boot</groupId><artifactId>spring-boot-maven-plugin</artifactId><executions><execution><id>repackage</id><goals><goal>repackage</goal></goals></execution></executions><configuration><mainClass>${spring-boot.run.main-class}</mainClass></configuration></plugin></plugins>
</build>
3. <parent>的完整能力
通过使用spring-boot-maven-plugin,我们的jar已经能够正常执行了。不过spring-boot-starter-parent提供的能力要比这个多得多。
3.1 资源文件处理
spring-boot-starter-parent默认会将src/main/resource下的所有文件当成资源文件,这些资源文件会被分成两类处理:
- application*,做变量引用(${变量名})替换,然后包含在资源文件中
- 其他,不做处理,直接复制进资源文件
<build><resources><resource><directory>${basedir}/src/main/resources</directory><filtering>true</filtering><includes><include>**/application*.yml</include><include>**/application*.yaml</include><include>**/application*.properties</include></includes></resource><resource><directory>${basedir}/src/main/resources</directory><excludes><exclude>**/application*.yml</exclude><exclude>**/application*.yaml</exclude><exclude>**/application*.properties</exclude></excludes></resource></resources>
</build>
3.2 插件默认配置
此外spring-boot-starter-parent对插件还做了额外的配置,这里我们捡紧要的说
| 插件 | 配置 | 作用 |
| maven-compiler-plugin | 配置parameters=true,在编译的时候调用javac -parameters | 在.class文件里保留参数名,供反射时读取 |
| maven-jar-plugin | 配置mainClass为start-class的值,JarLauncher | 设置可执行jar的启动引导类 |
| maven-war-plugin | 配置mainClass为start-class的值,WarLauncher | 设置可执行jar的启动引导类 |
| git-commit-id-maven-plugin | 配置git信息存储的文件,git.properties | 获取打包时git仓库的版本号/分支等 |
| spring-boot-maven-plugin | 打包SpringBoot项目结构,包括第3方依赖 | BOOT-INF/classes和BOOT-INF/lib |
| maven-shade-plugin | 创建uber jar,资源的合并处理,创建可执行jar | META-INF下配置文件的合并处理,比如spring.handles |
| native-maven-plugin | 使用GraalVM构建Spring成为native应用 |

)


)


)

)

