一、硬件设计
步进电机介绍
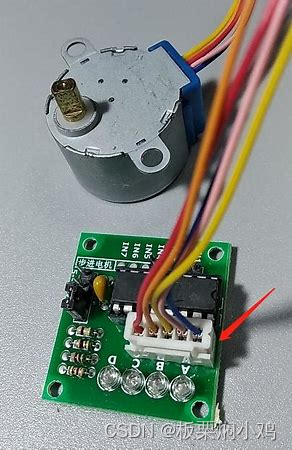
本项目用到的是常见的也是控制起来最简单的步进电机:五线四项的步进电机28BYJ-48。
单片机IO口输出电流太小无法直接驱动电机运行,在这里我们需要另外加一个电机驱动板。可以选择ULN2003电机驱动板。

步进电机的控制原理
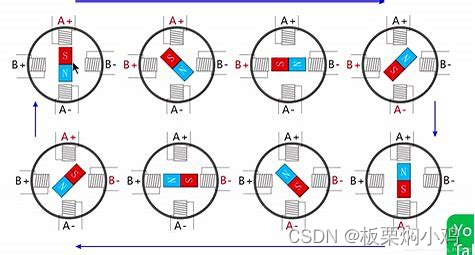
给步进电机不同的项轮流进行通电,在电磁感应作用下,每次产生一个很小的角位移,连贯起来就能够带动电机的转动,进行负载的驱动。
通过单片机来实现电机的控制,需要关注以下几点:
1)通过脉冲信号进行控制。
2)电机总转动的角度由输入的脉冲数来决定。
3)电机的转速由脉冲输入的频率决定。
本项目用到的是八拍驱动的方式:A→AB→B→BC→C→CD→D→DA

二、软件设计
1.电机控制引脚初始化
此处可以参考手把手从0到1教你做STM32+FreeRTOS智能家居--第1篇之点亮LED灯-CSDN博客对STM32CubeMX进行引脚配置,将所用到的引脚配置为推挽输出即可。
本项目的引脚连接为电机的
蓝色A线--PA8 粉色B线--PC9 黄色C线--PC8 橙色D线--PC7,我在Motor.h文件中将控制GPIO高低电平的函数设置为宏定义,此处提一嘴,方便大家阅读。
#ifndef __MOTOR_H
#define __MOTOR_H	 #include "main.h"#define u8 uint8_t#define  YELLOW_GPIO_PORT       	GPIOC
#define  YELLOW_GPIO_PIN       	  GPIO_PIN_8#define  ORANGE_GPIO_PORT       	GPIOC
#define  ORANGE_GPIO_PIN       	  GPIO_PIN_7#define  PINK_GPIO_PORT       	  GPIOC
#define  PINK_GPIO_PIN       	    GPIO_PIN_9#define  BLUE_GPIO_PORT       	 GPIOA
#define  BLUE_GPIO_PIN       		 GPIO_PIN_8#define orange_H_D      	HAL_GPIO_WritePin(ORANGE_GPIO_PORT, ORANGE_GPIO_PIN, GPIO_PIN_SET)
#define orange_L_D 				HAL_GPIO_WritePin(ORANGE_GPIO_PORT, ORANGE_GPIO_PIN, GPIO_PIN_RESET)	#define yellow_H_C 				HAL_GPIO_WritePin(YELLOW_GPIO_PORT, YELLOW_GPIO_PIN, GPIO_PIN_SET)
#define yellow_L_C 				HAL_GPIO_WritePin(YELLOW_GPIO_PORT, YELLOW_GPIO_PIN, GPIO_PIN_RESET)	#define pink_H_B   				HAL_GPIO_WritePin(PINK_GPIO_PORT, PINK_GPIO_PIN, GPIO_PIN_SET)
#define pink_L_B	 				HAL_GPIO_WritePin(PINK_GPIO_PORT, PINK_GPIO_PIN, GPIO_PIN_RESET)#define blue_H_A   				HAL_GPIO_WritePin(BLUE_GPIO_PORT, BLUE_GPIO_PIN, GPIO_PIN_SET)
#define blue_L_A   				HAL_GPIO_WritePin(BLUE_GPIO_PORT, BLUE_GPIO_PIN, GPIO_PIN_RESET)void	MOTO_Stop(void);
void Open_Door(void);
void Close_Door(void);
void Set_Motor_Loop (unsigned char dirction,unsigned char loop,unsigned char speed);
void Set_Motor_Angle(unsigned char dirction, int angle, unsigned char speed);
#endif
2.电机控制函数
void Set_Motor_Num (unsigned char dirction, unsigned int num, unsigned char speed)是控制电机转动一步的函数,用于调用Set_Motor函数,对照着步进电机的控制原理中的图,理论和实际应用完全对得上。
void Set_Motor_Loop (unsigned char dirction, unsigned char loop, unsigned char speed) 电机旋转一圈360°需要转动4096步。
void Set_Motor_Angle(unsigned char dirction, int angle, unsigned char speed) 用于控制电机旋转特定的角度,其中有计算公式的注释,实现粗略地角度控制。
#include "motor.h"//IN1: PA8  A  Blue
//IN2: PC9  B  Pink
//IN3: PC8  C  Yellow
//IN4: PC7  d  Orange
uint8_t Step = 0;void Stop_Motor(void);
void Set_Motor(unsigned char InputData, unsigned int speed);//dirction = 1 正转 dirction = 0 逆转
void Set_Motor_Num (unsigned char dirction, unsigned int num, unsigned char speed)  //电机按步数运行
{unsigned int i;for(i = 0; i < num; i++){	if(dirction == 1){ Step++;if(Step > 7)Step = 0;}else{if(Step == 0) Step = 8;Step--;}Set_Motor(Step, speed);}
}//控制步进电机旋转特定圈数
void Set_Motor_Loop (unsigned char dirction, unsigned char loop, unsigned char speed)  //电机按圈数运行
{Set_Motor_Num(dirction, loop * 4096, speed);
}//360度=4096步
//1度≈11.38步
//粗略地控制步进电机旋转特定角度
void Set_Motor_Angle(unsigned char dirction, int angle, unsigned char speed)
{unsigned int i;unsigned int step = 11.38 * angle;if(dirction == 1){for(i = 0; i < step;i++) {Set_Motor_Num(1, 1, 1);}}else{for(i = 0;i < step;i++) {Set_Motor_Num(0, 1, 1);}	}}void Stop_Motor(void)
{blue_L_A;pink_L_B;yellow_L_C;orange_L_D;
}void Set_Motor(unsigned char InputData, unsigned int speed)
{switch(InputData){case 0:blue_H_A; pink_L_B; yellow_L_C; orange_L_D;break;case 1:blue_H_A; pink_H_B; yellow_L_C; orange_L_D;break;case 2:blue_L_A; pink_H_B; yellow_L_C; orange_L_D;break;case 3:blue_L_A; pink_H_B; yellow_H_C; orange_L_D;break;case 4:blue_L_A; pink_L_B; yellow_H_C; orange_L_D;break;case 5:blue_L_A; pink_L_B; yellow_H_C; orange_H_D;break;case 6:blue_L_A; pink_L_B; yellow_L_C; orange_H_D;break;case 7:blue_H_A; pink_L_B; yellow_L_C; orange_H_D;break;default:break;}HAL_Delay(speed);Stop_Motor();
}void Open_Door(void)
{Set_Motor_Angle(1, 90, 1);
}
void Close_Door(void)
{Set_Motor_Angle(0, 90, 1);
}
3.应用代码
参数1为正传(1正,0逆),参数2为度数:90°,参数三为旋转速度。
Set_Motor_Angle(1, 90, 1);三、实验效果
stm32控制步进电机旋转特定角度
)


)


)
服务端)
期末作业)


