NIO网络通信
- 网络通信
- BIO
- NIO
- select
- poll
- epoll
- select poll epoll对比
- Netty原理
- Netty架构
- reactor响应式编程
- netty组件
- eventLoop
- 线程间交互
- Future接口
- Promise接口
- Handler和Pipeline
- ByteBuf
- 组成
- 指针
- 常用方法
网络通信
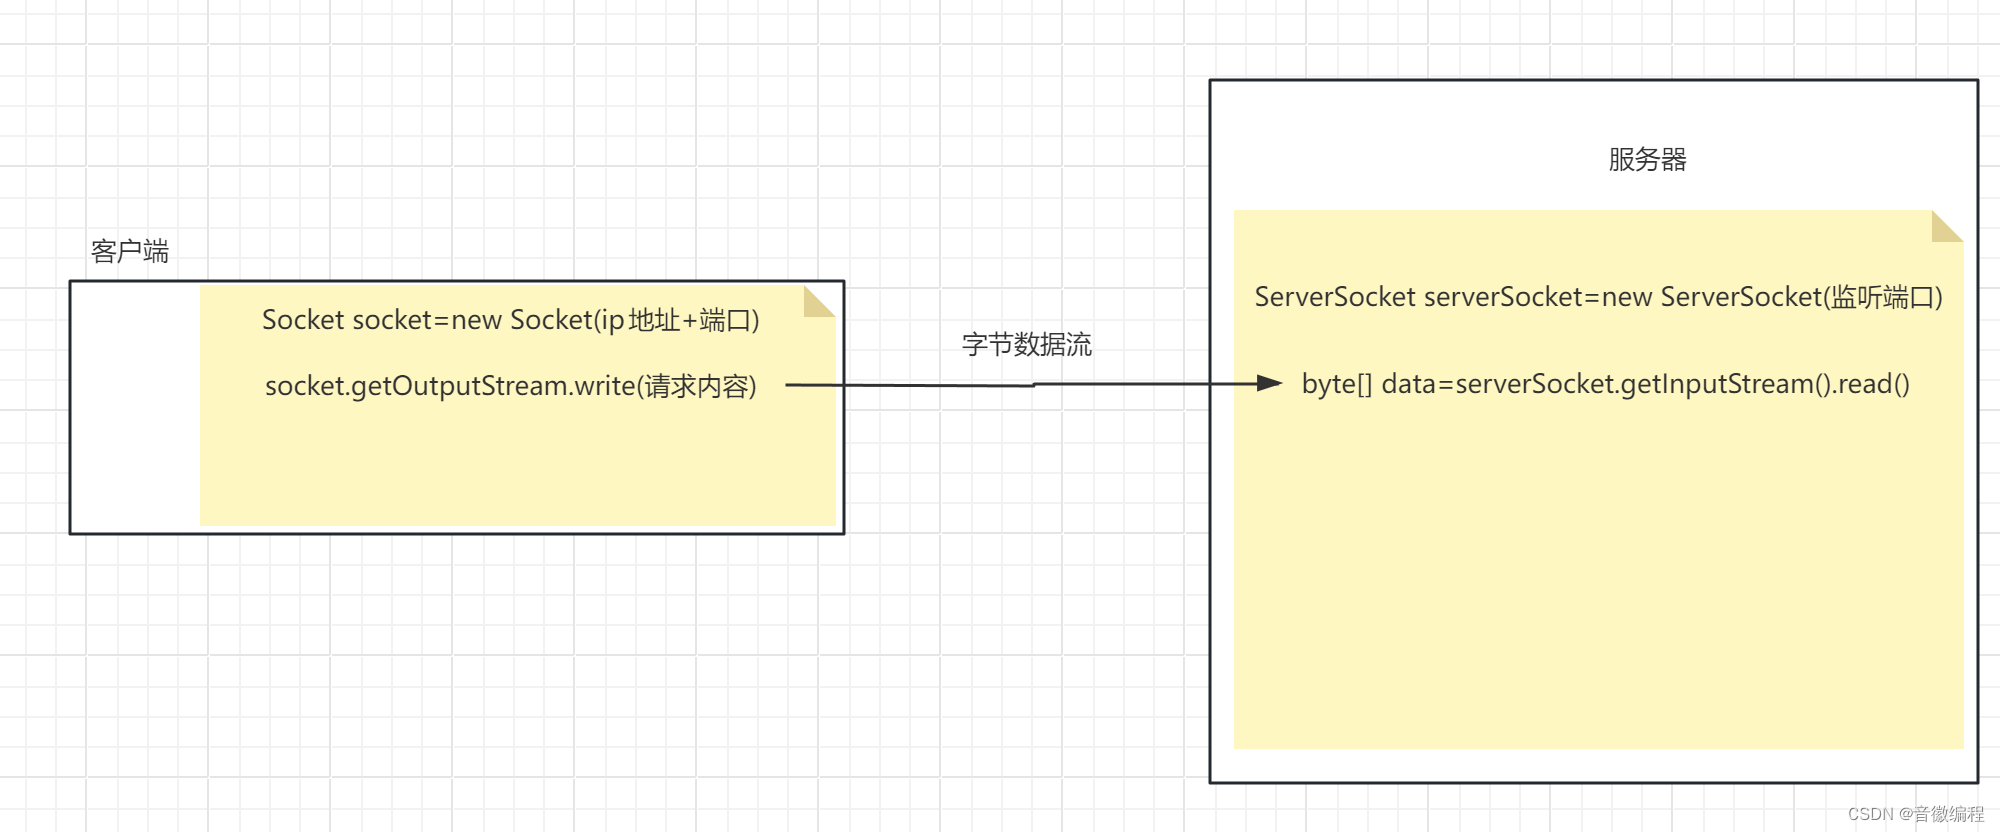
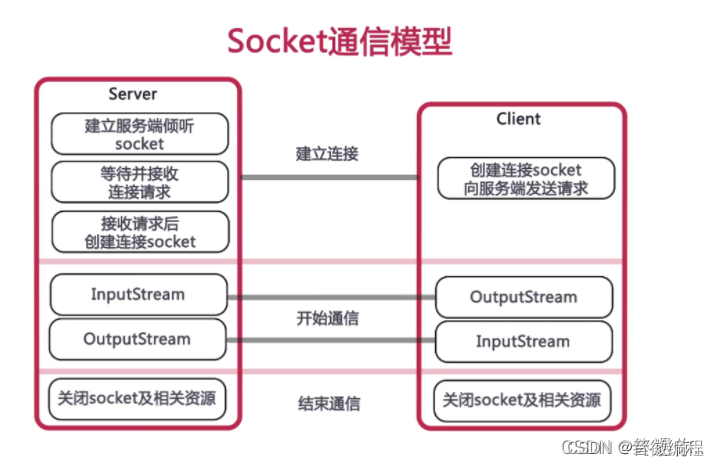
通过网络编程的基础可以知道,各设备通过I/O流写入写出数据,而网络成为数据源或者数据输出的目的地
数据是以字节流的形式进行传输
BIO
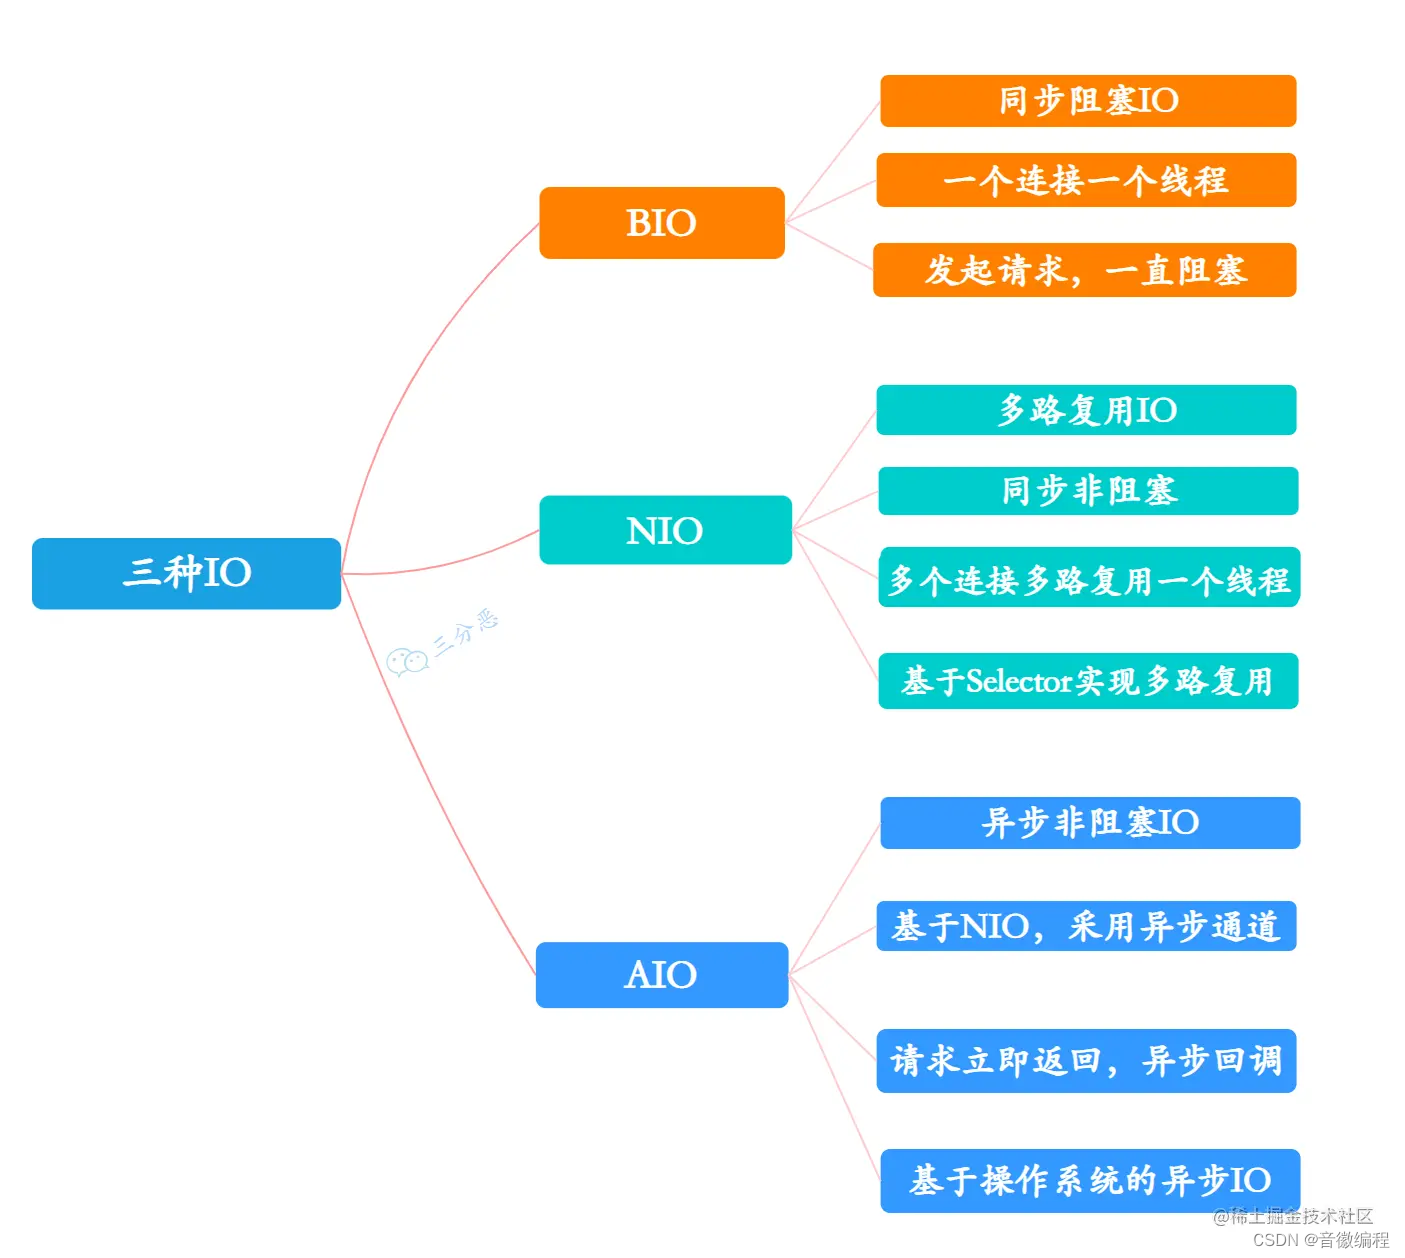
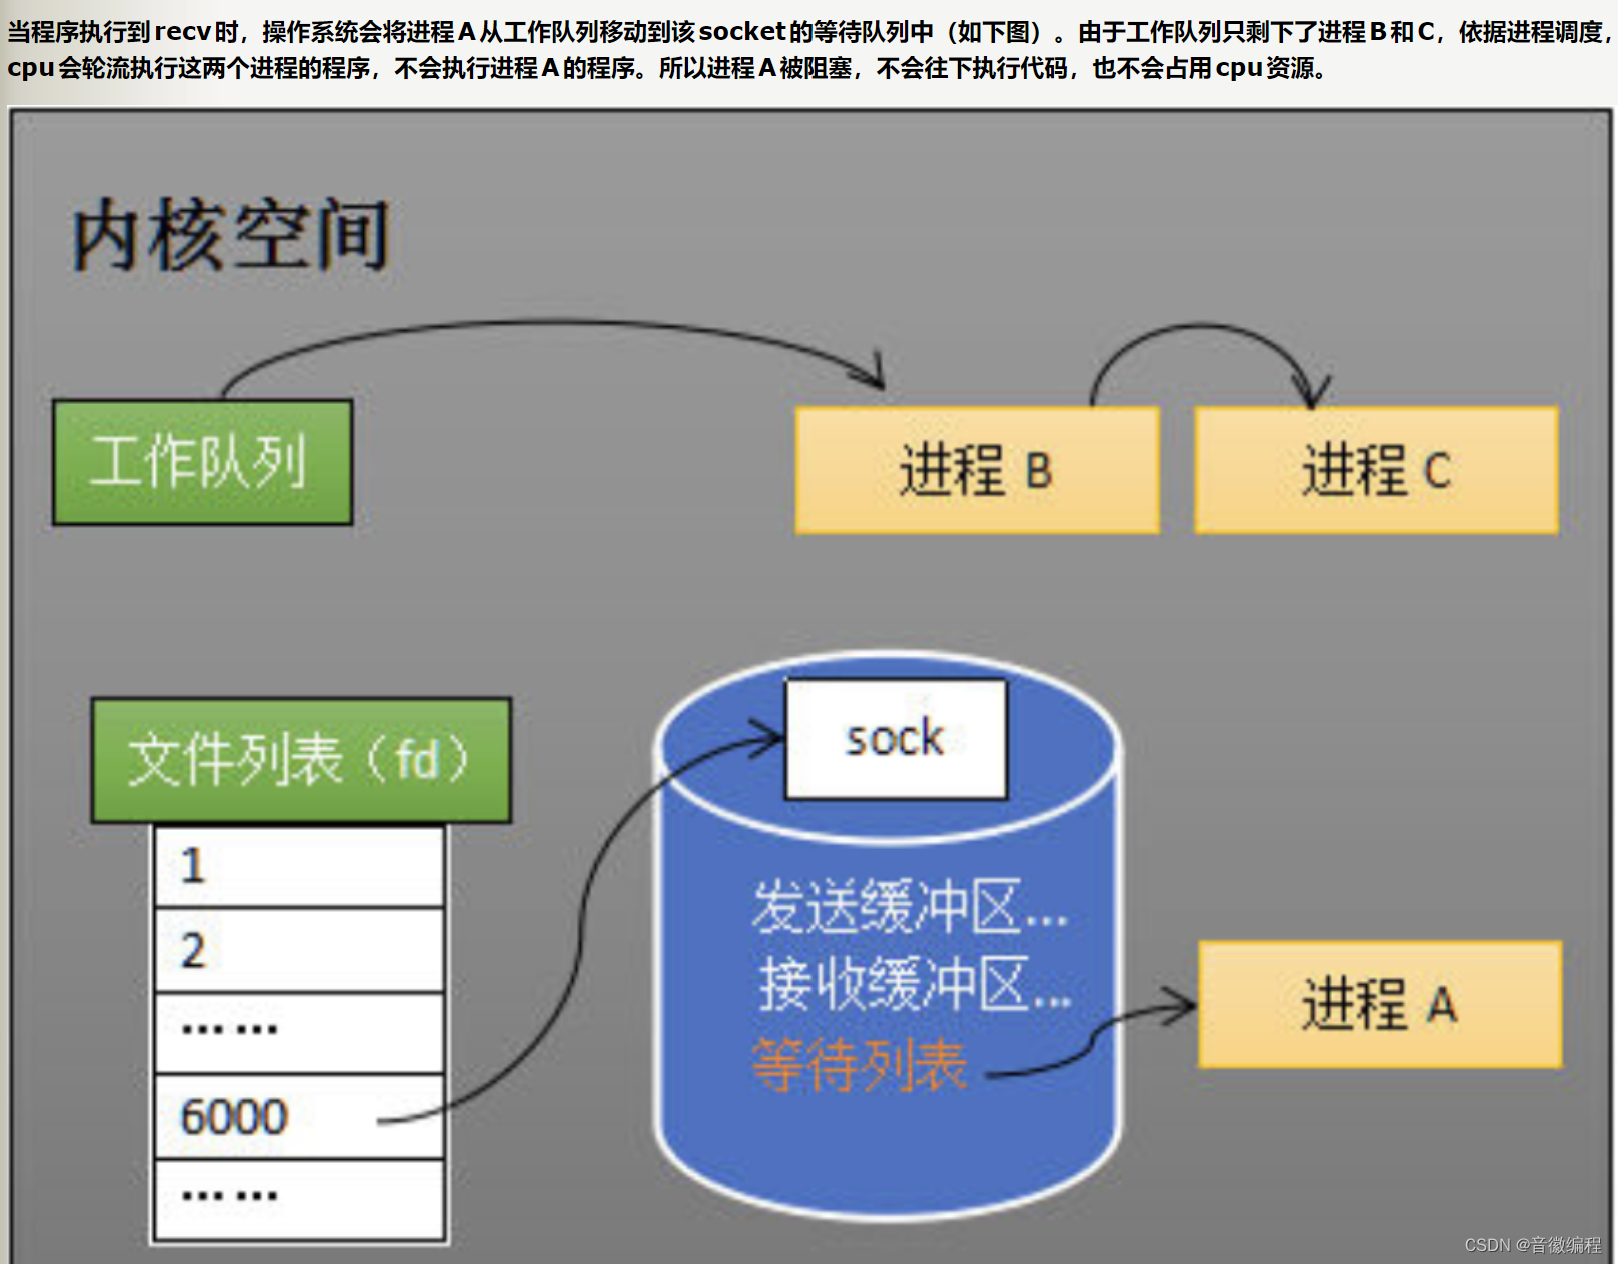
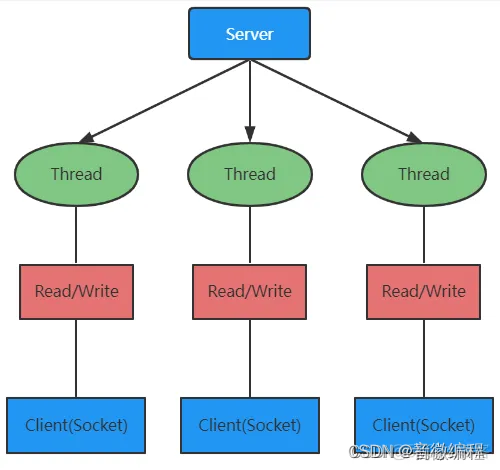
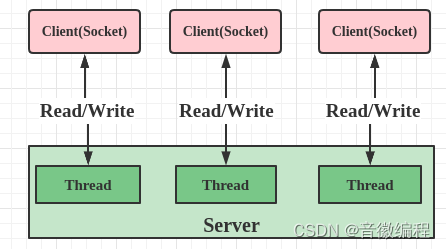
BIO指的是Blocking IO,即在实行网络IO通信时,会直接阻断该线程,直至连接断开
在阻塞期间,主线程只能处理IO通信,即服务器只能与一个客户端进行数据交互
线程的吞吐量极小,当请求量大时,客户端等待时间会很长
java.io包下,包括accept()和read()方法都是阻塞式,当没有客户端建立连接或者客户端没有发送数据时,线程将处于等待状态,无法执行其他操作
在一个连接期间,一个线程只能与一个客户端交互

NIO
有专门的线程负责维护客户端的连接,这个线程称为selector(调度中心)
客户端需要将自己注册到调度中心
线程将不断轮询各个客户端,当发现客户端发出数据后,立马到线程池中,取出一个线程,并将客户端连接交给它处理

- selector:epoll对象,epoll_create
- 注册:将socket添加到一个数组中(红黑树)
- selector.select():epoll监听所有socket事件,epoll_wait
- socket事件发生,执行回调函数,socket进入就绪队列,唤醒线程
一个简单的NIO程序,redis底层以及netty底层原理均与此类似:
public static void main(String[] args) {try {//1.创建多路复用器对象(调度中心)//在Linux系统下,selector底层是epoll对象Selector selector = Selector.open();//2.创建服务器通道对象并注册到调度中心ServerSocketChannel serverSocketChannel = ServerSocketChannel.open();serverSocketChannel.socket().bind(new InetSocketAddress(15000));serverSocketChannel.configureBlocking(false);serverSocketChannel.register(selector, SelectionKey.OP_ACCEPT);//3.调度中心轮询所有socket并监测事件的发生while (true){//调度中心等待socket事件发生selector.select();//事件发生,获取事件集合Set<SelectionKey> selectionKeys = selector.selectedKeys();//遍历所有就绪socketIterator<SelectionKey> iterator = selectionKeys.iterator();while (iterator.hasNext()){SelectionKey selectionKey = iterator.next();//根据事件种类分类讨论if (selectionKey.isAcceptable()){//连接事件:触发者是服务端通道,需要将客户端注册到调度中心//拿到服务器通道对象ServerSocketChannel _serverSocketChannel = (ServerSocketChannel) selectionKey.channel();SocketChannel socketChannel = _serverSocketChannel.accept();if (socketChannel==null){break;}socketChannel.configureBlocking(false);socketChannel.register(selector,SelectionKey.OP_READ);System.out.println(socketChannel.getRemoteAddress());}else if (selectionKey.isReadable()){//读事件:触发者是客户端通道SocketChannel socketChannel = (SocketChannel) selectionKey.channel();//将通道的数据写入内存缓冲区ByteBuffer byteBuffer = ByteBuffer.allocate(1024);int len = socketChannel.read(byteBuffer);//检查一下是否读取到数据if (len==-1){//断开连接socketChannel.close();System.out.println("断开连接");}else if (len>0){byteBuffer.flip();byte[] dataBytes = new byte[byteBuffer.remaining()];byteBuffer.get(dataBytes);String data = new String(dataBytes);System.out.println(data);}}}}} catch (IOException e) {throw new RuntimeException(e);}}
我们可以通过,一个线程服务多个客户端的方式,来提高系统的吞吐量
而一个线程服务多个客户端,也叫做I/O多路复用,有三种算法可以实现:select/poll,epoll
多路复用,可以简单理解成,多个客户端共用一个线程
select
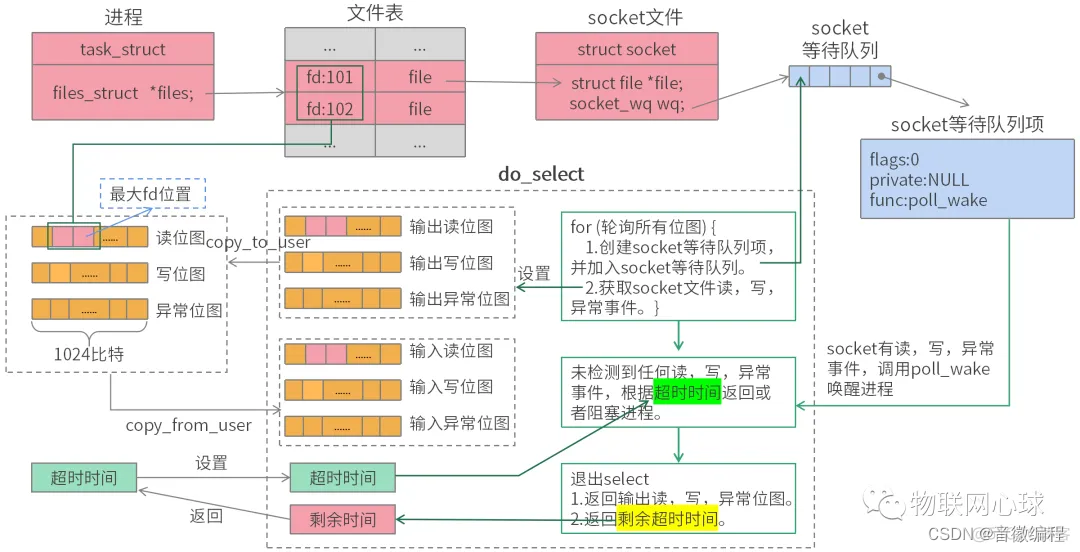
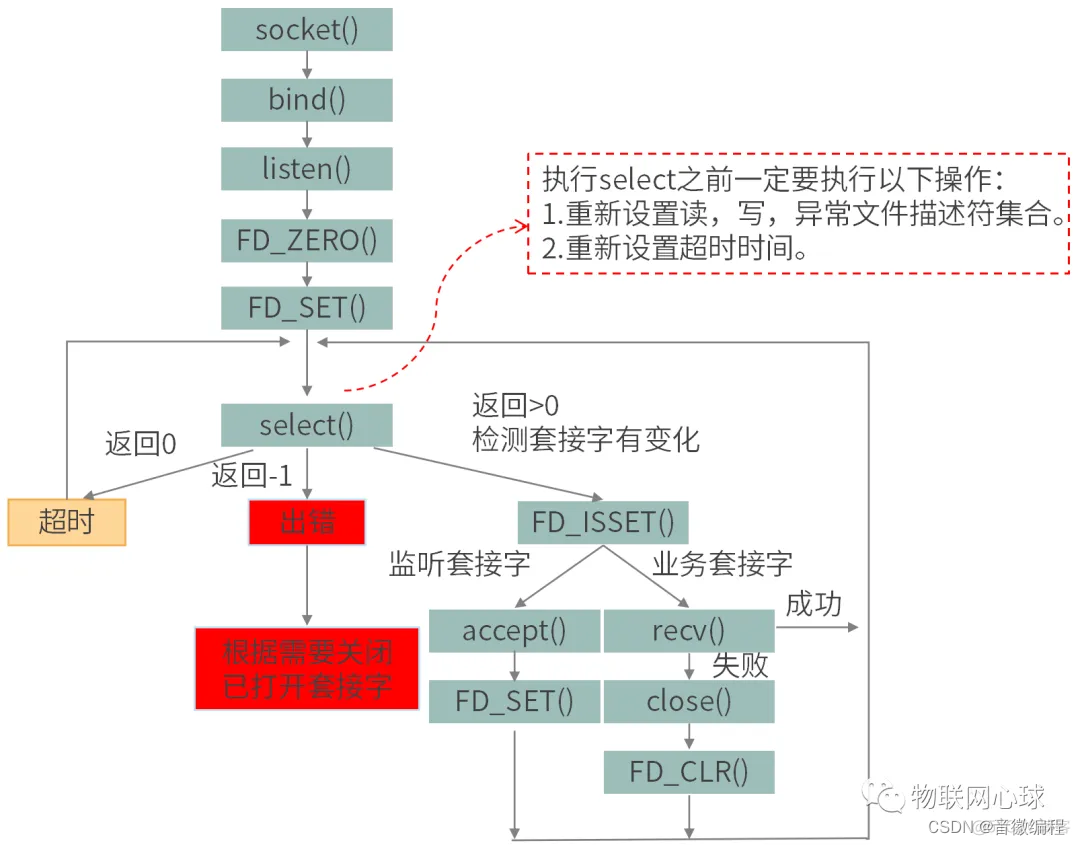
由一个专门线程执行
维护一个socket等待队列,线程会不断循环遍历所有socket,只有当检测到写,读或异常事件时,才回去唤醒其他线程,之后,还得通过遍历去找到对应监听端口的socket
频繁地遍历等待队列是其一大缺点
poll
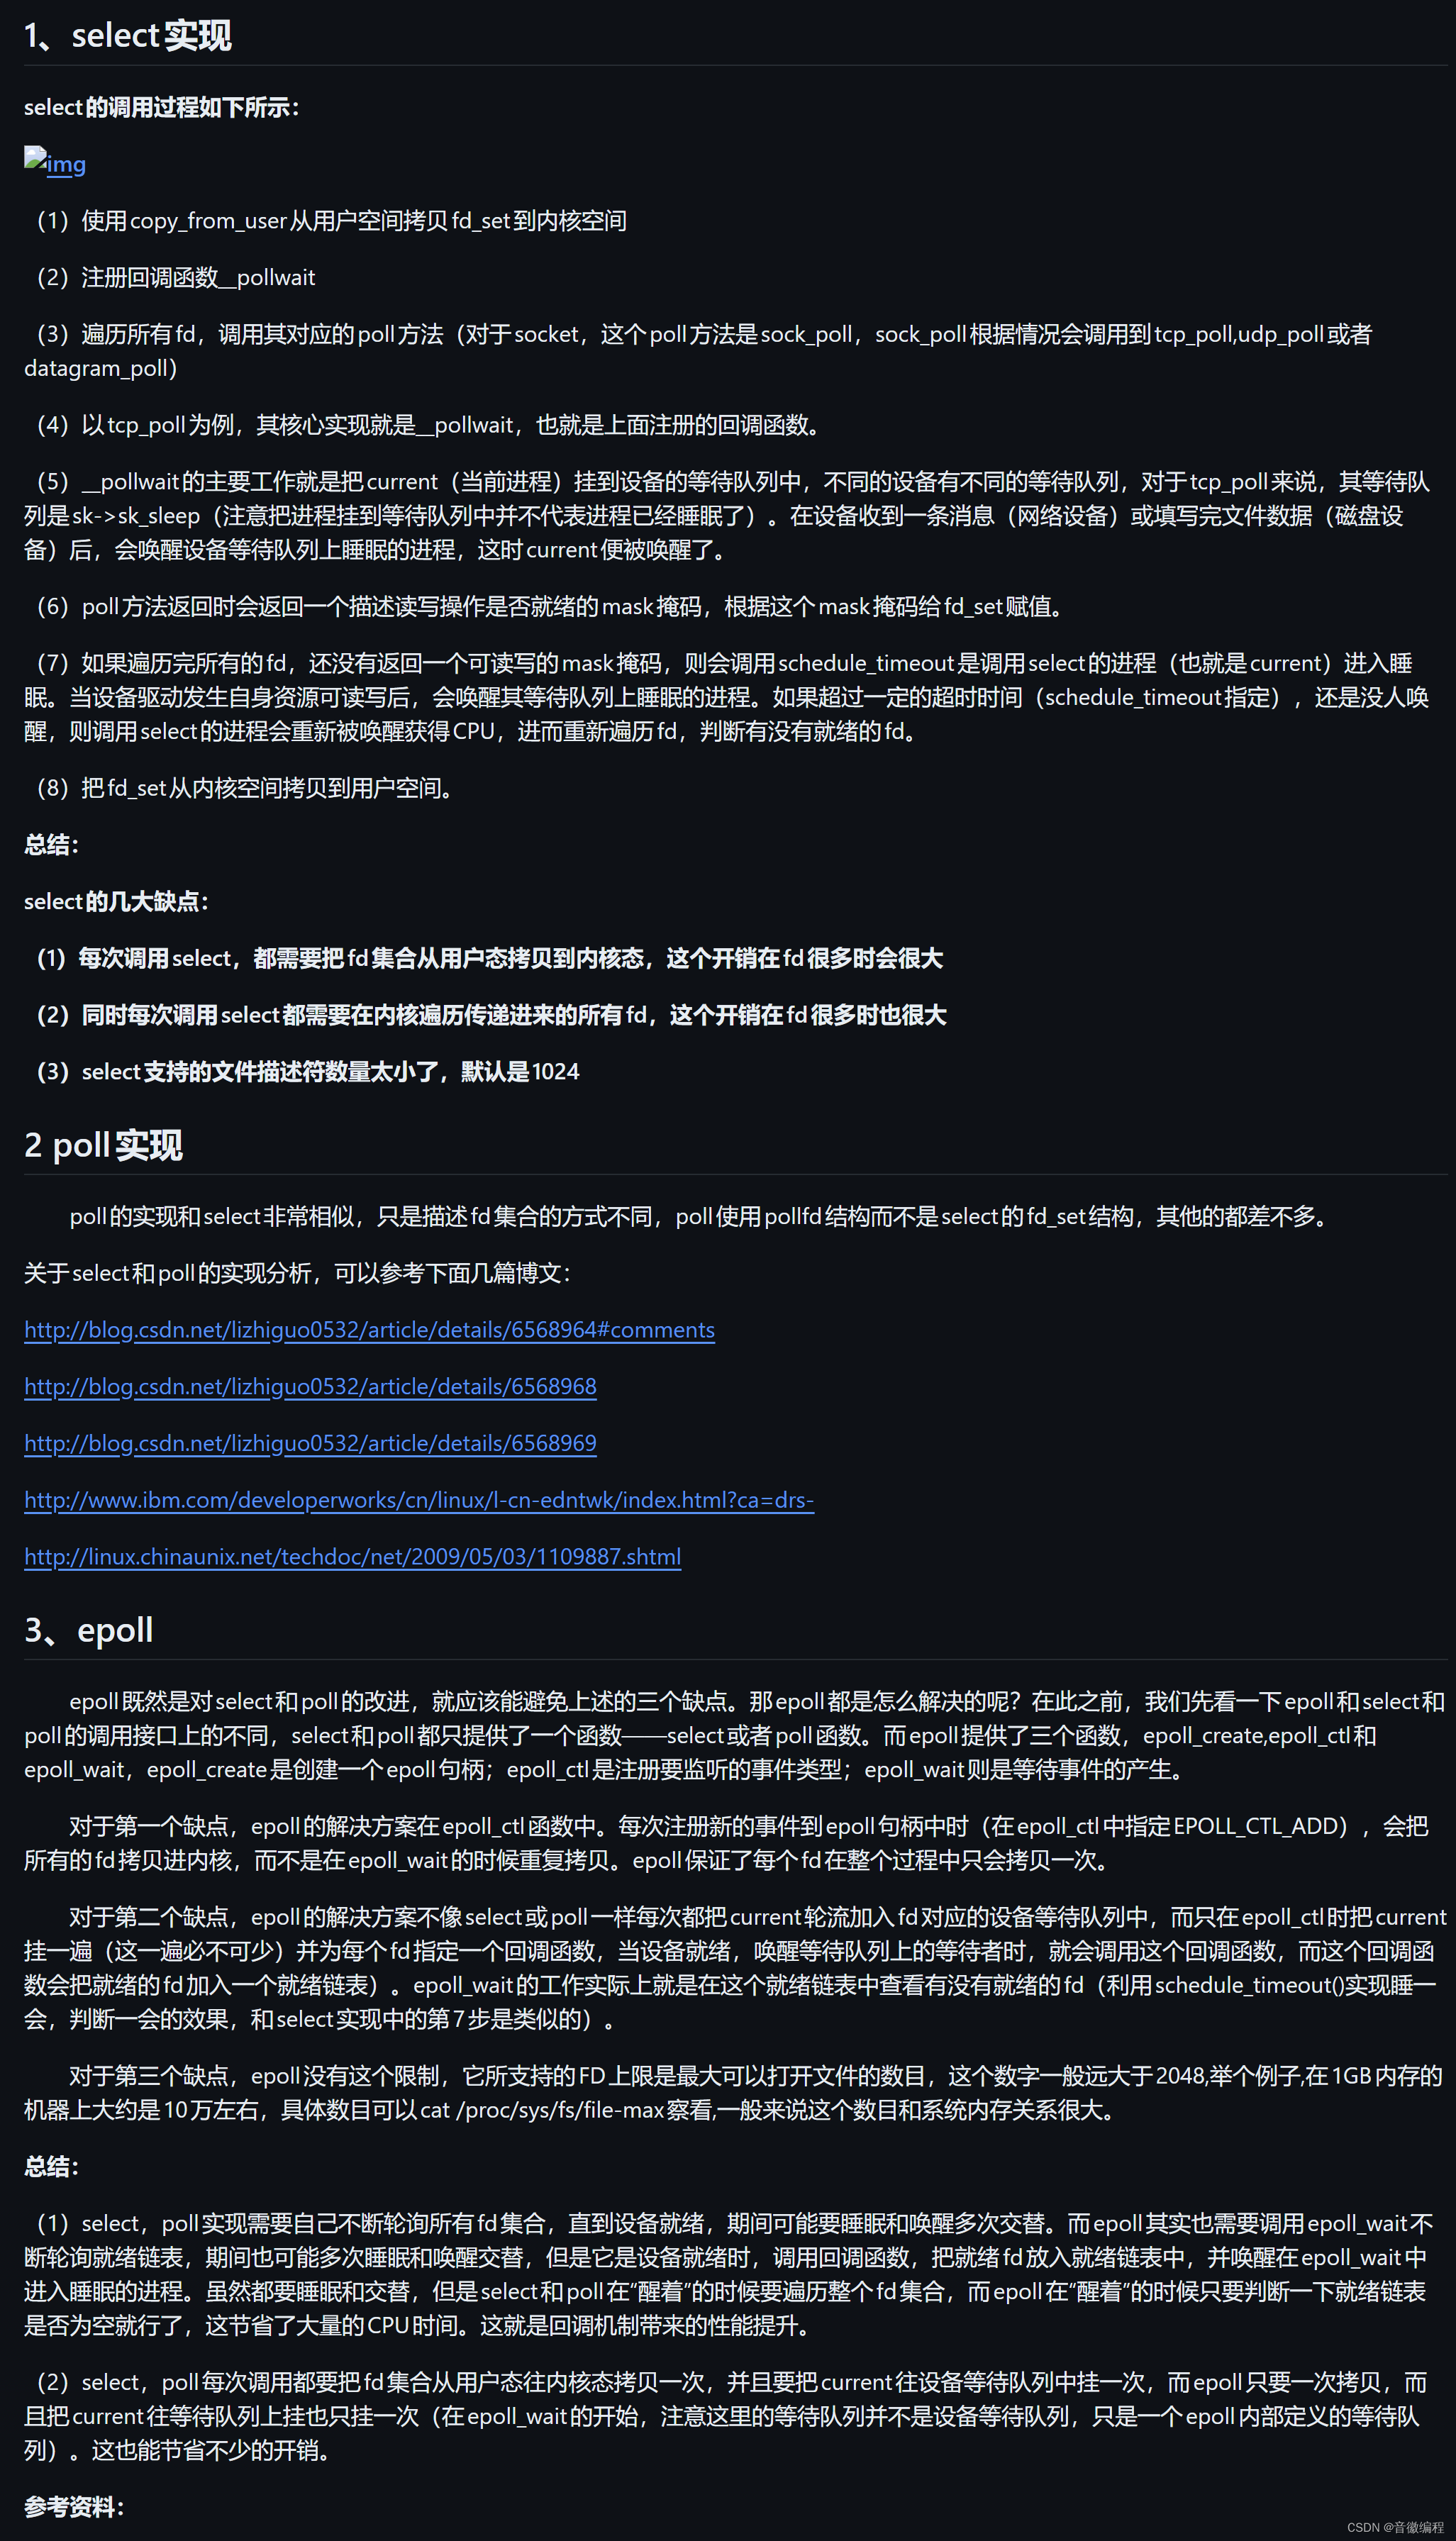
select 使用固定长度的 BitsMap,表示文件描述符集合,而且所支持的文件描述符的个数是有限制的,在 Linux 系统中,由内核中的FD_SETSIZE 限制, 默认最大值为 1024,只能监听 0~1023 的文件描述符。
poll 不再用 BitsMap 来存储所关注的文件描述符,取而代之用动态数组,以链表形式来组织,突破了 select 的文件描述符个数限制,当然还会受到系统文件描述符限制。
但是 poll 和 select 并没有太大的本质区别,都是使用线性结构存储进程关注的 Socket 集合,因此都需要遍历文件描述符集合来找到可读或可写的 Socket,时间复杂度为 O(n),而且也需要在用户态与内核态之间拷贝文件描述符集合,这种方式随着并发数上来,性能的损耗会呈指数级增长。
epoll
epoll_create:创建epoll对象以及socket红黑树容器,都只执行一次
epoll_wait:然后,进入等待状态,主动放弃cpu,并且cpu不会执行处于等待状态的线程
epoll_ctl:网卡将数据写入内存中的socket的缓冲区,cpu会唤醒等待线程,再由该线程处理
epoll在监测到socket事件后,立马触发一个回调函数,将socket放入就绪队列中,不需要像select/poll那样遍历所有socket
只需要关心就绪队列即可
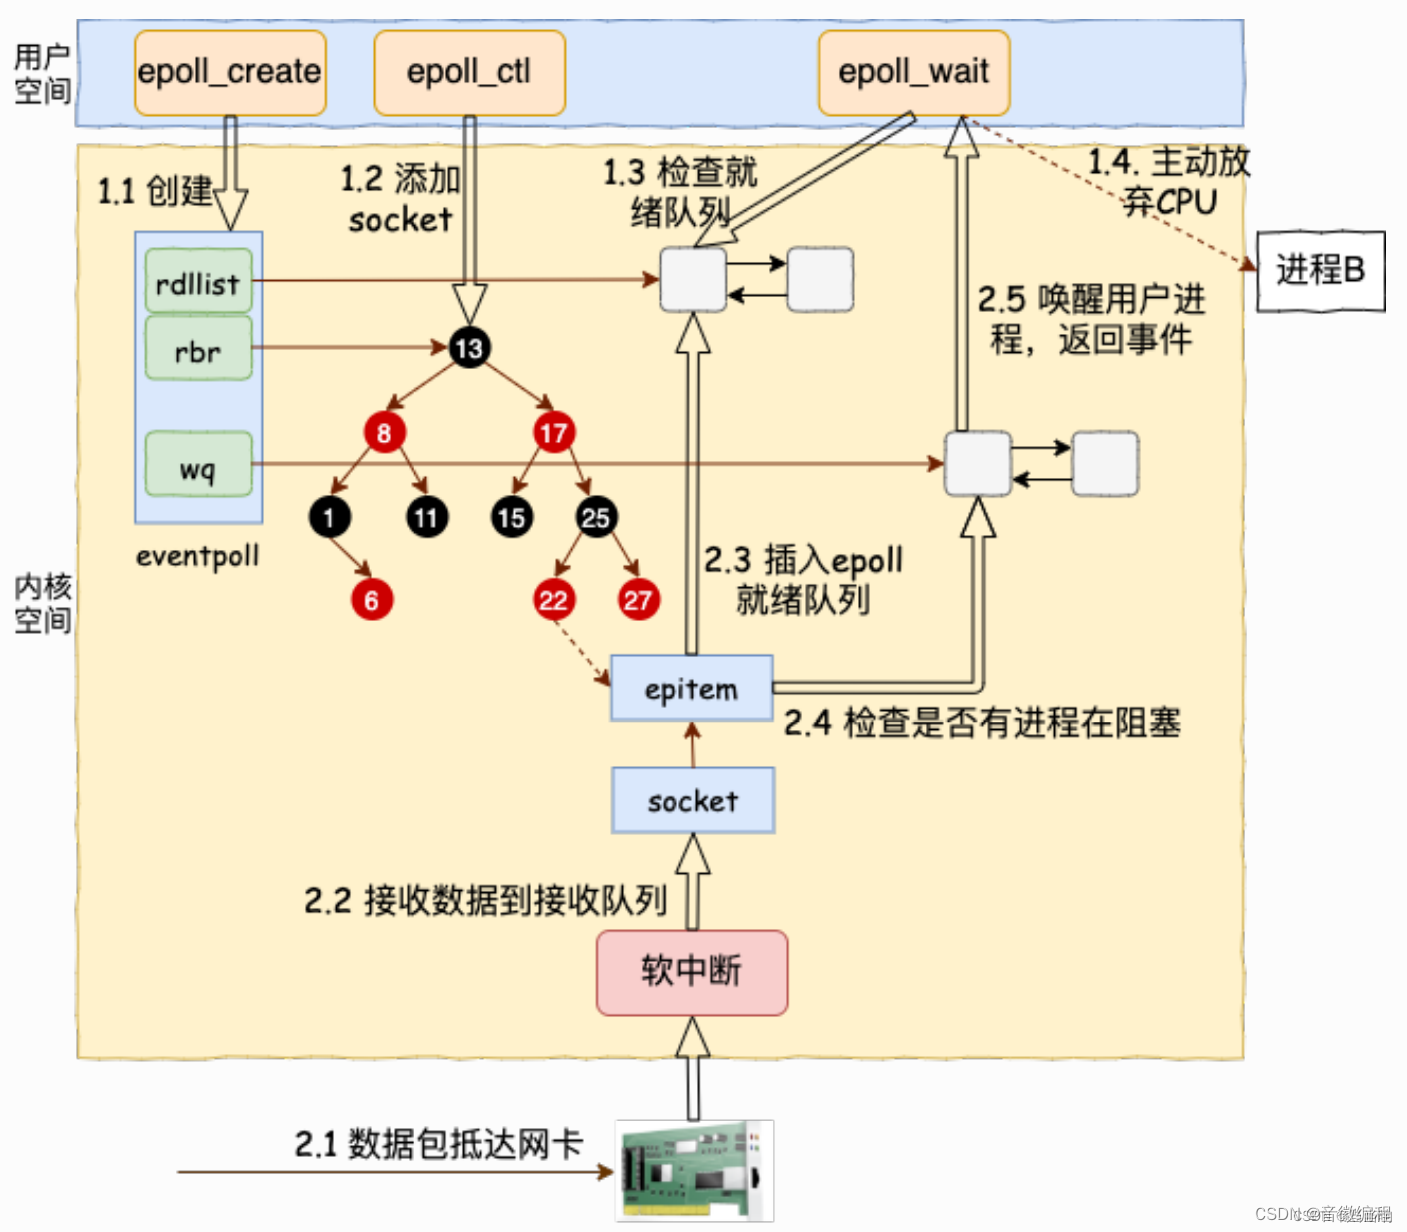
第一点,epoll使用更加高效的红黑树,来维护所有需要监测的socket
第二点, epoll通过回调函数,将所有发生事件的socket放入一个链表中
select poll epoll对比
Netty原理
Netty是一个基于异步多线程,事件驱动模型的网络通讯框架
Netty底层采用了NIO,专门应用于服务端-客户端网络交互
Netty专门用于开发高性能网络通讯程序
Netty与Redis,Spring等,同为中间件
Netty采用异步化,一个线程只执行某一类任务的方式,提高了单位时间内处理的任务数,可以减少所有客户端的等待时间从而提高了效率
不足的是,由于在同一个任务中需要频繁的切换线程,反而延长了真正执行任务的时间,即单个任务的执行时间会变长
以下框架都是以Netty为基础开发:
RocketMQ,Dubbo,Spring-WebFlux
Netty架构
public static void main(String[] args) {//配置服务器Netty程序参数new ServerBootstrap()//1.创建一组eventLoop(selector+thread)且基于NIO.group(new NioEventLoopGroup())//2.配置服务器网络连接通道.channel(NioServerSocketChannel.class)//3.指定worker线程处理器.childHandler(new ChannelInitializer<NioServerSocketChannel>() {//3.1.初始化服务器连接通道对象,此时已成功建立连接,所以能拿到一个非空的channel对象@Overrideprotected void initChannel(NioServerSocketChannel channel) throws Exception {//3.2在这里可以直接为ServerChannel添加一些handler,这些handler对pipeline中的所有channel都生效channel.pipeline().addLast(new StringDecoder()).addLast(new ChannelInboundHandlerAdapter(){@Overridepublic void channelRead(ChannelHandlerContext ctx, Object msg) throws Exception {System.out.println(msg);}});}})//4.绑定端口.bind(15000);}
-
EventLoop(事件循环):
- 功能:EventLoop 是 Netty 中的核心组件,包含selector以及对应的线程,负责处理 Channel 上的各种事件,如 I/O 事件、定时任务和用户自定义事件等。
- 原理:EventLoop 是一个单线程的事件循环,它负责从注册在其上的多个 Channel 中选择一个并处理其上的事件。EventLoop 使用 Selector(选择器)来监听 Channel 上的 I/O 事件,并通过线程池来执行各种任务,以保证高效的事件处理和任务执行。
-
Channel(通道):
- 功能:Channel 是 Netty 中用于传输数据的对象,和BIO中的Socket作用相同。由Channel相关方法完成网络I/O操作。
- 原理:Channel 使用底层的网络传输组件进行数据的读写操作,比如 Java 的 NIO、Epoll(Linux 系统)、Kqueue(BSD 系统)等。Channel 通过注册到 EventLoop 上来实现异步事件驱动的操作。
-
ChannelHandler(通道处理器):
- 功能:ChannelHandler 是 Netty 中用于处理入站和出站事件的组件,它可以用于实现各种协议、编解码、数据处理和业务逻辑等。
- 原理:ChannelHandler 通过实现特定的接口或继承特定的抽象类来处理 Channel 上的事件。它可以被添加到 ChannelPipeline 中,以便在数据流经过通道时对数据进行处理和转换。
-
ChannelPipeline(通道管道):
- 功能:ChannelPipeline 是 Netty 中的一种机制,用于组织和管理 ChannelHandler,以实现数据的流动和处理。
- 原理:ChannelPipeline 是一个双向链表结构,每个 Channel 都有一个对应的 ChannelPipeline。当数据通过 Channel 时,它会依次经过 ChannelPipeline 中的各个 ChannelHandler,每个 ChannelHandler 都可以对数据进行处理、转换或传递。这种机制可以灵活地组合和调整各种处理器,以满足不同的需求。
-
Bootstrap(引导器):
- 功能:Bootstrap 是 Netty 中用于配置和启动网络应用的引导器,它提供了一种简单易用的方式来配置和启动服务器或客户端。
- 原理:Bootstrap 用于配置和初始化各种网络组件,如 Channel、EventLoopGroup、ChannelPipeline 等,并将它们组装在一起,以构建一个完整的网络应用。通过 Bootstrap,可以灵活地配置网络应用的各种参数,如监听端口、连接超时、编解码器等。
reactor响应式编程
以下概念原理相似:
reactor模式,响应式编程,事件驱动模型,观察者模式,发布订阅模式
它们都是基于事件触发原理:
由一个专门线程(selector/reactor/消息队列),去监测各个目标对象,当目标发生了事件后,唤醒所有等待状态的观察者线程,并执行它们的代码逻辑
netty组件
eventLoop
包括一个selector以及一个单线程,该线程专门用于处理channel通道中的读写I/O操作,用于IO事件发生后的回调操作
eventLoopGroup中包括了多个eventLoop,也就是包括了多个线程,可以并发处理多个客户端请求
创建一个EventLoopGroup对象,从源码可以知道,在不指定线程数的情况下,程序会有默认的线程数,默认是并行线程数的两倍

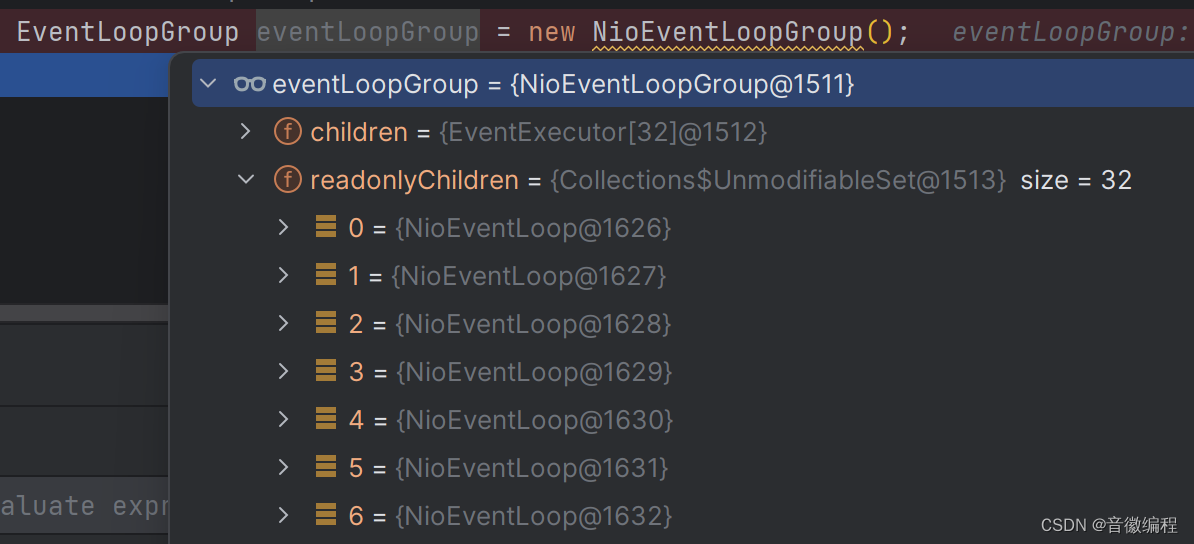
可以直接把eventLoopGroup当成线程池,enventLoop当成单线程
可以直接从eventLoopGroup中拿到一个eventLoop对象,然后可以同个其中的线程去执行任务
bossEventLoop负责accept连接,workerEventLoop负责I/O任务
线程间交互
在线程单一职责的前提下,完成一个任务往往需要多个线程的协作,这就需要将各线程执行的结果,存到内存中,并用一个对象去引用
Future或Promise对象,就是专门用来存储线程执行结果的
Future接口
从线程池中取出一个线程,并给它一个callable任务,线程执行任务的结果,将封装成一个future对象返回
package java.util.concurrent;public interface Future<V> {boolean cancel(boolean mayInterruptIfRunning);boolean isCancelled();boolean isDone();V get() throws InterruptedException, ExecutionException;V get(long timeout, TimeUnit unit)throws InterruptedException, ExecutionException, TimeoutException;default V resultNow() {if (!isDone())throw new IllegalStateException("Task has not completed");boolean interrupted = false;try {while (true) {try {return get();} catch (InterruptedException e) {interrupted = true;} catch (ExecutionException e) {throw new IllegalStateException("Task completed with exception");} catch (CancellationException e) {throw new IllegalStateException("Task was cancelled");}}} finally {if (interrupted) Thread.currentThread().interrupt();}}default Throwable exceptionNow() {if (!isDone())throw new IllegalStateException("Task has not completed");if (isCancelled())throw new IllegalStateException("Task was cancelled");boolean interrupted = false;try {while (true) {try {get();throw new IllegalStateException("Task completed with a result");} catch (InterruptedException e) {interrupted = true;} catch (ExecutionException e) {return e.getCause();}}} finally {if (interrupted) Thread.currentThread().interrupt();}}enum State {/*** The task has not completed.*/RUNNING,/*** The task completed with a result.* @see Future#resultNow()*/SUCCESS,/*** The task completed with an exception.* @see Future#exceptionNow()*/FAILED,/*** The task was cancelled.* @see #cancel(boolean)*/CANCELLED}default State state() {if (!isDone())return State.RUNNING;if (isCancelled())return State.CANCELLED;boolean interrupted = false;try {while (true) {try {get();  // may throw InterruptedException when donereturn State.SUCCESS;} catch (InterruptedException e) {interrupted = true;} catch (ExecutionException e) {return State.FAILED;}}} finally {if (interrupted) Thread.currentThread().interrupt();}}
}
public static void main(String[] args) {try {//1.创建一个eventLoop组,类似于线程池NioEventLoopGroup group = new NioEventLoopGroup();//2.从group中获取一个eventLoop对象,类似于单线程,可以向其指定任务EventLoop eventLoop = group.next();//3.向其指定任务Future<Integer> future = eventLoop.submit(new Callable<Integer>() {@Overridepublic Integer call() throws Exception {return 20;}});//4.从future对象中,取出线程执行结果System.out.println(Thread.currentThread().getName() + future.get());future.addListener(new GenericFutureListener<Future<? super Integer>>() {@Overridepublic void operationComplete(Future<? super Integer> future) throws Exception {System.out.println(Thread.currentThread().getName() + future.getNow());}});} catch (InterruptedException e) {throw new RuntimeException(e);} catch (ExecutionException e) {throw new RuntimeException(e);}}
package io.netty.util.concurrent;import java.util.concurrent.TimeUnit;public interface Future<V> extends java.util.concurrent.Future<V> {boolean isSuccess();boolean isCancellable();Throwable cause();Future<V> addListener(GenericFutureListener<? extends Future<? super V>> var1);Future<V> addListeners(GenericFutureListener<? extends Future<? super V>>... var1);Future<V> removeListener(GenericFutureListener<? extends Future<? super V>> var1);Future<V> removeListeners(GenericFutureListener<? extends Future<? super V>>... var1);Future<V> sync() throws InterruptedException;Future<V> syncUninterruptibly();Future<V> await() throws InterruptedException;Future<V> awaitUninterruptibly();boolean await(long var1, TimeUnit var3) throws InterruptedException;boolean await(long var1) throws InterruptedException;boolean awaitUninterruptibly(long var1, TimeUnit var3);boolean awaitUninterruptibly(long var1);V getNow();boolean cancel(boolean var1);
}
public static void main(String[] args) {//1.创建一个线程池ExecutorService threadPool = Executors.newFixedThreadPool(20);//2.向线程池中提交任务Future<Integer> future = threadPool.submit(new Callable<Integer>() {@Overridepublic Integer call() throws Exception {int result = 25 * 2;return result;}});try {//通过future对象的相关方法,可以获得返回结果Integer result = future.get();System.out.println(result);} catch (InterruptedException e) {throw new RuntimeException(e);} catch (ExecutionException e) {throw new RuntimeException(e);}}
Promise接口
Promise对象也可以用于接收线程执行结果,并且是由开发人员控制全流程,更加自由灵活
public static void main(String[] args) {try {//NioEventLoopGroup group = new NioEventLoopGroup();EventLoop eventLoop = group.next();//手动创建promise对象DefaultPromise<Object> promise = new DefaultPromise<>(eventLoop);//指定另外的线程执行任务Thread thread = new Thread(new Runnable() {@Overridepublic void run() {try {System.out.println(Thread.currentThread().getName());promise.setSuccess(20);} catch (Exception e) {throw new RuntimeException(e);}}});thread.start();//从promise对象中获取结果Object result = promise.get();System.out.println(result);} catch (InterruptedException e) {throw new RuntimeException(e);} catch (ExecutionException e) {throw new RuntimeException(e);}}Handler和Pipeline
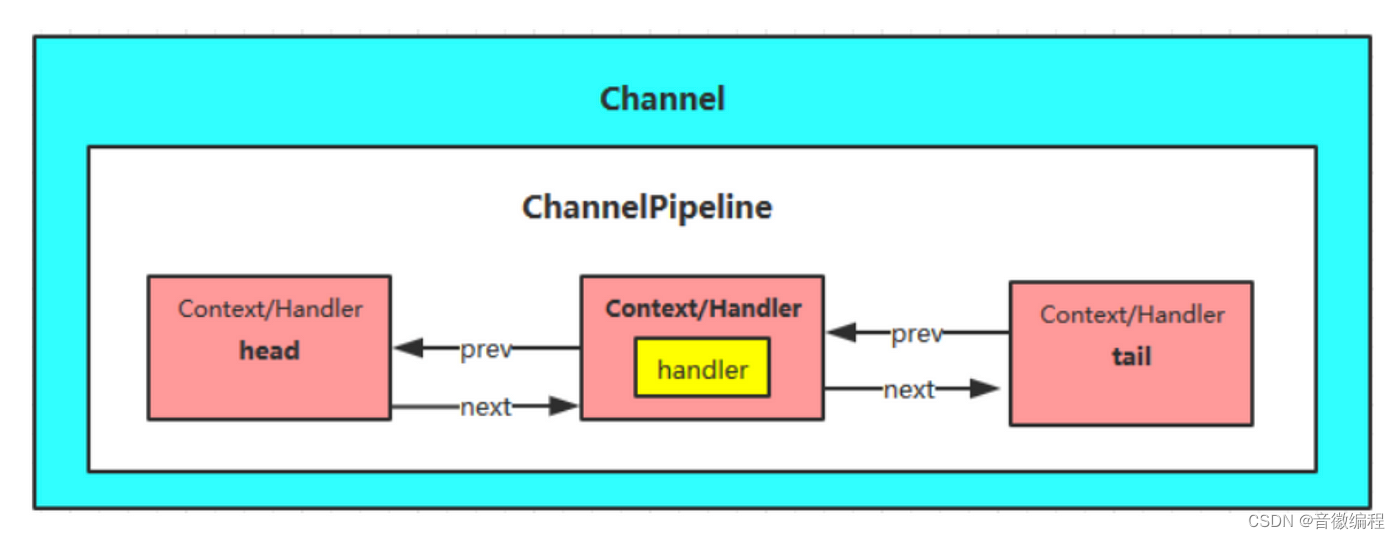
一个handler代表一个数据操作,而pipeline就是包括很多handler的流水线
开发人员可以通过编写handler,来完成对数据的加工处理
所有handler都存在底层的一个双向链表中
handler分为入站处理器和出站处理器,分别作用于接收数据和发送数据过程,无论服务端还是客户端都是这样
ByteBuf
ByteBuf 是一个字节容器,内部是一个字节数组。
组成
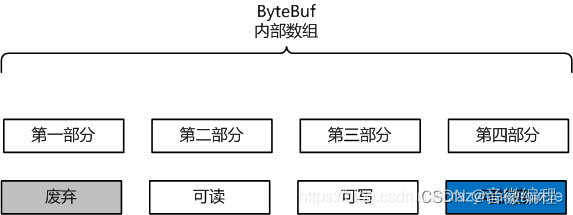
从逻辑上来分,字节容器内部,可以分为四个部分:

第一个部分是已经丢弃的字节,这部分数据是无效的;
第二部分是可读字节,这部分数据是 ByteBuf 的主体数据, 从 ByteBuf 里面读取的数据都来自这一部分;
第三部分的数据是可写字节,所有写到 ByteBuf 的数据都会写到这一段。
第四部分的字节,表示的是该 ByteBuf 最多还能扩容的大小。
四个部分的逻辑功能,如下图所示:
指针
通过指针对byteBuf进行操作
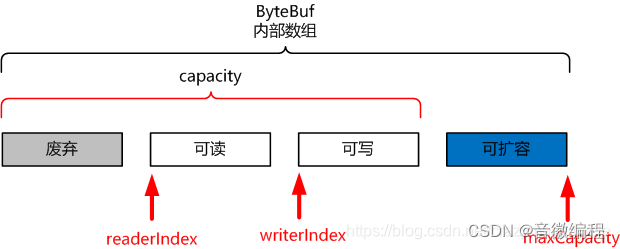
ByteBuf 通过三个整型的指针(index),有效地区分可读数据和可写数据,使得读写之间相互没有冲突。
这个三个指针,分别是:
readerIndex(读指针)
writerIndex(写指针)
maxCapacity(最大容量)
- readerIndex 读指针
指示读取的起始位置。
每读取一个字节,readerIndex 自增1 。一旦 readerIndex 与 writerIndex 相等,ByteBuf 不可读 。
- writerIndex 写指针
指示写入的起始位置。
每写一个字节,writerIndex 自增1。一旦增加到 writerIndex 与 capacity() 容量相等,表示 ByteBuf 已经不可写了 。
capacity()容量不是一个成员属性,是一个成员方法。表示 ByteBuf 内部的总容量。 注意,这个不是最大容量。
- maxCapacity 最大容量
指示可以 ByteBuf 扩容的最大容量。
当向 ByteBuf 写数据的时候,如果容量不足,可以进行扩容。
扩容的最大限度,直到 capacity() 扩容到 maxCapacity为止,超过 maxCapacity 就会报错。
capacity()扩容的操作,是底层自动进行的。
常用方法
public static void main(String[] args) {//获得一个byteBuf缓冲区对象ByteBuf buffer = ByteBufAllocator.DEFAULT.buffer();System.out.println(buffer.readerIndex() + "->" + buffer.writerIndex() + "|" + buffer.capacity() + "/" + buffer.maxCapacity());for (int i = 0; i < 500; i++) {buffer.writeByte(65);}System.out.println(buffer.readerIndex() + "->" + buffer.writerIndex() + "|" + buffer.capacity() + "/" + buffer.maxCapacity());for (int i = 0; i < 10; i++) {System.out.println("----------------------");System.out.println("data:"+buffer.readByte());System.out.println(buffer.readerIndex() + "->" + buffer.writerIndex() + "|" + buffer.capacity() + "/" + buffer.maxCapacity());System.out.println("----------------------");}}
第一组:容量系列
-
capacity():表示 ByteBuf 的容量,包括丢弃的字节数、可读字节数、可写字节数。
-
maxCapacity():表示 ByteBuf 底层最大能够占用的最大字节数。当向 ByteBuf 中写数据的时候,如果发现容量不足,则进行扩容,直到扩容到 maxCapacity。
第二组:写入系列
- isWritable():表示 ByteBuf 是否可写。如果 capacity() 容量大于 writerIndex 指针的位置 ,则表示可写。否则为不可写。
isWritable()的源码,也是很简单的。具体如下:
public boolean isWritable() {return this.capacity() > this.writerIndex;
}
注意:如果 isWritable() 返回 false,并不代表不能往 ByteBuf 中写数据了。 如果Netty发现往 ByteBuf 中写数据写不进去的话,会自动扩容 ByteBuf。
- writableBytes()
返回表示 ByteBuf 当前可写入的字节数,它的值等于 capacity()- writerIndex。
- maxWritableBytes()
返回可写的最大字节数,它的值等于 maxCapacity-writerIndex 。
- :**writeBytes(byte[] src) **
把字节数组 src 里面的数据全部写到 ByteBuf。
这个是最为常用的一个方法。
- writeTYPE(TYPE value) 基础类型写入方法
基础数据类型的写入,包含了 8大基础类型的写入。
具体如下:writeByte()、 writeBoolean()、writeChar()、writeShort()、writeInt()、writeLong()、writeFloat()、writeDouble() ,向 ByteBuf写入基础类型的数据。
- setTYPE(TYPE value)基础类型写入,不改变指针值
基础数据类型的写入,包含了 8大基础类型的写入。
具体如下:setByte()、 setBoolean()、setChar()、setShort()、setInt()、setLong()、setFloat()、setDouble() ,向 ByteBuf 写入基础类型的数据。
setType 系列与writeTYPE系列的不同:
setType 系列 不会 改变写指针 writerIndex ;
writeTYPE系列 会 改变写指针 writerIndex 的值。
- markWriterIndex() 与 resetWriterIndex()
这里两个方法一起介绍。
前一个方法,表示把当前的写指针writerIndex 保存在 markedWriterIndex 属性中;
后一个方法,表示把当前的写指针 writerIndex 恢复到之前保存的 markedWriterIndex 值 。
标记 markedWriterIndex 属性, 定义在 AbstractByteBuf 抽象基类中。
第三组:读取系列
方法一:isReadable()
表示 ByteBuf 是否可读。如果 writerIndex 指针的值大于 readerIndex 指针的值 ,则表示可读。否则为不可写。
isReadable()的源码,也是很简单的。具体如下:
public boolean isReadable() {
return this.writerIndex > this.readerIndex;
}
方法二:readableBytes()
返回表示 ByteBuf 当前可读取的字节数,它的值等于 writerIndex - readerIndex 。
方法三: readBytes(byte[] dst)
把 ByteBuf 里面的数据全部读取到 dst 字节数组中,这里 dst 字节数组的大小通常等于 readableBytes() 。 这个方法,也是最为常用的一个方法。
方法四:readType() 基础类型读取
基础数据类型的读取,可以读取 8大基础类型。
具体如下:readByte()、readBoolean()、readChar()、readShort()、readInt()、readLong()、readFloat()、readDouble() ,从 ByteBuf读取对应的基础类型的数据。
方法五:getTYPE(TYPE value)基础类型读取,不改变指针值
基础数据类型的读取,可以读取 8大基础类型。
具体如下:getByte()、 getBoolean()、getChar()、getShort()、getInt()、getLong()、getFloat()、getDouble() ,从 ByteBuf读取对应的基础类型的数据。
getType 系列与readTYPE系列的不同:
getType 系列 不会 改变读指针 readerIndex ;
readTYPE系列 会 改变读指针 readerIndex 的值。
方法六:markReaderIndex() 与 resetReaderIndex()
这里两个方法一起介绍。
前一个方法,表示把当前的读指针ReaderIndex 保存在 markedReaderIndex 属性中。
后一个方法,表示把当前的读指针 ReaderIndex 恢复到之前保存的 markedReaderIndex 值 。
标记 markedReaderIndex 属性, 定义在 AbstractByteBuf 抽象基类中。


)
)

)


)


