CompletableFuture
- 1 前言
- 1.1 Fork/Join
- 1.2 Future接口的局限性
- 2 正文
- 2.1 神奇的CompletableFuture
- 2.2 CompletableFuture API
- 2.3 组合式异步编程
- 2.4 几个小例子
1 前言
1.1 Fork/Join
1.概念
Fork/Join 是 JDK 1.7 加入的新的线程池实现,它体现的是一种分治思想,适用于能够进行任务拆分的 cpu 密集型运算
所谓的任务拆分,是将一个大任务拆分为算法上相同的小任务,直至不能拆分可以直接求解。跟递归相关的一些计算,如归并排序、斐波那契数列、都可以用分治思想进行求解
Fork/Join 在分治的基础上加入了多线程,可以把每个任务的分解和合并交给不同的线程来完成,进一步提升了运算效率
Fork/Join 默认会创建与 cpu 核心数大小相同的线程池
2.使用
提交给 Fork/Join 线程池的任务需要继承 RecursiveTask(有返回值)或 RecursiveAction(没有返回值),例如下面定义了一个对 1~n 之间的整数求和的任务
import java.util.concurrent.RecursiveTask;
import lombok.extern.slf4j.Slf4j;
/*** @author shenyang* @version 1.0* @info IO_dome* @since 2024/4/9 上午11:12*/
@Slf4j(topic = "c.AddTask")
class AddTask1 extends RecursiveTask<Integer> {int n;public AddTask1(int n) {this.n = n;}@Overridepublic String toString() {return "{" + n + '}';}@Overrideprotected Integer compute() {// 如果 n 已经为 1,可以求得结果了if (n == 1) {log.debug("join() {}", n);return n;}// 将任务进行拆分(fork)AddTask1 t1 = new AddTask1(n - 1);t1.fork();log.debug("fork() {} + {}", n, t1);// 合并(join)结果int result = n + t1.join();log.debug("join() {} + {} = {}", n, t1, result);return result;}
}
然后提交给 ForkJoinPool 来执行
public static void main(String[] args) {ForkJoinPool pool = new ForkJoinPool(4);System.out.println(pool.invoke(new AddTask1(5)));
}
结果
[ForkJoinPool-1-worker-0] - fork() 2 + {1}
[ForkJoinPool-1-worker-1] - fork() 5 + {4}
[ForkJoinPool-1-worker-0] - join() 1
[ForkJoinPool-1-worker-0] - join() 2 + {1} = 3
[ForkJoinPool-1-worker-2] - fork() 4 + {3}
[ForkJoinPool-1-worker-3] - fork() 3 + {2}
[ForkJoinPool-1-worker-3] - join() 3 + {2} = 6
[ForkJoinPool-1-worker-2] - join() 4 + {3} = 10
[ForkJoinPool-1-worker-1] - join() 5 + {4} = 15
15
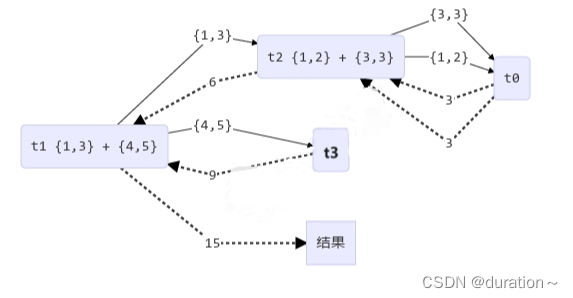
用图来表示

改进
import lombok.extern.slf4j.Slf4j;import java.util.concurrent.RecursiveTask;@Slf4j
class AddTask3 extends RecursiveTask<Integer> {int begin;int end;public AddTask3(int begin, int end) {this.begin = begin;this.end = end;}@Overridepublic String toString() {return "{" + begin + "," + end + '}';}@Overrideprotected Integer compute() {// 5, 5if (begin == end) {log.debug("join() {}", begin);return begin;}// 4, 5if (end - begin == 1) {log.debug("join() {} + {} = {}", begin, end, end + begin);return end + begin;}// 1 5int mid = (end + begin) / 2; // 3AddTask3 t1 = new AddTask3(begin, mid); // 1,3t1.fork();AddTask3 t2 = new AddTask3(mid + 1, end); // 4,5t2.fork();log.debug("fork() {} + {} = ?", t1, t2);int result = t1.join() + t2.join();log.debug("join() {} + {} = {}", t1, t2, result);return result;}
}
结果
[ForkJoinPool-1-worker-0] - join() 1 + 2 = 3
[ForkJoinPool-1-worker-3] - join() 4 + 5 = 9
[ForkJoinPool-1-worker-0] - join() 3
[ForkJoinPool-1-worker-1] - fork() {1,3} + {4,5} = ?
[ForkJoinPool-1-worker-2] - fork() {1,2} + {3,3} = ?
[ForkJoinPool-1-worker-2] - join() {1,2} + {3,3} = 6
[ForkJoinPool-1-worker-1] - join() {1,3} + {4,5} = 15
15
用图来表示

1.2 Future接口的局限性
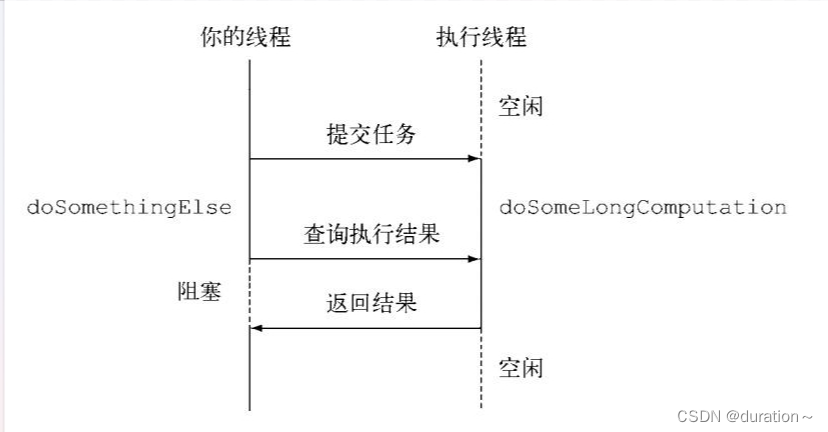
当我们得到包含结果的Future时,我们可以使用get方法等待线程完成并获取返回值,Future的get() 方法会阻塞主线程。 Future文档原文如下
A {@code Future} represents the result of an asynchronous computation.
Methods are provided to check if the computation is complete, to wait
for its completion, and to retrieve the result of the computation.
谷歌翻译:
{@code Future}代表异步*计算的结果。提供了一些方法来检查计算是否完成,等待其完成并检索计算结果。
Future执行耗时任务
由此我们得知,Future获取得线程执行结果前,我们的主线程get()得到结果需要一直阻塞等待,即使我们使用isDone()方法轮询去查看线程执行状态,但是这样也非常浪费cpu资源。

当Future的线程进行了一个非常耗时的操作,那我们的主线程也就阻塞了。 当我们在简单业务上,可以使用Future的另一个重载方法get(long,TimeUnit)来设置超时时间,避免我们的主线程被无穷尽地阻塞。 不过,有没有更好的解决方案呢?
因此,我们需要更强大异步能力
不仅如此,当我们在碰到一下业务场景的时候,单纯使用Future接口或者FutureTask类并不能很好地完成以下我们所需的业务
- 将两个异步计算合并为一个,这两个异步计算之间相互独立,同时第二个又依赖于第一个的结果
- 等待Future集合种的所有任务都完成。
- 仅等待Future集合种最快结束的任务完成(有可能因为他们试图通过不同的方式计算同一个值),并返回它的结果。
- 通过编程方式完成一个Future任务的执行(即以手工设定异步操作结果的方式)。
- 应对Future的完成时间(即当Future的完成时间完成时会收到通知,并能使用Future的计算结果进行下一步的的操作,不只是简单地阻塞等待操作的结果)
2 正文
2.1 神奇的CompletableFuture
什么是CompletableFuture?
在Java 8中, 新增加了一个包含50个方法左右的类: CompletableFuture,结合了Future的优点,提供了非常强大的Future的扩展功能,可以帮助我们简化异步编程的复杂性,提供了函数式编程的能力,可以通过回调的方式处理计算结果,并且提供了转换和组合CompletableFuture的方法。
CompletableFuture被设计在Java中进行异步编程。异步编程意味着在主线程之外创建一个独立的线程,与主线程分隔开,并在上面运行一个非阻塞的任务,然后通知主线程进展,成功或者失败。
通过这种方式,你的主线程不用为了任务的完成而阻塞/等待,你可以用主线程去并行执行其他的任务。 使用这种并行方式,极大地提升了程序的表现。
Java8源码doc注释:

译文:
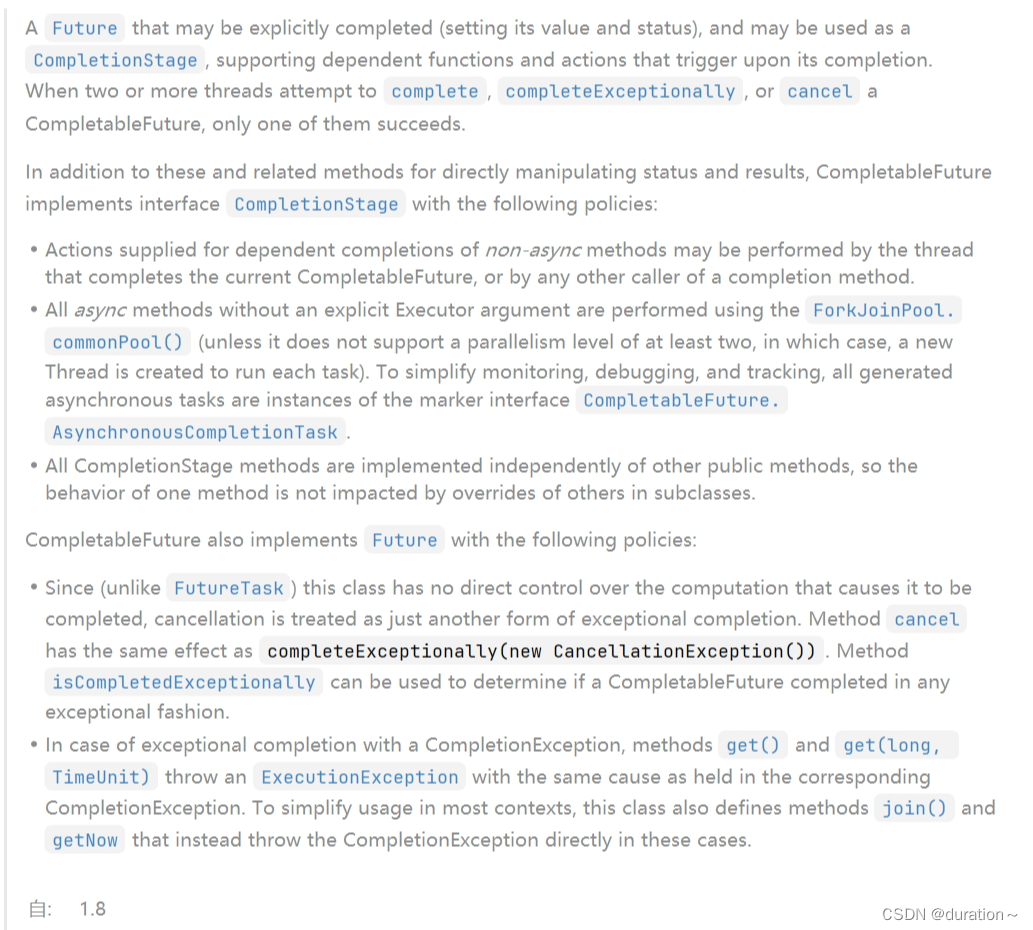
当一个Future可能需要显示地完成时,使用CompletionStage接口去支持完成时触发的函数和操作。
当2个以上线程同时尝试完成、异常完成、取消一个CompletableFuture时,只有一个能成功。CompletableFuture实现了CompletionStage接口的如下策略:
1.为了完成当前的CompletableFuture接口或者其他完成方法的回调函数的线程,提供了非异步的完成操作。
2.没有显式入参Executor的所有async方法都使用ForkJoinPool.commonPool()为了简化监视、调试和跟踪,
所有生成的异步任务都是标记接口AsynchronousCompletionTask的实例。3.所有的CompletionStage方法都是独立于其他共有方法实现的,因此一个方法的行为不会受到子类中其他
方法的覆盖。CompletableFuture实现了Futurre接口的如下策略:
1.CompletableFuture无法直接控制完成,所以cancel操作被视为是另一种异常完成形式。
方法isCompletedExceptionally可以用来确定一个CompletableFuture是否以任何异常的方式完成。2.以一个CompletionException为例,方法get()和get(long,TimeUnit)抛出一个ExecutionException,
对应CompletionException。为了在大多数上下文中简化用法,这个类还定义了方法join()和getNow,
而不是直接在这些情况中直接抛出CompletionException。
2.2 CompletableFuture API
想直接找例子上手的小伙伴可以跳过去后面
实例化CompletableFuture
实例化方式
public static <U> CompletableFuture<U> supplyAsync(Supplier<U> supplier);
public static <U> CompletableFuture<U> supplyAsync(Supplier<U> supplier, Executor executor);public static CompletableFuture<Void> runAsync(Runnable runnable);
public static CompletableFuture<Void> runAsync(Runnable runnable, Executor executor);
有两种格式,一种是supply开头的方法,一种是run开头的方法
- supply开头:这种方法,可以返回异步线程执行之后的结果
- run开头:这种不会返回结果,就只是执行线程任务
或者可以通过一个简单的无参构造器
CompletableFuture<String> completableFuture = new CompletableFuture<String>();
小贴士: 我们注意到,在实例化方法中,我们是可以指定Executor参数的,当我们不指定的试话,我们所开的并行线程使用的是默认系统及公共线程池ForkJoinPool,而且这些线程都是守护线程。我们在编程的时候需要谨慎使用守护线程,如果将我们普通的用户线程设置成守护线程,当我们的程序主线程结束,JVM中不存在其余用户线程,那么CompletableFuture的守护线程会直接退出,造成任务无法完成的问题,其余的包括守护线程阻塞问题我就不在本篇赘述。
Java8实战:
其中supplyAsync用于有返回值的任务,runAsync则用于没有返回值的任务。Executor参数可以手动指定线程池,否则默认ForkJoinPool.commonPool()系统级公共线程池,注意:这些线程都是Daemon线程,主线程结束Daemon线程不结束,只有JVM关闭时,生命周期终止。
获取结果
同步获取结果
public T    get()
public T    get(long timeout, TimeUnit unit)
public T    getNow(T valueIfAbsent)
public T    join()
简单的例子
CompletableFuture<Integer> future = new CompletableFuture<>();
Integer integer = future.get();
get() 方法同样会阻塞直到任务完成,上面的代码,主线程会一直阻塞,因为这种方式创建的future从未完成。有兴趣的小伙伴可以打个断点看看,状态会一直是not completed
前两个方法比较通俗易懂,认真看完上面Future部分的小伙伴肯定知道什么意思。 getNow() 则有所区别,参数valueIfAbsent的意思是当计算结果不存在或者Now时刻没有完成任务,给定一个确定的值。
join() 与get() 区别在于 join() 返回计算的结果或者抛出一个unchecked异常(CompletionException),而get() 返回一个具体的异常.
计算完成后续操作1——complete
public CompletableFuture<T>     whenComplete(BiConsumer<? super T,? super Throwable> action)
public CompletableFuture<T>     whenCompleteAsync(BiConsumer<? super T,? super Throwable> action)
public CompletableFuture<T>     whenCompleteAsync(BiConsumer<? super T,? super Throwable> action, Executor executor)
public CompletableFuture<T>     exceptionally(Function<Throwable,? extends T> fn)
方法1和2的区别在于是否使用异步处理,2和3的区别在于是否使用自定义的线程池,前三个方法都会提供一个返回结果和可抛出异常,我们可以使用lambda表达式的来接收这两个参数,然后自己处理。 方法4,接收一个可抛出的异常,且必须return一个返回值,类型与钻石表达式种的类型一样,详见下文的exceptionally() 部分,更详细
CompletableFuture<Integer> future = CompletableFuture.supplyAsync(() -> {return 10086;});future.whenComplete((result, error) -> {System.out.println("拨打"+result);error.printStackTrace();});
计算完成后续操作2——handle
public <U> CompletableFuture<U>     handle(BiFunction<? super T,Throwable,? extends U> fn)
public <U> CompletableFuture<U>     handleAsync(BiFunction<? super T,Throwable,? extends U> fn)
public <U> CompletableFuture<U>     handleAsync(BiFunction<? super T,Throwable,? extends U> fn, Executor executor)
眼尖的小伙伴可能已经发现了,handle方法集和上面的complete方法集没有区别,同样有两个参数一个返回结果和可抛出异常,区别就在于返回值,没错,虽然同样返回CompletableFuture类型,但是里面的参数类型,handle方法是可以自定义的。
// 开启一个异步方法CompletableFuture<List> future = CompletableFuture.supplyAsync(() -> {List<String> list = new ArrayList<>();list.add("语文");list.add("数学");// 获取得到今天的所有课程return list;});// 使用handle()方法接收list数据和error异常CompletableFuture<Integer> future2 = future.handle((list,error)-> {// 如果报错,就打印出异常error.printStackTrace();// 如果不报错,返回一个包含Integer的全新的CompletableFuturereturn list.size();// 注意这里的两个CompletableFuture包含的返回类型不同});
计算完成的后续操作3——apply
public <U> CompletableFuture<U>     thenApply(Function<? super T,? extends U> fn)
public <U> CompletableFuture<U>     thenApplyAsync(Function<? super T,? extends U> fn)
public <U> CompletableFuture<U>     thenApplyAsync(Function<? super T,? extends U> fn, Executor executor)
为什么这三个方法被称作,计算完成的后续操作2呢,因为apply方法和handle方法一样,都是结束计算之后的后续操作,唯一的不同是,handle方法会给出异常,可以让用户自己在内部处理,而apply方法只有一个返回结果,如果异常了,会被直接抛出,交给上一层处理。 如果不想每个链式调用都处理异常,那么就使用apply吧。
例子: 请看下面的 exceptionally() 示例
计算完成的后续操作4——accept
public CompletableFuture<Void>  thenAccept(Consumer<? super T> action)
public CompletableFuture<Void>  thenAcceptAsync(Consumer<? super T> action)
public CompletableFuture<Void>  thenAcceptAsync(Consumer<? super T> action, Executor executor)
accept()三个方法只做最终结果的消费,注意此时返回的CompletableFuture是空返回。只消费,无返回,有点像流式编程的终端操作。
例子: 请看下面的 exceptionally() 示例
捕获中间产生的异常——exceptionally
public CompletableFuture<T> exceptionally(Function<Throwable, ? extends T> fn)
exceptionally() 可以帮我们捕捉到所有中间过程的异常,方法会给我们一个异常作为参数,我们可以处理这个异常,同时返回一个默认值,跟服务降级 有点像,默认值的类型和上一个操作的返回值相同。
小贴士 : 向线程池提交任务的时候发生的异常属于外部异常,是无法捕捉到的,毕竟还没有开始执行任务。作者也是在触发线程池拒绝策略的时候发现的。exceptionally() 无法捕捉RejectedExecutionException()
// 实例化一个CompletableFuture,返回值是IntegerCompletableFuture<Integer> future = CompletableFuture.supplyAsync(() -> {// 返回nullreturn null;});CompletableFuture<String> exceptionally = future.thenApply(result -> {// 制造一个空指针异常NPEint i = result;return i;}).thenApply(result -> {// 这里不会执行,因为上面出现了异常String words = "现在是" + result + "点钟";return words;}).exceptionally(error -> {// 我们选择在这里打印出异常error.printStackTrace();// 并且当异常发生的时候,我们返回一个默认的文字return "出错啊~";});exceptionally.thenAccept(System.out::println);}
最后输出结果

2.3 组合式异步编程
组合两个completableFuture
还记得我们上面说的Future做不到的事吗
- 将两个异步计算合并为一个,这两个异步计算之间相互独立,同时第二个又依赖于第一个的结果。
thenApply()
假设一个场景,我是一个小学生,我想知道今天我需要上几门课程 此时我需要两个步骤,1.根据我的名字获取我的学生信息 2.根据我的学生信息查询课程 我们可以用下面这种方式来链式调用api,使用上一步的结果进行下一步操作
CompletableFuture<List<Lesson>> future = CompletableFuture.supplyAsync(() -> {// 根据学生姓名获取学生信息return StudentService.getStudent(name);}).thenApply(student -> {// 再根据学生信息获取今天的课程return LessonsService.getLessons(student);});
我们根据学生姓名获取学生信息,然后使用把得到的学生信息student传递到apply() 方法再获取得到学生今天的课程列表。
- 将两个异步计算合并为一个,这两个异步计算之间相互独立,互不依赖
thenCompose()
假设一个场景,我是一个小学生,今天有劳技课和美术课,我需要查询到今天需要带什么东西到学校
CompletableFuture<List<String>> total = CompletableFuture.supplyAsync(() -> {// 第一个任务获取美术课需要带的东西,返回一个listList<String> stuff = new ArrayList<>();stuff.add("画笔");stuff.add("颜料");return stuff;}).thenCompose(list -> {// 向第二个任务传递参数list(上一个任务美术课所需的东西list)CompletableFuture<List<String>> insideFuture = CompletableFuture.supplyAsync(() -> {List<String> stuff = new ArrayList<>();// 第二个任务获取劳技课所需的工具stuff.add("剪刀");stuff.add("折纸");// 合并两个list,获取课程所需所有工具List<String> allStuff = Stream.of(list, stuff).flatMap(Collection::stream).collect(Collectors.toList());return allStuff;});return insideFuture;});System.out.println(total.join().size());
我们通过 CompletableFuture.supplyAsync() 方法创建第一个任务,获得美术课所需的物品list,然后使用 thenCompose() 接口传递list到第二个任务,然后第二个任务获取劳技课所需的物品,整合之后再返回。至此我们完成两个任务的合并。 (说实话,用compose去实现这个业务场景看起来有点别扭,我们看下一个例子)
- 将两个异步计算合并为一个,这两个异步计算之间相互独立,互不依赖
thenCombine()
还是上面那个场景,我是一个小学生,今天有劳技课和美术课,我需要查询到今天需要带什么东西到学校
CompletableFuture<List<String>> painting = CompletableFuture.supplyAsync(() -> {// 第一个任务获取美术课需要带的东西,返回一个listList<String> stuff = new ArrayList<>();stuff.add("画笔");stuff.add("颜料");return stuff;});CompletableFuture<List<String>> handWork = CompletableFuture.supplyAsync(() -> {// 第二个任务获取劳技课需要带的东西,返回一个listList<String> stuff = new ArrayList<>();stuff.add("剪刀");stuff.add("折纸");return stuff;});CompletableFuture<List<String>> total = painting// 传入handWork列表,然后得到两个CompletableFuture的参数Stuff1和2.thenCombine(handWork, (stuff1, stuff2) -> {// 合并成新的listList<String> totalStuff = Stream.of(stuff1, stuff1).flatMap(Collection::stream).collect(Collectors.toList());return totalStuff;});System.out.println(JSONObject.toJSONString(total.join()));
- 等待Future集合中的所有任务都完成。
获取所有完成结果——allOf
public static CompletableFuture<Void> allOf(CompletableFuture<?>... cfs)
allOf方法,当所有给定的任务完成后,返回一个全新的已完成CompletableFuture
CompletableFuture<Integer> future1 = CompletableFuture.supplyAsync(() -> {try {//使用sleep()模拟耗时操作TimeUnit.SECONDS.sleep(2);} catch (InterruptedException e) {e.printStackTrace();}return 1;});CompletableFuture<Integer> future2 = CompletableFuture.supplyAsync(() -> {return 2;});CompletableFuture.allOf(future1, future1);// 输出3System.out.println(future1.join()+future2.join());
获取率先完成的任务结果——anyOf
- 仅等待Future集合种最快结束的任务完成(有可能因为他们试图通过不同的方式计算同一个值),并返回它的结果。
- 小贴士 : 如果最快完成的任务出现了异常,也会先返回异常,如果害怕出错可以加个 exceptionally() 去处理一下可能发生的异常并设定默认返回值
public static CompletableFuture<Object> anyOf(CompletableFuture<?>... cfs)
CompletableFuture<Integer> future = CompletableFuture.supplyAsync(() -> {throw new NullPointerException();});CompletableFuture<Integer> future2 = CompletableFuture.supplyAsync(() -> {try {// 睡眠3s模拟延时TimeUnit.SECONDS.sleep(3);} catch (InterruptedException e) {e.printStackTrace();}return 1;});CompletableFuture<Object> anyOf = CompletableFuture.anyOf(future, future2).exceptionally(error -> {error.printStackTrace();return 2;});System.out.println(anyOf.join());
2.4 几个小例子
多个方法组合使用
- 通过编程方式完成一个Future任务的执行(即以手工设定异步操作结果的方式)。
- 应对Future的完成时间(即当Future的完成时间完成时会收到通知,并能使用Future的计算结果进行下一步的的操作,不只是简单地阻塞等待操作的结果)
public static void main(String[] args) {CompletableFuture.supplyAsync(() -> 1).whenComplete((result, error) -> {System.out.println(result);error.printStackTrace();}).handle((result, error) -> {error.printStackTrace();return error;}).thenApply(Object::toString).thenApply(Integer::valueOf).thenAccept((param) -> System.out.println("done"));}
循环创建并发任务
public static void main(String[] args) {long begin = System.currentTimeMillis();// 自定义一个线程池ExecutorService executorService = Executors.newFixedThreadPool(10);// 循环创建10个CompletableFutureList<CompletableFuture<Integer>> collect = IntStream.range(1, 10).mapToObj(i -> {CompletableFuture<Integer> future = CompletableFuture.supplyAsync(() -> {// 在i=5的时候抛出一个NPEif (i == 5) {throw new NullPointerException();}try {// 每个依次睡眠1-9s,模拟线程耗时TimeUnit.SECONDS.sleep(i);} catch (InterruptedException e) {e.printStackTrace();}System.out.println(i);return i;}, executorService)// 这里处理一下i=5时出现的NPE// 如果这里不处理异常,那么异常会在所有任务完成后抛出,小伙伴可自行测试.exceptionally(Error -> {try {TimeUnit.SECONDS.sleep(5);System.out.println(100);} catch (InterruptedException e) {e.printStackTrace();}return 100;});return future;}).collect(Collectors.toList());// List列表转成CompletableFuture的Array数组,使其可以作为allOf()的参数// 使用join()方法使得主线程阻塞,并等待所有并行线程完成CompletableFuture.allOf(collect.toArray(new CompletableFuture[]{})).join();System.out.println("最终耗时" + (System.currentTimeMillis() - begin) + "毫秒");executorService.shutdown();}
使用CompletableFuture场景
- 执行比较耗时的操作时,尤其是那些依赖一个或多个远程服务的操作,使用异步任务可以改善程序的性能,加快程序的响应速度
- 使用CompletableFuture类,它提供了异常管理的机制,让你有机会抛出、管理异步任务执行种发生的异常
- 如果这些异步任务之间相互独立,或者他们之间的的某一些的结果是另一些的输入,你可以讲这些异步任务构造或合并成一个
小贴士 : 测试多线程的小伙伴请勿使用JUit单元测试,因为JUnit在主线程完成之后就会关闭JVM,有兴趣的小伙伴请自行百度
)
)


)

)


 ——Context)


引合,見積的概念,数据流(完了规则和参照Status),Copy管理,VBKD表的明细)


)
