图像分割:Pytorch实现UNet++进行医学细胞分割
- 前言
- 相关介绍
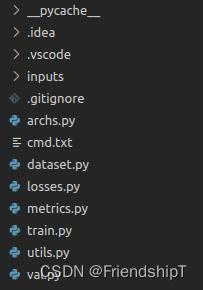
- 项目结构
- 具体步骤
- 准备数据集
- 读取数据集
- 设置并解析相关参数
- 定义网络模型
- 定义损失函数
- 定义优化器
- 训练
- 验证
- 参考

前言
- 由于本人水平有限,难免出现错漏,敬请批评改正。
- 更多精彩内容,可点击进入人工智能知识点专栏、Python日常小操作专栏、OpenCV-Python小应用专栏、YOLO系列专栏、自然语言处理专栏或我的个人主页查看
- 基于DETR的人脸伪装检测
- YOLOv7训练自己的数据集(口罩检测)
- YOLOv8训练自己的数据集(足球检测)
- YOLOv5:TensorRT加速YOLOv5模型推理
- YOLOv5:IoU、GIoU、DIoU、CIoU、EIoU
- 玩转Jetson Nano(五):TensorRT加速YOLOv5目标检测
- YOLOv5:添加SE、CBAM、CoordAtt、ECA注意力机制
- YOLOv5:yolov5s.yaml配置文件解读、增加小目标检测层
- Python将COCO格式实例分割数据集转换为YOLO格式实例分割数据集
- YOLOv5:使用7.0版本训练自己的实例分割模型(车辆、行人、路标、车道线等实例分割)
- 使用Kaggle GPU资源免费体验Stable Diffusion开源项目
相关介绍
UNet++:一种改进的医学图像分割网络
UNet++是一种基于经典的U-Net网络结构而进一步优化设计的深度学习模型,主要用于医学图像分割和其他高精度像素级分类任务。U-Net因其在保持图像细节的同时有效利用上下文信息的能力而在分割领域广受欢迎,而UNet++则在此基础上提出了更为精细化和深层次的特征融合机制。
- 论文地址:https://arxiv.org/pdf/1807.10165.pdf
- 官方源代码地址:https://github.com/MrGiovanni/UNetPlusPlus
- 有兴趣可查阅论文和官方源代码地址。
UNet++的关键创新点:
密集跳过连接:
- 在UNet中,跳跃连接直接将编码器阶段的低层次特征图与解码器阶段的对应高层次特征图进行拼接或求和操作。
- UNet++引入了更为密集的跳跃连接结构,不仅保留了U-Net的基本跳过连接模式,还增加了多个层级之间的细化连接,使得浅层和深层特征能够更加细致地融合在一起。
嵌套的解码器模块:
- UNet++在解码过程中采用嵌套的方式构建解码器模块,每个解码块内部包含更多的局部跳跃连接,这种设计允许模型更好地捕获不同尺度下的语义信息,并弥合编码器和解码器特征间的语义差距。
特征重采样与融合:
- 在解码阶段,UNet++不是简单地复制编码器的特征图到相应的解码位置,而是采用了逐层渐进式的特征融合策略,这样可以逐步整合不同层次的特征,从而提升分割效果。
结构概览:
- UNet++的整体架构仍然遵循U-Net的编码-解码思路,但其解码器部分包含了更多层次的特征融合模块。
- 每个解码模块都包含一系列卷积层以及与之对应的编码层特征融合单元,这些单元通过卷积运算和跳过连接机制有效地提取和融合多尺度特征。
应用场景:- 医学影像分割,如细胞、器官等微观结构的精确识别;
- 其他需要精细化分割的任务,包括但不限于遥感图像、自然场景图像等领域的应用。
总结: UNet++通过改进特征提取和融合过程,在保持计算效率的同时提升了分割性能,特别是在处理具有复杂细节和丰富语义信息的图像时表现出色。这一特性使其成为医学图像处理及其他细分领域图像分割任务的重要候选模型之一。
项目结构
具体步骤
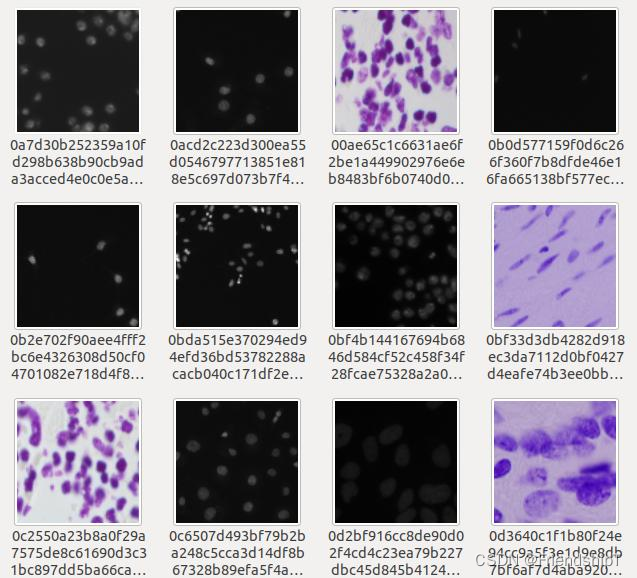
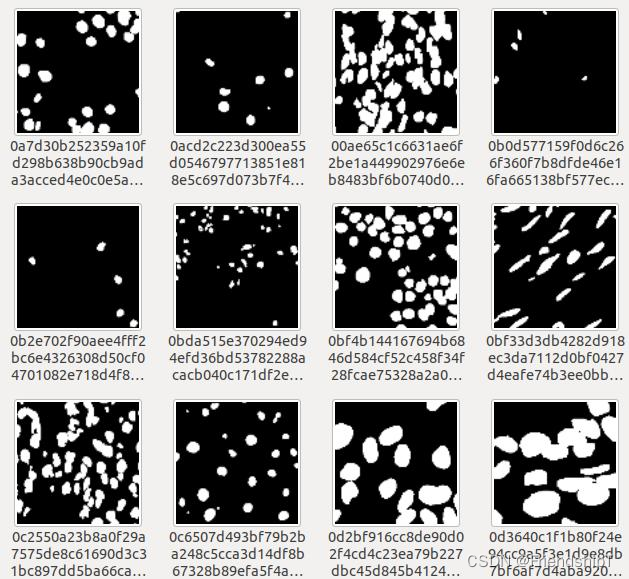
准备数据集
- 原图
- mask图
读取数据集
# Data loading codeimg_ids = glob(os.path.join('inputs', config['dataset'], 'images', '*' + config['img_ext']))img_ids = [os.path.splitext(os.path.basename(p))[0] for p in img_ids]train_img_ids, val_img_ids = train_test_split(img_ids, test_size=0.2, random_state=41)# 数据增强train_transform = Compose([albu.RandomRotate90(),albu.Flip(),OneOf([albu.HueSaturationValue(),albu.RandomBrightness(),albu.RandomContrast(),], p=1),#按照归一化的概率选择执行哪一个albu.Resize(config['input_h'], config['input_w']),albu.Normalize(),])val_transform = Compose([albu.Resize(config['input_h'], config['input_w']),albu.Normalize(),])train_dataset = Dataset(img_ids=train_img_ids,img_dir=os.path.join('inputs', config['dataset'], 'images'),mask_dir=os.path.join('inputs', config['dataset'], 'masks'),img_ext=config['img_ext'],mask_ext=config['mask_ext'],num_classes=config['num_classes'],transform=train_transform)val_dataset = Dataset(img_ids=val_img_ids,img_dir=os.path.join('inputs', config['dataset'], 'images'),mask_dir=os.path.join('inputs', config['dataset'], 'masks'),img_ext=config['img_ext'],mask_ext=config['mask_ext'],num_classes=config['num_classes'],transform=val_transform)train_loader = torch.utils.data.DataLoader(train_dataset,batch_size=config['batch_size'],shuffle=True,num_workers=config['num_workers'],drop_last=True)#不能整除的batch是否就不要了val_loader = torch.utils.data.DataLoader(val_dataset,batch_size=config['batch_size'],shuffle=False,num_workers=config['num_workers'],drop_last=False)
设置并解析相关参数
config = vars(parse_args())if config['name'] is None:if config['deep_supervision']:config['name'] = '%s_%s_wDS' % (config['dataset'], config['arch'])else:config['name'] = '%s_%s_woDS' % (config['dataset'], config['arch'])os.makedirs('models/%s' % config['name'], exist_ok=True)print('-' * 20)for key in config:print('%s: %s' % (key, config[key]))print('-' * 20)with open('models/%s/config.yml' % config['name'], 'w') as f:yaml.dump(config, f)
定义网络模型
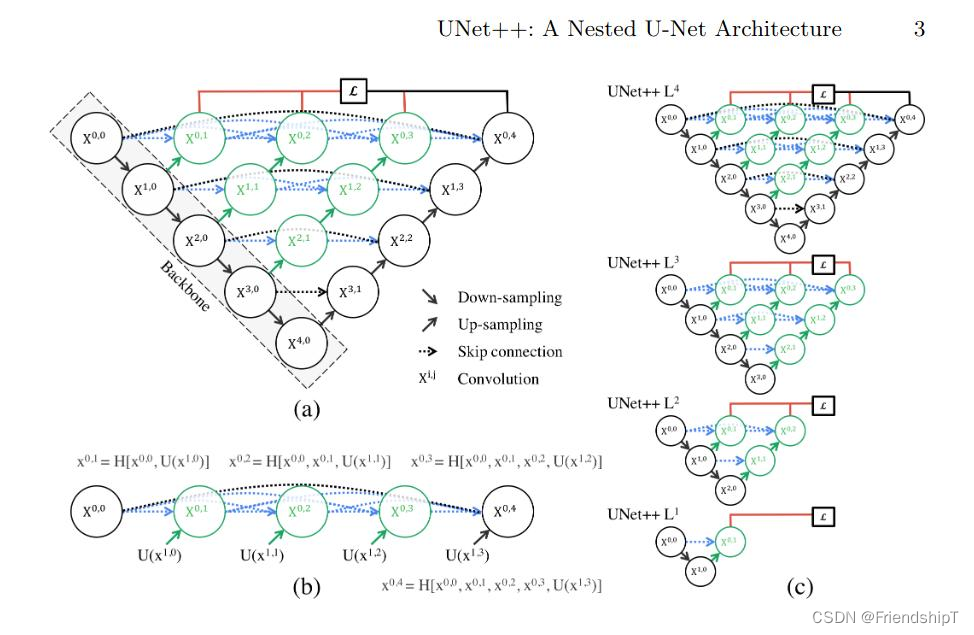
class VGGBlock(nn.Module):def __init__(self, in_channels, middle_channels, out_channels):super().__init__()self.relu = nn.ReLU(inplace=True)self.conv1 = nn.Conv2d(in_channels, middle_channels, 3, padding=1)self.bn1 = nn.BatchNorm2d(middle_channels)self.conv2 = nn.Conv2d(middle_channels, out_channels, 3, padding=1)self.bn2 = nn.BatchNorm2d(out_channels)def forward(self, x):out = self.conv1(x)out = self.bn1(out)out = self.relu(out)out = self.conv2(out)out = self.bn2(out)out = self.relu(out)return outclass NestedUNet(nn.Module):def __init__(self, num_classes, input_channels=3, deep_supervision=False, **kwargs):super().__init__()nb_filter = [32, 64, 128, 256, 512]self.deep_supervision = deep_supervisionself.pool = nn.MaxPool2d(2, 2)self.up = nn.Upsample(scale_factor=2, mode='bilinear', align_corners=True)self.conv0_0 = VGGBlock(input_channels, nb_filter[0], nb_filter[0])self.conv1_0 = VGGBlock(nb_filter[0], nb_filter[1], nb_filter[1])self.conv2_0 = VGGBlock(nb_filter[1], nb_filter[2], nb_filter[2])self.conv3_0 = VGGBlock(nb_filter[2], nb_filter[3], nb_filter[3])self.conv4_0 = VGGBlock(nb_filter[3], nb_filter[4], nb_filter[4])self.conv0_1 = VGGBlock(nb_filter[0]+nb_filter[1], nb_filter[0], nb_filter[0])self.conv1_1 = VGGBlock(nb_filter[1]+nb_filter[2], nb_filter[1], nb_filter[1])self.conv2_1 = VGGBlock(nb_filter[2]+nb_filter[3], nb_filter[2], nb_filter[2])self.conv3_1 = VGGBlock(nb_filter[3]+nb_filter[4], nb_filter[3], nb_filter[3])self.conv0_2 = VGGBlock(nb_filter[0]*2+nb_filter[1], nb_filter[0], nb_filter[0])self.conv1_2 = VGGBlock(nb_filter[1]*2+nb_filter[2], nb_filter[1], nb_filter[1])self.conv2_2 = VGGBlock(nb_filter[2]*2+nb_filter[3], nb_filter[2], nb_filter[2])self.conv0_3 = VGGBlock(nb_filter[0]*3+nb_filter[1], nb_filter[0], nb_filter[0])self.conv1_3 = VGGBlock(nb_filter[1]*3+nb_filter[2], nb_filter[1], nb_filter[1])self.conv0_4 = VGGBlock(nb_filter[0]*4+nb_filter[1], nb_filter[0], nb_filter[0])if self.deep_supervision:self.final1 = nn.Conv2d(nb_filter[0], num_classes, kernel_size=1)self.final2 = nn.Conv2d(nb_filter[0], num_classes, kernel_size=1)self.final3 = nn.Conv2d(nb_filter[0], num_classes, kernel_size=1)self.final4 = nn.Conv2d(nb_filter[0], num_classes, kernel_size=1)else:self.final = nn.Conv2d(nb_filter[0], num_classes, kernel_size=1)def forward(self, input):x0_0 = self.conv0_0(input)x1_0 = self.conv1_0(self.pool(x0_0))x0_1 = self.conv0_1(torch.cat([x0_0, self.up(x1_0)], 1))x2_0 = self.conv2_0(self.pool(x1_0))x1_1 = self.conv1_1(torch.cat([x1_0, self.up(x2_0)], 1))x0_2 = self.conv0_2(torch.cat([x0_0, x0_1, self.up(x1_1)], 1))x3_0 = self.conv3_0(self.pool(x2_0))x2_1 = self.conv2_1(torch.cat([x2_0, self.up(x3_0)], 1))x1_2 = self.conv1_2(torch.cat([x1_0, x1_1, self.up(x2_1)], 1))x0_3 = self.conv0_3(torch.cat([x0_0, x0_1, x0_2, self.up(x1_2)], 1))x4_0 = self.conv4_0(self.pool(x3_0))x3_1 = self.conv3_1(torch.cat([x3_0, self.up(x4_0)], 1))x2_2 = self.conv2_2(torch.cat([x2_0, x2_1, self.up(x3_1)], 1))x1_3 = self.conv1_3(torch.cat([x1_0, x1_1, x1_2, self.up(x2_2)], 1))x0_4 = self.conv0_4(torch.cat([x0_0, x0_1, x0_2, x0_3, self.up(x1_3)], 1))if self.deep_supervision:output1 = self.final1(x0_1)output2 = self.final2(x0_2)output3 = self.final3(x0_3)output4 = self.final4(x0_4)return [output1, output2, output3, output4]else:output = self.final(x0_4)return output
定义损失函数
- UNet++损失函数是二元交叉熵损失(Binary Cross Entropy, BCE)与Dice损失函数(Dice Coefficient Loss )的结合,相关介绍可查阅损失函数:BCE Loss(二元交叉熵损失函数)、Dice Loss(Dice相似系数损失函数)
class BCEDiceLoss(nn.Module):def __init__(self):super().__init__()def forward(self, input, target):bce = F.binary_cross_entropy_with_logits(input, target)smooth = 1e-5input = torch.sigmoid(input)num = target.size(0)input = input.view(num, -1)target = target.view(num, -1)intersection = (input * target)dice = (2. * intersection.sum(1) + smooth) / (input.sum(1) + target.sum(1) + smooth)dice = 1 - dice.sum() / numreturn 0.5 * bce + dice
# define loss function (criterion)if config['loss'] == 'BCEWithLogitsLoss':criterion = nn.BCEWithLogitsLoss().cuda()#WithLogits 就是先将输出结果经过sigmoid再交叉熵else:criterion = losses.__dict__[config['loss']]().cuda()cudnn.benchmark = True
定义优化器
params = filter(lambda p: p.requires_grad, model.parameters())if config['optimizer'] == 'Adam':optimizer = optim.Adam(params, lr=config['lr'], weight_decay=config['weight_decay'])elif config['optimizer'] == 'SGD':optimizer = optim.SGD(params, lr=config['lr'], momentum=config['momentum'],nesterov=config['nesterov'], weight_decay=config['weight_decay'])else:raise NotImplementedErrorif config['scheduler'] == 'CosineAnnealingLR':scheduler = lr_scheduler.CosineAnnealingLR(optimizer, T_max=config['epochs'], eta_min=config['min_lr'])elif config['scheduler'] == 'ReduceLROnPlateau':scheduler = lr_scheduler.ReduceLROnPlateau(optimizer, factor=config['factor'], patience=config['patience'],verbose=1, min_lr=config['min_lr'])elif config['scheduler'] == 'MultiStepLR':scheduler = lr_scheduler.MultiStepLR(optimizer, milestones=[int(e) for e in config['milestones'].split(',')], gamma=config['gamma'])elif config['scheduler'] == 'ConstantLR':scheduler = Noneelse:raise NotImplementedError
训练
def train(config, train_loader, model, criterion, optimizer):avg_meters = {'loss': AverageMeter(),'iou': AverageMeter()}model.train()pbar = tqdm(total=len(train_loader))for input, target, _ in train_loader:input = input.cuda()target = target.cuda()# compute outputif config['deep_supervision']:outputs = model(input)loss = 0for output in outputs:loss += criterion(output, target)loss /= len(outputs)iou = iou_score(outputs[-1], target)else:output = model(input)loss = criterion(output, target)iou = iou_score(output, target)# compute gradient and do optimizing stepoptimizer.zero_grad()loss.backward()optimizer.step()avg_meters['loss'].update(loss.item(), input.size(0))avg_meters['iou'].update(iou, input.size(0))postfix = OrderedDict([('loss', avg_meters['loss'].avg),('iou', avg_meters['iou'].avg),])pbar.set_postfix(postfix)pbar.update(1)pbar.close()return OrderedDict([('loss', avg_meters['loss'].avg),('iou', avg_meters['iou'].avg)])
$ python train.py --dataset dsb2018_96 --arch NestedUNet
--------------------
arch NestedUNet
--------------------
name: dsb2018_96_NestedUNet_woDS
epochs: 100
batch_size: 8
arch: NestedUNet
deep_supervision: False
input_channels: 3
num_classes: 1
input_w: 96
input_h: 96
loss: BCEDiceLoss
dataset: dsb2018_96
img_ext: .png
mask_ext: .png
optimizer: SGD
lr: 0.001
momentum: 0.9
weight_decay: 0.0001
nesterov: False
scheduler: CosineAnnealingLR
min_lr: 1e-05
factor: 0.1
patience: 2
milestones: 1,2
gamma: 0.6666666666666666
early_stopping: -1
num_workers: 0
--------------------
=> creating model NestedUNet
/home/leiwei/anaconda3/envs/mycuda/lib/python3.8/site-packages/albumentations/augmentations/transforms.py:1800: FutureWarning: This class has been deprecated. Please use RandomBrightnessContrastwarnings.warn(
/home/leiwei/anaconda3/envs/mycuda/lib/python3.8/site-packages/albumentations/augmentations/transforms.py:1826: FutureWarning: This class has been deprecated. Please use RandomBrightnessContrastwarnings.warn(
Epoch [0/100]
100%|███████████████████████████████████████████████████████████████████| 67/67 [00:04<00:00, 16.68it/s, loss=1.06, iou=0.291]
100%|███████████████████████████████████████████████████████████████████| 17/17 [00:00<00:00, 33.02it/s, loss=1.14, iou=0.163]
loss 1.0559 - iou 0.2912 - val_loss 1.1419 - val_iou 0.1633
=> saved best model
Epoch [1/100]
100%|██████████████████████████████████████████████████████████████████| 67/67 [00:03<00:00, 20.44it/s, loss=0.829, iou=0.519]
100%|██████████████████████████████████████████████████████████████████| 17/17 [00:00<00:00, 53.06it/s, loss=0.746, iou=0.609]
loss 0.8288 - iou 0.5193 - val_loss 0.7464 - val_iou 0.6088
=> saved best model
Epoch [2/100]
100%|██████████████████████████████████████████████████████████████████| 67/67 [00:03<00:00, 20.37it/s, loss=0.705, iou=0.577]
100%|███████████████████████████████████████████████████████████████████| 17/17 [00:00<00:00, 52.80it/s, loss=0.629, iou=0.66]
loss 0.7047 - iou 0.5771 - val_loss 0.6294 - val_iou 0.6601
=> saved best model
......
Epoch [97/100]
100%|██████████████████████████████████████████████████████████████████| 67/67 [00:03<00:00, 20.28it/s, loss=0.178, iou=0.813]
100%|██████████████████████████████████████████████████████████████████| 17/17 [00:00<00:00, 53.27it/s, loss=0.165, iou=0.831]
loss 0.1782 - iou 0.8127 - val_loss 0.1651 - val_iou 0.8313
Epoch [98/100]
100%|██████████████████████████████████████████████████████████████████| 67/67 [00:03<00:00, 20.16it/s, loss=0.185, iou=0.802]
100%|██████████████████████████████████████████████████████████████████| 17/17 [00:00<00:00, 53.31it/s, loss=0.166, iou=0.826]
loss 0.1848 - iou 0.8017 - val_loss 0.1656 - val_iou 0.8264
Epoch [99/100]
100%|██████████████████████████████████████████████████████████████████| 67/67 [00:03<00:00, 20.02it/s, loss=0.204, iou=0.788]
100%|██████████████████████████████████████████████████████████████████| 17/17 [00:00<00:00, 52.86it/s, loss=0.168, iou=0.833]
loss 0.2035 - iou 0.7876 - val_loss 0.1677 - val_iou 0.8328
验证
import argparse
import os
from glob import glob
import matplotlib.pyplot as plt
import numpy as np
import cv2
import torch
import torch.backends.cudnn as cudnn
import yaml
from albumentations.augmentations import transforms
from albumentations.core.composition import Compose# tfx20240410
import albumentations as albufrom sklearn.model_selection import train_test_split
from tqdm import tqdmimport archs
from dataset import Dataset
from metrics import iou_score
from utils import AverageMeter
"""
需要指定参数:--name dsb2018_96_NestedUNet_woDS
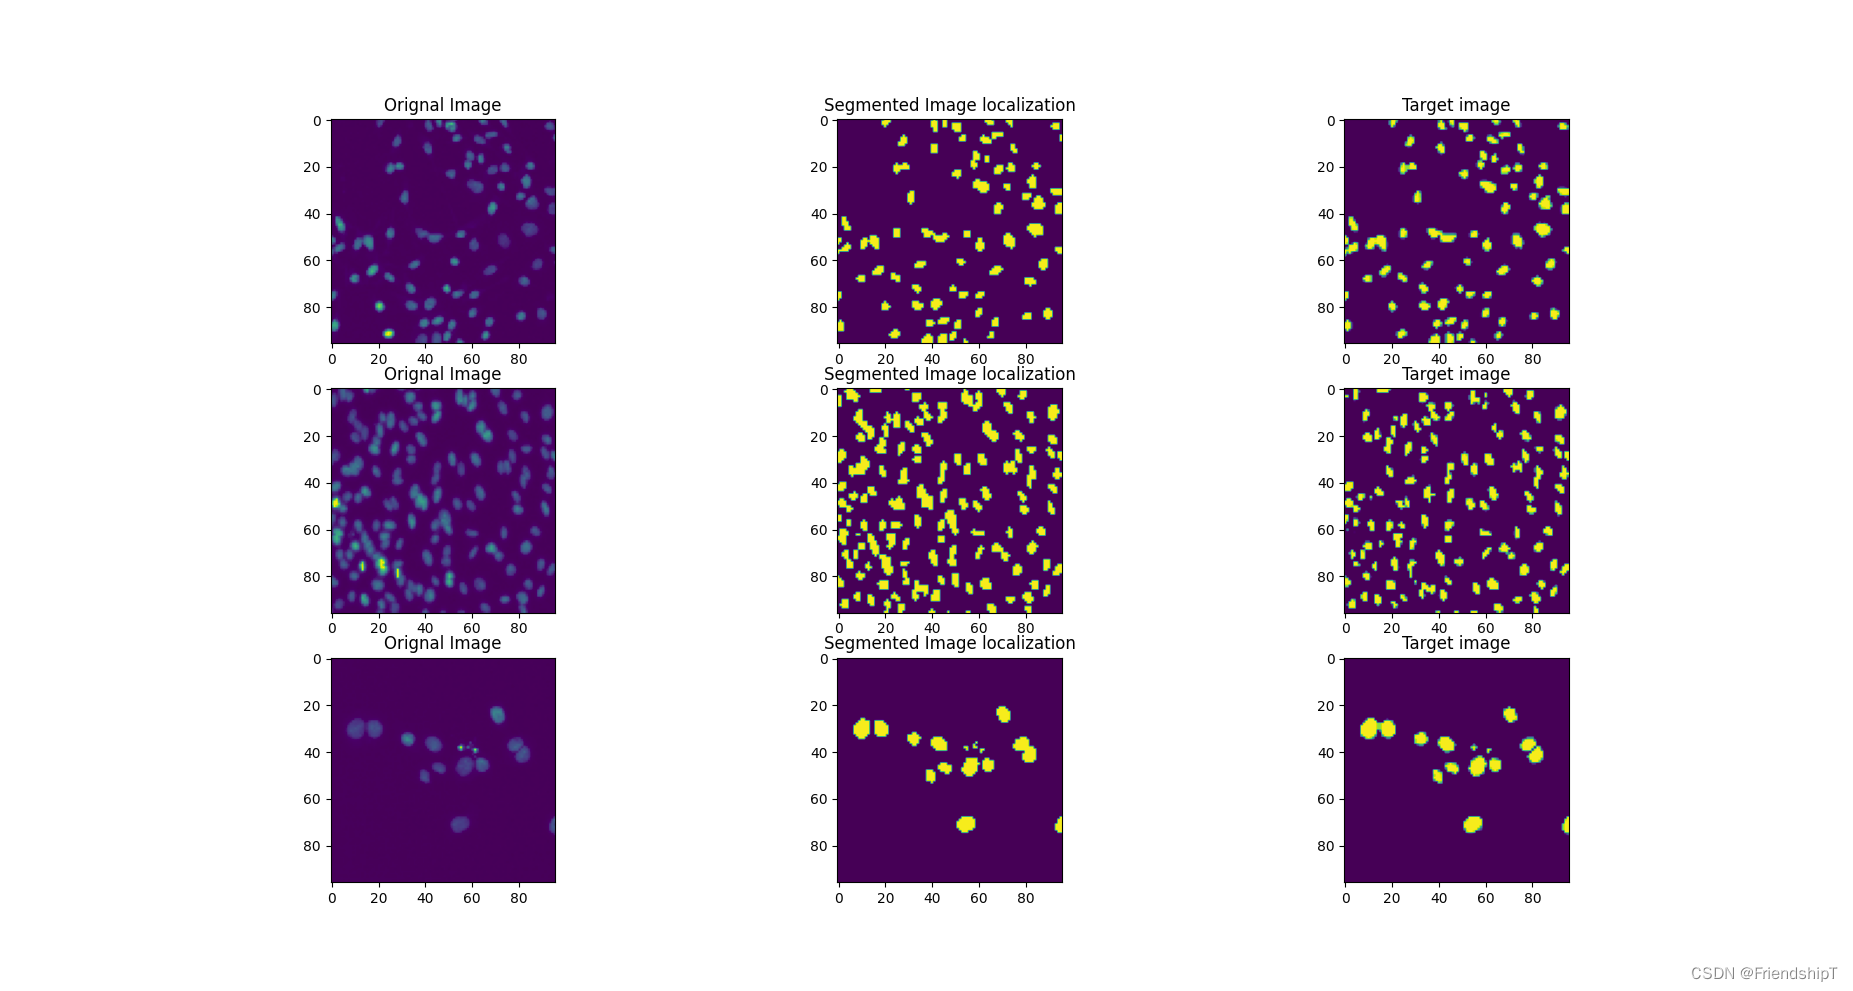
"""def parse_args():parser = argparse.ArgumentParser()parser.add_argument('--name', default=None,help='model name')args = parser.parse_args()return argsdef main():args = parse_args()with open('models/%s/config.yml' % args.name, 'r') as f:config = yaml.load(f, Loader=yaml.FullLoader)print('-'*20)for key in config.keys():print('%s: %s' % (key, str(config[key])))print('-'*20)cudnn.benchmark = True# create modelprint("=> creating model %s" % config['arch'])model = archs.__dict__[config['arch']](config['num_classes'],config['input_channels'],config['deep_supervision'])model = model.cuda()# Data loading codeimg_ids = glob(os.path.join('inputs', config['dataset'], 'images', '*' + config['img_ext']))img_ids = [os.path.splitext(os.path.basename(p))[0] for p in img_ids]_, val_img_ids = train_test_split(img_ids, test_size=0.2, random_state=41)model.load_state_dict(torch.load('models/%s/model.pth' %config['name']))model.eval()# val_transform = Compose([#     transforms.Resize(config['input_h'], config['input_w']),#     transforms.Normalize(),# ])# tfx20240410 val_transform = Compose([albu.Resize(config['input_h'], config['input_w']),albu.Normalize(),])val_dataset = Dataset(img_ids=val_img_ids,img_dir=os.path.join('inputs', config['dataset'], 'images'),mask_dir=os.path.join('inputs', config['dataset'], 'masks'),img_ext=config['img_ext'],mask_ext=config['mask_ext'],num_classes=config['num_classes'],transform=val_transform)val_loader = torch.utils.data.DataLoader(val_dataset,batch_size=config['batch_size'],shuffle=False,num_workers=config['num_workers'],drop_last=False)avg_meter = AverageMeter()for c in range(config['num_classes']):os.makedirs(os.path.join('outputs', config['name'], str(c)), exist_ok=True)with torch.no_grad():for input, target, meta in tqdm(val_loader, total=len(val_loader)):input = input.cuda()target = target.cuda()# compute outputif config['deep_supervision']:output = model(input)[-1]else:output = model(input)iou = iou_score(output, target)avg_meter.update(iou, input.size(0))output = torch.sigmoid(output).cpu().numpy()for i in range(len(output)):for c in range(config['num_classes']):cv2.imwrite(os.path.join('outputs', config['name'], str(c), meta['img_id'][i] + '.jpg'),(output[i, c] * 255).astype('uint8'))print('IoU: %.4f' % avg_meter.avg)plot_examples(input, target, model,num_examples=3)torch.cuda.empty_cache()def plot_examples(datax, datay, model,num_examples=6):fig, ax = plt.subplots(nrows=num_examples, ncols=3, figsize=(18,4*num_examples))m = datax.shape[0]for row_num in range(num_examples):image_indx = np.random.randint(m)image_arr = model(datax[image_indx:image_indx+1]).squeeze(0).detach().cpu().numpy()ax[row_num][0].imshow(np.transpose(datax[image_indx].cpu().numpy(), (1,2,0))[:,:,0])ax[row_num][0].set_title("Orignal Image")ax[row_num][1].imshow(np.squeeze((image_arr > 0.40)[0,:,:].astype(int)))ax[row_num][1].set_title("Segmented Image localization")ax[row_num][2].imshow(np.transpose(datay[image_indx].cpu().numpy(), (1,2,0))[:,:,0])ax[row_num][2].set_title("Target image")plt.show()if __name__ == '__main__':main()
$ python val.py --name dsb2018_96_NestedUNet_woDS
--------------------
arch: NestedUNet
batch_size: 8
dataset: dsb2018_96
deep_supervision: False
early_stopping: -1
epochs: 100
factor: 0.1
gamma: 0.6666666666666666
img_ext: .png
input_channels: 3
input_h: 96
input_w: 96
loss: BCEDiceLoss
lr: 0.001
mask_ext: .png
milestones: 1,2
min_lr: 1e-05
momentum: 0.9
name: dsb2018_96_NestedUNet_woDS
nesterov: False
num_classes: 1
num_workers: 0
optimizer: SGD
patience: 2
scheduler: CosineAnnealingLR
weight_decay: 0.0001
--------------------
=> creating model NestedUNet
100%|█████████████████████████████████████████████████████████████████████████████████████████| 17/17 [00:00<00:00, 21.87it/s]
IoU: 0.8358
参考
[1] Zongwei Zhou, Md Mahfuzur Rahman Siddiquee, Nima Tajbakhsh, and Jianming Liang. UNet++: A Nested U-Net Architecture for Medical Image Segmentation. 2020
[2] UNet++源代码地址. https://github.com/MrGiovanni/UNetPlusPlus
- 由于本人水平有限,难免出现错漏,敬请批评改正。
- 更多精彩内容,可点击进入人工智能知识点专栏、Python日常小操作专栏、OpenCV-Python小应用专栏、YOLO系列专栏、自然语言处理专栏或我的个人主页查看
- 基于DETR的人脸伪装检测
- YOLOv7训练自己的数据集(口罩检测)
- YOLOv8训练自己的数据集(足球检测)
- YOLOv5:TensorRT加速YOLOv5模型推理
- YOLOv5:IoU、GIoU、DIoU、CIoU、EIoU
- 玩转Jetson Nano(五):TensorRT加速YOLOv5目标检测
- YOLOv5:添加SE、CBAM、CoordAtt、ECA注意力机制
- YOLOv5:yolov5s.yaml配置文件解读、增加小目标检测层
- Python将COCO格式实例分割数据集转换为YOLO格式实例分割数据集
- YOLOv5:使用7.0版本训练自己的实例分割模型(车辆、行人、路标、车道线等实例分割)
- 使用Kaggle GPU资源免费体验Stable Diffusion开源项目

)
)


Parametrize源码拆解)


)
![[重学Python]Day3 函数和模块的使用](http://pic.xiahunao.cn/[重学Python]Day3 函数和模块的使用)

