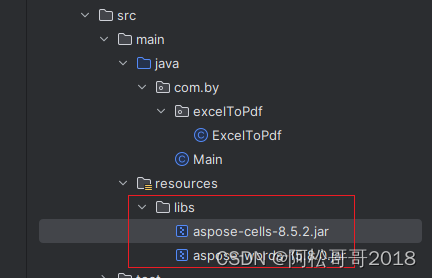
< dependency> < groupId> </ groupId> < artifactId> </ artifactId> < scope> </ scope> < systemPath> </ systemPath> < version> </ version> </ dependency> < dependency> < groupId> </ groupId> < artifactId> </ artifactId> < scope> </ scope> < systemPath> </ systemPath> < version> </ version> </ dependency> < build> < finalName> </ finalName> < plugins> < plugin> < groupId> </ groupId> < artifactId> </ artifactId> < configuration> < includeSystemScope> </ includeSystemScope> </ configuration> </ plugin> </ plugins> </ build> package com. by. excelToPdf ; import com. aspose. cells. License ;
import com. aspose. cells. PdfSaveOptions ;
import com. aspose. cells. Workbook ; import java. io. ByteArrayInputStream ;
import java. io. ByteArrayOutputStream ;
import java. io. FileOutputStream ;
import java. io. InputStream ; public class PdfUtil { public static ByteArrayOutputStream excel2pdf ( ByteArrayInputStream is) { ByteArrayOutputStream bos = null ; try { bos = new ByteArrayOutputStream ( ) ; getLicense ( ) ; Workbook wb = new Workbook ( is) ; PdfSaveOptions pdfSaveOptions = new PdfSaveOptions ( ) ; pdfSaveOptions. setOnePagePerSheet ( true ) ; wb. save ( bos, pdfSaveOptions) ; bos. flush ( ) ; bos. close ( ) ; } catch ( Exception e) { System . out. println ( "convert failed" ) ; e. printStackTrace ( ) ; } return bos; } public static void excel2pdf ( String excelFilePath) { excel2pdf ( excelFilePath, null , null ) ; } public static void excel2pdf ( String excelFilePath, int [ ] convertSheets) { excel2pdf ( excelFilePath, null , convertSheets) ; } public static void excel2pdf ( String excelFilePath, String pdfFilePath) { excel2pdf ( excelFilePath, pdfFilePath, null ) ; } public static void excel2pdf ( String excelFilePath, String pdfFilePath, int [ ] convertSheets) { try { pdfFilePath = pdfFilePath == null ? getPdfFilePath ( excelFilePath) : pdfFilePath; getLicense ( ) ; Workbook wb = new Workbook ( excelFilePath) ; FileOutputStream fileOS = new FileOutputStream ( pdfFilePath) ; PdfSaveOptions pdfSaveOptions = new PdfSaveOptions ( ) ; pdfSaveOptions. setOnePagePerSheet ( true ) ; if ( null != convertSheets) { printSheetPage ( wb, convertSheets) ; } wb. save ( fileOS, pdfSaveOptions) ; fileOS. flush ( ) ; fileOS. close ( ) ; System . out. println ( "convert success" ) ; } catch ( Exception e) { System . out. println ( "convert failed" ) ; e. printStackTrace ( ) ; } } private static String getPdfFilePath ( String excelFilePath) { return excelFilePath. split ( "\\." ) [ 0 ] + ".pdf" ; } private static void getLicense ( ) { String licenseFilePath = "excel-license.xml" ; try { InputStream is = PdfUtil . class . getClassLoader ( ) . getResourceAsStream ( licenseFilePath) ; License license = new License ( ) ; license. setLicense ( is) ; } catch ( Exception e) { System . out. println ( "license verify failed" ) ; e. printStackTrace ( ) ; } } private static void printSheetPage ( Workbook wb, int [ ] sheets) { for ( int i = 1 ; i < wb. getWorksheets ( ) . getCount ( ) ; i++ ) { wb. getWorksheets ( ) . get ( i) . setVisible ( false ) ; } if ( null == sheets || sheets. length == 0 ) { wb. getWorksheets ( ) . get ( 0 ) . setVisible ( true ) ; } else { for ( int i = 0 ; i < sheets. length; i++ ) { wb. getWorksheets ( ) . get ( i) . setVisible ( true ) ; } } }
} public static void main ( String [ ] args) { String inputFile = "D:/testPdf/222.xlsx" ; String outputFile = "D:/testPdf/222.pdf" ; PdfUtil . excel2pdf ( inputFile, outputFile) ; }
linux环境查看字段方法 字体路径/usr/share/fonts
fc-cache
fc-list
fc-list :lang= zh
如果无中文字体 我们可能把windows环境中的字段上传至linux字段目录下,windows环境字段路径C:\Windows\Fonts,上传后安装字段 yum -y install mkfontscale mkfontdir fontconfig
mkfontscale && mkfontdir && fc-cache
如果使用docker 容器启动的应用服务,则还需要使用挂载卷的方式,将宿主体的字体和容器共享,具体方式即启动容器时 加上 “-v /usr/share/fonts/:/usr/share/fonts” 
 got an unexpected keyword argument ‘reducing_gap‘)

)


)


