这里写目录标题
- 材料准备
- 宿主机安装KVM
- 网络规划
- 硬件规划
- 本案例局限性
- 密码规划
- 虚拟机准备
- 网络准备
- centos7模板机准备
- 数据库安装
- 安装rabbitMQ消息队列
- 安装memcached服务
- 安装Etcd
- 安装keystone身份服务
- 创建数据库用户keystone
- 安装keystone组件
- 创建admin并启动keystone监听
- 验证keystone是否可用
- 创建域、项目、demo用户
- 再次验证keystone服务的安装
- 创建用户openRC文件
- 安装Glance镜像服务
- 数据库中创建glance用户
- 创建glance用户凭据
- 安装glance组件
- 安装Placement放置服务
- 数据库用户placement创建
- 创建placement相关service和端点
- 组件安装和配置
- 验证placement安装
- 安装Nova计算服务
- 计算节点上的nova组件
- 安装Neutron网络服务
- 安装Horizon面板
- 安装Cinder块存储服务
- 安装swift对象存储
材料准备
- 宿主机:华为服务器一台。系统Debian12.5,96GB内存,硬盘空间1.5TB以上。
- 虚拟化软件:KVM(virt-manager图形化)。
Why KVM? 我们的实验环境是双网口,网口1是管理面,网口2给Openstack虚拟机提供外网的。在安装openstack过程中,网口2不能设置ip,否则L3网络组件无法安装。且网口2需要有能力访问外网,所以这个网口要一个NAT。安装过程需要从外网下载openstack组件,一个网口已经没有ip了,软件包只能通过管理面的网口1去下载,所以管理面网口也要有访问外网的能力,所以要求本实验的虚拟化软件支持创建双NAT。据我所知,双NAT网络只有KVM能够做到,VMware workstation和Virtualbox都做不到(vmware只允许创建一个NAT网络)。故以本次实验物理机需要Linux,虚拟化用KVM!
真正的生产环境,会提前把openstack组件打包到系统里,形成UVP系统(Unified Virtualization Platform),管理面无需访问外网,在内网中pxe装机即可,生产环境也不止2个网口。 - centos7镜像:https://mirrors.ustc.edu.cn/centos/7.9.2009/isos/x86_64/CentOS-7-x86_64-Everything-2009.iso
宿主机安装KVM
# 安装桌面
apt update && apt -y upgrade
apt -y install ubuntu-desktop
apt -y install xrdp
systemctl enable xrdp --now
# 安装virt-manager
apt -y install qemu-system qemu-kvm virt-manager bridge-utils vlan# 关闭防火墙
ufw disable
网络规划
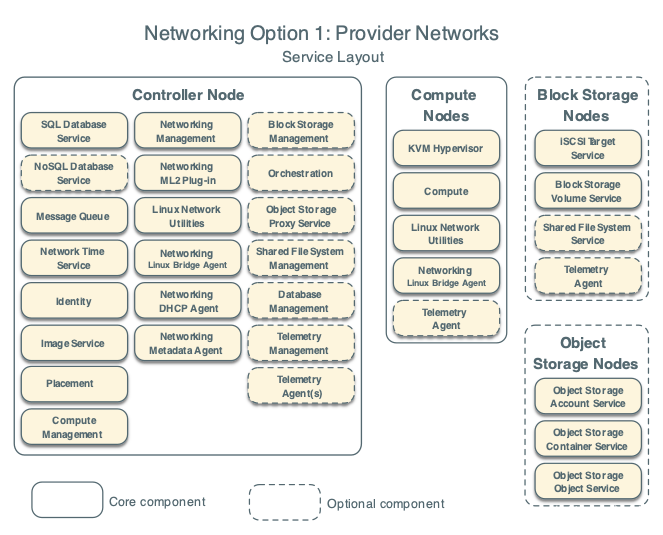
openstack提供者网络,为虚拟机提供外网。弹性公网IP、公网NAT网关出自这种网络
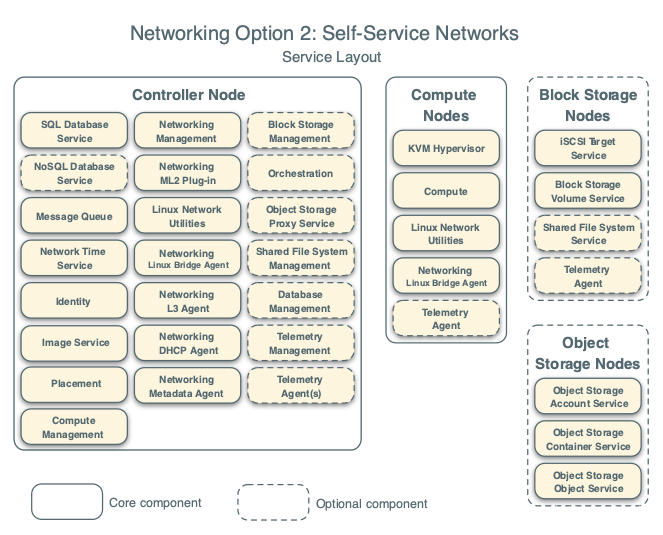
openstack自服务网络。vpc功能出自这个网络。
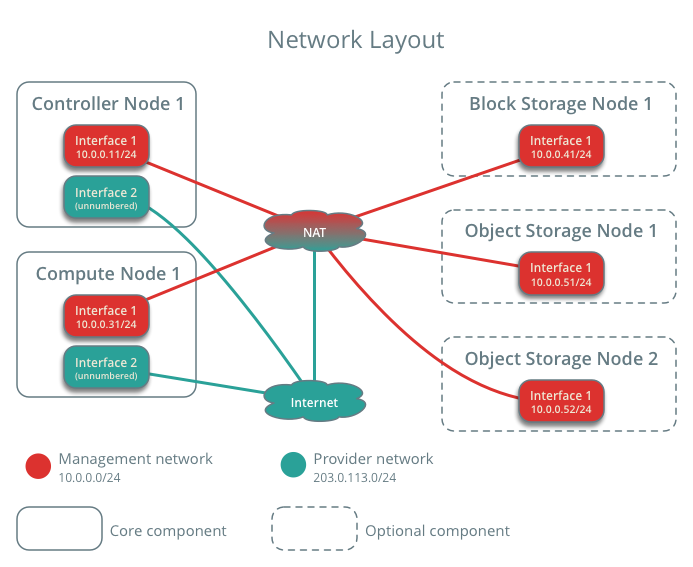
网络拓扑:
硬件规划
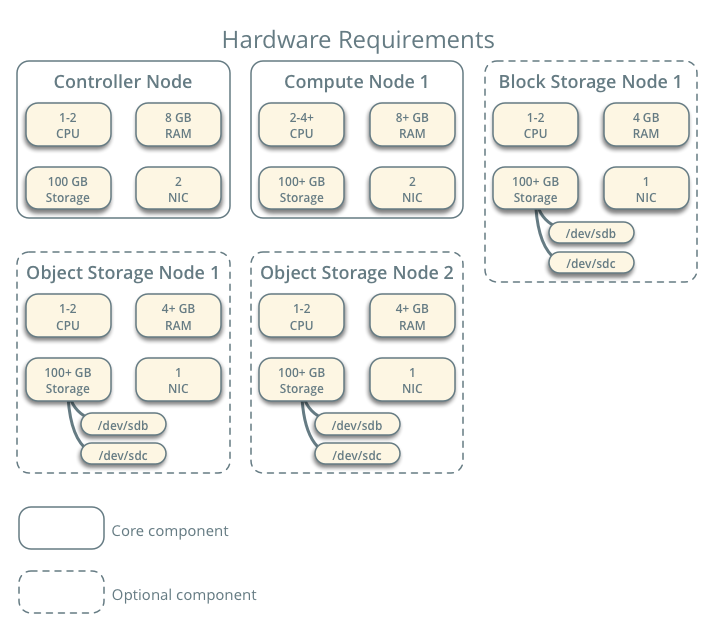
为了展示全部openstack IAAS层功能,需创建5个虚拟机,每个虚拟机至少2个vcpu,8GB内存,100GB系统盘。
controller控制节点1个,nova计算节点1个,cinder块存储节点1个,swift块备份节点2个。控制和计算节点需要双网口,存储节点单网口。存储节点需要额外2个物理硬盘用于组成vg。
本案例局限性
- 不适合生产,只供学习的概念性平台。生产上需要单独设置租户面网络。块存储采用先进的RDMA方式(华为云采用这种方式),而不是传统的iscsi挂载云盘。
- 生产上需要有专门的网络节点,用于运行OVN的南北向数据库,并访问外网。本案例把网络组件也部署到了控制节点,生产时需要移动一下。
- 本案例是单控制节点,生产上至少3个控制节点做高可用。核心服务keystone需要大算力保证,阿里云在用户认证服务上已经吃过不止一次亏了,2023年11.12崩溃2小时。
- 没有外部防火墙和加密,也没有堡垒机。生产时这些都要有
- 本案例纯手动二进制安装,属于非标准操作,不可用于生产,容易引发人工事故。后期需要使用自动化部署工具ansible来简化部署和规范流程。
密码规划
接下来的安装过程中需要用到许多密码,先提前生成好,用记事本记录下来。密码中不得包含@符号
随机生成10位字符密码的方法
openssl rand --hex 10
(以下密码都是由命令提前生成)
| 用户账户 | 账户密码 |
|---|---|
| MariaDB root用户 | 7b207b60c05be40a8060 |
| RabbitMQ的openstack用户 | ff0f8c45477bf040af8b |
| keystone数据库用户 | 184cb89d99029b5a4c6c |
| nova数据库用户 | 32ba4c7b813ea00552ae |
| nova服务用户 | 8427c132592e25cf7b78 |
| neutron数据库用户 | d8edf6ff1a1348cdfc1c |
| neutron服务用户 | 0837b826888c92c87174 |
| 元数据代理 | b3e67eb5f648ed04659e |
| cinder数据库用户 | ba36cad2eb49141a0894 |
| cinder服务用户 | dd3340170b55a52d639d |
| glance数据库用户 | 1ff9f4076430b86c4fe9 |
| glance服务用户 | a632d3091a46d80a5354 |
| placement数据库用户 | d11f974de3853f7eb3c4 |
| placement服务用户 | f053d72a006b44ae47a3 |
| 管理员admin | 93e98ada6158b4b7c307 |
| 普通租户demo | 9d7158fa4962a57f430d |
查看配置小技巧:
不以井号开头的行
cat <配置文件> |grep ^[^#]
虚拟机准备
网络准备
| 节点 | 管理面 | 外网面 |
|---|---|---|
| controller | 10.0.0.11 | 203.0.113.11 |
| compute | 10.0.0.21 | 203.0.113.21 |
| block | 10.0.0.31 | |
| obs1 | 10.0.0.41 | |
| obs2 | 10.0.0.42 |
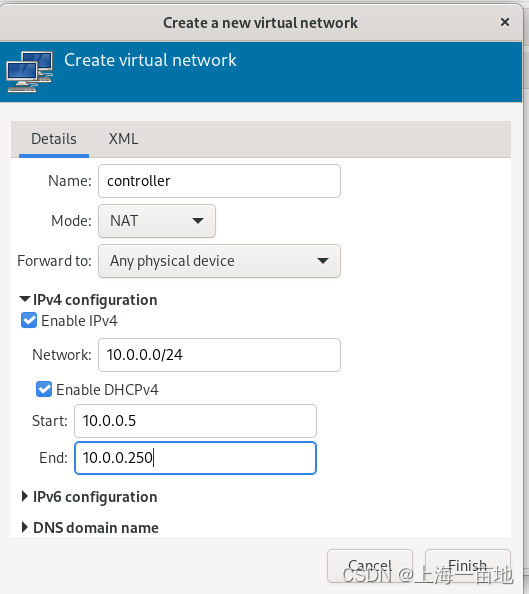
管理面+租户面网络:10.0.0.0/24,根据这个网络部署openstack自服务网络。包括vpc功能
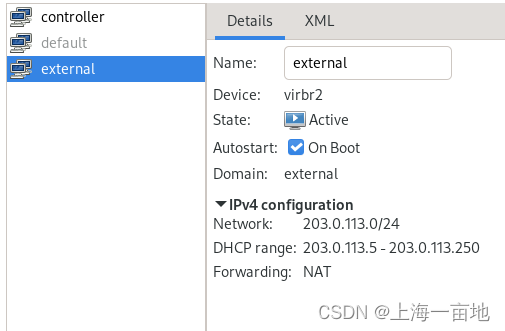
外部网络:203.0.113.0/24,根据这个网络部署openstack提供者网络,包括浮动IP功能。
打开virt-manager图形化桌面,创建两个NAT网络
centos7模板机准备
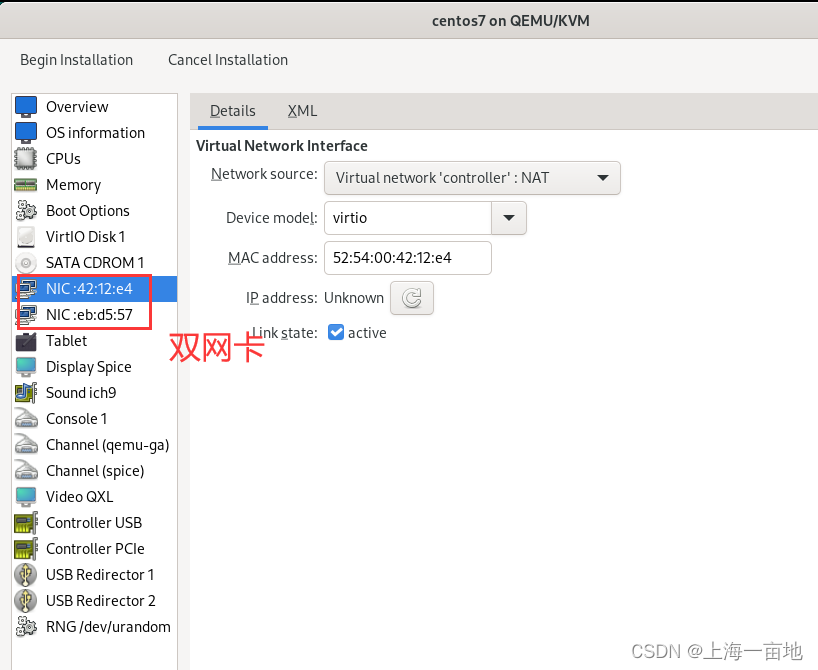
4vcpu 16GB内存,100GB系统盘的Centos7准备一个,并将刚才的两个网络添加到虚拟机。
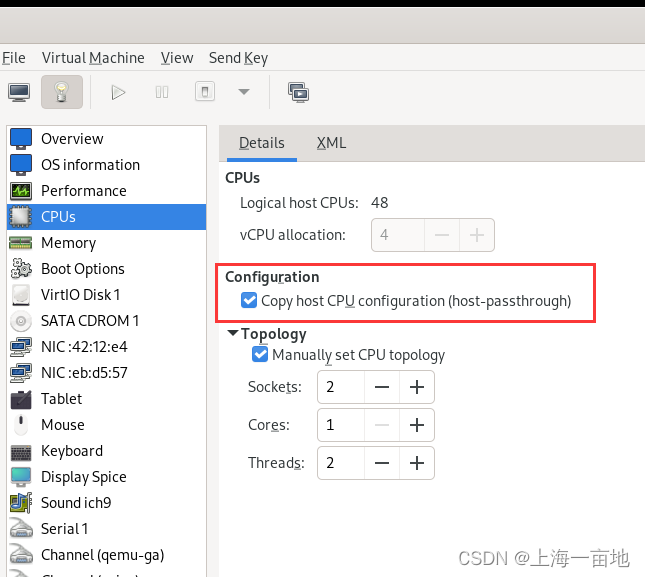
cpu一定要勾选host passthrough直通。这样可以再虚拟机中运行虚拟机。
系统安装时,语言必须选择英文。
安装好一个Centos7虚拟机后,根据这个虚拟机克隆出5个节点
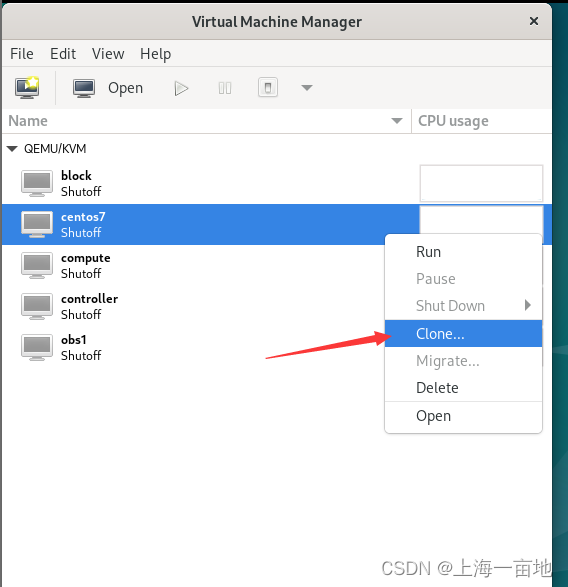
5个节点都开机,虚拟机系统配置如下,我以controller节点为例,其他机器自行斟酌。
# 主机名
hostnamectl set-hostname controller# 其他节点主机名,请在对应的虚拟机上执行对应的命令
hostnamectl set-hostname compute
hostnamectl set-hostname block
hostnamectl set-hostname  obs1
hostnamectl set-hostname  obs2# hosts文件。每个节点都追加这五行内容,原有内容保留
yum -y install vim wget net-tools
vim /etc/hosts
-------------------------------------
10.0.0.11  controller
10.0.0.21  compute
10.0.0.31  block
10.0.0.41  obs1
10.0.0.42  obs2# 关闭防火墙
systemctl disable firewalld --now# 关闭selinux
setenforce 0
vim /etc/selinux/config
-----------------------------------------
SELINUX=disabled# 设置时区
timedatectl set-timezone "Asia/Shanghai"# 禁用NetworkManager,启用Network服务
yum -y update
systemctl enable network.service --now
/sbin/chkconfig network on
# 禁用NetworkManager
systemctl disable NetworkManager --now# 查看网口设备名,默认网卡名称是eth0和eth1
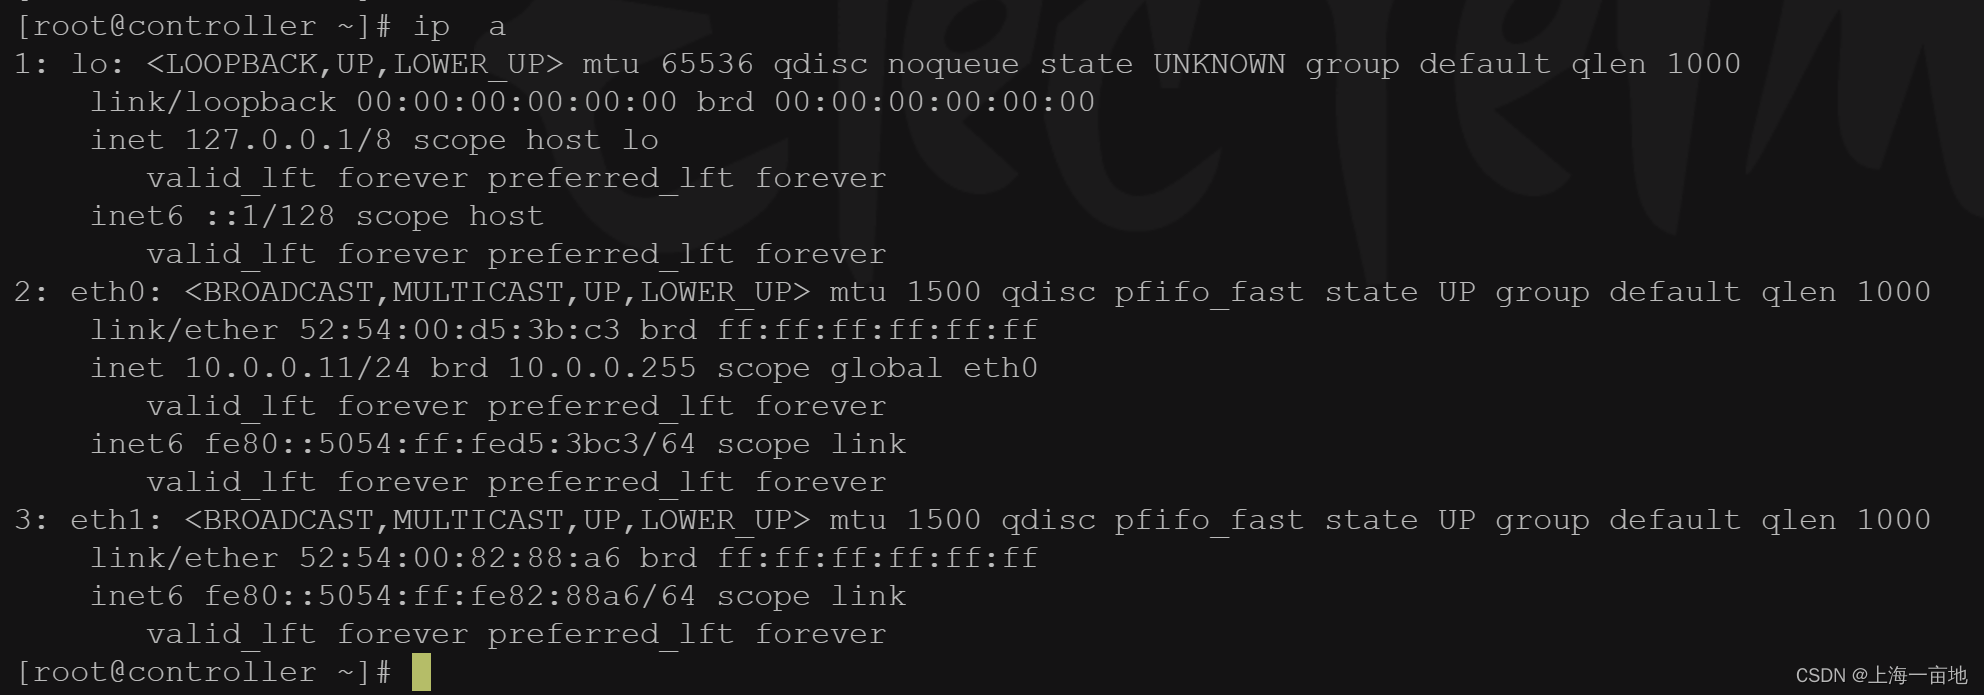
ip a# 修改为静态ip
vim /etc/sysconfig/network-scripts/ifcfg-eth0
---------------------------------------------------
NAME=eth0
DEVICE=eth0
TYPE=Ethernet
PROXY_METHOD=none
BROWSER_ONLY=no
BOOTPROTO=static
DEFROUTE=yes
IPV4_FAILURE_FATAL=no
ONBOOT=yes
IPADDR=10.0.0.11
PREFIX=24
GATEWAY=10.0.0.1
DNS1=114.114.114.114# 第二个网卡不设置ip,但是必须active
vim /etc/sysconfig/network-scripts/ifcfg-eth1
---------------------------------------------
NAME=eth1
DEVICE=eth1
TYPE=Ethernet
ONBOOT=yes
BOOTPROTO=static# 重启网络
systemctl restart network# 测试网络联通性
ping -c 2 controller
ping -c 2 www.baidu.com# 时间同步
yum install -y chrony jq curl wget
vim /etc/chrony.conf
---------------------------------
# 清除文件内所有内容,写入如下两行
server ntp1.aliyun.com iburst
allow 10.0.0.0/24systemctl restart chronyd
systemctl enable --now chronyd# 如上配置是controller的时间同步。
# 其他节点可以通过控制节点获取时间
vim /etc/chrony.conf
---------------------------------
server 10.0.0.11 iburst# 安装一些包
yum -y install vim bash-completion yum-utils# 安装openstack软件包
yum -y install centos-release-openstack-train
yum -y install python-openstackclient# openstack可以管理selinux,所以不用关闭selinux
yum -y install openstack-selinux# 重启
reboot
网卡截图
数据库安装
控制节点上执行命令:
yum -y install mariadb mariadb-server python2-PyMySQL
为openstack写一个数据库配置文件
vim  /etc/my.cnf.d/openstack.cnf
-------------------------------------
[mysqld]
bind-address = 10.0.0.11
default-storage-engine = innodb
innodb_file_per_table = on
max_connections = 4096
collation-server = utf8_general_ci
character-set-server = utf8
开机自启动
systemctl enable mariadb.service
systemctl start mariadb.service
数据库初始化,执行mysql_secure_installation命令
mysql_secure_installationNOTE: RUNNING ALL PARTS OF THIS SCRIPT IS RECOMMENDED FOR ALL MariaDBSERVERS IN PRODUCTION USE!  PLEASE READ EACH STEP CAREFULLY!In order to log into MariaDB to secure it, we'll need the current
password for the root user.  If you've just installed MariaDB, and
you haven't set the root password yet, the password will be blank,
so you should just press enter here.Enter current password for root (enter for none):
OK, successfully used password, moving on...Setting the root password ensures that nobody can log into the MariaDB
root user without the proper authorisation.Set root password? [Y/n] Y
New password:   # 这里使用之前创建的mariadb数据库root用户密码,见本文开头。
Re-enter new password: # 再输一次
Password updated successfully!
Reloading privilege tables..... Success!By default, a MariaDB installation has an anonymous user, allowing anyone
to log into MariaDB without having to have a user account created for
them.  This is intended only for testing, and to make the installation
go a bit smoother.  You should remove them before moving into a
production environment.Remove anonymous users? [Y/n] Y... Success!Normally, root should only be allowed to connect from 'localhost'.  This
ensures that someone cannot guess at the root password from the network.Disallow root login remotely? [Y/n] Y... Success!By default, MariaDB comes with a database named 'test' that anyone can
access.  This is also intended only for testing, and should be removed
before moving into a production environment.Remove test database and access to it? [Y/n] Y- Dropping test database...... Success!- Removing privileges on test database...... Success!Reloading the privilege tables will ensure that all changes made so far
will take effect immediately.Reload privilege tables now? [Y/n] Y... Success!Cleaning up...All done!  If you've completed all of the above steps, your MariaDB
installation should now be secure.Thanks for using MariaDB!
[root@controller ~]#
安装rabbitMQ消息队列
控制节点完成以下操作:
# 安装
yum -y install rabbitmq-server# 开机自启动
systemctl start rabbitmq-server.service
systemctl enable rabbitmq-server.service# 为消息队列添加一个openstack用户
rabbitmqctl add_user openstack ff0f8c45477bf040af8b #密码来自之前生成的# 为openstack设置读写权限
rabbitmqctl set_permissions openstack ".*" ".*" ".*"
安装memcached服务
openstack使用memcached服务缓存keystone产生的token令牌。
以下操作在控制节点上完成
yum -y install memcached python-memcached# 配置controller可以访问memcached
vim /etc/sysconfig/memcached
-------------------------------
OPTIONS="-l 127.0.0.1,::1,controller"# 开机自启
systemctl enable memcached.service
systemctl start memcached.service
生产环境memcached需要加密。
安装Etcd
以下造作在控制节点上运行
yum -y install etcdvim /etc/etcd/etcd.conf
---------------------------------
# 需要将文中的localhost改成10.0.0.11
#[Member]
#ETCD_CORS=""
ETCD_DATA_DIR="/var/lib/etcd/default.etcd"
#ETCD_WAL_DIR=""
ETCD_LISTEN_PEER_URLS="http://10.0.0.11:2380"
ETCD_LISTEN_CLIENT_URLS="http://10.0.0.11:2379"
#ETCD_MAX_SNAPSHOTS="5"
#ETCD_MAX_WALS="5"
ETCD_NAME="controller"
#ETCD_SNAPSHOT_COUNT="100000"
#ETCD_HEARTBEAT_INTERVAL="100"
#ETCD_ELECTION_TIMEOUT="1000"
#ETCD_QUOTA_BACKEND_BYTES="0"
#ETCD_MAX_REQUEST_BYTES="1572864"
#ETCD_GRPC_KEEPALIVE_MIN_TIME="5s"
#ETCD_GRPC_KEEPALIVE_INTERVAL="2h0m0s"
#ETCD_GRPC_KEEPALIVE_TIMEOUT="20s"
#
#[Clustering]
ETCD_INITIAL_ADVERTISE_PEER_URLS="http://10.0.0.11:2380"
ETCD_ADVERTISE_CLIENT_URLS="http://10.0.0.11:2379"
#ETCD_DISCOVERY=""
#ETCD_DISCOVERY_FALLBACK="proxy"
#ETCD_DISCOVERY_PROXY=""
#ETCD_DISCOVERY_SRV=""
ETCD_INITIAL_CLUSTER="controller=http://10.0.0.11:2380"
ETCD_INITIAL_CLUSTER_TOKEN="etcd-cluster-01"
ETCD_INITIAL_CLUSTER_STATE="new"
#ETCD_STRICT_RECONFIG_CHECK="true"
#ETCD_ENABLE_V2="true"
#
开机自启动
systemctl enable etcd
systemctl start etcd
安装keystone身份服务
到现在我们才开始安装第一个服务keystone。安装keystone需要用到keystone-manager命令行工具,基本语法如下
keystone-manage [选项] 操作 [附加参数]
这个命令还可以初始化keystone并管理keystone数据,用于那些不能通过http完成的工作。阿里云2023年11月12日崩溃两小时的原因,就是用这个工具导入用户数据,结果没有导入完整。
keystone安装好后,后续安装每个服务都需要在kestone中注册,创建service用户和服务目录catalog。
let’s do it
创建数据库用户keystone
mysql -u root -p
Enter Password: 7b207b60c05be40a8060
Welcome to the MariaDB monitor.  Commands end with ; or \g.
Your MariaDB connection id is 16
Server version: 10.3.20-MariaDB MariaDB ServerCopyright (c) 2000, 2018, Oracle, MariaDB Corporation Ab and others.Type 'help;' or '\h' for help. Type '\c' to clear the current input statement.MariaDB [(none)]> CREATE DATABASE keystone;
Query OK, 1 row affected (0.001 sec)MariaDB [(none)]> GRANT ALL PRIVILEGES ON keystone.*  TO 'keystone'@'localhost' IDENTIFIED BY '184cb89d99029b5a4c6c';
Query OK, 0 rows affected (0.001 sec)MariaDB [(none)]> GRANT ALL PRIVILEGES ON keystone.*  TO 'keystone'@'%' IDENTIFIED BY '184cb89d99029b5a4c6c';
Query OK, 0 rows affected (0.000 sec)MariaDB [(none)]> exit
Bye
文中的184cb89d99029b5a4c6c是我们之前设置的keystone数据库用户的密码。
安装keystone组件
yum -y install openstack-keystone httpd mod_wsgivim /etc/keystone/keystone.conf
找到database一节中的connection和token一节中的provider----------------------------[database]
# ...
connection = mysql+pymysql://keystone:184cb89d99029b5a4c6c@controller/keystone[token]
# ...
provider = fernet
初始化keystone数据库,生成对应的数据表
su -s /bin/sh -c "keystone-manage db_sync" keystone
初始化Fernet密钥库,完成keystone对自己的授权。
keystone-manage fernet_setup --keystone-user keystone --keystone-group keystone
keystone-manage credential_setup --keystone-user keystone --keystone-group keystone
创建admin并启动keystone监听
(一般公有云都是按照地名来的,比如华东-上海、华北-北京等等)
创建admin用户和域RegionOne(密码是之前生成的):
keystone-manage bootstrap \
--bootstrap-password 93e98ada6158b4b7c307 \
--bootstrap-admin-url http://controller:5000/v3/ \
--bootstrap-internal-url http://controller:5000/v3/ \
--bootstrap-public-url http://controller:5000/v3/ \
--bootstrap-region-id RegionOne
配置apache HTTP服务器
vim /etc/httpd/conf/httpd.conf
找到如下参数-------------------------------------
ServerName controller
将系统内核的wsgi模块加到apache中供其调度
ln -s /usr/share/keystone/wsgi-keystone.conf /etc/httpd/conf.d/
重启httpd
systemctl enable httpd.service
systemctl start httpd.service# 查看5000端口是否有监听
netstat -natlp |grep 5000
# 返回: tcp6   0   0    :::5000   :::*   LISTEN    2192/httpd
创建admin用户信息环境变量
export OS_USERNAME=admin
export OS_PASSWORD=93e98ada6158b4b7c307 # 这个就是之前运行API时候的bootstrap-password
export OS_PROJECT_NAME=admin
export OS_USER_DOMAIN_NAME=Default
export OS_PROJECT_DOMAIN_NAME=Default
export OS_AUTH_URL=http://controller:5000/v3
export OS_IDENTITY_API_VERSION=3
验证keystone是否可用
openstack service list
+----------------------------------+----------+----------+
| ID                               | Name     | Type     |
+----------------------------------+----------+----------+
| 3e2b1b7d2b964fb8bf7957d885ead138 | keystone | identity |
+----------------------------------+----------+----------+curl http://controller:5000/v3
{"version": {"status": "stable", "updated": "2019-07-19T00:00:00Z", "media-types": [{"base": "application/json", "type": "application/vnd.openstack.identity-v3+json"}], "id": "v3.13", "links": [{"href": "http://controller:5000/v3/", "rel": "self"}]}}
创建域、项目、demo用户
查看域和项目
openstack domain list
+---------+---------+---------+--------------------+
| ID      | Name    | Enabled | Description        |
+---------+---------+---------+--------------------+
| default | Default | True    | The default domain |
+---------+---------+---------+--------------------+openstack project list
+----------------------------------+-------+
| ID                               | Name  |
+----------------------------------+-------+
| 05aa9c49cd8f4e298571833801f9256f | admin |
+----------------------------------+-------+
已经有了一个default域和admin项目
在default域下面创建项目service,供后面服务注册
openstack project create --domain default --description "Service Project" service
创建demo用户,这是一个普通租户,用于测试。密码使用之前生成好的demo用户密码。
openstack user list
+----------------------------------+-------+
| ID                               | Name  |
+----------------------------------+-------+
| b6fcdbae65d345759a2d0a3bac4f5e1a | admin |
+----------------------------------+-------+openstack project create --domain default --description "Demo Project" demo
openstack user create --domain default --password-prompt demo
User Password: 9d7158fa4962a57f430d
Repeat User Password: 9d7158fa4962a57f430d
创建角色
openstack role list
+----------------------------------+--------+
| ID                               | Name   |
+----------------------------------+--------+
| 0418e032157748a59a1f8312ccb35475 | reader |
| 96afb8add014498a9cbcf58f2c7caffa | member |
| b839ca423df34ba49c52c26e69433078 | admin  |
+----------------------------------+--------+openstack role create demo# 用角色member将demo项目和demo用户进行关联
openstack role add --project demo --user demo member
再次验证keystone服务的安装
unset OS_AUTH_URL OS_PASSWORD# 用admin用户尝试登录
openstack --os-auth-url http://controller:5000/v3 --os-project-domain-name Default --os-user-domain-name Default --os-project-name admin --os-username admin token issue
Password:  93e98ada6158b4b7c307# 用demo用户尝试登录
openstack --os-auth-url http://controller:5000/v3 --os-project-domain-name Default --os-user-domain-name Default --os-project-name demo --os-username demo token issue
Password: 9d7158fa4962a57f430d
创建用户openRC文件
vim /root/admin-openrc
------------------------------------
export OS_PROJECT_DOMAIN_NAME=Default
export OS_USER_DOMAIN_NAME=Default
export OS_PROJECT_NAME=admin
export OS_USERNAME=admin
export OS_PASSWORD=93e98ada6158b4b7c307
export OS_AUTH_URL=http://controller:5000/v3
export OS_IDENTITY_API_VERSION=3
export OS_IMAGE_API_VERSION=2vim /root/demo-openrc
------------------------------------
export OS_PROJECT_DOMAIN_NAME=Default
export OS_USER_DOMAIN_NAME=Default
export OS_PROJECT_NAME=demo
export OS_USERNAME=demo
export OS_PASSWORD=9d7158fa4962a57f430d
export OS_AUTH_URL=http://controller:5000/v3
export OS_IDENTITY_API_VERSION=3
export OS_IMAGE_API_VERSION=2
openRC文件使用方法
# 登录admin
source /root/admin-openrc# 登录demo
source /root/demo-openrc
source完对应的openRC文件即可操作openstack命令,相当于登录对应的用户账户了
到此,keystone安装结束了
安装Glance镜像服务
数据库中创建glance用户
mysql -u root -p
Enter Password: 7b207b60c05be40a8060
Welcome to the MariaDB monitor.  Commands end with ; or \g.
Your MariaDB connection id is 16
Server version: 10.3.20-MariaDB MariaDB ServerCopyright (c) 2000, 2018, Oracle, MariaDB Corporation Ab and others.Type 'help;' or '\h' for help. Type '\c' to clear the current input statement.MariaDB [(none)]> CREATE DATABASE glance;
Query OK, 1 row affected (0.001 sec)MariaDB [(none)]> GRANT ALL PRIVILEGES ON glance.*  TO 'glance'@'localhost' IDENTIFIED BY '1ff9f4076430b86c4fe9';
Query OK, 0 rows affected (0.001 sec)MariaDB [(none)]> GRANT ALL PRIVILEGES ON glance.*  TO 'glance'@'%' IDENTIFIED BY '1ff9f4076430b86c4fe9';
Query OK, 0 rows affected (0.000 sec)MariaDB [(none)]> exit
Bye
这里使用到了glance数据库用户的密码
创建glance用户凭据
glance的service服务密码是之前创建的 a632d3091a46d80a5354
source /root/admin-openrcopenstack user create --domain default --password-prompt glance
User Password: a632d3091a46d80a5354openstack role add --project service --user glance adminopenstack service create --name glance --description "OpenStack Image" image# 创建服务的API端点
openstack endpoint create --region RegionOne image public http://controller:9292
openstack endpoint create --region RegionOne image internal http://controller:9292
openstack endpoint create --region RegionOne image admin http://controller:9292
安装glance组件
yum -y install openstack-glance
配置glance服务,
database指定数据库连接、keystone_authtoken指定keystone连接,glance_store这一节可以修改镜像在系统中的存储位置。
vim /etc/glance/glance-api.conf
--------------------------------
[database]
# ...
connection = mysql+pymysql://glance:1ff9f4076430b86c4fe9@controller/glance[keystone_authtoken]
# ...
www_authenticate_uri = http://controller:5000
auth_url = http://controller:5000
memcached_servers = controller:11211
auth_type = password
project_domain_name = Default
user_domain_name = Default
project_name = service
username = glance
password = a632d3091a46d80a5354[paste_deploy]
# ...
flavor = keystone[glance_store]
# ...
stores = file,http
default_store = file
filesystem_store_datadir = /var/lib/glance/images/
初始化glance数据库,创建数据表
su -s /bin/sh -c "glance-manage db_sync" glance
开机自启动
systemctl enable openstack-glance-api.service
systemctl start openstack-glance-api.service
验证glance安装
yum -y install wget
wget http://download.cirros-cloud.net/0.4.0/cirros-0.4.0-x86_64-disk.img -O ~/cirros-0.4.0-x86_64-disk.img
source /root/admin-openrc
openstack image create  "cirros" --file ~/cirros-0.4.0-x86_64-disk.img --disk-format qcow2 --container-format bare --public
openstack image list
安装Placement放置服务
Placement用于监控资源提供者清单和资源使用情况。放置服务必须放在控制节点上,以下操作在控制节点上进行。
数据库用户placement创建
mysql -u root -p
Enter Password: 7b207b60c05be40a8060
Welcome to the MariaDB monitor.  Commands end with ; or \g.
Your MariaDB connection id is 16
Server version: 10.3.20-MariaDB MariaDB ServerCopyright (c) 2000, 2018, Oracle, MariaDB Corporation Ab and others.Type 'help;' or '\h' for help. Type '\c' to clear the current input statement.MariaDB [(none)]> CREATE DATABASE placement;
Query OK, 1 row affected (0.001 sec)MariaDB [(none)]> GRANT ALL PRIVILEGES ON placement.*  TO 'placement'@'localhost' IDENTIFIED BY 'd11f974de3853f7eb3c4';
Query OK, 0 rows affected (0.001 sec)MariaDB [(none)]> GRANT ALL PRIVILEGES ON placement.*  TO 'placement'@'%' IDENTIFIED BY 'd11f974de3853f7eb3c4';
Query OK, 0 rows affected (0.000 sec)MariaDB [(none)]> exit
Bye
创建placement相关service和端点
source /root/admin-openrc
openstack user create --domain default --password-prompt placement
User Password: f053d72a006b44ae47a3openstack role add --project service --user placement adminopenstack service create --name placement --description "Placement API" placement# 创建服务的API端点
openstack endpoint create --region RegionOne placement public http://controller:8778
openstack endpoint create --region RegionOne placement internal http://controller:8778
openstack endpoint create --region RegionOne placement admin http://controller:8778
组件安装和配置
yum -y install openstack-placement-api
修改配置
vim /etc/placement/placement.conf
------------------------------------------
[placement_database]
# ...
connection = mysql+pymysql://placement:d11f974de3853f7eb3c4@controller/placement[api]
# ...
auth_strategy = keystone[keystone_authtoken]
# ...
auth_url = http://controller:5000
memcached_servers = controller:11211
auth_type = password
project_domain_name = Default
user_domain_name = Default
project_name = service
username = glance
password = f053d72a006b44ae47a3
初始化placement,创建相关数据库表
su -s /bin/sh -c "placement-manage db sync" placement
systemctl restart httpd
验证placement安装
状态检查
source /root/admin-openrc
placement-status upgrade check
+----------------------------------+
| Upgrade Check Results            |
+----------------------------------+
| Check: Missing Root Provider IDs |
| Result: Success                  |
| Details: None                    |
+----------------------------------+
| Check: Incomplete Consumers      |
| Result: Success                  |
| Details: None                    |
+----------------------------------+
测试placementAPI
# 安装python2的pip
yum -y install epel-release
yum -y install python-pip# 安装osc-placement
pip install osc-placement -i https://mirrors.aliyun.com/pypi/simple/# 因为osc-placement的python2软件包有bug,需要添加配置到httpd中才行。U版本的openstack已经全面采用python3,没有这个问题了
vim /etc/httpd/conf.d/00-nova-placement-api.conf
-----------------------------------------------------------
<Directory /usr/bin><IfVersion >= 2.4>Require all granted</IfVersion><IfVersion < 2.4>Order allow,denyAllow from all</IfVersion>
</Directory># 重启httpd让刚才的配置生效
systemctl restart httpd# 列出可用的资源类和特性
openstack --os-placement-api-version 1.2 resource class list --sort-column name
+----------------------------------------+
| name                                   |
+----------------------------------------+
| DISK_GB                                |
| FPGA                                   |
| IPV4_ADDRESS                           |
| MEMORY_MB                              |
......openstack --os-placement-api-version 1.6 trait list --sort-column name
+---------------------------------------+
| name                                  |
+---------------------------------------+
| COMPUTE_ACCELERATORS                  |
| COMPUTE_ARCH_AARCH64                  |
| COMPUTE_ARCH_MIPSEL                   |
| COMPUTE_ARCH_PPC64LE                  |
:权限修饰符包Object类)


)


)


:Blackbox监控安装配置)


