将光投射(Cast)到物体的光源叫做投光物(Light Caster)。
投光物主要分为点光源,聚光灯,平行光。
平行光
当一个光源处于很远的地方时,来自光源的每条光线就会近似于互相平行。不论物体和/或者观察者的位置,看起来好像所有的光都来自于同一个方向。当我们使用一个假设光源处于无限远处的模型时,它就被称为定向光,因为它的所有光线都有着相同的方向,它与光源的位置是没有关系的。
定向光非常好的一个例子就是太阳。太阳距离我们并不是无限远,但它已经远到在光照计算中可以把它视为无限远了。所以来自太阳的所有光线将被模拟为平行光线,我们可以在下图看到:

我们可以定义一个光线方向向量而不是位置向量来模拟一个定向光。
所以修改片段着色器的结构
#version 330 core
out vec4 FragColor;struct Material {sampler2D diffuse;sampler2D specular;    sampler2D emission;float shininess;
}; struct Light {//vec3 position;vec3 direction;vec3 ambient;vec3 diffuse;vec3 specular;
};in vec3 FragPos;
in vec3 Normal;
in vec2 TexCoords;uniform vec3 viewPos;
uniform Material material;
uniform Light light;
uniform float time;void main()
{vec3 lightDir = normalize(-light.direction);// ambientvec3 ambient = light.ambient * vec3(texture(material.diffuse, TexCoords));  	// diffuse vec3 norm = normalize(Normal);//vec3 lightDir = normalize(light.position - FragPos);float diff = max(dot(norm, lightDir), 0.0);vec3 diffuse = light.diffuse * diff * vec3(texture(material.diffuse, TexCoords));    // specularvec3 viewDir = normalize(viewPos - FragPos);vec3 reflectDir = reflect(-lightDir, norm);  float spec = pow(max(dot(viewDir, reflectDir), 0.0), material.shininess);vec3 specular = light.specular * spec * vec3(texture(material.specular, TexCoords)); vec3 emission;if(texture(material.specular, TexCoords).r==0)emission = texture(material.emission,TexCoords+vec2(0.0,time/2)).rgb;emission =   emission * (sin(2*time) * 0.5 + 0.5) ;//fadingvec3 result = ambient + diffuse + specular;FragColor = vec4(result, 1.0);}
点光源
定向光对于照亮整个场景的全局光源是非常棒的,但除了定向光之外我们也需要一些分散在场景中的点光源(Point Light)。点光源是处于世界中某一个位置的光源,它会朝着所有方向发光,但光线会随着距离逐渐衰减。想象作为投光物的灯泡和火把,它们都是点光源。

光照衰减
随着光线传播距离的增长逐渐削减光的强度通常叫做衰减(Attenuation)
在现实世界中,灯在近处通常会非常亮,但随着距离的增加光源的亮度一开始会下降非常快,但在远处时剩余的光强度就会下降的非常缓慢了。所以,我们需要一个不同的公式来减少光的强度。
幸运的是一些聪明的人已经帮我们解决了这个问题。下面这个公式根据片段距光源的距离计算了衰减值,之后我们会将它乘以光的强度向量:

在这里d代表了片段距光源的距离。接下来为了计算衰减值,我们定义3个(可配置的)项:常数项Kc、一次项Kl和二次项Kq。
- 常数项通常保持为1.0,它的主要作用是保证分母永远不会比1小,否则的话在某些距离上它反而会增加强度,这肯定不是我们想要的效果。
- 一次项会与距离值相乘,以线性的方式减少强度。
- 二次项会与距离的平方相乘,让光源以二次递减的方式减少强度。二次项在距离比较小的时候影响会比一次项小很多,但当距离值比较大的时候它就会比一次项更大了。
由于二次项的存在,光线会在大部分时候以线性的方式衰退,直到距离变得足够大,让二次项超过一次项,光的强度会以更快的速度下降。这样的结果就是,光在近距离时亮度很高,但随着距离变远亮度迅速降低,最后会以更慢的速度减少亮度。下面这张图显示了在100的距离内衰减的效果:

但是,该对这三个项设置什么值呢?正确地设定它们的值取决于很多因素:环境、希望光覆盖的距离、光的类型等。在大多数情况下,这都是经验的问题,以及适量的调整。下面这个表格显示了模拟一个(大概)真实的,覆盖特定半径(距离)的光源时,这些项可能取的一些值。第一列指定的是在给定的三项时光所能覆盖的距离。这些值是大多数光源很好的起始点,它们由Ogre3D的Wiki所提供:
| 距离 | 常数项 | 一次项 | 二次项 |
|---|---|---|---|
| 7 | 1.0 | 0.7 | 1.8 |
| 13 | 1.0 | 0.35 | 0.44 |
| 20 | 1.0 | 0.22 | 0.20 |
| 32 | 1.0 | 0.14 | 0.07 |
| 50 | 1.0 | 0.09 | 0.032 |
| 65 | 1.0 | 0.07 | 0.017 |
| 100 | 1.0 | 0.045 | 0.0075 |
| 160 | 1.0 | 0.027 | 0.0028 |
| 200 | 1.0 | 0.022 | 0.0019 |
| 325 | 1.0 | 0.014 | 0.0007 |
| 600 | 1.0 | 0.007 | 0.0002 |
| 3250 | 1.0 | 0.0014 | 0.000007 |
实现衰减
只需要将衰减值乘上计算出来的环境光,漫反射光,以及镜面反射光
#version 330 core
out vec4 FragColor;struct Material {sampler2D diffuse;sampler2D specular;    sampler2D emission;float shininess;
}; struct Light {vec3 position;//vec3 direction;vec3 ambient;vec3 diffuse;vec3 specular;float constant;float linear;float quadratic;
};in vec3 FragPos;
in vec3 Normal;
in vec2 TexCoords;uniform vec3 viewPos;
uniform Material material;
uniform Light light;
uniform float time;void main()
{// vec3 lightDir = normalize(-light.direction);float distance    = length(light.position - FragPos);float attenuation = 1.0 / (light.constant + light.linear * distance + light.quadratic * (distance * distance));// ambientvec3 ambient = light.ambient * vec3(texture(material.diffuse, TexCoords));  	// diffuse vec3 norm = normalize(Normal);vec3 lightDir = normalize(light.position - FragPos);float diff = max(dot(norm, lightDir), 0.0);vec3 diffuse = light.diffuse * diff * vec3(texture(material.diffuse, TexCoords));    // specularvec3 viewDir = normalize(viewPos - FragPos);vec3 reflectDir = reflect(-lightDir, norm);  float spec = pow(max(dot(viewDir, reflectDir), 0.0), material.shininess);vec3 specular = light.specular * spec * vec3(texture(material.specular, TexCoords)); vec3 emission;if(texture(material.specular, TexCoords).r==0)emission = texture(material.emission,TexCoords+vec2(0.0,time/2)).rgb;emission =   emission * (sin(2*time) * 0.5 + 0.5) ;//fadingambient  *= attenuation; diffuse  *= attenuation;specular *= attenuation;vec3 result = ambient + diffuse + specular;FragColor = vec4(result, 1.0);}
聚光
聚光是位于环境中某个位置的光源,它只朝一个特定方向而不是所有方向照射光线。这样的结果就是只有在聚光方向的特定半径内的物体才会被照亮,其它的物体都会保持黑暗。聚光很好的例子就是路灯或手电筒。
OpenGL中聚光是用一个世界空间位置、一个方向和一个切光角(Cutoff Angle)来表示的,切光角指定了聚光的半径(译注:是圆锥的半径不是距光源距离那个半径)。对于每个片段,我们会计算片段是否位于聚光的切光方向之间(也就是在锥形内),如果是的话,我们就会相应地照亮片段。下面这张图会让你明白聚光是如何工作的:

LightDir:从片段指向光源的向量。SpotDir:聚光所指向的方向。Phiϕ:指定了聚光半径的切光角。落在这个角度之外的物体都不会被这个聚光所照亮。Thetaθ:LightDir向量和SpotDir向量之间的夹角。在聚光内部的话θ�值应该比ϕ�值小。
所以我们要做的就是计算LightDir向量和SpotDir向量之间的点积(还记得它会返回两个单位向量夹角的余弦值吗?),并将它与切光角ϕ�值对比。你现在应该了解聚光究竟是什么了,下面我们将以手电筒的形式创建一个聚光。
手电筒
手电筒(Flashlight)是一个位于观察者位置的聚光,通常它都会瞄准玩家视角的正前方。基本上说,手电筒就是普通的聚光,但它的位置和方向会随着玩家的位置和朝向不断更新。
在片段着色器中我们需要的值有聚光的位置向量(来计算光的方向向量)、聚光的方向向量和一个切光角。我们可以将它们储存在Light结构体中:
接下来就是计算θ值,并将它和切光角ϕ对比,来决定是否在聚光的内部:
float theta = dot(lightDir, normalize(-light.direction));if(theta > light.cutOff)
{       // 执行光照计算
}
else  // 否则,使用环境光,让场景在聚光之外时不至于完全黑暗color = vec4(light.ambient * vec3(texture(material.diffuse, TexCoords)), 1.0);
为了创建一种看起来边缘平滑的聚光,我们需要模拟聚光有一个内圆锥(Inner Cone)和一个外圆锥(Outer Cone)。我们可以将内圆锥设置为上一部分中的那个圆锥,但我们也需要一个外圆锥,来让光从内圆锥逐渐减暗,直到外圆锥的边界。
为了创建一个外圆锥,我们只需要再定义一个余弦值来代表聚光方向向量和外圆锥向量(等于它的半径)的夹角。然后,如果一个片段处于内外圆锥之间,将会给它计算出一个0.0到1.0之间的强度值。如果片段在内圆锥之内,它的强度就是1.0,如果在外圆锥之外强度值就是0.0。
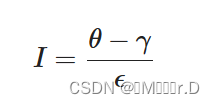
我们可以用下面这个公式来计算这个值:

这里ϵ(Epsilon)是内(ϕ)和外圆锥(γ)之间的余弦值差(ϵ=ϕ−γ)。最终的I值就是在当前片段聚光的强度。
很难去表现这个公式是怎么工作的,所以我们用一些实例值来看看:
| θ� | θ�(角度) | ϕ�(内光切) | ϕ�(角度) | γ�(外光切) | γ�(角度) | ϵ� | I� |
|---|---|---|---|---|---|---|---|
| 0.87 | 30 | 0.91 | 25 | 0.82 | 35 | 0.91 - 0.82 = 0.09 | 0.87 - 0.82 / 0.09 = 0.56 |
| 0.9 | 26 | 0.91 | 25 | 0.82 | 35 | 0.91 - 0.82 = 0.09 | 0.9 - 0.82 / 0.09 = 0.89 |
| 0.97 | 14 | 0.91 | 25 | 0.82 | 35 | 0.91 - 0.82 = 0.09 | 0.97 - 0.82 / 0.09 = 1.67 |
| 0.83 | 34 | 0.91 | 25 | 0.82 | 35 | 0.91 - 0.82 = 0.09 | 0.83 - 0.82 / 0.09 = 0.11 |
| 0.64 | 50 | 0.91 | 25 | 0.82 | 35 | 0.91 - 0.82 = 0.09 | 0.64 - 0.82 / 0.09 = -2.0 |
| 0.966 | 15 | 0.9978 | 12.5 | 0.953 | 17.5 | 0.9978 - 0.953 = 0.0448 | 0.966 - 0.953 / 0.0448 = 0.29 |
片段着色器
#version 330 core
out vec4 FragColor;struct Material {sampler2D diffuse;sampler2D specular;    float shininess;
}; struct Light {vec3 position;  vec3 direction;float cutOff;float outerCutOff;vec3 ambient;vec3 diffuse;vec3 specular;float constant;float linear;float quadratic;
};in vec3 FragPos;
in vec3 Normal;
in vec2 TexCoords;uniform vec3 viewPos;
uniform Material material;
uniform Light light;void main()
{vec3 lightDir = normalize(light.position - FragPos);// check if lighting is inside the spotlight conefloat theta = dot(lightDir, normalize(-light.direction)); if(theta > light.cutOff) // remember that we're working with angles as cosines instead of degrees so a '>' is used.{    // ambientvec3 ambient = light.ambient * texture(material.diffuse, TexCoords).rgb;// diffuse vec3 norm = normalize(Normal);float diff = max(dot(norm, lightDir), 0.0);vec3 diffuse = light.diffuse * diff * texture(material.diffuse, TexCoords).rgb;  // specularvec3 viewDir = normalize(viewPos - FragPos);vec3 reflectDir = reflect(-lightDir, norm);  float spec = pow(max(dot(viewDir, reflectDir), 0.0), material.shininess);vec3 specular = light.specular * spec * texture(material.specular, TexCoords).rgb;  // attenuationfloat distance    = length(light.position - FragPos);float attenuation = 1.0 / (light.constant + light.linear * distance + light.quadratic * (distance * distance));    // ambient  *= attenuation; // remove attenuation from ambient, as otherwise at large distances the light would be darker inside than outside the spotlight due the ambient term in the else branchdiffuse   *= attenuation;specular *= attenuation;   vec3 result = ambient + diffuse + specular;FragColor = vec4(result, 1.0);}else {// else, use ambient light so scene isn't completely dark outside the spotlight.FragColor = vec4(light.ambient * texture(material.diffuse, TexCoords).rgb, 1.0);}
}
实现多光源
当我们在场景中使用多个光源时,通常使用以下方法:我们需要有一个单独的颜色向量代表片段的输出颜色。对于每一个光源,它对片段的贡献颜色将会加到片段的输出颜色向量上。所以场景中的每个光源都会计算它们各自对片段的影响,并结合为一个最终的输出颜色。
我们需要分别定义每一种光源的结构体,并且在main.cpp里设置他们需要的参数,另外还需要编写不同的函数计算不同的光源,这样不至于让代码变得太复杂。
最后效果

片元着色器代码
#version 330 core
out vec4 FragColor;struct Material {sampler2D diffuse;sampler2D specular;float shininess;
}; struct DirLight {vec3 direction;vec3 ambient;vec3 diffuse;vec3 specular;
};struct PointLight {vec3 position;float constant;float linear;float quadratic;vec3 ambient;vec3 diffuse;vec3 specular;
};struct SpotLight {vec3 position;vec3 direction;float cutOff;float outerCutOff;float constant;float linear;float quadratic;vec3 ambient;vec3 diffuse;vec3 specular;
};#define NR_POINT_LIGHTS 4in vec3 FragPos;
in vec3 Normal;
in vec2 TexCoords;uniform vec3 viewPos;
uniform DirLight dirLight;
uniform PointLight pointLights[NR_POINT_LIGHTS];
uniform SpotLight spotLight;
uniform Material material;// function prototypes
vec3 CalcDirLight(DirLight light, vec3 normal, vec3 viewDir);
vec3 CalcPointLight(PointLight light, vec3 normal, vec3 fragPos, vec3 viewDir);
vec3 CalcSpotLight(SpotLight light, vec3 normal, vec3 fragPos, vec3 viewDir);void main()
{    // propertiesvec3 norm = normalize(Normal);vec3 viewDir = normalize(viewPos - FragPos);vec3 result;// phase 1: directional lighting// result+ = CalcDirLight(dirLight, norm, viewDir);// phase 2: point lightsfor(int i = 0; i < NR_POINT_LIGHTS; i++)// result += CalcPointLight(pointLights[i], norm, FragPos, viewDir);    // phase 3: spot lightresult += CalcSpotLight(spotLight, norm, FragPos, viewDir);    FragColor = vec4(result, 1.0);
}// calculates the color when using a directional light.
vec3 CalcDirLight(DirLight light, vec3 normal, vec3 viewDir)
{vec3 lightDir = normalize(-light.direction);// diffuse shadingfloat diff = max(dot(normal, lightDir), 0.0);// specular shadingvec3 reflectDir = reflect(-lightDir, normal);float spec = pow(max(dot(viewDir, reflectDir), 0.0), material.shininess);// combine resultsvec3 ambient = light.ambient * vec3(texture(material.diffuse, TexCoords));vec3 diffuse = light.diffuse * diff * vec3(texture(material.diffuse, TexCoords));vec3 specular = light.specular * spec * vec3(texture(material.specular, TexCoords));return (ambient + diffuse + specular);
}// calculates the color when using a point light.
vec3 CalcPointLight(PointLight light, vec3 normal, vec3 fragPos, vec3 viewDir)
{vec3 lightDir = normalize(light.position - fragPos);// diffuse shadingfloat diff = max(dot(normal, lightDir), 0.0);// specular shadingvec3 reflectDir = reflect(-lightDir, normal);float spec = pow(max(dot(viewDir, reflectDir), 0.0), material.shininess);// attenuationfloat distance = length(light.position - fragPos);float attenuation = 1.0 / (light.constant + light.linear * distance + light.quadratic * (distance * distance));    // combine resultsvec3 ambient = light.ambient * vec3(texture(material.diffuse, TexCoords));vec3 diffuse = light.diffuse * diff * vec3(texture(material.diffuse, TexCoords));vec3 specular = light.specular * spec * vec3(texture(material.specular, TexCoords));ambient *= attenuation;diffuse *= attenuation;specular *= attenuation;return (ambient + diffuse + specular);
}// calculates the color when using a spot light.
vec3 CalcSpotLight(SpotLight light, vec3 normal, vec3 fragPos, vec3 viewDir)
{vec3 lightDir = normalize(light.position - fragPos);// diffuse shadingfloat diff = max(dot(normal, lightDir), 0.0);// specular shadingvec3 reflectDir = reflect(-lightDir, normal);float spec = pow(max(dot(viewDir, reflectDir), 0.0), material.shininess);// attenuationfloat distance = length(light.position - fragPos);float attenuation = 1.0 / (light.constant + light.linear * distance + light.quadratic * (distance * distance));    // spotlight intensityfloat theta = dot(lightDir, normalize(-light.direction)); float epsilon = light.cutOff - light.outerCutOff;float intensity = clamp((theta - light.outerCutOff) / epsilon, 0.0, 1.0);// combine resultsvec3 ambient = light.ambient * vec3(texture(material.diffuse, TexCoords));vec3 diffuse = light.diffuse * diff * vec3(texture(material.diffuse, TexCoords));vec3 specular = light.specular * spec * vec3(texture(material.specular, TexCoords));ambient *= attenuation * intensity;diffuse *= attenuation * intensity;specular *= attenuation * intensity;return (ambient + diffuse + specular);
}
练习
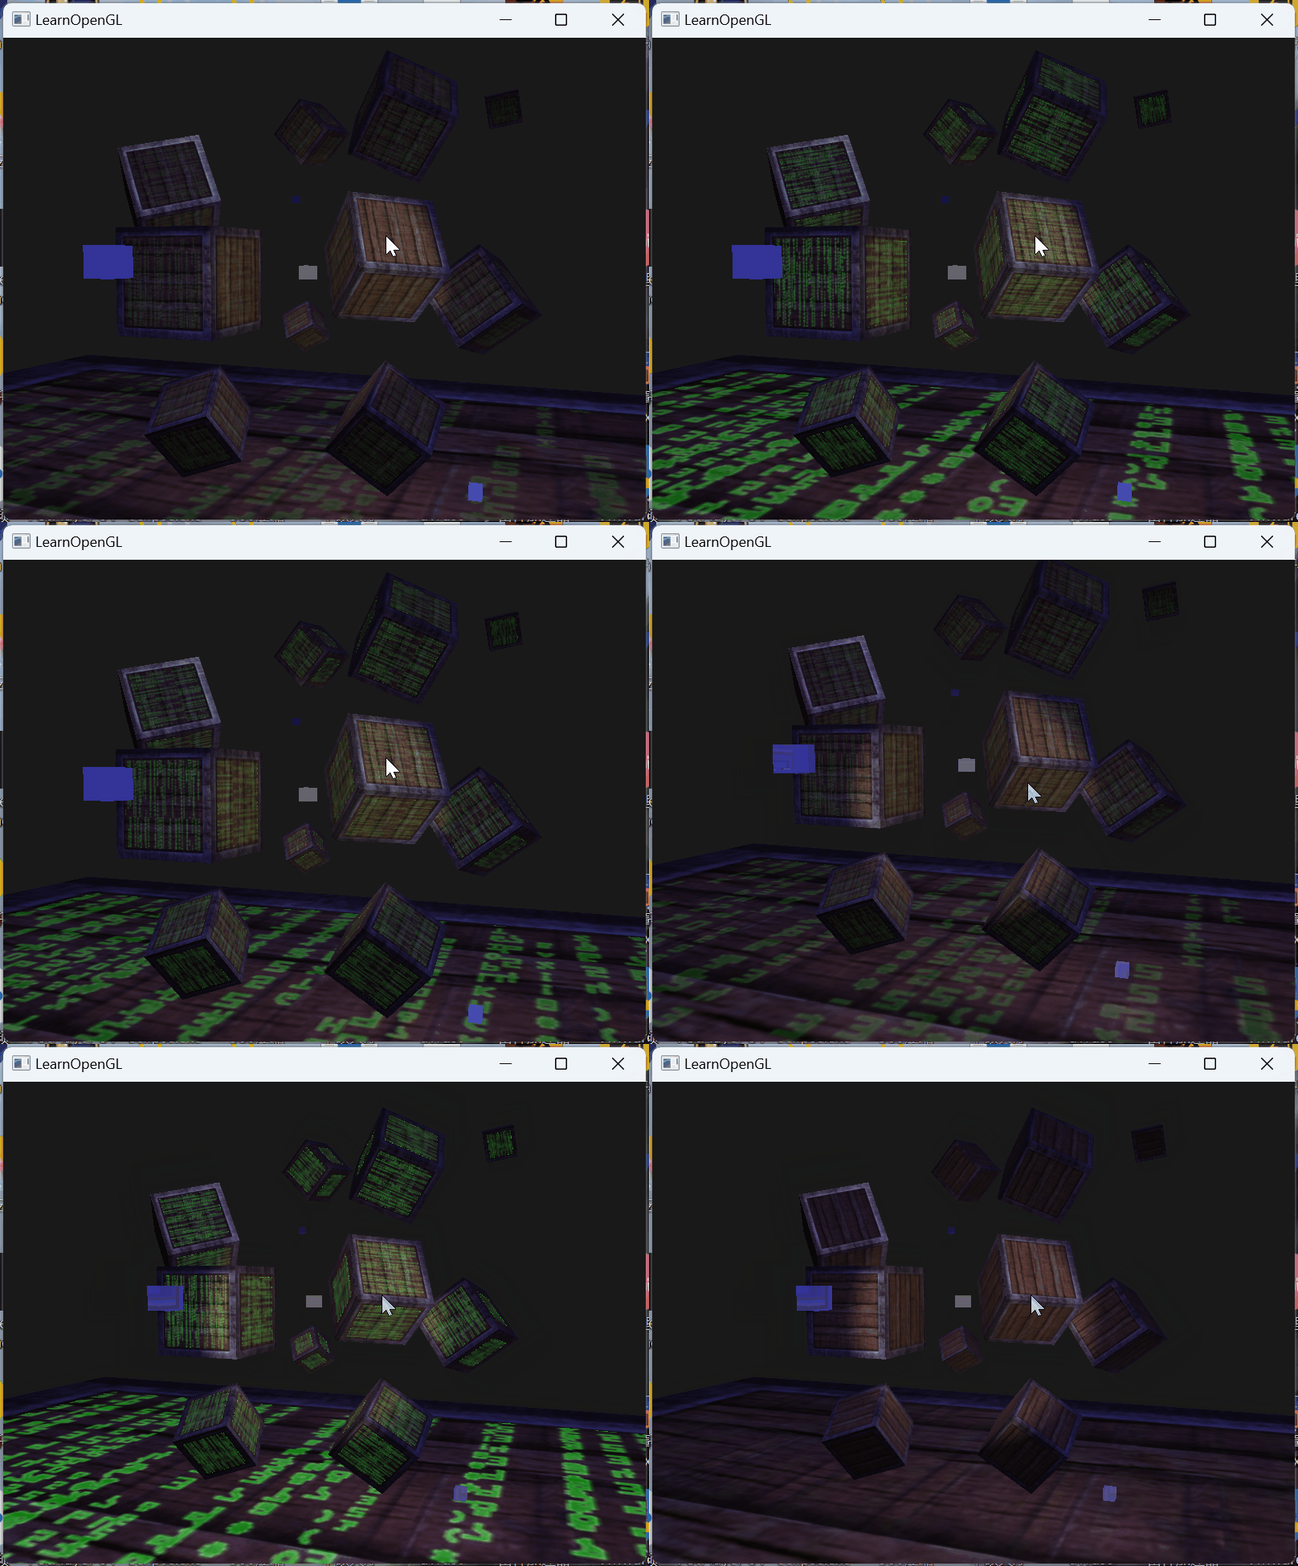
要复现这几个氛围,首先需要提取到几个氛围的背景色。
可以用拾色器获取到颜色值,然后除以255就是rgb的小数值
p1
第一个场景
效果

因为要设置点光源的颜色,所以要修改光源的片段着色器
#version 330 core
out vec4 FragColor;uniform vec3 lightcolor;void main()
{FragColor = vec4(lightcolor,1);
}
在循环渲染点光源的时候为他们设置颜色
for (unsigned int i = 0; i < 4; i++){lightShader.setVec3("lightcolor", pointLightColors[i]);model = glm::mat4(1.0f);model = glm::translate(model, pointLightPositions[i]);model = glm::scale(model, glm::vec3(0.2f)); // Make it a smaller cubelightShader.setMat4("model", model);glDrawArrays(GL_TRIANGLES, 0, 36);}然后就是剩下的光照参数的设置
// directional lightlightingShader.setVec3("dirLight.direction", glm::vec3(-0.2f, -1.0f, -0.3f));lightingShader.setVec3("dirLight.ambient", glm::vec3(0.3f, 0.24f, 0.14f));lightingShader.setVec3("dirLight.diffuse", glm::vec3(0.7f, 0.42f, 0.26f));lightingShader.setVec3("dirLight.specular", glm::vec3(0.5f, 0.5f, 0.5f));// point light 1lightingShader.setVec3("pointLights[0].position", pointLightPositions[0]);lightingShader.setVec3("pointLights[0].ambient", glm::vec3(0.1)*pointLightColors[0]);lightingShader.setVec3("pointLights[0].diffuse", pointLightColors[0]);lightingShader.setVec3("pointLights[0].specular", pointLightColors[0]);lightingShader.setFloat("pointLights[0].constant", 1.0f);lightingShader.setFloat("pointLights[0].linear", 0.09f);lightingShader.setFloat("pointLights[0].quadratic", 0.032f);// Point light 2lightingShader.setVec3("pointLights[1].position", pointLightPositions[1]);lightingShader.setVec3("pointLights[1].ambient", glm::vec3(0.1f) * pointLightColors[1]);lightingShader.setVec3("pointLights[1].diffuse", pointLightColors[1]);lightingShader.setVec3("pointLights[1].specular", pointLightColors[1]);lightingShader.setFloat("pointLights[1].constant", 1.0f);lightingShader.setFloat("pointLights[1].linear", 0.09f);lightingShader.setFloat("pointLights[1].quadratic", 0.032f);// Point light 3lightingShader.setVec3("pointLights[2].position", pointLightPositions[2]);lightingShader.setVec3("pointLights[2].ambient", glm::vec3(0.1f) * pointLightColors[2]);lightingShader.setVec3("pointLights[2].diffuse", pointLightColors[2]);lightingShader.setVec3("pointLights[2].specular", pointLightColors[2]);lightingShader.setFloat("pointLights[2].constant", 1.0f);lightingShader.setFloat("pointLights[2].linear", 0.09f);lightingShader.setFloat("pointLights[2].quadratic", 0.032f);// Point light 4lightingShader.setVec3("pointLights[3].position", pointLightPositions[3]);lightingShader.setVec3("pointLights[3].ambient", glm::vec3(0.1f) * pointLightColors[3]);lightingShader.setVec3("pointLights[3].diffuse", pointLightColors[3]);lightingShader.setVec3("pointLights[3].specular", pointLightColors[3]);lightingShader.setFloat("pointLights[3].constant", 1.0f);lightingShader.setFloat("pointLights[3].linear", 0.09f);lightingShader.setFloat("pointLights[3].quadratic", 0.032f);// spotLightlightingShader.setVec3("spotLight.position", glm::vec3(camera.Position.x, camera.Position.y, camera.Position.z));lightingShader.setVec3("spotLight.direction", glm::vec3(camera.Front.x, camera.Front.y, camera.Front.z));lightingShader.setVec3("spotLight.ambient", glm::vec3(0.0f, 0.0f, 0.0f));lightingShader.setVec3("spotLight.diffuse", glm::vec3(0.8f, 0.8f, 0.0f));lightingShader.setVec3("spotLight.specular", glm::vec3(0.8f, 0.8f, 0.0f));lightingShader.setFloat("spotLight.constant", 1.0f);lightingShader.setFloat("spotLight.linear", 0.09f);lightingShader.setFloat("spotLight.quadratic", 0.032f);lightingShader.setFloat("spotLight.cutOff", glm::cos(glm::radians(12.5f)));lightingShader.setFloat("spotLight.outerCutOff", glm::cos(glm::radians(13.0f)));P2
和上一个一样的思路
效果:

这次将参数设置的代码精炼了很多,一次循环设置了四个点光源的参数
// directional lightlightingShader.setVec3("dirLight.direction", glm::vec3(-0.2f, -1.0f, -0.3f));lightingShader.setVec3("dirLight.ambient", glm::vec3(0.05f, 0.05f, 0.1f));lightingShader.setVec3("dirLight.diffuse", glm::vec3(0.2f, 0.2f, 0.7f));lightingShader.setVec3("dirLight.specular", glm::vec3(0.7f, 0.7f, 0.7f));// Point lightsfor (int i = 0; i < 4; ++i) {std::string pointLightIndex = "pointLights[" + std::to_string(i) + "].";lightingShader.setVec3(pointLightIndex + "position", pointLightPositions[i]);lightingShader.setVec3(pointLightIndex + "ambient", glm::vec3(pointLightColors[i].x * 0.1, pointLightColors[i].y * 0.1, pointLightColors[i].z * 0.1));lightingShader.setVec3(pointLightIndex + "diffuse", pointLightColors[i]);lightingShader.setVec3(pointLightIndex + "specular", pointLightColors[i]);lightingShader.setFloat(pointLightIndex + "constant", 1.0f);lightingShader.setFloat(pointLightIndex + "linear", 0.09f);lightingShader.setFloat(pointLightIndex + "quadratic", 0.032f);}// SpotLightlightingShader.setVec3("spotLight.position", glm::vec3(camera.Position.x, camera.Position.y, camera.Position.z));lightingShader.setVec3("spotLight.direction", glm::vec3(camera.Front.x, camera.Front.y, camera.Front.z));lightingShader.setVec3("spotLight.ambient", glm::vec3(0.0f, 0.0f, 0.0f));lightingShader.setVec3("spotLight.diffuse", glm::vec3(1.0f, 1.0f, 1.0f));lightingShader.setVec3("spotLight.specular", glm::vec3(1.0f, 1.0f, 1.0f));lightingShader.setFloat("spotLight.constant", 1.0f);lightingShader.setFloat("spotLight.linear", 0.009f);lightingShader.setFloat("spotLight.quadratic", 0.0032f);lightingShader.setFloat("spotLight.cutOff", glm::cos(glm::radians(10.0f)));lightingShader.setFloat("spotLight.outerCutOff", glm::cos(glm::radians(12.5f)));


使用Jenkins+Gitblit/Gitlab构建Java项目并生成镜像推送到Harbor/Nexus)

)


 时间插入、删除和获取随机元素 - 允许重复)