定义摄像机参数
glm::vec3 cameraPos = glm::vec3(0.0f, 0.0f, 3.0f);//摄像机位置glm::vec3 cameraTarget = glm::vec3(0.0f, 0.0f, 0.0f);glm::vec3 cameraDirection = glm::normalize(cameraPos - cameraTarget);//摄像机方向,指向z轴正方向 glm::vec3 up = glm::vec3(0.0f, 1.0f, 0.0f);glm::vec3 cameraRight = glm::normalize(glm::cross(up, cameraDirection));//摄像机右方向glm::vec3 cameraUp = glm::cross(cameraDirection, cameraRight);//上方向构建View矩阵
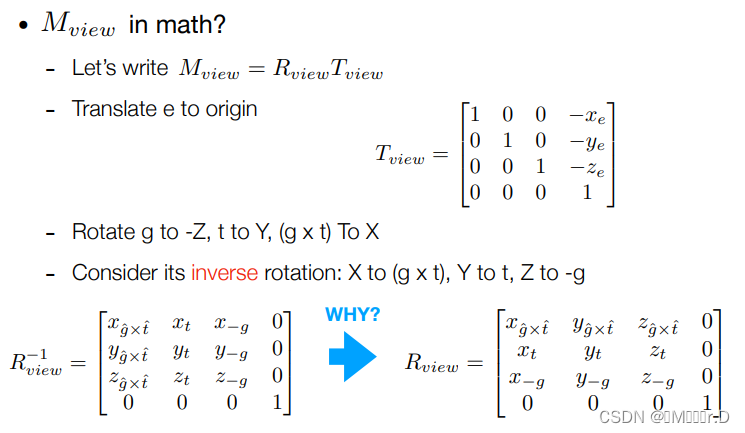
这里可以参考Games101的MVP变换那一节
视图变换要做的内容就是把相机放到正确的位置和角度上,但其实变换矩阵都是对模型进行变换,因为如果对模型进行视图变换以后,相机也就在正确的位置上了。

这里就是相机移动到原点,g指向-z,t指向y等等。因为正着构建矩阵很困难,所以可以先求矩阵的逆变换。
分别将X(1,0,0,0),Y,Z轴带入可以发现都符合

也就是这样
glm::vec3 cameraPos = glm::vec3(0.0f, 0.0f, 3.0f);//摄像机位置glm::vec3 cameraTarget = glm::vec3(0.0f, 0.0f, 0.0f);glm::vec3 cameraDirection = glm::normalize(cameraPos - cameraTarget);//摄像机方向,指向z轴正方向 glm::vec3 up = glm::vec3(0.0f, 1.0f, 0.0f);glm::vec3 cameraRight = glm::normalize(glm::cross(up, cameraDirection));//摄像机右方向glm::vec3 cameraUp = glm::cross(cameraDirection, cameraRight);//上方向glm::mat4 view;view = glm::lookAt(cameraPos, cameraPos + cameraFront, cameraUp);自由移动摄像机
需要在按键检测函数里加上对应按键发生的时候对应的函数
float cameraSpeed = 0.05f; // adjust accordinglyif (glfwGetKey(window, GLFW_KEY_W) == GLFW_PRESS)cameraPos += cameraSpeed * cameraFront;if (glfwGetKey(window, GLFW_KEY_S) == GLFW_PRESS)cameraPos -= cameraSpeed * cameraFront;if (glfwGetKey(window, GLFW_KEY_A) == GLFW_PRESS)cameraPos -= glm::normalize(glm::cross(cameraFront, cameraUp)) * cameraSpeed;if (glfwGetKey(window, GLFW_KEY_D) == GLFW_PRESS)cameraPos += glm::normalize(glm::cross(cameraFront, cameraUp)) * cameraSpeed;转换欧拉角
对于我们的摄像机系统来说,我们只关心俯仰角和偏航角,所以我们不会讨论滚转角。给定一个俯仰角和偏航角,我们可以把它们转换为一个代表新的方向向量的3D向量。

如果我们想象自己在xz平面上,看向y轴,我们可以基于第一个三角形计算来计算它的长度/y方向的强度(Strength)(我们往上或往下看多少)。从图中我们可以看到对于一个给定俯仰角的y值等于sin θ:
direction.y = sin(glm::radians(pitch)); // 注意我们先把角度转为弧度
这里我们只更新了y值,仔细观察x和z分量也被影响了。从三角形中我们可以看到它们的值等于:
direction.x = cos(glm::radians(pitch));
direction.z = cos(glm::radians(pitch));
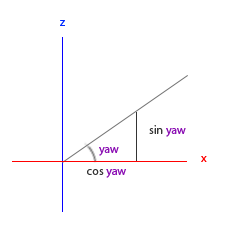
看看我们是否能够为偏航角找到需要的分量:

就像俯仰角的三角形一样,我们可以看到x分量取决于cos(yaw)的值,z值同样取决于偏航角的正弦值。把这个加到前面的值中,会得到基于俯仰角和偏航角的方向向量:
direction.x = cos(glm::radians(pitch)) * cos(glm::radians(yaw)); // 译注:direction代表摄像机的前轴(Front),这个前轴是和本文第一幅图片的第二个摄像机的方向向量是相反的
direction.y = sin(glm::radians(pitch));
direction.z = cos(glm::radians(pitch)) * sin(glm::radians(yaw));
这样我们就有了一个可以把俯仰角和偏航角转化为用来自由旋转视角的摄像机的3维方向向量了。
鼠标输入与缩放
分别设置鼠标移动和滚轮滑动的回调函数就可以了
可以先设置这个函数隐藏光标
glfwSetInputMode(window, GLFW_CURSOR, GLFW_CURSOR_DISABLED);//隐藏光标设置两个回调函数
void mouse_callback(GLFWwindow* window, double xpos, double ypos)
{if (firstMouse){lastX = xpos;lastY = ypos;firstMouse = false;}float xoffset = xpos - lastX;float yoffset = lastY - ypos;lastX = xpos;lastY = ypos;float sensitivity = 0.03;xoffset *= sensitivity;yoffset *= sensitivity;yaw += xoffset;pitch += yoffset;if (pitch > 89.0f)pitch = 89.0f;if (pitch < -89.0f)pitch = -89.0f;glm::vec3 front;front.x = cos(glm::radians(yaw)) * cos(glm::radians(pitch));front.y = sin(glm::radians(pitch));front.z = sin(glm::radians(yaw)) * cos(glm::radians(pitch));cameraFront = glm::normalize(front);
}void scroll_callbacks(GLFWwindow* window, double xoffset, double yoffset)
{if (fov >= 1.0f && fov <= 45.0f)fov -= yoffset;if (fov <= 1.0f)fov = 1.0f;if (fov >= 45.0f)fov = 45.0f;
}
要到前面注册回调函数
glfwSetScrollCallback(window, scroll_callbacks);//注册回调函数glfwSetCursorPosCallback(window, mouse_callback);
实现摄像机类
因为每个场景都一定会需要一个摄像机,所以将摄像机类分离出来是个很有必要的事情,方便以后重复使用。直接创建一个摄像机类,它会自动生成一个camera.h文件和camera.cpp文件
camera.h
#pragma once#include <glm/glm.hpp>
#include <glm/gtc/matrix_transform.hpp>
#include <GLFW/glfw3.h>// Defines several possible options for camera movement. Used as abstraction to stay away from window-system specific input methods
enum Camera_Movement {FORWARD,BACKWARD,LEFT,RIGHT
};// Default camera values
const float YAW = -90.0f;
const float PITCH = 0.0f;
const float SPEED = 2.5f;
const float SENSITIVITY = 0.1f;
const float ZOOM = 45.0f;class Camera
{
public:// camera Attributesglm::vec3 Position;	//摄影机位置glm::vec3 Front;	//Forward 摄影机的“方向”(一个和朝向相反的向量)glm::vec3 Up;	//摄影机的上方向glm::vec3 Right;glm::vec3 WorldUp;	//世界的上方向// euler Anglesfloat Yaw;//偏航角float Pitch;//俯仰角// camera optionsfloat MovementSpeed;float MouseSensitivity;float Zoom;//FOV// constructor with vectorsCamera(glm::vec3 position = glm::vec3(0.0f, 0.0f, 0.0f), glm::vec3 up = glm::vec3(0.0f, 1.0f, 0.0f), float yaw = YAW, float pitch = PITCH);Camera(float posX, float posY, float posZ, float upX, float upY, float upZ, float yaw, float pitch);glm::mat4 GetViewMatrix();void ProcessKeyboard(Camera_Movement direction, float deltaTime);//按键检测函数void ProcessMouseMovement(float xoffset, float yoffset, GLboolean constrainPitch = true);//鼠标移动检测函数void ProcessMouseScroll(float yoffset);//滚轮移动函数private:// calculates the front vector from the Camera's (updated) Euler Anglesvoid updateCameraVectors();//通过欧拉角更新摄像机位置};
Camera.cpp
#include "Camera.h"Camera::Camera(glm::vec3 position, glm::vec3 up, float yaw, float pitch): Front(glm::vec3(0.0f, 0.0f, -1.0f)), MovementSpeed(SPEED), MouseSensitivity(SENSITIVITY), Zoom(ZOOM)
{Position = position;WorldUp = up;Yaw = yaw;Pitch = pitch;updateCameraVectors();
}Camera::Camera(float posX, float posY, float posZ, float upX, float upY, float upZ, float yaw, float pitch): Front(glm::vec3(0.0f, 0.0f, -1.0f)), MovementSpeed(SPEED), MouseSensitivity(SENSITIVITY), Zoom(ZOOM)
{Position = glm::vec3(posX, posY, posZ);WorldUp = glm::vec3(upX, upY, upZ);Yaw = yaw;Pitch = pitch;updateCameraVectors();
}// returns the view matrix calculated using Euler Angles and the LookAt Matrix
glm::mat4 Camera::GetViewMatrix()
{return glm::lookAt(Position, Position + Front, Up);
}// processes input received from any keyboard-like input system. Accepts input parameter in the form of camera defined ENUM (to abstract it from windowing systems)
void Camera::ProcessKeyboard(Camera_Movement direction, float deltaTime)
{float velocity = MovementSpeed * deltaTime;if (direction == FORWARD)Position += Front * velocity;if (direction == BACKWARD)Position -= Front * velocity;if (direction == LEFT)Position -= Right * velocity;if (direction == RIGHT)Position += Right * velocity;
}// processes input received from a mouse input system. Expects the offset value in both the x and y direction.
void Camera::ProcessMouseMovement(float xoffset, float yoffset, GLboolean constrainPitch )
{xoffset *= MouseSensitivity;yoffset *= MouseSensitivity;Yaw += xoffset;Pitch += yoffset;// make sure that when pitch is out of bounds, screen doesn't get flippedif (constrainPitch){ if (Pitch > 89.0f)Pitch = 89.0f;if (Pitch < -89.0f)Pitch = -89.0f;}//std::cout<<// update Front, Right and Up Vectors using the updated Euler anglesupdateCameraVectors();
}// processes input received from a mouse scroll-wheel event. Only requires input on the vertical wheel-axis
void Camera::ProcessMouseScroll(float yoffset)
{Zoom -= (float)yoffset;if (Zoom < 1.0f)Zoom = 1.0f;if (Zoom > 45.0f)Zoom = 45.0f;
}void Camera::updateCameraVectors()
{// calculate the new Front vectorglm::vec3 front;front.x = cos(glm::radians(Yaw)) * cos(glm::radians(Pitch));front.y = sin(glm::radians(Pitch));front.z = sin(glm::radians(Yaw)) * cos(glm::radians(Pitch));Front = glm::normalize(front);// also re-calculate the Right and Up vectorRight = glm::normalize(glm::cross(Front, WorldUp));  // normalize the vectors, because their length gets closer to 0 the more you look up or down which results in slower movement.Up = glm::normalize(glm::cross(Right, Front));
}
大功告成,注意在main函数里对应的变量也需要修改,然后main.cpp里原来声明的定义相机的变量就可以删掉了
练习
-
看看你是否能够修改摄像机类,使得其能够变成一个真正的FPS摄像机(也就是说不能够随意飞行);你只能够呆在xz平面上:参考解答
-
只需要最后将y值永远设置在平面上就可以
void Camera::ProcessKeyboard(Camera_Movement direction, float deltaTime)
{float velocity = MovementSpeed * deltaTime;if (direction == FORWARD)Position += Front * velocity;if (direction == BACKWARD)Position -= Front * velocity;if (direction == LEFT)Position -= Right * velocity;if (direction == RIGHT)Position += Right * velocity;Position.y = 0.0f;}-
试着创建你自己的LookAt函数,其中你需要手动创建一个我们在一开始讨论的观察矩阵。用你的函数实现来替换GLM的LookAt函数,看看它是否还能一样地工作:参考解答

根据这张图把矩阵构建出来即可
注意GLM规定了矩阵的第一个参数是列,第二个参数是行
旋转矩阵的第一行是右向量,第二行是上面的向量,第三行是方向向量。
依次计算出向量搭建出矩阵就可以了
// Custom implementation of the LookAt function
glm::mat4 Camera::calculate_lookAt_matrix(glm::vec3 position, glm::vec3 target, glm::vec3 worldUp)
{// 1. Position = known// 2. Calculate cameraDirectionglm::vec3 zaxis = glm::normalize(position - target);// 3. Get positive right axis vectorglm::vec3 xaxis = glm::normalize(glm::cross(glm::normalize(worldUp), zaxis));// 4. Calculate camera up vectorglm::vec3 yaxis = glm::cross(zaxis, xaxis);// Create translation and rotation matrix// In glm we access elements as mat[col][row] due to column-major layoutglm::mat4 translation = glm::mat4(1.0f); // Identity matrix by defaulttranslation[3][0] = -position.x; // Third column, first rowtranslation[3][1] = -position.y;translation[3][2] = -position.z;glm::mat4 rotation = glm::mat4(1.0f);rotation[0][0] = xaxis.x; // First column, first rowrotation[1][0] = xaxis.y;rotation[2][0] = xaxis.z;rotation[0][1] = yaxis.x; // First column, second rowrotation[1][1] = yaxis.y;rotation[2][1] = yaxis.z;rotation[0][2] = zaxis.x; // First column, third rowrotation[1][2] = zaxis.y;rotation[2][2] = zaxis.z;// Return lookAt matrix as combination of translation and rotation matrixreturn rotation * translation; // Remember to read from right to left (first translation then rotation)
}

——map再深理解)


)
![[C++] C++生成随机数](http://pic.xiahunao.cn/[C++] C++生成随机数)

)

